There are two types of water supply in the thermopot: 1 - from the button from the pump 2 - from the top, manual pump, both seem to work, but the water does not flow. If the pump motor hums from the button, you can see on the water level scale that the water is trying to rise up, but does not reach the top. It’s the same with a manual pump, the water dangles up and down, but does not rise to the spout.
I removed the bottom of the thermopot, visually everything seemed to be in order; the hoses were clean and not clogged. I don’t know how to take the spout apart.. Maybe the spout is clogged or the seal is broken? Is there any need for tightness there at all?
checking for clogged water channels
when it’s cold (so as not to get burned), blow into the spout of the thermopot; if the air flows normally, then there are no blockages.
Check the pump in cold water; if it doesn’t pump even in cold water, you will have to disassemble the pump itself, the impeller could be jammed. It is not rigidly fixed to the motor armature; torque is transmitted through a magnetic field.
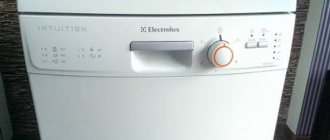
Thermopot is a modern household appliance for heating water poured into it and keeping it hot. The device is indispensable where you need to gradually consume hot water over a long period of time. But with frequent use, breakdowns are possible (for example, control systems, pumps, etc.). In this article we will look at repairing a thermopot pump with our own hands.
General thermopot device
Its capacity is usually 3-5 liters. For coffee breaks at large conferences, thermal pots with a capacity of 6, 8 and 10 liters are used. The thermopot is not much more complicated than a kettle. The main components of the device are located inside the plastic case:
- Flask. Made from stainless steel or special strengthened glass. There is a heating element at the bottom of the flask. It has the shape of a spiral or is built into the bottom of the vessel. The top of the flask is closed with a sealed lid;
- There is a hot water pouring unit at the front. It consists of a tube that goes down to the bottom of the flask, filters and a spout under which cups are placed;
- Electric pump. This is a mini compressor that pumps water out through a spout;
- Hand pump. Many models are equipped with a manual pump in addition to the electric one or as the main pump;
- Power unit. This unit provides power to the electric heater, and also converts AC mains voltage of 220 to low-voltage DC to power the pump and control system;
- Control and indication system. The electronic unit controls the operation of the thermopot: it allows you to set and maintain the required water temperature, unlock the pump, and controls its operation. The unit shows on the display the current operating mode of the device and the water temperature.
Why doesn't the water supply work in the thermopot?
All home appliances are created with the goal of providing comfort to the user. Getting used to convenient exploitation, we become upset when any feature does not function. Quite often, the thermopot's pump does not work. As a result, water enters the cup manually. It seems that the equipment generally works, but a minor breakdown makes it difficult to use the device. Today we will figure out why the water supply in the thermopot does not work.
What to do if the pump does not pump?
Work begins with dismantling the bottom cover of the device. Usually it is attached to several bolts that need to be removed. Then you should disassemble the pump; it will be more convenient to do this if you remove the supply tube. Next you need to check the condition of the connecting tubes. Namely, are they clogged with scale? If necessary, remove them and clean them.
The next step is to remove the magnet from the engine. All parts must be thoroughly cleaned to remove scale and debris. This is best done with a napkin or cloth. When disassembling the pump and engine, do not forget to leave the gaskets intact. They will be useful when assembling the device.
After these simple steps, the thermopot should supply water again. If the problem persists, you will most likely need to replace parts.
The pump does not work and the temperature is not maintained
If the breakdown is complex, then look for the cause of the malfunction in the heating element. Most often this indicates overheating of the heating element. In this case, work begins with dismantling the top cover. Next we perform the following steps:
1. Turn the thermopot over and remove the support ring. To do this you will need a screwdriver and a little effort.
2. Next, you need to remove the screws and remove the bottom of the device. It is attached not only with screws, but also secured with latches.
3. All the insides of the thermopot are hidden under the lid. We need to remove the upper part of the equipment body.
4. Next, you should find the heating element. It looks like a ring-collar, to which three outputs are connected (two on one side and one on the other).
5. The next step is to remove the heating element. It is important to proceed carefully here. The contacts can be released using a socket wrench, and the heating element tie can be released using a Phillips screwdriver.
6. All that remains is to ring the heating element, replace it and make sure it is working.
Be careful when replacing the heating element. Their size may vary depending on the model. For example, there are heating elements of 150 or 160 mm. Therefore, before purchasing, you should clarify what size is needed for your thermopot.
Advantages and disadvantages
The presence of a spout makes it possible not to tilt the device to pour water. This eliminates the risk of tip-overs and hot water spills, which can cause severe burns. Thermopot provides a much higher level of safety than a kettle or thermos. This makes it indispensable for use by children, the sick and the elderly. In addition, most models are equipped with a system for blocking the water supply when accidentally pressed.
Figure 1 Thermopot. General form
Water can be boiled in advance and set to maintain the desired temperature. At the same time, energy consumption is minimal. Typically, several heating modes are supported - one hour, three, six and nine hours. This way you can prepare in advance for a coffee break during a meeting or conference, and at home boil water for the whole day during the cheap tariff.
The device also has disadvantages. Boiling water takes much longer than in a regular kettle. If the water in the flask runs out, you will again have to wait a long time for a new portion of hot water. For conferences, in this case, they usually provide several thermopots or add hot water boiled in a regular kettle to them.
Why do you need a pump in a thermopot?
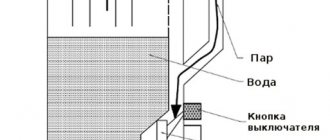
A pump, or pomp, is needed to supply water through the spout. After the lid has been sealed and the water has been heated to the required temperature, you must press the unlock button. The Lock LED turns off and the Power key can be pressed. The pump begins to pump water that flows out of the spout. As soon as the user releases the key, the pump turns off and the water supply stops. After a few seconds, the interlock is activated, again locking the electric motor switching circuit. The control system of advanced models includes a water level sensor. If the water in the flask runs out, the pump turns off.
Many models are equipped with a backup hand pump in case of power failure. It is a corrugated tank located under the top cover of the device.
Its structure and principle of operation
An electric pump consists of an electric motor and the pump itself mounted on its operating shaft - a chamber with an impeller, inlet and outlet pipes. When the engine is turned on, the impeller begins to rotate and distill water from the inlet pipe going into the flask into the outlet pipe going to the spout. In some models, there is a filter in front of the pump that traps mechanical inclusions, such as, for example, tea leaves that have fallen into the flask. Its condition must also be checked, washed or replaced if necessary.
A hand pump is a corrugated plastic cylinder. In the list of spare parts it is listed as an “air pump”. This pump only works when the lid of the thermopot is closed, when the flask is a sealed volume. When you press the large button on the lid, the cylinder contracts and forces air into the top of the flask. Excessive pressure forces a portion of water through the pipes into the spout. When the manual feed button is released, the elasticity of the cylinder and the pressure in the flask return the manual pump to its original position. The pump is ready for the next cycle.
Pump design in a thermopot
The pump is responsible for pumping water in the thermopot. It can be manual in the form of a pump and electric, where the impeller is driven by an electric motor. Each node differs in its structure:
- The electric pump consists of an electric motor. A plastic working chamber is mounted on its body. Inside it, water is pumped due to a rotating impeller mounted on the electric motor shaft. Some manufacturers of thermopots install a filter in front of the inlet pipe.
Important! A clogged filter may be the reason why the pump of a household appliance has stopped working.
The electric pump consists of a motor and a plastic pumping chamber - The hand pump is a pump made in the form of a corrugated cylinder. All elements are made of plastic. The pump operates only with the lid tightly closed. She needs tightness. A person operates the pump. When he presses a button on the closed lid of the thermopot with his finger, the corrugated cylinder contracts. Air is forced into the upper part of the chamber. The resulting pressure pushes out a portion of water with each press of the button. The displaced liquid is directed through the pipe to the thermopot spout. When the button is released, the mechanism returns to its original position.
The hand pump is made of plastic and operates by generating air pressure inside the chamber.
If there is a need to purchase a new unit, it is important to know that the electric pump is called that in the list of spare parts. But the manual element is designated as an air pump.
How to repair a thermopot pump with your own hands?
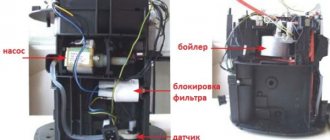
If the other systems are checked and it is determined that the thermopot pump is not working, then a major disassembly of the device will be necessary - the pump is hidden deep in its depths. After all the bottom parts are dismantled, you can see the pump. When the thermopot does not pump, the pump can be repaired with your own hands
Figure 2 Pump after removing the bottom. Pipes and contacts are visible (right)
The sequence of actions for disassembling the unit is as follows:
- Disconnect the inlet and outlet pipes. If they are filled with scale, the pump does not pump water well. They should be cleaned, washed and blown out.
- Unscrew the screws securing the electric motor housing to the pump chamber.
Figure 3 Beginning to disassemble the pump
- Carefully separate the pump chamber with impeller and the motor housing. In this case, you need to treat the silicone gasket with care. If it is worn out or damaged, it must be replaced with a good one.
- There may be scale in the chamber that interferes with the rotation of the impeller. It must be carefully removed with a plastic or wooden spatula. The use of sharp metal objects is not recommended as they may damage the camera body.
Figure 4 Scale in the chamber
- After dismantling the impeller, the magnet recessed in the chamber body becomes visible, which is also susceptible to scale deposits. It must be cleaned with care. You can do this with a screwdriver, but it is safer to use a plastic or wooden spatula.
Figure 5 Scale prevents the impeller from rotating
Figure 6 Cleaning the magnet from dirt
- After cleaning the pump parts from scale, carefully reassemble it in the reverse order of disassembly. Particular attention should be paid to uniform tightening of the screws securing the electric motor to the pump housing and even laying of the gasket.
After assembly, you need to perform a test run. If the pump still does not work, it will have to be replaced. The engine is manufactured non-separable and cannot be repaired.
What to do if the hand pump does not work? It is much simpler. Actually, it consists of a single part - a corrugated cylinder. If it is worn out and leaky, it stops performing its functions and pumping air into the flask.
Figure 7 Dirty hand pump
In this case, it needs to be replaced. To replace it, you will have to remove the cover of the thermopot and disassemble it. On some models, the hand pump is pressed against a top cover secured with several screws. These screws will have to be unscrewed. On other models, the cover holding the hand pump cylinder is secured with latches. They must be pressed out with a thin screwdriver, being careful. If the latches break, you will have to change the entire cover, and it costs from one and a half to two and a half thousand rubles.
Figure 8 Spare part for hand pump
The hand pump may not pump water in another case - if the silicone gasket of the thermopot lid is leaking. In this case, the air pumped by the button comes out freely, and water is not supplied through the spout. In this case, the gasket will need to be replaced. To do this you will need to disassemble the case. In some models, the gasket can be carefully lifted with a spatula or a thin screwdriver. On others you have to remove the flask.
Thermopot does not pump water - what to do and how to repair
Over time, the air pump accumulates contaminants in its chamber. However, they are not so significant that it stops pumping water. Most often, the corrugated chamber wears out. Frequent cycles of operation cause a crack to appear on its walls. The chamber is depressurized. It is no longer able to pump air to push water out. There is only one way out. A leaky hand pump in a thermopot cannot be repaired. It must be replaced.
The air pump is usually dirty enough for it to stop pumping water.
To replace the manual water pump, disassemble the thermopot cover. Depending on the model of the device, it is attached to the body with screws or latches. The first option is simpler. You will have to tinker with the latches. They cannot be broken, since you will have to buy a new cover, and it costs 1.5-2.5 thousand rubles. Carefully try to press the latches with a screwdriver. When the cover is removed, the old pump is removed and a new part for pumping water is installed in its place. The thermopot cover is returned to its place.
A new air pump is installed after removing the cover from the thermopot.
If after examination it turns out that the hand pump is intact and not even dirty, the problem lies in another unit. The silicone seal under the lid needs to be replaced. In some place it is leaking air, and the thermopot pump does not pump water from the reservoir to the spout.
The method for replacing the gasket depends on the model of the household appliance. Sometimes the seal can be picked up with a hook or a screwdriver. If the design is complex, you will have to disassemble the body or remove the flask.
Eating problems
When the electric pump stops pumping water, diagnostics similarly begin with an inspection. If there is no contamination inside the chamber, the problem lies in the motor power supply. Here you will need a multimeter and basic knowledge of electrical engineering to perform the test.
Before checking the thermopot pump, start testing with a multimeter from the power cord. Often the wire breaks at bends, areas near the plug. If it turns out that one of the wires has fallen off, the cable is replaced. The next element is the socket on the thermopot, where the power cord is connected. Here contacts can burn or become loose.
The electric pump motor runs on 12 volt DC. If you have knowledge of electronics, use a multimeter to check the diodes of the rectifier unit. They must allow current to pass in one direction and not pass in the other. Check the power supply itself. When the water supply pump on a thermopot with a heating function does not work, you need to test the resistance of the spiral with a multimeter. The motor of such a device is powered through a heating element. If it fails, the water supply will stop.
If you have no knowledge of electronics, do not despair. You can check the electric pump in another way. The motor is supplied with 12 volts from the battery. If it starts working and flows water, the problem is in the control system. When the engine shows no signs of life, the entire pump is replaced.
The thermopot does not pump water, but the motor hums
The serviceability of the electric pump motor can be judged by a clearly audible hum. The sound is not loud, but it is easy to hear. When the thermopot pump hums but does not pump water to the spout, the reason lies in the clogging of the working chamber, supply pipes or filter (if it is provided in the system by the manufacturer).
To troubleshoot the problem, perform the following steps:
- The thermopot is disconnected from the power supply and the water is drained. Unscrew the screws on the bottom and remove the cover. Underneath it, the entire electrical circuit of the household appliance will open along with the pump.
- The supply pipes are disconnected from the inlet and outlet of the pump, and, if any, the filter. The parts are checked for contamination and washed. To get into the working chamber of the electric pump, unscrew the bolts connecting it to the motor.
- First, remove the plastic cover of the camera. Do this carefully so as not to tear the silicone seal. If it is worn out or damaged during disassembly, it will have to be replaced. Dirt deposits on the inner walls of the chamber are cleaned with a wooden or plastic scraper. Do not clean with metal objects to avoid damaging the plastic.
- The impeller will not necessarily be covered in scale. Even if it is clean, it is still removed.
- After dismantling the impeller, the magnet will open. It is recessed inside the camera body. Dirt is most often deposited here, which prevents the impeller from rotating. Hard deposits on the magnet can be carefully removed with a flat-blade screwdriver.
After cleaning is completed, all parts are reassembled in reverse order. The problem when the thermopot does not pump hot water well must be solved.
Repair of a thermos kettle
Among all kinds of household appliances, many people have an electric kettle, and not an ordinary one, but a thermos kettle. In other words, thermopot.
Despite the fairly good design of these “miracle teapots,” they also fail due to faulty electrical components.
Since the cost of a new thermos kettle is quite high (3-5 times higher than the cost of a regular electric kettle), in many cases, independent repair of a thermos is not only justified, but also necessary.
Let's look at the design, typical malfunctions of thermopots and methods for eliminating them using the example of repairing a kettle - a thermos brand Elenberg TH-6012.
Disassembling a kettle - thermos.
The thermopot body can be easily disassembled. The rigidity of the structure is given by two bolts or self-tapping screws that secure the lower plastic part. The bolts can be hidden under a round plastic stand, thanks to which the thermopot can be rotated horizontally. By unscrewing both bolts and removing the plastic bottom of the thermos kettle, you can gain access to the electrical part. For ease of diagnosis, you can remove the outer metal casing by first disconnecting from it the grounding wire coming from the middle (grounding) terminal of the power outlet.
Most thermos kettles have a similar design, regardless of the manufacturer. The differences lie in the absence of some additional protection units and functional additions (water level illumination, sound notification, etc.).
What parts does the thermopot consist of:
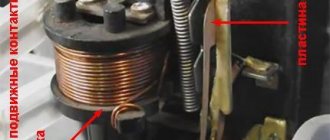
Stainless steel tank.
Two heating elements built into the bottom of the metal tank. One heater is the main one and serves to boil water. Another heater serves to maintain water heating. The photograph shows the terminals of these heaters. Pin 3 is common for heating coils. To prevent electrical contact with the metal tank, ceramic beads are placed on the terminals.