No electricity
The LG washing machine may not turn on due to such a banal reason as a lack of electricity in the network. This situation is the most likely.
There may be no electricity for the following reasons:
- The electricity in the house was turned off.
- A short circuit or overload occurred in the network, as a result of which the machine was knocked out.
- The RCD tripped. This can happen, for example, due to an electrical leak.
- The socket is broken. Here it is recommended to first check the serviceability of the outlet. To do this, you need to plug in another electrical appliance. If the device works, then the problem is not in the socket.
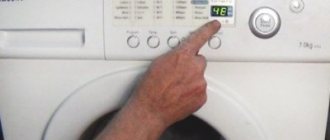
Error codes for LG washing machines
LG equipment is equipped with a self-diagnosis system so that the user can use the error code to understand which specific part has failed and what repairs are required to restore the unit’s functionality. If errors occur, the system displays the corresponding code on the display. The user only needs to understand the code and troubleshoot the problem.
I.E.
There is not enough compression to carry out a washing cycle; the water takes a very long time to fill the tank, and it does not fill to the required level. A breakdown occurs due to a malfunction of the water inlet valve or level controller. Another common cause of this error code is insufficient pressure in the water supply or a water shutoff.
F.E.
The drainage does not occur within the prescribed period, water accumulates in the drum. A breakdown occurs due to incorrect functioning of the drain pump or electric sensor.
O.E.
The code is displayed on the screen when the maximum water level in the drum is exceeded, and when there is remaining water after draining. The reasons may be similar to the FE code; a clogged drain or blockages in the pipeline can also lead to the problem.
P.E.
Insufficient or excess water volume, this error can be caused by excessively strong or weak water pressure in the pipeline. Often the cause of a failure is a broken pressure switch or its short-term stop due to a short circuit or lack of voltage in the network.
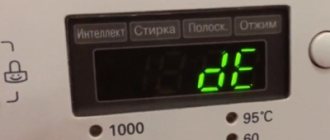
DE
The error code suggests that the door is not closed. You should try to close the lid again, as laundry may get caught there. If the failure is technical, then this indicates a breakdown of the electric sensor or hatch lock.
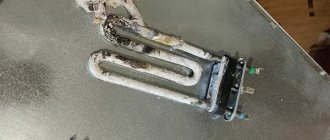
T.E.
This code indicates that the water is not heated to the required number of degrees or is too hot. The root of the problem is the malfunction of the thermostat that controls the heating element, which is associated with a sharp surge in the power supply.
UE
The code lights up on the display if the balance in the drum is not maintained and the items are unevenly distributed during standard washing and in spin mode. The error occurs in cases where the user loads too little laundry or overloads the drum, and if the error occurs during washing, the code is not displayed immediately. This code is also displayed when the electrical sensor malfunctions.
S.E.
The error code is unique to direct drive devices, since the code reacts to malfunctions of the Hall sensor installed only in this type of unit. If there are problems with the sensor, the motor is blocked, which makes further operation impossible.
A.E.
The code is displayed on the screen when the washing machine automatically turns off. The main cause of failure is incorrect operation by the user.
C.E.
The error occurs when overloading, loading the weight of things exceeding the maximum permissible value. As a result, the motor is overloaded and cannot pull the heavy weight of the drum. To solve the problem, you can remove some of the laundry and leave it until the next wash. If the load of laundry is small, the error may be caused by incorrect operation of the electric sensor or motor.
E1
The error is displayed when water accumulates in the pan and a leak occurs. This malfunction is caused by tank depressurization or failure, hose ruptures and improper operation of leakage sensors.
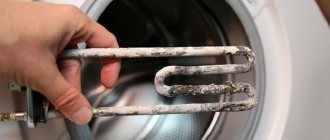
HE
The code indicates a malfunction of the water heating element or power supplies.
It is better to entrust the repair of washing machines to professionals!!!
We present to you our unique catalog of private craftsmen and service centers —
Select your city and artist in the filter: by rating, reviews, price!
E3
The washing machine is unable to determine the load weight.
L.E.
Error in the controller responsible for blocking the hatch due to a breakdown of the mechanism or insufficient voltage in the electrical network. The cause is also a breakdown of the motor or electrical sensor.
LG washing machines have two more specific codes, which are not essentially errors, but serve to provide information to the user:
- C.L. _ The code does not mean an error, but assumes that child protection has been installed. The function is activated by a set of keys, which varies depending on the model and is indicated in the instructions;
- EE . A symbol that appears exclusively during service testing of the device or the first wash.
A malfunction does not always indicate a breakdown; sometimes this can occur due to frozen electronics. Unplug the washing machine, wait 15-20 minutes and turn it on again.
These are the main fault codes that appear on the smart display of LG washing machines. Knowing the error code, you can independently repair or replace a worn-out part without resorting to the services of service centers.
The network cable is faulty
To check the serviceability of the power cord of your LG washing machine, you should use a tester. This can be done using an indicator screwdriver.
If the wire of the LG washing machine is faulty, then it will have to be completely replaced with a new one. You can, of course, try to connect the cord at the breaking point using a soldering iron or special tape. But this is dangerous and will only delay the solution to the problem.
Power button doesn't work
When you plug in your LG washing machine, there should be power to the on/off button.
You can check the functionality of the button using a tester. To do this, you need to set it to buzzer mode and disconnect the LG washing machine from the power supply. Then ring the button in the off and on state. The tester will make a characteristic sound if the button is working properly. Otherwise, the button will have to be replaced.
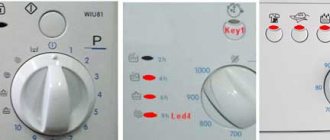
Why doesn't the washing machine turn on?
You inserted the plug into the socket, but the washing machine did not turn on. The control panel indicator does not light up. Such cases are not uncommon and occur for various reasons: from violations of operating rules to serious breakdowns. In some cases, it will not be possible to do without the help of specialists. After all, the machine may not work due to problems with the cable or electricity, due to a malfunction of the power button, noise filter, or control module. Let's look at each of the reasons in more detail.
Interference filter malfunction
An interference filter is an element of a washing machine that dampens electromagnetic waves that can interfere with the operation of nearby appliances (microwave oven, TV, dishwasher).
When a noise filter fails, it stops passing electricity through the circuit. As a result, the LG washing machine does not turn on. You can check the performance of the FPS using a multimeter.
In this case, it is necessary, first of all, to remove the top cover of the washing unit. Below it is a noise filter. The FPS has three wires at the input: phase, ground, and zero. And there are only two outputs - neutral and phase. A part is faulty if there is voltage at the input but not at the output. In this case, it is recommended to replace this part of the washing machine.
It should be noted that this work must be done very carefully.
Removing the control panel block
Let's assume that everything is fine with the network cable. This means that the problem is hidden somewhere in the depths of the control unit. To continue testing, we need to dismantle this block and then disassemble it. Let's get to work.
- First you need to remove the cover from the LG washing machine.
- Next, you need to remove the powder receptacle and put it aside.
- We take a Phillips screwdriver in our hands and unscrew the screws that are located next to the powder receptacle niche on the right and left.
- Using the same screwdriver, we press in the latches of the control unit, and then carefully separate the unit from the body.
Be careful with the bundle of wires that connects the chassis to the control panel
We won't remove the wires for now. But if during the test you need to completely separate the control unit from the body, then first take a photograph of the location of the wires so that you can easily connect everything in place.
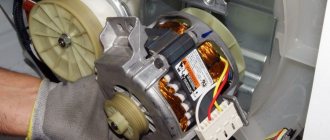
Repair of FPS, transformer and on/off button
For now, let's remove the control unit, placing it aside on top of the corner of the machine body. First you need to check and fix the FPS failure, if any. On top, under the housing cover, you can find an interference filter.
We call it using a multimeter. If the part does not ring, it must be replaced; if everything is in order with it, we return to the block. We disconnect the wires and then disassemble the block to get to the transformer. We visually check the tracks to make sure that the transformer is not unsoldered, and then we start calling it with a multimeter. If you find a breakdown, it means that your own repairs will consist of either soldering the tracks or replacing the transformer; there is nothing else you can do.
An LG direct drive washing machine may stop turning on for another reason. Why? Because of the start button. Again, we take the multimeter and call the contacts of this button, at the same time we check the start and on/off buttons. Having discovered a problem, take a soldering iron, solder the tracks, remove the faulty buttons and solder new ones. At the end, connect the control unit and turn on the power, if the light blinks, it means the power is on and the machine will work.
Interesting:
- Electrolux washing machine fault repair
- Electrolux washing machine does not turn on
- How to place a washing machine in the bathroom
- Ardo washing machine does not turn on
- Furniture for the washing machine in the bathroom
- Why doesn't the washing machine work?
Reader comments
- Share your opinion - leave a comment
Reasons why the washing mode does not start
In some cases, when the washing machine is connected to the power supply, the indicator lights up, but the washing process does not start. The causes of this problem are listed below.
The door lock is out of order
First of all, you need to check whether the washing machine hatch closes tightly. If the door closes freely and nothing interferes with it, then all that remains is to check the hatch lock after starting the program.
The washing machine door lock has failed if the lock has not occurred. To be more sure, you can ring the mechanism.
If, when starting the program, there is voltage on the door, but the locking does not occur, then the washing machine hatch locking device must be replaced with a new one.
Indicators flash when the machine is turned on
If, when you connect the washing machine to the power supply, the indicators begin to flash randomly, then the problem is in the leash.
Also, with this breakdown, the indicators can light up and go out at the same time. In this situation, it is necessary to identify the problem area of the washing machine wiring and then replace it.
Drain not working in LG car
Causes:
- Incorrect mode selection.
- There is a blockage in the drain system (filter, pipe, pump).
How to fix problems with a Lji washing machine with your own hands? You need to check the drain pump. For this:
- Open the hatch and remove the clamp by bending the cuff to the side.
- Disconnect the door lock connectors and close the door.
- Remove water using a drain filter.
- After unscrewing the mounting bolts, remove the filter housing.
- Lift the top panel by removing the screws.
- Remove the dispenser tray.
- Unscrew the bolts behind the tray at the front and back.
- Remove the control panel by unfastening the latches.
- Remove the front panel screws. Take it away.
- Loosen the clamps of the circulation and drain hoses. Remove the hoses.
- Disconnect the pump hose clamps by loosening them.
- Remove the pump assembly bolts.
- Unclench the clamps and remove the pump.
- After unscrewing the screws, pull the pump out of the volute.
- Look for threads on the impeller that could interfere with operation.
- If there is a malfunction, install a new part.