An ordinary toaster, which does not have additional functions, can be classified as a household appliance that does not cause much trouble in the kitchen space. It's simple: the frying program can be set with a timer, and the operation of the device will begin from the moment the pieces of bread are dropped into it.
Classic toaster
Bread slices are baked under the influence of infrared radiation until the timer turns off. However, the basic principle of operation does not mean that the toaster will work for many years without breakdowns. Still, many problems can be fixed on your own. The material will discuss options for eliminating simple breakdowns at home, without turning to specialists. By following the steps in the description of disassembling the device, you can repair the toaster yourself.
What is a toaster and what is used to cook with it?
The word “toast” comes from the English toast and refers to thin slices of dried or lightly browned bread served for breakfast. To quickly prepare toast without overcooking it, special ovens have been invented - toasters. Toasters come in three main types: classic toaster, toaster roaster and sandwich toaster.
Classic toaster
A classic toaster is a vertical box with narrow slots. Inside there are baskets in which pieces of bread are placed. The user presses a lever, the baskets are lowered and locked in the lower position, and the bread is placed between the heating elements.
The finished toast is thrown out by a spring
As soon as the timer goes off, the heating stops and the spring returns the basket to the top position. Ready toasts appear from the cracks, you can have breakfast.
Toaster-roaster
You can brown pieces of bread in a regular oven, but heating up the oven just for a couple of loaves of bread for breakfast is ineffective. The industry produces mini-kitchen ovens (volume no more than 20 liters), which are also called “roasters” (from the English roast - to fry).
The bread is placed horizontally in the mini-oven roaster.
The bread in the roaster is positioned horizontally between the upper and lower heating elements. Unlike a toaster, a roaster can heat sandwiches and pizza, fry sausages and sausages.
Sandwich toaster
A classic toaster can only dry and brown bread slices. Since the bread in it is installed vertically, it is impossible to make a full-fledged hot sandwich in a toaster - the ingredients will fall down. A special sandwich toaster can make a real sandwich.
In a sandwich toaster, bread and filling are baked between hot panels
This device looks more like a waffle iron than an oven or toaster. The assembled sandwich is placed on the bottom panel and covered with the top panel. Both panels are heated, so the sandwich bakes evenly on top and bottom, turning into a flat pie. The shape of the sandwich is given by the recesses in the panels.
Toaster design and device
The device for frying bread slices consists of several parts:
- metal or plastic case;
- heating coils fixed from the inside;
- a movable basket with a spring into which pieces of bread are dropped;
- a lever that lowers the compartment with toast and simultaneously turns on the heating;
- an electric magnet that is responsible for holding the basket in the lowered position during cooking.
In addition, the toaster circuit has a circuit breaker responsible for forcing the device to stop. Modern models have additional electronic components - a timer, heating regulator and buttons for switching between modes.
Many toasters have a crumb tray, but pieces of bread still accumulate inside.
How does a toaster work and how does it work?
A classic toaster is a closed case with slots, inside of which there are heating elements, as well as a movable bread basket. To prepare, the slices are placed in a basket.
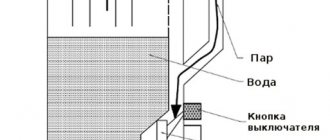
Toaster diagram. Non-working (upper) position
The diagram shows the following parts of the toaster in the non-operating position:
- Lever arm. Used to lower the bread basket and turn on the appliance.
- Heater. Hot nichrome wires heating the bread.
- Breaker. Placed on the building and about. Designed for emergency power outage and early termination of cooking.
- Lock. Locks the basket in the down position.
In the off state, the lever (1) is in the upper position, the heating coils (2) are turned off, the circuit breaker (3) is closed, and the basket is raised. The basket lock (4) is open.
The breaker is needed in order to forcibly break the power supply circuit of the electromagnet and interrupt the process if something goes wrong.
Toaster diagram. Working (lower) position
The diagram shows the following parts of the toaster in operating position:
5. Hot coil heater. Emits heat that bakes bread.
6. Movable basket. Lowers the product to the heater.
7. Locking plate. Holds the basket during cooking.
8. Electromagnet. Magnetizes the locking bar while the bread is cooking.
9. Wedge-shaped plate. Closes the contacts when the basket is lowered.
When the user presses the lever, the basket (6) moves down, and the following processes occur simultaneously:
- A wedge-shaped plastic plate (9) lowers and pushes the spring contacts.
- The spring contacts close and turn on the control circuit, heaters and electromagnet.
- The electromagnet creates a magnetic field that magnetizes the bar (7) to the core, thereby locking the basket (6) with the lock (4) in the lower position.
- The control circuit starts the countdown timer.
Infrared radiation (5) warms the bread until the timer goes off. As soon as the cooking time has expired, the control circuit removes power from the electromagnet, the basket is released from engagement and returns to the upper position under the action of a spring. The wedge-shaped plate (9) releases the spring contacts, they open and turn off the heaters and the control circuit.
Video: demonstration of the toaster operation
Frequent breakdowns when using a toaster
Below we will look at typical toaster malfunctions and the reasons for their occurrence.
Failure to lock the lever
It happens that when you press the lever, it does not lock and returns to its original position. To lock, you need to press the lever more than once or constantly hold it. This problem occurs due to lack of power supply to the toaster. You need to check the serviceability of the socket, plug, and cable. There may be a break somewhere or the cable is pinched. If there is a damaged wire, it should be replaced. You should also check the fuse and replace it if necessary.
Another reason is lack of power for the electromagnet. Because of this, the basket does not press completely. In this case, you need to set the middle position on the regulator. Also, the lever may simply become clogged and therefore not reach the desired position. The solution is to clear the cavity of any remaining bread, turn the device over and gently shake it.
Toaster won't turn on
Doesn't your toaster turn on when you press the lever? This may occur due to a lack of power supply. Again, you need to check the plug, socket, and wire for serviceability. Also, these problems arise due to oxidized contacts on the control circuit. Therefore, you need to remove the device housing and carefully inspect the circuit. You may have to resolder the contacts.
The coil does not heat up
If, after turning on the toaster and fixing the basket, the coil does not heat up, most likely the heater itself is faulty.
It is worth noting that if the device contains glass heater tubes, only specialists can help.
If you have a wire heating element, you can act independently. It may have broken or burned out. In this case, you need to remove the plate with the nichrome wire and carefully inspect it.
If you cannot visually find the break point, you can measure the resistance using a tester. If there is a break, the tester reading will be zero. How to repair such a breakdown? You need to straighten the wire where it breaks, twist it, and also apply a bandage, which can be a copper tube.
Toast control does not work
These regulators are either electronic or mechanical. As for the mechanical regulator, it is a bimetallic plate. The principle of its operation is to open the contacts after heating. Plate breakage may occur as a result of clogging. Therefore, to repair the device, you need to disassemble the mechanism and clean it from bread crumbs.
As for the electronic type regulator, it is a variable resistor and regulates the operation of the timer. The regulator handle is located outside. If you can’t turn it, it means there is debris in the resistor. It may also not work due to lack of contact with the board. In this case, you need to check the wires for serviceability and resolder the contacts.
Toast preparation is poor quality
The problem arises due to an incorrectly working timer, too low a cooking temperature, a misaligned bread basket, or an incorrectly set roasting control. A number of problems can be solved by correctly installing the regulator, adjusting the board, and straightening the basket guides in case of mechanical damage.
If there is a burnt smell, then most likely the problem is due to clogging or using too soft bread . The toaster and basket need to be cleaned.
How to use a toaster correctly?
A toaster is an electrical appliance with exposed heating elements. The luminous coils are heated to very high temperatures and can cause injury and ignite flammable materials.
General rules of use
- The toaster should be installed in a free space. The curtain should not hang over the cracks. Do not place the device on the edge of the tabletop, so as not to accidentally pull it down.
- The toaster only cooks dry bread. Ready-made sandwiches with cheese or sausage, soaked bread are unacceptable: they will fall, burn and clog the device.
- You can't toast anything other than bread in a toaster. There is a special toaster for preparing hot sandwiches, and a roaster is used for sausages.
- It is recommended to plug in the appliance only while making toast. Do not cover a toaster while it is running.
- If water gets on the wire, the heater coil will burst with a fireworks display of hot particles.
- The heating coils are hot and energized. You cannot check the readiness of bread with a steel fork - you will get an electric shock. If you really need to straighten a piece, use wooden tongs.
How to make toast correctly
- The spirals should not run idle - they will overheat and burn out. Occupy all the free slots of the toaster with bread.
- Choose the right bread. Homemade pieces are rarely the same; they will protrude from the grill, may touch the spirals and burn. It is recommended to take slices cut at the factory; they are always the same in thickness, so they will fry evenly.
- Toasted bread creates a lot of crumbs. Good toasters have a pull-out tray underneath the basket. After each cooking, it is recommended to shake out any crumbs. Perform general cleaning and cleaning of the toaster at least once a month.
Interruptions in the operation of mechanical parts
Problems with the lifting mechanism
They may be caused by the toast being too thick, which interferes with the movement of the holders. By the way, too thin toasts can also interfere with the movement of the holders. Such toasts can become deformed and jam the mechanism.
The most common cause of failure of mechanical things is the same bread crumbs. They can stick to the guides or directly into the mechanism itself.
To gain access to the mechanical components of the toaster, you will have to disassemble it. There are models in which it is enough to remove the side panels to gain access to the mechanisms, but in some products you can remove the entire body. Therefore, before you begin disassembling, you need to carefully inspect the case and understand how to disassemble it. By the way, the slider handle that controls the movement of the toast holders can be removed either separately or together with the casing, this also applies to the button that gives the command for frying.
Once the interference has been eliminated and the mechanism is working without interruption, the toaster can be assembled.
Why you need to clean your toaster
In addition to wiping the outside surface of the toaster, where splatters and fingerprints remain, you should also clean the inside surface.
In order for the toaster to perform at its best, the inside of the toaster needs to be cleaned once a month. The simplest and most accessible cleaning tool is a toothbrush (or something similar).
Using a toothbrush, you can efficiently remove any remaining bread from the inner surface. It is also necessary to clean the inside of the toaster so that harmful bacteria do not appear in it. Crumbs lying on the tray or stuck to the mesh or spiral cause an unpleasant odor and uneven heating of the spiral; it is also necessary to thoroughly clean your toaster from residual fat and oil. The accumulation of all these residues may cause the appliance to catch fire. Here is an algorithm for how to properly clean the inside of a toaster.
Typical toaster malfunctions
Among the common breakdowns that lead electric toasters to malfunction, and therefore inability to toast bread, are:
- When plugged into an electrical outlet, the device shows no signs of working at all. (No power is supplied to the control circuit.)
- The toaster only works when the lever is pressed. (The electromagnet does not work).
- In any mode, the toaster turns off after 1-2 seconds. (The overheating protection system is working).
- The electric toaster turns on, the indicator light is on, the bread is not toasted. (Heating element circuit malfunction).
Do not immediately throw a toaster that is not working properly into a landfill. You need to give him a chance and try to repair the equipment yourself or take it to a repair service.
Electric toaster device
Before looking at how a toaster works, let’s answer the question: Is it possible to leave a toaster-bread maker plugged in all the time? Theoretically yes, practically no. Why? – On the one hand, theoretically, the device will not turn on without human intervention, when we mechanically move the lever for loading slices of bread to the lower position. In this case, the power contacts are closed, power is supplied to the mode board and the electromagnet locking the lever in the lower position. In practice, a toaster is not a device protected from external factors. The toaster bread loading compartments are always open. Water in this case is the main enemy. Now let’s imagine a situation where, during a heavy downpour, the roof leaked or your neighbors from above flooded you, and as circumstances passed, water poured into an electrical appliance plugged into an electrical outlet where all the power contacts were located at the bottom. I think the rest is clear and we won’t even think about the possible consequences.
The figure below shows how the toaster works and the location of its main elements.
Here we will attach the electrical circuit diagram of the toaster.
Repairing a toaster
Toaster repair should begin with troubleshooting (determining the causes) of its malfunction. Above we listed the reasons why a household prior may not work. It’s not a fact that this will be your case. Having disassembled an electrical device with your own hands, which must be disconnected from the network, knowing the principle of its operation from the above diagram, you can easily detect a breakdown. Toasters of any model are repairable. Even if the control board burns out, any parts are sold in radio electronics stores. The only thing you may not find is a failed heating element of the required configuration. Only a donor will help here.
Why do toasters break?
There can be several reasons why a toaster fails, from poor quality assembly parts to improper operation of the device. Although the bread machine is low maintenance, a number of rules must be followed when using it.
Periodically, the toaster must be cleaned of crumbs (many models are equipped with a special tray for this). And wash the body from dust and grease with a damp cloth, but so that no water gets inside the device. In advanced cases, when stains cannot be cleaned the first time, dilute a little dishwasher in water. If the toaster body is made of stainless steel, to maintain it you will need a stainless steel cleaner, which can be purchased at any hardware store. And definitely! Before cleaning your toaster, make sure it is unplugged from the power source.
By caring for the toaster, following the recommendations and rules of use prescribed by the product manufacturer, you will significantly extend its trouble-free operation while enjoying the warm, crispy crusts of your sandwich bread.
And finally, a video on repairing one of the most common toaster malfunctions:
How to fix a toaster: won't lock in down position, won't turn off automatically
Few people in the morning before leaving for work will refuse to enjoy sandwiches made from fragrant bread toasts baked in toasters. This breakfast will lift anyone's spirits! However, toasters also don't last long. They need to be looked after and serviced regularly. And although the toaster, due to its simple design, is reliable and easy to use, if it is not used correctly, it can break. At home, it is quite possible to repair a toaster with your own hands if you know its internal structure, operating principle and main malfunctions.
Toaster device
The toaster is mounted in a metal or plastic case, where heating coils and a movable basket with a spring are fixed for pushing out the finished toast. Taken outside:
- receiving holes for inserting slices of bread;
- a lever that lowers the basket with bread inside and starts heating;
- a breaker with the inscription Stop for forced opening of the circuit in an emergency.
In addition to the listed structural elements, the following parts are provided inside:
- a locking device in the form of a metal bar that secures the basket in the lower position;
- electric magnet holds the bar during cooking;
- plastic wedge for closing contacts after lowering the basket.
The device is electric, so the required elements are a power supply with a power cord and a timer setting regulator.
Should I fix it myself or call a professional?
If the problem is not crumbs stuck inside the device, you should definitely not tamper with electrical equipment. Firstly, you can unknowingly cause even greater harm to the equipment. Secondly, if you break the device, there is a high risk of causing a short circuit. Electrical appliances should be handled by professionals with appropriate education. True, repairs in service workshops are expensive, and private craftsmen are not responsible for the work performed. The issue of the feasibility of repairs is doubly acute if the toaster has been in use for many years. It is possible that breakdown will follow breakdown, so it is easier and cheaper to buy new equipment.
Principle of operation
Before starting the work cycle, you must set the cooking time. Then we proceed as follows:
- We press the drive lever with our hand, which lowers the basket with bread to the lower position.
- The plastic wedge lowers and closes the contacts.
- At the same time, the heating element turns on and the electromagnet starts working.
- The latter locks the basket at the bottom.
- The timer starts.
The bread is fried until the timer opens the circuit. After this, the basket is released and, under the action of a spring, pushes out the finished toast.
Failure to lock the toaster lever that does not turn on/lock
Initially, every housewife should make sure of the thickness of the bread being laid - thin slices can stall the rising process if they become deformed during frying.
Problems with your toaster may be caused by a locking failure. By pressing it, you will not receive browned pieces in response, but only the initial position of the lever. The solution may be to press harder or to constantly hold it in the working position. This happens due to lack of electricity. Here you need to check not only the device, but also the serviceability of the socket, plug and cord. Perhaps they are the root of the problem, but the fuse can also burn out - it won’t hurt to check it in any case. It is important to make sure that the plug is connected correctly and that the wire is not broken.
It’s another matter when there may simply be crumbs of bread lying in the groove of the lever, which means that the toaster simply requires cleaning: you just need to turn the toaster over and shake it.
If the device does not function when you press the power lever, the reason is simple - there is no power. As in the case described above, you need to check the areas of the plug, socket and electrical wire. Oxidized contacts in the control circuit will not allow electricity to pass through. The contact areas could simply have been burnt. You will need to open the case and pay attention to the circuit and how they are soldered. When the latches are turned on, the plates should only be in the closed position; they should not be specially bent.
The use of solder joints by the manufacturer immediately indicates that the fault cannot be eliminated on its own.
Required Tools
To repair a toaster yourself, with your own hands, you should have at hand:
- a screwdriver for the crosspiece and its slotted counterpart for disassembling and subsequent installation of the housing and internal parts of the structure;
- pliers, which will be needed for the same purposes;
- tweezers to remove the spring and hold the fasteners;
- a multimeter, which will be needed to diagnose the electrical condition.
You can't do without a clean cloth and a brush with medium-hard bristles. They will be needed to clean the internal cavity from crumbs, dust, and other debris.
We thoroughly clean the toaster
If the lever suddenly stops locking, you must first clean the device before suspecting serious damage. First of all, turn off the toaster and wait until it has completely cooled down. Next, take out the crumb tray and shake it. You can turn the device over and shake it thoroughly. Sometimes the internal parts become so clogged with debris that you have to disassemble the equipment to clean the lever grooves and the magnetic plate. Afterwards, they assemble and try to turn on the device: if the handle works, it means that the problem lies precisely in contamination with crumbs.
How to properly disassemble the device
It is advisable to start repairs by reading the instructions. Before disassembling the device, be sure to disconnect it from the network .
The dismantling sequence will be as follows:
- Open the crumb tray and remove accumulated debris.
- Remove the decorative handle from the lever.
- Unscrew the fastening screws on the bottom plane of the device.
- Release the pallet clamps and remove it.
- Remove the walls of the plastic case.
- Press out the fastening tabs of the metal casing that covers the heating element.
- Remove the plate with the wound spiral.
After dismantling, we begin to search for a specific malfunction that will have to be repaired.
How to disassemble a toaster with your own hands
First of all, you need to make sure that the device is disconnected from the power supply. Then you should proceed step by step.
- The toaster turns over and the tray is pulled out, where the crumbs accumulate.
The handle that lowers the bread basket is removed.
The device is turned over, all screws are unscrewed.
The walls are moved apart, the tray is completely removed, then the walls are removed.
The plate with the heating element is removed.
In conclusion, it is worth noting that disassembling a toaster with your own hands is a fairly simple job. In addition, you can find several videos on a given topic on the Internet. And to have fewer problems with this device, it is better to buy toasters from trusted companies, such as Tefal or Bosch.
Common faults
There can be many possible breakdowns; it is difficult to foresee and describe everything. But there are a number of typical faults, knowledge of which will help you quickly repair the device.
The toaster does not lock
If the toaster lever does not lock, before repairing it, you need to sequentially check the probable causes of the breakdown from simple to complex:
- Blockage due to untimely cleaning of the tray. It is enough to open the tray and empty the internal cavity of debris.
- Incorrect setting of the temperature controller, as a result, the electromagnet does not receive the necessary power and does not hold the lock. It is necessary to set the knob to medium heating mode and press the lever again.
- There is no network connection. If the device is plugged into an outlet, possible causes of the malfunction are related to a lack of contact in the plug or damage to the wire. Another reason could be a faulty fuse.
In the latter case, the device can be repaired by replacing the failed element.
The device does not turn on
The heating does not start, although the lever is fixed in the lower position. The simplest reason is a lack of power due to a faulty plug or wire. Oxidation or burning of contacts will require more trouble. In this case you will need:
- dismantling the casing,
- cleaning contacts,
- checking them for short circuits.
If the unit still does not start, the problem may be hidden in the circuit. You will need to check all connections and solder at the break point.
Heater coil does not light up
When using a wire element in a design, the reason is most likely a break. Complete disassembly will be required to access the spiral and its visual inspection. A bandage is applied to the site of the break, assembly is performed and the functionality is checked. If a break cannot be detected visually, use a multimeter.
The roasting regulator does not turn on
The repair method depends on the type of regulator. The mechanical version often fails due to clogging with crumbs. It is enough to remove them and check the functionality of the device . If the bimetallic plate that opens the contacts is deformed or broken, the help of a specialist will be required.
An electronic regulator is more difficult to repair - at a minimum you need to be able to read the circuit diagram. If you don’t have such a skill, it’s better not to waste your time and contact a workshop.
Toasts are not toasted and burnt
The simplest reason for undercooked or overcooked toast can be an incorrectly set temperature. To eliminate it, just check the settings are correct. Requires more attention:
- deformation of the basket or guides, which will need to be straightened after disassembling the device;
- the timer malfunctions, the board needs to be checked and repaired;
- The mechanism is clogged, the device needs to be cleaned of crumbs and debris.
A variant of the defect may be a short circuit of the spiral, which will require elimination or replacement of the heating element.
A common failure is burning and smoking due to crumbs and pieces of bread. They stick to the heating element and begin to burn. Using slightly dried bread and timely cleaning of the device will help prevent this situation.
Frequent breakdowns when using a toaster
It will be useful to know that in addition to the timer and the start lever, the toaster has two compartments for bread, and inside it, on both sides, there are heating elements - nichrome spirals.
The frying stop button can be considered a circuit breaker - you can stop cooking even before the timer goes off. Some toasters have a temperature sensor; without it, repairs will be easier. In total, the toaster has 3 heaters: the central one is double-sided, the right and left are single-sided.
- There is a tray right under the holes for crumbs to fall off, but it also happens that they end up where the electronic components are located. If a breakdown occurs because of this, you can simply disassemble the toaster and clean it thoroughly. The screws are usually located under the rubber covering of the legs, which can simply be unscrewed. At this point, the user will be presented with a view of the bottom contacts. In general, you should always be careful with this problem - too many small crumbs can cause a fire. For cleaning, a soft brush or cloth is usually used.
- If paper gets on the heating element coils, the heater wires may burn out. In this case, you cannot repair the device yourself. In most cases, toasters break due to magnets. Here you will need to look for a fault on the surface of the printed circuit board and, accordingly, fix it. To be more precise, there is a microcircuit and resistors in the internal part of the electrical device, and the absence of capacitors will allow anyone with knowledge of the basics of electronics to cope with the problem.
- Insufficient electricity supply to the electromagnet, due to which the basket may not be pressed all the way and it is necessary to set the regulator to the middle position. The difficulty will not go away, but toasting it will be possible this time.
Choose a toaster from SMEG
The Italian manufacturer develops toasters, thoughtfully selecting a design solution, expanding functionality and taking care of high quality workmanship. Its devices look stylish and are easy to use combined with reliability.
This brand produces equipment with several levels of frying. Therefore, using a toaster, you can bring the bread to the desired degree of roasting. For a large family, it is advisable to purchase a device with not two, but four compartments. Sometimes the defrosting function helps out. It is convenient if there is an option for heating baked goods or sandwiches. Such models are complemented by a special grille.
Sunbeam automatic loading and unloading device
The brand’s toasters surprise you with their ability to load bread independently. Let's put a piece in, the slices are swallowed, coming out ready. Marvelous. The internal mechanism is foreign to a standard toaster. The bracket is balanced by two spring mechanisms, one of which can be adjusted with a screw located on the bottom plane of the compartment.
- The spring, with an upward force, pulls the bracket to the upper edge of the working compartment. The spiral is easy to find, located near an impressive thermostat (bimetallic plate), reminiscent of an iron, three times larger in size.
- The second mechanism is not obvious. The end of the bracket resembles a zigzag. The bottom edge is flush with the bottom of the working compartment. There is a spring in the middle that lowers the bread net. The mechanism is adjusted with a screw located in the bottom center of the compartment.
The two springs oppose each other. From the end, the design of the mesh plus the calipers resembles the letter Z. Under the lower edge there is a spring that lowers the mesh; a lifting mechanism is attached to the upper side, next to the temperature regulator for the operation of the bimetallic plate of the toaster thermorelay. On the opposite side is a mechanism that pushes the structure upward when the bread is ready. With a free state, without slices, the mesh does not fall down, held by the latch. The part will allow you to put bread inside, the unit itself will load, fry, and unload back. It looks simply wonderful.
Let's describe the work. A man drops bread into the cracks. The food presses down on the locking bracket and the spring mechanism is released. The cage lifting mechanism is disabled, the time has not come. The bracket begins to lower, pressing the lever against the contact that closes the power circuit of the heating elements. The toaster begins to glow orange, the baking process has begun. The bracket lowers smoothly, the precision start is determined by the accuracy of the spring adjustment. If we overtighten one, either the bread will refuse to come out at the end of the cycle, or it will be afraid to go inside. The tension of the bimetallic plate (more like a bracket) is regulated by the thermostat knob. You need to adjust it to the desired type of bread, it’s not very convenient.
Between the vertical side spirals, reminiscent of springs, a space is left through which the heat enters the vertically located bimetallic bracket. The temperature reaches the set temperature, a click is heard, disconnecting the heating, and at the same time the lifting device is activated. The bread comes out of the toaster briskly. The degree and quality of baking are determined by the correct adjustment of the thermostat. The power supply to the heating plates is open. The toaster is ready for new bread.
Later they realized: the wonderful mechanism is inconvenient when a large batch of bread is baked. Because two pieces (even four) are not enough for a family. Until the device cools down completely, it will not be ready to accept a new portion. The spirals have considerable inertia; the steel body of the device catches up with the coils. Together they store heat, the secondary heating of the toaster will happen faster, which means the bread will not be completely baked. When reloading, the slices enter a heated environment, therefore, they cook a little faster. However, the factor cannot smooth out the first one. Therefore, we believe that in conveyor mode the adjustment will have to be made a little more stringent.
What can break in a Sunbeam toaster? You saw what we saw! Anything can break. However, the durability of the device is due to its simplicity from an electrical point of view. There is not a single resistor, capacitor, or transistor; the electrical line of the toaster is reliable. The mechanical part will have to be adjusted. The bimetallic plate is durable. Toasters work for 60 years without showing signs of fatigue! We cannot say whether there are varieties for 230 volts. The American version caught my eye. The design of the toaster is amazing!
Homemade car toaster
The device will be useful to truck drivers and fans of long-distance road rallies in places not yet covered by civilization and progress.
Homemade car toaster: necessary materials
The toaster has the simplest design, is devoid of any automation and operates from an on-board 12 volt network. It is designed for heating sausages and hot dogs.
Necessary materials
To make a toaster you will need:
- metal beer can 0.5 liters;
- nichrome spiral from any electric heater;
- wires with a cross section of at least 2.5 mm2 - 2 meters;
- Alligator clips - 2 pcs. or a plug for connecting to the cigarette lighter;
- heat-resistant glue;
- fiberglass - 0.2 m.
Step-by-step instruction
Manufacturing the device takes about an hour (most of the time will be spent on the glue drying) and is carried out in the following sequence:
- cut the neck of the jar;
- cover the walls of the jar with a piece of fiberglass cut to size;
- carefully stretch the spiral until it becomes a straight wire;
- twist several nichrome wires together and solder the ends;
Twist several nichrome wires together and solder the ends
- wrap the can with the resulting stranded wire, you should get 6-8 turns;
Wrap the can with the resulting stranded wire, you should get 6-8 turns
- cover the winding with several more layers of fiberglass for thermal insulation;
- solder (or connect to terminals) the wires to the winding terminals;
Solder (or connect to terminals) the wires to the winding terminals
- You can make a hole in the bottom of the jar to insert a skewer into and accurately center the sausage or hot dog.
The toaster is ready to use. If you do not make a hole in the bottom, it can also be used as a boiler.
Poorly prepared toast
Undercooked toast? A breakdown occurred in the operation of the timer. But also the reasons why the toaster does not work include too low a temperature during the cooking process, a misalignment of the basket itself for pieces of bread, and an incorrectly inserted roasting regulator. Accordingly, eliminating the problem lies precisely in correcting the parts: install a new regulator or simply correct its position, adjust the board and straighten the basket guides if there is mechanical damage.
The reason for poor quality cooking may be the operation of the bimetallic switch. You should try turning the frying intensity control knob to the increasing time position.
In the case when the bread is baked on only one side, check the springs that displace the support grids of the basket. The springs may not only be moved, but also broken. You can replace them yourself: remove the casing or outer panels of the housing to open access to the springs, which are located between the hooks on the inner metal island. Visually you need to find those that are broken or out of order.
If you notice a burning smell coming from your toaster, you need to keep in mind that it is most likely a clogged casing due to the use of very soft baked goods. And if the toast begins to burn more than once, it is worth reconsidering the mode in which it is fried. In addition, this is a sure sign that more crumbs have accumulated in the tray than is allowed.
When only one slice is baked. Manufacturers of some device models may initially indicate in the instructions which connector should be used. An incorrectly selected location may cause the latch to operate ahead of schedule.
When the mechanical latch itself operates very early, telltale signs of wear can be found on the surface. Replacement may be too expensive and it may be easier to buy a new appliance.
Choose a toaster from SMEG
The Italian manufacturer develops toasters, thoughtfully selecting a design solution, expanding functionality and taking care of high quality workmanship. Its devices look stylish and are easy to use combined with reliability.
This brand produces equipment with several levels of frying. Therefore, using a toaster, you can bring the bread to the desired degree of roasting. For a large family, it is advisable to purchase a device with not two, but four compartments. Sometimes the defrosting function helps out. It is convenient if there is an option for heating baked goods or sandwiches. Such models are complemented by a special grille.
DIY toaster repair
Few people in the morning before leaving for work will refuse to enjoy sandwiches made from fragrant bread toasts baked in toasters. This breakfast will lift anyone's spirits! However, toasters also don't last long. They need to be looked after and serviced regularly. And although the toaster, due to its simple design, is reliable and easy to use, if it is not used correctly, it can break. At home, it is quite possible to repair a toaster with your own hands if you know its internal structure, operating principle and main malfunctions.
Buy with a guarantee
In an online store specializing in the sale of SMEG products, you will have a much larger selection than in a supermarket of household appliances from different manufacturers. This provides other advantages: a warranty from the manufacturer, the opportunity to consult about any functions of household appliances. If you want to furnish your entire kitchen with reliable appliances, you can order appliances from the same SMEG collection. You can limit yourself to only small household appliances. Imagine how great the kitchen will look with a stylish breakfast set - a toaster, coffee machine, electric kettle in a retro style! Gourmets will probably not resist ordering a blender, juicer and planetary mixer. Choose the color yourself: beige, cream, blue, green, pink and seven more options.
All products can be ordered with delivery to any region of Russia. Therefore, do not miss the opportunity to make a royal gift for a wedding, anniversary, or housewarming. Reliable and beautiful household appliances will delight you for many years!