Publication in the group: Desserts
Until the mid-19th century, ice cream was prepared by hand, but in 1840, a housewife from England came up with a freezer - an ice cream maker in which it was possible to prepare ice cream according to recipes in the home kitchen quickly and easily. A few years later, already in Russia, confectioner Ivan Izler came up with a machine that could produce ice cream automatically in large volumes.
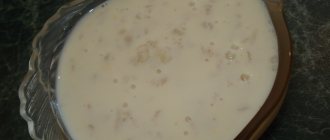
This delicious dessert has been known to mankind for more than 5,000 years, so it is impossible to say where and how ice cream first appeared. Many nations have their own popular recipe for cold dessert. In China, finely chopped ice was mixed with berries and pieces of fruit. And in ancient Europe, ice cream was prepared by freezing wine or juice. In Ancient Rus', ice cream was prepared like this: milk was frozen, then using a knife, small shavings were made from it and honey, nuts, dried berries or jam were added.
According to the classic recipe, ice cream is made from natural products - milk, cream, butter, eggs and sugar, so it is rich in vitamins A, B, D, E, P and mineral trace elements Mg, K, Fe, P.
Thanks to this composition, ice cream replenishes the lack of calcium and increases hemoglobin levels. It also normalizes kidney function and promotes the production of serotonin, the hormone of joy. So eating ice cream is not only tasty, but also healthy.
By type, ice cream is divided into:
- Seasoned ice cream. It is made in production, so this delicacy is required to not lose its qualities during transportation and long-term storage; for this purpose, it is frozen to -18°C immediately after production.
- Soft ice cream. It is usually sold in food service establishments and is not intended for long-term storage.
- Homemade ice cream. Already from the name it is clear that this is the name of a delicacy that is made in the home kitchen with your own hands.
Classic ice cream recipe
Ice cream recipes in an ice cream maker allow you to prepare a dessert at home, the taste of which will be similar to classic Soviet ice cream.
Composition of ingredients
| egg yolks | 4 things. |
| sugar or powdered sugar | 100 gr |
| vanilla | 10 g |
| milk 3.2% | 250 ml |
| cream 35% | 350 ml |
Step-by-step cooking process
- First you need to separate the egg whites from the yolks. The whites can be set aside; they will not be used in this recipe. The yolks must be ground with powdered sugar until they have a homogeneous whitish structure.
- Then pour the milk into a thick-bottomed saucepan and add vanilla. After this, you should put the milk on low heat and heat it to a temperature no higher than 90°C.
- Now you need to combine the milk with the yolks. To avoid boiling the egg yolks with hot milk, you need to pour a small amount of the milk-vanilla mixture in a thin stream into the yolks, stirring constantly. Then pour it back and mix everything together until it has a homogeneous structure.
- The next step is to put the resulting mixture on low heat and heat, stirring, until it thickens. Do not allow the mixture to boil, otherwise it may separate into liquid and flakes. When it thickens, remove the mixture from the heat and leave it aside to cool.
- In the meantime, you can whip the cream. Pour the pre-cooled cream into a bowl and beat with a mixer until fluffy. The main thing is not to overdo it, otherwise you may end up with oil.
- Then you should carefully add the milk-yolk mass to the whipped cream and beat for another 2-3 minutes.
Ice cream recipes in an ice cream maker - Then you need to take the ice cream maker bowl out of the freezer, put the prepared mixture into it and run the machine for 20 minutes. The cooking time depends on the model of the ice cream maker, so you need to set it in accordance with the instructions from the instructions.
How to serve a dish
To serve, transfer the ice cream into bowls and decorate to your taste, for example, sprinkle with colored dragees, grated chocolate or chopped nuts.
Step-by-step recipe for making homemade condensed milk ice cream
Report a bug
Sweet and tender homemade ice cream can be made from condensed milk. This original dessert will delight both adults and children. It won't take much time to prepare the dish.
Cooking time: 2 hours 30 minutes
Cooking time: 2 hours
Servings – 4
Ingredients:
- Cream – 200 gr.
- Vanilla sugar – 1 tsp.
- Condensed milk – 100 ml.
- Boiled condensed milk – 50 gr.
- Confectionery sprinkles - for decoration.
Cooking process:
- To prepare, you will need three main ingredients: condensed milk, cream and vanilla sugar.
- For decoration we will use boiled condensed milk and confectionery topping.
- Let's start cooking. Beat the cream with a mixer until thick.
- Add condensed milk and vanilla sugar to them.
- Stir the mixture until smooth.
- Pour the mixture into silicone molds. You can also use a plastic container.
- Place the product in the freezer for 2-4 hours until completely frozen.
- Place the finished ice cream out of the molds.
- Decorate the dessert with boiled condensed milk and confectionery topping. You can serve it to the table!
Classic eggless ice cream recipe
You can make a classic version of ice cream without using eggs; in this case, the ice cream will cook faster, but the taste will be different. To reduce the calorie content of ice cream, you can use cream with 20% fat content.
Composition of ingredients
- milk 3.2% – 150 ml;
- cream 35% - 350 ml;
- sugar – 100g;
- vanilla – 10 gr.
Step-by-step cooking process
- First, you need to pour the milk into a metal bowl, and also add vanillin and sugar to it.
- Then you need to put the milk mass on low heat and bring to a boil, but do not boil. The mixture must be stirred until the sugar is completely dissolved. When the milk is ready, remove it from the heat and cool.
- While the milk mixture is cooling, you need to whip the chilled cream to fluffy peaks.
- Now you need to put the whipped cream in the bowl of the ice cream maker and pour the milk mixture into it, stirring gently until the semi-finished product has a homogeneous consistency.
- After this, you need to place the mixture in the ice cream maker and turn on the cooking process for 20 minutes.
How to serve a dish
Place the finished ice cream in a portioned bowl and, if desired, you can decorate with fresh berries and pieces of fruit.
Cooking technology
In the 19th century, ice cream was prepared using a wooden tub: a container with the mixture was placed in it. Then they added salt and ice. After this, the master set the device in motion by slowly turning the handle. Constant intense rotation prevented the formation of large crystals. As a result, the mixture cooled evenly and the consistency became homogeneous. If the ice melted, its supply in the tub was replenished. The cooking process took about 60 minutes.
The technology itself has not changed over time, only the cooling system has been improved: the mechanical design with a handle has been replaced by an electric motor. A bucket of salt and ice replaced a tank with double walls, between which the coolant is installed.
A modern dessert preparation scheme consists of fulfilling two conditions:
- Saturate the main ingredients (cream, milk, fruit, egg yolks) with air by stirring, resulting in a whipped mixture.
- Gradually cool the emulsion to low temperature. In this case, the mixture should have a uniform consistency.
Ice cream recipe without cream
Ice cream recipes in an ice cream maker, which are prepared without the use of cream, are dietary because they contain a minimum of fat.
Composition of ingredients
- yogurt – 300 gr;
- honey – 50 g;
- fresh or frozen blackcurrants – 400 g;
- banana – 1 pc.
Step-by-step cooking process
- First of all, the currant berries need to be sorted and peeled. Then rinse with warm water and dry on a clean cloth. If ice cream will be prepared from frozen berries, they must first be thawed.
- Then you should take a convenient bowl with a thick bottom, pour the berries into it and mash the blackcurrants to a puree.
- Next, you need to put the berries on low heat, bring the puree to a boil and cook it for 5 minutes. The puree must be stirred constantly so that it does not burn. When the berries are ready, remove them from the stove, then let them cool.
- While the berry puree is cooling, you need to wash the bananas, wipe them with a napkin and peel them. After this, the bananas should be broken into pieces, placed in a blender bowl and chopped.
- Then you need to add honey and yogurt to the banana puree and mix thoroughly.
- Add cooled blackcurrant puree to the resulting mixture. Mix everything together again.
- Afterwards, the finished mass should be transferred to the ice cream maker and the cooling function should be started for 20 minutes.
How to serve a dish
The finished ice cream can be eaten immediately. Place it beautifully in portions into bowls and garnish with mint sprigs on top.
Types of ice cream makers
There are automatic, semi-automatic and mechanical models. Let's look at the advantages and disadvantages of each.
Automatic
Automatic devices are compressor-type equipment. It is equipped with freon, which works continuously and cools the walls of the container. Automatic options are designed to work all day long; they are used in cafes and restaurants. This ice cream maker is comparable in size to a microwave oven, so a separate shelf is provided for it.
Semi-automatic
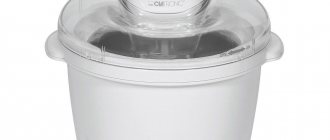
Non-compressor models will consist of several bowls and an engine; such bowls have double walls. Between them there is a coolant that accumulates cold. Before cooking, the bowl is placed in the freezer for 15 hours, so that this cold is enough for one cooking session. Semi-automatic options are compact and inexpensive, suitable for home use.
Mechanical
To cook in such an ice cream maker, you have to turn the blades manually - the device operates without electricity. Coarse salt and ice are used as a coolant. Ice is needed to freeze the mixture, and salt is needed to prevent the ice from melting. To get the dish, you need to rotate the blades for half an hour. This is labor-intensive, so such models are rarely purchased.
Homemade ice cream
The main difference between classic ice cream and ice cream is that a thickener is added to prepare the latter. This recipe uses agar-agar to thicken the ice cream in the ice cream maker, but you can use gelatin instead.
Composition of ingredients
- milk – 250 g;
- cream – 400 gr;
- whole condensed milk – 300 g;
- sugar – 30 g;
- water – 100 g;
- agar-agar – 3 gr.
Step-by-step cooking process
- Pour milk into a bowl and add sugar. After this, put on low heat and stir until the sugar is completely dissolved.
- Then pour condensed milk into the milk mixture and bring to a boil. Afterwards, you need to remove the milk mixture from the stove to the side to cool.
- Next, you need to add agar-agar to the water and stir until it dissolves. Then you need to put the water with agar-agar on low heat, heat and boil for about 1 minute. until the water thickens. The finished jelly should be removed from the heat and cooled.
- While the jelly is cooling, you need to take the pre-cooled cream and beat with a blender until fluffy.
- When the milk mixture has cooled a little, you need to mix it with agar-agar. To do this, pour a small amount of the milk mixture into the agar-agar, stir until the mass becomes homogeneous. Then pour it back into the milk mixture and stir constantly until the mixture cools down.
- The last step is to transfer the whipped cream into the bowl of the ice cream maker, add the milk mass to it and mix gently. Then turn on the ice cream maker for about 40 minutes.
How to serve a dish
The ice cream will turn out quite sweet, so it is better to decorate it with fresh, non-sweet berries or pieces of fruit.
General instructions for using the device
Regardless of the specific model and cooking recipe, you should adhere to the general requirements of the technology. Following the recipe, prepare the mixture and cool it to less than 10°C. This must be done in advance. To make the cooling process faster, you can add a little alcohol.
It is important to know! Do not fill the ice cream maker container more than 50%. The milk mixture, saturated with oxygen during mixing, doubles in size.
All fillers - fruit puree, condensed milk, pieces of berries or fruit - are added while the ice cream maker is operating, that is, almost at the end. Cracked or whole nuts are pre-cooled in the refrigerator. In addition, all ingredients, including milk or cream, must be fresh, this is the only way you will get a product that is tasty and safe for the body.
The device settings specified in the instructions must be strictly observed. Otherwise, the quality of the ice cream may be low (presence of unmixed pieces, large pieces of ice). You can only remove the finished dessert using wooden or plastic cutlery.
To avoid failures, follow the manufacturer's recommendations.
- Do not leave the ice cream maker on after use. Be sure to disconnect the device from the electrical outlet.
- Do not shorten the time the bowl is kept in the freezer before using the ice cream maker (for manual and semi-automatic models).
- Do not bring milk or fruit mixture to a boil while heating. Manufacturers recommend not to exceed the temperature of the mass more than 80°.
- You can get tender and airy ice cream at home by adding liqueur, cognac or rum. But don't forget, adding alcohol affects the taste.
By following the simple rules for using an ice cream maker, the recipe and recommendations given in the instructions, making natural ice cream will become a common and easy task.
Orange sherbet in an ice cream maker
Ice cream maker recipes allow you to make a cold dessert without dairy products. They are prepared from berry or fruit puree. Instead of water when preparing sherbets, you can use any syrup or alcoholic drink.
Composition of ingredients
- oranges – 6 pcs.;
- water – 350 ml;
- honey – 100 ml;
- pomegranate – 1 pc.
Step-by-step cooking process
- It is necessary to wash the oranges well and wipe until dry. Then remove the zest from them, being careful not to touch the white layer underneath, otherwise the ice cream will taste bitter. You will need 1 tbsp. l. orange zest.
- Then you should pour the water into a bowl, add honey and orange zest and stir until the honey is completely dissolved in the water. After this, put the syrup on low heat and bring to a boil, but do not boil. The finished syrup must be removed from the stove.
- While the syrup is cooling, you need to peel the oranges.
- Squeeze the juice out of three oranges into a separate bowl.
- The remaining oranges should be divided into slices and the membrane removed from them. Using a blender, make a puree from clean orange slices.
- Then in a clean bowl you need to combine the prepared syrup, orange juice and puree. Then mix all ingredients until smooth.
- The last step is to transfer the mixture into a cold bowl from the ice cream maker and set the cooking mode for 30 minutes.
How to serve a dish
The finished sorbet should be transferred into beautiful dessert molds and decorated with pomegranate seeds.
Quick milk ice cream in 1 minute at home
Report a bug
A fun way to make homemade ice cream in just one minute. Take note of this amazing recipe for a tasty and bright delicacy. Adults and children will appreciate it.
Cooking time: 5 minutes
Cooking time: 1 minute
Servings – 2
Ingredients:
- Cream – 100 gr.
- Powdered sugar – 2 tbsp.
- Apricot – 200 gr.
Cooking process:
- We freeze the apricots in advance in the freezer. Then we remove the seeds from them. We cut the ingredient into small slices. It is enough to divide small fruits into halves.
- Place frozen fruit pieces into a blender bowl.
- Pour cream into apricots. We also put powdered sugar here.
- Grind the ingredients to a soft and smooth paste.
- Divide the cold mass into portions and serve. Quick ice cream at home is ready!
Chocolate ice cream made from condensed milk
It is better to take sour cream for making ice cream according to this recipe with a fat content of at least 30%, since unscrupulous manufacturers use starch to thicken a less fatty product. The taste and consistency of the dessert will not be as delicate.
Composition of ingredients
- Whole condensed milk – 400 g;
- Sour cream – 400 gr;
- Cocoa powder – 100 gr.
Step-by-step cooking process
Condensed milk with sour cream must be pre-cooled.
- First, you need to put condensed milk in a bowl, pour sour cream into it and mix the products at medium speed until smooth.
- Then sift cocoa powder into the resulting mixture through a strainer and stir until the milk-sour cream mixture becomes an even chocolate color.
- After this, transfer the mixture to the ice cream maker and turn it on for 45 minutes.
How to serve a dish
The finished treat can be eaten immediately or put in the refrigerator for 2 hours to make hard ice cream. Place the ice cream in bowls and decorate the top with chocolate chips or caramel topping.
Operating principle of the device
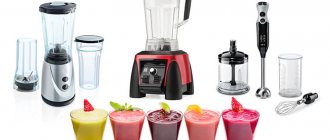
An ice cream maker is a small device consisting of a container for storing cooking products and a whorl designed for mixing ingredients. The operating principle of the device is almost the same as the operating principle of an electric mixer. After you press the power button, the whirlpool begins to mix the ingredients until a homogeneous mass is obtained. Also, the whorl prevents the water from freezing when stirred. An ice cream maker can be used not only to prepare treats, but you can also store ice cubes in it, prepare frozen yogurt, sorbet, cocktails, milk or fruit ice.
Which appliance is better: a mechanical ice cream maker or an electric ice cream maker? How to choose an ice cream maker?
This type of device can be divided into two types:
- mechanical
- electric
In a mechanical ice cream maker, the whirlpool must be turned using manual force, and ice mixed with coarse salt is used as a coolant. With electric ice cream makers everything is much simpler; they work on the principle of a mixer, and as a coolant in the walls of a special bowl there is a refrigerant that produces cold.
In turn, electrical appliances are divided into two subtypes:
- partings with compressor
- without compressor.
If the appliance does not have a compressor, then to make ice cream you will have to pre-cool the bowl in the freezer. The approximate cooling time is about 12-16 hours, which is quite long.
Therefore, you can understand that the simplest and most convenient to use are devices with a compressor . An element such as a compressor allows you to cool the bowl simultaneously with preparing ice cream and not waste precious time on this. The ingredients are mixed thoroughly, the mass is uniform and homogeneous, and does not crystallize during cooking. Approximate cooking time is about 20 or 30 minutes after starting the device.
Simple two-ingredient ice cream
Ice cream maker recipes allow you to make a cold dessert with just two ingredients. Thanks to this, not much time is spent on preparing ice cream.
Composition of ingredients
- cream – 300 gr;
- whole condensed milk – 300 gr.
Step-by-step cooking process
- First of all, you need to whip the chilled cream until fluffy.
- Then you should transfer the cream to the ice cream maker and add cold condensed milk there.
- After this, you need to turn on the ice cream maker for 20 minutes.
How to serve a dish
Simple but very tasty ice cream is ready. You can put the dessert in a convenient bowl and decorate with almonds.
Types of ice cream makers
Today there are two types of devices for making cool ice cream at home:
- mechanical ice cream makers;
- electric ice cream makers.
Both of them can be either simple, economical in design or trendy.
The cost of an ice cream maker varies widely. The device can be bought for 1,000 rubles and 45,000 rubles.
Regardless of the type, the ice cream maker includes a container into which the mixture is poured, and a rotating whorl - the place where the coolant (ice and salt) is located.
In order to use the ice cream maker for a long time and correctly, you should strictly follow the instructions for its operation, cleaning and storage.
Strawberry mint sorbet
You can use fresh or frozen strawberries to make ice cream. Frozen berries must first be thawed. Instead of mint leaves, you can use basil.
Composition of ingredients
- strawberries – 400 gr;
- mint – 5 leaves:
- cream – 50 gr.
Step-by-step cooking process
- First, you need to rinse the strawberries thoroughly and dry them on a clean napkin.
- After this, you need to place the berries in a blender and grind them to a puree consistency.
- Then wash the mint leaves, add to the strawberries and mix with a blender.
- Now you need to whip the cream separately until it doubles in volume.
- Then you should transfer the strawberry-mint puree into the cream and mix carefully.
- The resulting mass must be placed in the bowl of the ice cream maker and run the machine for 30 minutes.
How to serve a dish
When the sorbet is ready, place it in bowls and garnish with a whole strawberry and a mint leaf.
Delicate and delicious ice cream made from milk and banana
Report a bug
The original idea for making homemade ice cream is from bananas. A bright and delicate-tasting dessert will delight you and your loved ones. Enjoy this easy-to-make treat!
Cooking time: 2 hours 20 minutes
Cooking time: 2 hours
Servings – 2
Ingredients:
- Banana – 2 pcs.
- Cream – 100 ml.
- Powdered sugar – 30 gr.
- Lemon juice – 1 tbsp.
Cooking process:
- Peel the bananas and divide them into small pieces.
- Place the fruit in the blender bowl.
- Grind the ingredient to a fine paste. The mass should become very light.
- Add cream and powdered sugar to this. We continue to beat the products.
- Place the banana blank in a glass plate or plastic container.
- Prepare the dessert in the freezer for 2-4 hours. During this time, the product must be taken out and mixed several times.
- Delicious banana ice cream is ready! Serve in balls and decorate to your liking.
Sherbet with champagne
The use of alcoholic beverages in the process of preparing the cold delicacy adds a piquant note of flavor to the ice cream. However, you should not let children try this dessert.
Composition of ingredients
- pitted cherries – 700 g;
- champagne – 200 ml;
- sugar – 150 gr;
- orange zest – 100 g;
- water – 300 ml.
Step-by-step cooking process
- Pour water into the blender bowl and pour sugar and cherries into it. Then you need to beat until puree is formed.
- Then you need to transfer the cherry puree into an ice cream maker, add zest, champagne and stir with a spoon until smooth.
- After this, turn on the ice cream maker for 1 hour.
How to serve a dish
The finished sherbet is placed in a beautiful bowl in convenient portions, and the top can be decorated with cherries or chocolate chips.
Ice cream maker manufacturers
Ice cream makers are produced by Vitek, Ariete, Nemox, Clatronic.
Bright “magic” ice cream maker Vitek Winx
The Vitek WX-1351 model is painted in the style of the Winx “School of Sorceresses” and will be a good gift for a girl. The small device is capable of preparing 300 g of ice cream in 15 minutes.
Unusual ice cream maker from Ariete
The Ariete 634 ice cream maker will mix up to 700 g of treats in half an hour. The body stands on legs so you can immediately squeeze the dessert into a waffle cup. Welcome to the party!
Ice cream maker with interchangeable bowls prepares two flavors in a row
The bowl of a semi-automatic ice cream maker heats up after the first serving of dessert - it must be cooled again for the whole day. The Nemox company has added a second bowl to the Gelato Duo kit - immediately after the first serving, the second one is charged or a dessert with a different taste is prepared.
The Clatronic machine prepares two types of ice cream at the same time
The Clatronic ICM 3650 machine can prepare two servings of treats at once (up to 500 g each). The kit includes two mugs installed on the sides of the machine. A pair of whisks simultaneously knead the dessert.
Orange ice cream with cottage cheese and white wine
Using cottage cheese, you can prepare an original cold dessert for the holiday table. And dessert white wine will highlight and highlight the taste of oranges.
Composition of ingredients
- cottage cheese – 400 gr;
- whole condensed milk – 400 g;
- cream – 300 gr;
- sugar – 100 g;
- butter – 50 g;
- water – 50 g;
- oranges – 2 pcs.;
- white wine – 2 tbsp;
- vanillin – 10 gr.
Step-by-step cooking process
- Oranges should be washed well in warm water. Then you need to remove the zest from them and squeeze out the juice.
- Then you should pour water into a metal bowl, add sugar and add butter. The finished mixture should be placed on low heat and brought to a boil.
- Now you need to pour orange juice into oiled water and add zest to it, simmer for 2 minutes. and remove from heat.
- Then add white wine to the resulting mass, stir and let cool.
- The next step is to put the cottage cheese in a bowl, pour in the condensed milk and beat until a homogeneous consistency is formed.
- Chilled cream should be whipped separately, then transferred to the curd mixture and stirred.
- At the end, put the curd mass and a mixture of white wine and orange juice into the ice cream maker. Then mix the mixture with a spoon and turn on the ice cream maker for 40 minutes.
How to serve a dish
When the ice cream is ready, you need to put it into serving bowls and decorate with an orange slice or chocolate topping.
In order for the ice cream to turn out delicious and meet your expectations, you need to pay attention to important details:
- 12-14 hours before preparing ice cream, the ice cream bowl should be placed in the freezer. During this time, the refrigerant will freeze well and this will significantly reduce the time it takes to prepare a cold dessert.
- You cannot fill the bowl of the ice cream maker more than ½ of the volume, since during the cooking process the volume of the semi-finished product increases by 2-3 times.
- Recipes for ice cream in an ice cream maker usually indicate the amount of products per bowl capacity of 1.5 liters. If you prepare ice cream according to this recipe in a smaller bowl, then as the ice cream increases in volume it will overflow. If the bowl has a larger volume, then the mass will be scattered along the walls of the ice cream maker. Therefore, if the ice cream maker has a bowl of a different volume, then it is worth adjusting the amount of ingredients required by the recipe in accordance with the volume of the ice cream maker.
- When ice cream is prepared from frozen berries or fruits, they must first be thawed and excess moisture drained. Otherwise, ice crystals will appear in the ice cream when frozen.
- The structure of the ice cream depends on the fat content of cream and milk; the higher the fat content, the more tender the dessert is. Therefore, it is advisable to use products with a fat content of at least 35% for cream and at least 3.2% for milk.
- It is better to take fine crystalline sugar or replace it with powdered sugar, they will completely dissolve faster.
- Vanilla is added to the ice cream for flavor. It is advisable to use natural vanilla beans as it has a richer aroma, but you can use vanilla sugar or vanillin instead.
- Eggs must be fresh; when stored for a long time, they lose some of their moisture and it becomes difficult to separate the white from the yolk.
- If ice cream is prepared using condensed milk, then you should not add sugar to it; the dessert may turn out cloying.
- You should be careful when adding sugar to ice cream when preparing sherbets and sorbets from sweet varieties of berries and fruits. For example, raspberries are a sweet berry on its own and do not need additional sweetener.
- Ice cream with alcohol takes longer to harden, so you need to increase the cooking time in the ice cream maker. Or you can, after the dessert has cooled in the ice cream maker, put it in the refrigerator for an additional 2-3 hours.
- In order for the ice cream to have the correct consistency, the finished mass that is sent to the ice cream maker should be similar in structure to sour cream. If the semi-finished product has a thinner consistency, the ice cream will turn out watery with ice crystals.
- It is advisable to store finished ice cream prepared according to recipes for an ice cream maker in a container with a tight lid, as it quickly absorbs foreign odors.
How to choose an ice cream maker for your home
The choice of model for your home depends on the characteristics of the device and the principles of its operation. It is recommended to pay attention to the following.
- The volume of the container on which the product yield depends. To prepare 1 kg, you need a bowl with a volume of at least 600 g. During cooking, the thick paste increases in volume.
- Power, the time for preparing ice cream depends on it. The optimal choice is a power from 50 to 110 W.
- Device size. If the kitchen is small, then choose compact semi-automatic models. For spacious kitchens, devices of any size are suitable.
- Bowl body material. Metal bowls are expensive, but have a long service life. Plastic ones are cheaper; manufacturers make such containers in different colors and designs.
- Manufacturer and price. It is recommended to trust trusted manufacturers with a good reputation.
Interesting ! Devices that come with two types of spoons - with and without an ejector - are popular. The first type makes balls, the second is used for hard ice cream. Also, high-quality manufacturers equip the device with a plastic or wooden spatula for removing the product from the bowl.
How to make the right choice depending on a person's needs
When purchasing, pay attention to the type of ice cream maker - automatic or semi-automatic.
The first option is designed for continuous production of ice cream and is suitable for large companies and family celebrations.
The second option is optimal for home - in such an ice cream maker they prepare treats on weekends for a family of 2-3 people. Mechanical options are convenient to take with you to the country where there is no electricity.
Models equipped with a timer and a sound signal are easy to use; they will notify you when cooking is complete. A transparent window allows you to observe the preparation, and the included plastic portion cups help you prepare different desserts in one cycle.
Many options are equipped with a set of different molds to create beautiful embossed ice cream. They make delicious fruit ice.
Interesting ! Ice cream makers prepare creamy ice cream, fruit curd ice cream, desserts with chocolate pieces, berry ice and more. Coffee, condensed milk, honey, pistachios, mint, and champagne are used as toppings.
Homemade bright ice cream with strawberries
Report a bug
Bright strawberry ice cream can be prepared at home using a simple recipe. Use a culinary idea for your desserts. Please your loved ones with a delicious treat.
Cooking time: 3 hours 30 minutes
Cooking time: 3 hours
Servings – 6
Ingredients:
- Strawberries – 400 gr.
- Cream – 400 ml.
- Milk – 150 ml.
- Egg – 3 pcs.
- Sugar – 4 tbsp.
Cooking process:
- We extract only the yolks from the eggs. Grind them well with sugar.
- Heat the milk and pour it in a thin stream into the yolks.
- We rearrange the dishes and contents onto the stove. Cook the product over low heat until it begins to thicken. Continuous stirring is important during the process.
- Next, wash the strawberries. Grind the berries using a fine sieve. You should get juice with pulp.
- While the custard is cooling, begin whipping the cream. We work with a mixer until a thick foam forms.
- Combine the cooled cream, whipped cream and chopped strawberries. Stir.
- Place the workpiece in a plastic container. Distribute the mass evenly.
- Place in the freezer for 3-4 hours.
- Take the finished ice cream out of the refrigerator and spoon it on with a round spoon.
- The dessert can be supplemented with pieces of fresh strawberries. Bon appetit!
Types of ice cream making machines
There are automatic, semi-automatic and mechanical models. To choose which model is suitable, you need to understand the advantages and disadvantages of each.
Automatic ice cream maker
The device is equipped with a compressor that creates the necessary temperature for preparing dessert. Therefore, an automatic ice cream maker for your home is healthier and more convenient.
The device does not require many hours of pre-freezing the bowl in the freezer, and also guarantees a constant temperature during cooking
Automatic ice cream makers are made of steel, plastic, silver and stainless steel. Bowl volume - 0.5-2.5 l. Power - 135-250 kW. In semi-automatic and mechanical devices this figure is significantly lower.
Attention! The compressor increases the size and weight of the equipment. Therefore, when choosing a device, you need to provide a place for it.
Automatic technology is divided into 3 categories:
- simple;
- premium;
- freezers.
The devices are distinguished by their power and maximum weight of ice cream prepared in one production cycle.
An automatic ice cream maker has many advantages - speed, practicality, lightness and convenience. In addition, there is battery technology, which significantly saves energy consumption. An automatic ice cream maker signals the end of dessert preparation with a sound signal. There is a timer and a display with convenient indication. The disadvantages include high cost and high electricity consumption.
Semi-automatic ice cream maker
Such models are equipped with double walls, between which refrigerant is poured. A refrigerant is a substance whose characteristics and properties include low boiling and evaporation points.
The refrigerant is capable of accumulating cold, so semi-automatic ice cream makers are placed in the freezer for at least 12 hours before preparing dessert
Ice cream makers for home are made of plastic or metal. There is a whisk for stirring the mixture of these materials and a low-power electric motor. The device turns off automatically after a user-specified time.
This home appliance is more compact and takes up less space in the kitchen. Cooking time: 20-40 minutes. The disadvantage of a semi-automatic ice cream maker for home is that in one day you can prepare only 1 reservoir of treats; the next portion can be made a day later, when the bowl has cooled down again. The advantage is low power, up to 40 W, affordable price.
Mechanical ice cream maker
Disadvantage: it requires constant human participation in preparing the dessert. It is also cooled in the freezer, like a semi-automatic ice cream maker for home, then it is filled with the prepared ingredients and everything is mixed manually.
This device is not convenient to use because it takes a lot of time to prepare dessert.
Attention! It's faster to make ice cream with a mixer and freeze it than to use a mechanical device.