The principle of operation of a film projector: circuit and device
If you have an old non-working device on hand, then understanding its circuit is extremely simple. It is enough to disassemble it and study all the components. If this is not possible, consider the simple device in the photo. The main condition for organizing a home movie screening on the screen is the presence of high-precision elements.
Thus, a professional projector circuit is based on the following details:
- light bulb for illumination (any source can be selected, even a powerful LED);
- lens-condenser;
- color wheel or matrix (on modern devices);
- aspherical lens;
- DLP chip;
- lens;
- screen (multimedia boards are often used for such purposes).
The focused light from the bulb and a high-quality matrix (the kind you can get from any smartphone or tablet) combine to deliver an image, magnified through the lens, to a screen mounted on the wall. This can be white sheets, oilcloths, and even a light background of furniture or wallpaper.
Image quality is achieved through lenses and lamp brightness. Therefore, you should choose a source with high efficiency. In addition, it is necessary to correlate the size of the screen and the emission power of the light flux. Simply put, the farther the projection is from the light source, the more powerful the light bulb you need to take.
Theory
The principle of transmitting an image from any medium to a vertical surface is based on the laws of optics. When various carriers interact with the light flux, the rays are refracted, the spectrum changes, and is subsequently displayed on the screen.
A homemade projector can be implemented in different ways. In practice, there are several image transmission technologies that are implemented in all kinds of filmoscopes, sliders and projectors. The most popular design solutions are:
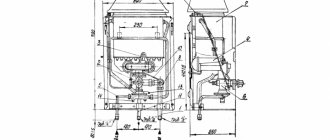
- An overhead projector is based on the passage of a light flux through a transparent medium. The figure below shows a diagram of such a device, Fig. 1: schematic diagram of an overhead projector
where from the light source 2 the flow is directed by the reflector 1 to the slide 4 located in the focusing lens 3. The modified spectrum extends to the optical amplifier 6 and is transmitted to the screen 7.
- Epiprojectors - work by reflecting the light flux from opaque objects. Rice. 2: schematic diagram of the epiprojector
The figure above shows the principle of operation of a reflective type projector, in which a light source 1 transmits a flux that is reflected by mirrors 2 and falls on an image 3. The modified light flux moves through the lens to a reflector, which transmits the image to the screen.
- Film projectors - transmit video information from moving film slides when a light flux passes through them.
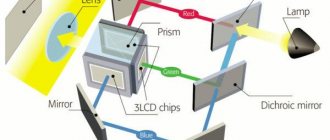
- DLP projectors – broadcast video information by reflecting the light flux from a special chip. The flow itself is formed by a color logical matrix. Such devices provide high image clarity and color accuracy. Rice. 3: Schematic diagram of DLP projector
- LCD projectors - realize image transmission by passing light through a transparent LCD panel. Unlike DLP technology, LCD projectors produce bright, vibrant and rich colors.
Today, digital multimedia projectors can easily compete in photo and video quality with the best HD TVs. Therefore, home projectors can be used as a personal cinema for family movie viewing or as a means of displaying visual materials at conferences and lectures. Alas, it is almost impossible to recreate a digital multimedia device with your own hands, since it is necessary to synchronize the operation of mechanical, optical and digital elements. But anyone can implement a classic projector using digital equipment.
Making a projector with your own hands using a phone
Modern gadgets often have a solid extension, through which you can get high-quality video broadcasting. You can watch any movies on the Internet, as well as self-made videos. Let's take a closer look at the stages of manufacturing such a device.
The simplest projector
To make a simple device, you will need a minimum of parts. However, you shouldn’t count on full image quality in this case, since most smartphones are not capable of transmitting images in sufficient brightness over long distances. However, this is a great alternative if you don't have a projector at all.
What you need for work
To construct a projector, you will need a cardboard or wooden box, as well as a smaller cardboard case in which you need to make a niche for a smartphone. To reduce light reflection from the walls of the box, you need to paint it black. Shoe polish or matte paint is ideal for this. You will also need a lens.
Preparing all elements
The sequence of operations is as follows.
- We arrange the box correctly. To do this, paint the inside of the body with a dark color.
- We place a smaller box in it so that the prepared niche into which the smartphone will be inserted is the size of the screen.
- We direct the open part to the free edge of the second box.
- We prepare a pendant or stand for the lens, place it on the table, and attach the magnifier to it.
- It can be attached to a cardboard box, having previously cut out a special niche for this.
- To prevent the magnifier from falling, it is secured with a glue gun.
Assembly of the structure
When all the parts are arranged, all that remains is to assemble them into a single whole. We insert the switched-on smartphone into the prepared niche and direct the image through the lens onto the canvas installed as a screen.
It is convenient to use such a film projector if you have a remote control that works via Wi-Fi, otherwise you will have to remove the phone from the box for each switch.
Holographic projector manufacturing process
Holographic projectors are able to accurately convey the image from any mobile gadget, provided that maximum brightness is turned on. You can find the parts in your workshop or spend a little money purchasing a few suitable items from the store.
List of materials and tools
To quickly create a 3D projector you will need:
- CD case;
- glue gun;
- painting or stationery knife;
- pliers;
- smartphone;
- special video with holographic graphics;
- corresponding drawing.
It is important to comply with all the dimensions specified in the drawing, otherwise it will be impossible to achieve clarity of the image.
Manufacturing parts for the projector
To create a truncated pyramid, we will use a drawing that will allow us to calculate the dimensions of each part.
Let's consider a step-by-step algorithm:
- Using the drawing, mark four identical sketches on the plastic from the disc case, and, using a utility knife, carefully cut them out.
- We glue all these parts together with a glue gun so that we get a truncated pyramid.
- When nicks appear on the ends of the patterns, they are processed with sandpaper.
- We install the smartphone on the top of the pyramid so that the display is located in the center.
- We put dark or matte cardboard on top (so that the animation is not mirrored).
Similarly, you can use the projector in a vertical position. But for this you will need to make stands that hold the smartphone and matte cardboard.
Adjusting the image on your smartphone
In order for the picture to be fully displayed on a matte surface, you need to make some screen adjustments. Be sure to set the brightness to the maximum level, adjust the color so that it is natural. In this situation, it is advisable to set the contrast mode to automatic and the background color to the “Standard” position.
What else is important to know
If you want the image on the wall to be brighter and clearer, it is better to use a tablet or laptop rather than a phone. In this case, the magnifying glass should be larger, because The screen size itself is larger. In this case, we use a special type of lens - a rectangular Fresnel lens, since finding a suitable glass lens is not an easy task. You can buy such a lens on the Internet. You can see an example of how to quickly make a projector from a laptop or tablet in the photo below:
Another important point - if a homemade device projects a not very good picture on the wall, and at the same time you have already tried to change the location of the smartphone, then the problem is with the lens. Try wiping it or replacing it with a better one if you previously bought a cheaper option. Increasing the lens size can also improve the picture.
In addition, I would like to draw attention to an important nuance - in order for a homemade home theater to show a clear picture, the brightness on the mobile device must be set to maximum. You can improve the clarity of the projector by painting the inside walls of a cardboard box black, for example, with spray paint or a regular marker, or you can cover the inside with black paper.
The wall on which the slide show or video will be displayed also has its own requirements. It is best to direct the projection onto a special canvas for the projector, but if this is not available, whatman paper of size A1, mounted in a frame or simply on the wall with buttons, will do. Here I would like to clarify that you can use such a homemade cinema at home only if the room is dark enough. The light will interrupt the image.
That's all I wanted to tell you about how to make a projector with your own hands at home! If you liked our ideas, don’t be lazy to share them with your friends on social networks, so that they too know about the technology for assembling a homemade home theater in 5 minutes!
It will be useful to read:
DIY projector based on a tablet
All modern tablets have a lot of capabilities, so you can watch movies and your favorite videos on the big screen through them. The likelihood that the picture will be distorted is minimized, since the screen parameters allow for high-quality image transmission.
What do you need for work?
In order to prepare a simple home theater with your own hands, you need to have:
- two cardboard boxes of different sizes;
- stationery knife;
- a lens with good focusing;
- tablet;
- pistol glue or PVA;
- black paint.
Manufacturing of structural elements and step-by-step instructions
To properly make a video projector with your own hands, we advise you to follow the instructions given below.
| Illustration | Description of action |
| Take a cardboard box. We outline the lens on the side and cut out a niche for installing the magnifier. | |
| We coat the end of the lens with glue and install it in the cut circle in the box. Paint the inside surface with black paint and let it dry. | |
| We are preparing foam plates that will be inserted inside the box. They will play the role of a tablet stand. The dimensions of the foam should be slightly less than the distance between the walls. | |
| A niche for the tablet is made from one piece of foam plastic. Its dimensions must match the parameters of the gadget. | |
| We glue one part to the other to get this design. | |
| We place the tablet inside and turn on the video we want to watch. Point the lens at a light canvas and enjoy watching. |
Good to know! It is important to set the backlight settings on your tablet. For ease of switching between videos, you can connect the mouse via a Bluetooth connector. Due to the physics of the lens, the gadget must be installed in an inverted 180º position.
Projector from a slide viewer
The use of a regular magnifying glass is justified when making projectors for amateur film viewing. But in order for the picture to be truly high-quality, you can use a special slider, which is used in educational institutions. Such an overhead projector is easy to create. To use it, you just need to find a good source for playing the picture.
List of materials for work
The user’s only concern is setting up and correctly installing the almost finished projector. What will be useful for these purposes:
- factory matrix with already configured optical units;
- factory projector;
- a laptop or tablet from which the matrix was removed;
Stages of work
You need to try to disassemble the laptop or tablet so that its screen is not damaged. Next, the structure is simply placed in an overhead projector and the slides or video begin to be shown. In such a situation, the screen plays the role of a navigator through the tablet system. What does this look like in practice?
- We connect the inserted matrix to the tablet and find the device to control. This can be a special Wi-Fi module or an ordinary wireless computer mouse.
- We turn on the projector to the network and point its lens at the multimedia screen. It can be a special professional board.
- We play the video and watch it in a darkened room as much as possible.
In order to obtain maximum image quality, special gobo lenses are installed on the projector.
Necessary materials
Before you enthusiastically start making a homemade projector, you need to come to terms with the obvious fact - the picture quality will not be excellent. The situation can be improved with the help of good tools and a more or less even surface, but drastic changes will not happen. Budget options are based on the use of smartphones, tablets or laptops, the images of which are enlarged and projected onto the screen.
If you plan to watch feature films on the projector, the quality will be sufficient. However, the picture will be too blurry for broadcasting sports matches or scientific videos. To make a primitive projector you will need the following basic set of tools:
- stationery knife;
- construction pencil;
- image source (smartphone, tablet, etc.);
- magnifying glass;
- insulating tape;
- clip;
- box.
Useful tips for craftsmen and subtleties of manufacturing
When creating a projector, everyone thought about its further purpose. It is this factor that should be taken into account when choosing the dimensions of a multimedia device. Check out some helpful tips from users.
- If you plan to often watch movies in semi-darkness and do it with the whole family, you will no longer need a cinema. The only condition is to use not a tablet or a phone, but a larger design, as an option, a laptop.
- To make the projector body, it is better to use decent quality materials, for example, plywood or MDF. Be sure to ensure that the device is stable.
- If you need to broadcast video to a screen located high, it is better to immediately provide a stand. Do not attempt to place books or other objects under the device. Angular radiation must be observed.
- The most effective viewing will be only at night in the absence of artificial lighting.
Dear readers, if you have experience in such operations, be sure to share your ideas.
If you have any questions while reading, ask them in the comments under the article. We always welcome feedback, so we will respond quickly.