Correct setting of the satellite dish has a key impact on the quality of satellite signal reception. Many people are afraid to install a satellite dish themselves, but after reading this guide, this procedure will no longer seem so difficult.
Let's figure out how to position the satellite dish and connect it yourself.
Materials and tools needed to install a satellite dish
You will need:
- Satellite dish with signal converter.
- Antenna mast or wall bracket (sold separately), depending on technical capabilities and installation location.
- External antenna cable designed for satellite installation (with a resistance of 75 Ohms). To assemble a Full HD set-top box with a recording device, you will need two cables. If you install a multiroom system, a correspondingly longer coaxial cable will be required.
- Type "F" connectors corresponding to the diameter of the coaxial cable, keys and tools necessary to attach the mast.
- Compass, protractor, ruler or corresponding application on your smartphone.
- Cable ties or glue, electrical tape, dowels, connectors for lightning protection . If it is not possible to make a hole in a window or wall for laying the cable, use a special flat cable with “F” type connectors.
Set of equipment for satellite TV
Installing a satellite dish and laying cables
In stores that sell equipment for satellite TV and satellite dishes, you can buy various types of antenna holders that are attached with brackets to the wall or antenna mast.
- Select the bracket that suits your installation location.
- Attach it as firmly as possible to a rigid base.
Installing a satellite dish using brackets - Buy a quality cable of suitable length. It is best to take a section with a margin of at least 3 meters (a cable longer than 30 meters requires a signal amplifier), which will connect the antenna kit to the HD decoder.
Satellite cable - Route and secure the cable so that there is no risk of tripping over it or accidentally damaging it (avoid sharp bends).
- Cut the cable after installing it. .
- If the converter is equipped with a water guard, place it over the cable before inserting (draw-out converters do not require a guard).
- F-type connectors should be screwed tightly to the coaxial cable, using wire cutters if necessary (it is better to use a special wrench). It is important to carefully prepare the cable and ensure that the metal braid of the coaxial cable does not touch the center wire.
Important: in houses equipped with a lightning protection system, the mast must be connected to it with a copper cable with a cross-section of 50 mm² or 80 mm², and external wires must be connected to the mast with a cable with a cross-section of 40 mm². But these requirements are not mandatory if the antenna is located less than 2 meters above the roof and closer than 1.5 meters to the wall from the house, that is, on the balcony.
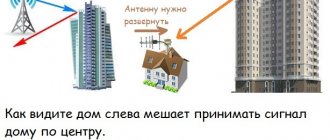
Choosing the right place to install a satellite dish is the first task
Installation instructions: choosing a location, calculating elevation angle, azimuth
Russian satellite TV operators are divided into two categories - southern (which includes NTV-plus and Tricolor TV) and eastern (Telekarta, MTS). In this case, we will give an example of installing a south antenna.
Read more about setting up a satellite signal from MTS in our material.
Map of satellites - you can start from it when setting up the satellite dish for the first time
Correct installation of a satellite dish depends on the correct setting of four parameters:
- azimuth is the angle between north and the desired direction;
- angle of inclination/elevation – angle of orientation of the plate in the vertical plane;
- elevation angle – a horizontal angle corresponding to the rotation of the plate left-right;
- converter rotation - the angle at which the antenna looks in a given direction of the world.
Adjusting the Azimuth Angle Using a Compass
Azimuth for different cities
Tilt adjustment:
If the converter has a scale or you have a protractor, turn the converter to the value in the table above that corresponds to your city.
The azimuth is set with a compass and measured in a clockwise direction. The antenna direction angle (azimuth – 180º) is measured from the south clockwise.
- use mounting bolts to secure the converter in the bracket;
- attach the antenna to the mast and adjust the angle;
- screw the wires to the converter and to the receiver;
- Connect the set-top box to the TV according to the instructions and launch it.
Installation, connection and self-tuning of a satellite dish - video instructions:
You can fine-tune the position of the satellite dish based on the measurement results of the received signal. You don't need a special counter for this. Modern decoders have sufficient functionality to measure the signal received from the satellite.
Calculation of elevation and azimuth when installing a satellite dish
F connector connection
To connect coaxial cables, you need to strip them and put F-connectors on them. There are two ways to do this.
Method 1 – cut off only the outer sheath of the cable with a knife at a distance of 20-25mm. The screen must not be damaged.
Carefully bend all the wires onto the shell.
Now you need to remove the insulation from the central core. It should protrude from the screen by a maximum of 2mm.
After this, screw on the F connector.
Shorten the excess stock of the central core, leaving no more than 5mm from the plane of the connector.
Method 2 is easier. Take the utility knife again. Step back approximately 1cm from the edge of the cable and cut off all the insulation. Including external and internal, up to the central core.
Then, retreating 3mm, cut off only the outer braid.
Make sure that no lint or wires get between the braid and the central core.
There is no need to remove any more insulation or bend anything. Just insert and screw on the f connector from above.
Next, you lay out cables throughout the apartment in all the rooms where you have TVs. You sign them all too.
At the same time, it is much safer to run the cable directly into the device rather than connect it through a satellite TV outlet. This may be associated with either a loss of quality or a complete loss of signal.
The wiring diagram when using a multiswitch may look like this:
Signal setup
Signal quality is critical. When positioning the antenna, you should be guided by the maximum value of the quality parameter, even at the cost of reducing the signal power. If you find an antenna position with maximum signal strength and zero quality, it means the antenna is pointing at another satellite.
In this case, you should continue your search, first of all by changing the direction of the antenna. Once you have found the satellite you want, adjust the LNB settings to get the best quality.
Setting up a satellite dish:
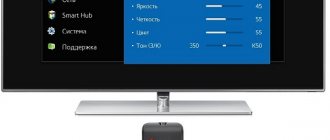
- After connecting the device, a start screen will appear on the TV screen indicating the signal levels (if not, you can open it by pressing F1 on the keyboard or I on the remote control). Typically these are two parameters: signal strength/power and quality (these parameters are also displayed on the displays of some set-top boxes).
Signal quality - The force parameter must have a value greater than zero. For example, this could be 50%, depending on the type of converter and the length of the antenna cable, which confirms the correct connection. The quality parameter for the first time will most likely be at zero, because “hitting” the satellite in the initial settings is unlikely.
- To fine-tune the signal, you need to manually rotate the antenna 2-3 degrees in the horizontal plane, monitoring the signal level, and then move the converter closer and further away from the antenna, observing the signal quality indicator. After this, you need to tighten the screws securing the antenna to the mast (they need to be screwed in one by one, controlling the signal parameters so that deformations of the antenna fasteners do not change its position). The antennas are attached to the mast with two screws, and after tightening them, additional adjustments to the angle of inclination may be required
- The process may take some time, so it is better to have two people do this - one turns, the other watches the signal level change. The optimal signal level for normal video playback is from 70%. After this, start an automatic search for TV channels and save the settings. Even if the antenna becomes damaged, you will not need to repeat the procedure again.
An important point: in the factory state, many decoders automatically activate the download procedure after startup. If there is no signal reception from the satellite, the first startup process will stop on the settings screen with the signal measurement results, or it will be preceded by the antenna installation selection screen. If the decoder has already been launched previously (for example, at the seller's office to check its functionality), the startup procedure will stop at the screen already mentioned above with the strength and quality parameters.
Principle of operation
Satellite works just like terrestrial television. The dish is used as a receiving device, and the satellite serves as a repeater. Therefore, for successful operation it is necessary to receive a high-quality signal and display the image on the screen.
Television broadcasts in analog format and digital standard. In the latter case, a digital signal of the DVB-S/S2 standard is transmitted, which must be decrypted before viewing. Only two devices can be used for this:
- TV tuner. A built-in TV decoder of digital information into a familiar image.
- Receiver. A separate device for decoding the digital signal and displaying the image on the screen.
Television supply
There are two types of programs broadcast from the satellite - open and encrypted TV channels. The latter are paid content, to unlock which you use an operator payment card inserted into the CAM connector.
From what has been discussed, we can conclude that in order to connect a satellite dish, you need two devices - a decoder and a CAM connector.
Technically, television is available even if you connect a dish without the above-mentioned equipment. However, only open channels will become available, and the image quality will remain at a low level, comparable to ATV. Therefore, to watch high-quality television, you need to connect both devices.
Software and programs for PCs and smartphones for setting up satellite television
Satellite Antenna Alignment
Using this free PC program, you can easily and easily calculate the azimuth and elevation angle for installing a satellite dish. The program is very easy to work with.
After launching the program, simply enter the latitude and longitude of your home in the “Coordinates of the antenna installation” section (you can find out by opening Google maps and entering your address). The left side of the screen will display the azimuth angles and locations for all possible satellites. Find the satellite you need and use the obtained coordinates. The program can be downloaded completely free of charge here: https://satellite-antenna-alignment.ru.uptodown.com/windows.
Advantages:
- many settings;
- completely Russian-language;
- works in all parts of the world.
Disadvantages: outdated interface.
SatFinder
A similar free smartphone app is called SatFinder. It allows you to configure a satellite dish using GPS navigation and operates in two modes:
- In camera mode.
- In "sight" mode.
In the first case, the location of the satellites is automatically displayed on the phone screen in the form of a special arc. All you need to do is point the antenna correctly.
In aim mode, the app will guide you using coordinates and arrows that will change as you move the antenna. If it is aimed exactly at the satellite, the arrows in the application will turn green. The application can be installed for free from the Google Play store https://play.google.com/store/apps/details?id=com.esys.satfinder&hl=ru&gl=US.
SatFinder program interface
Advantages:
- two satellite search modes;
- instant location determination via GPS;
- convenient interface.
Disadvantages: none found.
Dishpointer Pro
A good alternative application for a smartphone. It's not free, but it's considered one of the best satellite dish tuning apps in the world. It can be purchased for Android from the Google Play store https://play.google.com/store/apps/details?id=satellite.finder.comptech&hl=ru&gl=US.
Advantages:
- high-precision satellite identification;
- finding the user even in conditions with a poor GPS signal (using mobile operator data).
Flaws:
- the application is paid;
- menu in English.
How to set a satellite dish to 75 degrees
Let's consider, as an example, the process of setting up a dish on the ABS 75E satellite.
Initially we need to determine the azimuth (antenna direction):
- Open Yandex maps, enter the name of the locality in which the installation is taking place. We take the coordinates from there and copy them.
- Turn on the receiver and enter the coordinates in the “Satellite Guide” tab and click “Calculate”
- Now we know the azimuth and tilt angle of the antenna. We determine the direction using a compass and fix the plate on the bracket.
Now you need to configure the signal:
- We turn on the tuner and in the “Installation” section we find the ABS 75E satellite.
- We return to the antenna and begin to slowly move it up and down until we catch the signal from the ABS 75E. Then we scan the channels.
Installing and configuring satellite antennas on ABS 75E, the language is not Russian, but everything is intuitive:
Once the signal is picked up and the channels are located, you can fasten all the screws and connect the dish to the tuner.
Connecting a dish to a TV without a receiver
Connecting a satellite dish directly to your TV has both advantages and disadvantages. To connect, you need to connect a TV cable with an F connector to the LNBSatellite input. Immediately after this, you can configure the channels. On television devices of today's popular brands, such as Samsung, Philips, LG, etc., this process is very similar. Only the appearance of the menu and the names of items may differ.
After connecting the antenna, you need to turn on the TV, open the settings menu and select “Automatic channel search”. The satellite must be noted as the signal source. After this, the user will be able to select the desired satellite. Of course, to watch satellite TV you need an element such as a receiver. True, modern TV models are equipped with digital tuners. This tuner gives the user the opportunity to watch satellite TV without a receiver.
So, by going to the settings menu, you will need to specify which channels you need and which should not be shown. So, if the user plans to turn on and watch exclusively free channels, you should indicate that all encrypted channels should be skipped. Next, a search will be launched, during which channels are connected. Once it is completed, the user can immediately start watching satellite TV.
Setting up a satellite dish for 3 satellites Amos, Astra, Sirius Hotbird
Installing satellite television from three satellites will allow you to watch many free Russian-language TV channels (more than 90) and a huge number of foreign ones (more than 2 thousand). Standard equipment:
- satellite antenna,
- three Ku-band converters;
- two plastic fastenings for side converters;
- antenna masts or brackets;
- DiSEqС (Disek) - converter switch;
- F-type connectors;
- coaxial cables 75 Ohm.
Astra
Transponders for satellites Astra, Amos, Hot Bird
Use a satellite tuner (receiver), for example Openbox X800. In the tuner menu, open the “Antenna installation” item and independently set the frequency for the Astra satellite, which will become central in our three-satellite connection:
- H – horizontal polarization;
- V – vertical polarization;
- position – 4.80 E;
- frequency – 11.766 GHz;
- symbol rate (S/R) – 27500;
- error correction (FEC) – ¾.
The antenna must be oriented towards the location of the satellite. When doing this, you must ensure that the antenna is pointed at the correct satellite. To check, you must enter the transponders shown in the table and turn on any channel. If no channels appear as a result of scanning, then the antenna is not configured correctly and the setup needs to be done again.
Amos
Setting up the Hotbird and Amos satellite is that you need to find the correct position of the converter relative to the center one. To do this, you must move it horizontally and vertically until you find an acceptable signal level.
- position – 13E;
- frequency – 10.815 GHz;
- symbol rate (S/R) – 30000.
Hotbird
Connect the cable to the converter, then open the tuner menu and set the following parameters:
- position – 4W;
- frequency – 11.139 GHz;
- symbol rate (S/R) – 27500.
Then connect DiSEqC to the appropriate converter and set the port numbers for each satellite in the tuner. For example, in our specific case:
- the first port is the Astra satellite;
- second port – Amos;
- third port – Hot Bird;
- the fourth port is free.
The so-called dragon is a satellite dish tuned to the three popular satellites Amos, Astra and Hotbird
Diseqc connection
If you only have a dashcam, connecting and configuring satellites is carried out in the following sequence.
Remember that any self-respecting store of satellite equipment and similar systems always sells tuners already programmed for certain channels and satellites. Otherwise, competitors will simply drive him out of the market.
At the same time, when purchasing, be sure to ask the seller to write you the Diseqc ports of the switch, since they were set by him during the settings. It is through these ports that you will have to make all cable connections.
When installing, you first connect the cables to the heads, and then run them to the dashik. Just on it, it is advisable to connect everything initially with the “factory” tuner settings.
If you have any satellite in the receiver configured to the first port, then accordingly it should not go to port No. 1. If it is on the second one, then port No. 2 is also used in the switch, etc.
All input ports are always signed. The central single connector is the output to the tuner itself.
Tips and tricks
Choose a location to install the antenna - it should provide a view of the sky in a southern direction. Check to see if any of your neighbors use satellite TV. If yes, then point the antenna in the same direction as him. It should be directed to the Eutelsat 36B satellite and/or Express-AMU1.
It is important that there are no obstacles blocking the signal (wires, trees, buildings) on the path from the antenna installation site to the satellite.
The satellite dish installation procedure will be easier if you:
- take a second person as an assistant.
- The antenna installation location is within walking distance;
- the premises are your property, or you have permission to install an antenna system from the building manager;
- The distance from the antenna to the decoder is small (no more than 30 m) and there are not many obstacles on the way, such as walls or windows.