Latest articles
After calling our service center, the client voiced the problem.
Bosch washing machine does not drain water. Master. Electrical equipment often breaks down; one of the most pressing problems is the problem of shorting the CD drive. In these.
After falling, the display of the Xiaomi mi5s phone was broken. Let's look at how to replace the Modular Display on this series.
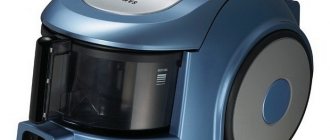
Simply Service Vacuum cleaners Samsung SC4520
Now we will fix the most common problems with Samsung vacuum cleaners.
In this case, the vacuum cleaner does not turn on. Most often the engine fails. Now we will start replacing it.
First, take out the dust container
Unscrew the four screws at the front of the case
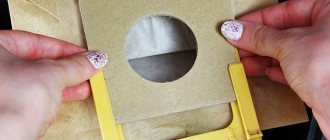
Next, unscrew the secret screw hidden under the film
Next, remove the cover of the vacuum cleaner
View of a vacuum cleaner without top cover
We take out the engine along with the casing
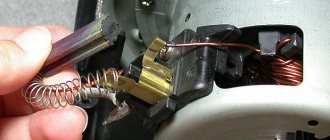
We remove the sealing rubber and pull out the faulty engine. Upon closer inspection, it turns out that its lamellas are burnt, one of the most common causes of malfunctioning vacuum cleaner engines.
We take a new engine purchased in advance and insert it in place of the old engine and assemble it in the reverse order.
If everything is assembled and connected correctly, the vacuum cleaner will work as before.
A vacuum cleaner always breaks down at the wrong time - a sudden breakdown can ruin plans and mood, and a malfunctioning device will cease to be an assistant in cleaning and will only add problems in the process. Let's look at how to disassemble a Samsung 1600w vacuum cleaner yourself, and in what cases you need to take it in for repairs.
The main problems of the Samsung 1600w vacuum cleaner
Have you noticed that the vacuum cleaner has started to work worse? If the device begins to suck in dust worse, makes louder noise and vibrates strongly, you should find the cause of the malfunction. Most models of Samsung vacuum cleaners in the mid-price category have a similar device, so similar reasons occur in most of them.
The main causes of breakdowns are:
- A drop in suction power can occur due to mechanical damage to the tube or hose, an object stuck in it, or a malfunction of the motor.
- Clogged filters. If the device has a special indicator, it will light up and you can clean the filter, but if there is no indicator, the main sign of clogged filters will be a decrease in draft and increased noise during operation of the device. In modern models, the filter can be taken out and cleaned very easily.
- The device does not turn on at all or works intermittently. The hum of a working vacuum cleaner becomes intermittent, and it begins to smell of dust or burnt wires. In order to finally make sure that the vacuum cleaner is faulty, try reconnecting it to other sockets - if it still works, then the device needs to be disassembled and the cause of the breakdown is understood.
- The cord does not retract, the plug is faulty, the wires are exposed - this problem can be solved without disassembling the case.
After a brief diagnosis, it is necessary to disassemble the device to find the cause of the breakdown and, possibly, quickly eliminate it.
Common faults
The type and complexity of the breakdown may depend to some extent on the model of the device. But since, in general, the design of all Samsung vacuum cleaners has a fairly simple design, the types of breakdowns they usually have are the same. Troubleshooting work in different models is practically no different from each other.
Before proceeding with disassembly, it is necessary to conduct a thorough diagnosis and try to determine the nature of the malfunction as accurately as possible. This will eliminate unnecessary steps and save time. Often the cause of reduced performance of the vacuum cleaner is an overfilled container, a clogged hose or tube.
Doesn't turn on
When, after pressing the power button, the vacuum cleaner engine does not start, this means that there are problems with the electrical part. First, you need to make sure that the outlet itself is working properly - connect other household appliances to it. If the outlet works, you can begin diagnosing the vacuum cleaner. First of all, you should carefully inspect the device cord for kinks, cracks, and abrasions.
The cable may also burn out, and it will not be possible to determine this by probing with your hands. An electrical tester will help here. You need to disassemble the plug of the vacuum cleaner and “ring” the wires. It is quite difficult to visually find the location of the burnout - if the darkened areas are not visible, then a complete replacement of the entire cord will be required.
Doesn't pull well
The most common cause of poor draft is the formation of a blockage in the tube or hose of the device. You need to disconnect the hose from the vacuum cleaner and remove the metal pipe from it. Hold these elements up to the light; if a blockage is detected, remove it with wire or another similar object. For convenience, the hose can be laid flat on the floor or pulled out in your hands. If the tube is dismountable, disconnect all components, including the brush. The telescopic pipe must be pushed inwards all the way.
Often, blockages form in the structure of the brush itself; they are difficult to detect there, since the brush has a curved shape. In this case, you need to disassemble it, unscrew the mounting screws, inspect and clean the inside. Particular attention should be paid to turbo brushes - they quickly become clogged, wrapping hair and threads around themselves, which then attract small debris. To clean them, you need to unscrew the plastic fastening screw from the end of the brush, remove and clean the inner rod.
Poor traction can also be caused by a broken hose - the formation of cracks. This happens when housewives are too lazy to bend down to carry the vacuum cleaner, and they pull it by the tube, dragging it around the room. If such cracks form, a complete replacement of the hose will be required. You can wrap the cracks with electrical tape or stick a soft rubber patch on them, but this will only be a temporary solution, since the crack will grow over time.
Often the cause of poor traction is a simple clogged filter or an overfilled dust container. It is necessary to empty the dust container (the cloth bag can even be washed), thoroughly clean or replace the removable filters if cleaning is no longer possible due to their long service life. If, after all the procedures performed, the traction does not improve, it means that problems have arisen with the device’s engine - its speed has dropped. It is necessary to dismantle the unit and identify the cause.
READ MORE: Bathroom drain: design and installation
Noisy and vibrates
The cause of extraneous noise in vacuum cleaners with a plastic dust collector is often a large object that has fallen into the container: a metal nut, a bead, a button. Therefore, the first thing you need to do is clean the dust collector and check it for internal damage (chips, punctures, cracks). In vacuum cleaners with a garbage collection bag, the same foreign object may make noise if it is inside the body outside the bag. You need to open the lid, remove the bag and carefully inspect the inside of the device. However, there are more serious causes of noise.
- Damage to the fan or its seats in vacuum cleaners of vertical models. You need to disassemble the case, try to balance, lubricate or replace the fan, depending on its condition.
- In washing models, extraneous noise can be caused by a worn-out pump that pumps water into the hose - only replacing it completely will help here.
- Unnatural noise and rattling may occur due to broken bearings in the brush of the device. Then you need to unscrew the end cap and remove the working shaft. Holding one end of it with pliers, unscrew the end mounting bolt, inspect and, if necessary, replace the components: bearings, boots, seals, gaskets.
- In some models, the working shaft in the brush is fixed with a special belt. When the belt wears out or breaks, the shaft inside the structure begins to hit the housing. It is necessary to disassemble the brush, try to tighten or replace the belt.
In most cases, the vacuum cleaner vibrates and hums unnaturally due to problems with the engine. The reason may be a broken seat for the electric motor shell. Then the repair will be relatively simple - you can wrap electrical tape around the metal shell so that it fits more tightly to the body of the vacuum cleaner.
Features of disassembling the vacuum cleaner
If you need to clean or replace filters, remove blockages in the hose, it is enough to perform partial disassembly and fix the problem. However, if the reason turns out to be more serious, you will need to completely disassemble the device.
In order to disassemble the Samsung 1600w vacuum cleaner model sc4520, you will need special tools that can easily be found from any owner. These are pliers, flat-head and Phillips screwdrivers, an awl, sandpaper, a construction knife and a vice. If you decide to replace any of the parts yourself, you will need a new part of the same type and fasteners for it.
Repair instructions for various breakdowns
The Korean corporation Samsung occupies one of the first places in the world in the production of all kinds of cleaning equipment. It produces all types of vacuum cleaners: industrial, construction, for cleaning companies, but the most popular are household devices for home use. These devices also have many varieties, for example, for dry or wet cleaning, washing vacuum cleaners, units with an aqua filter, and even robotic vacuum cleaners.
Samsung SC4520
A budget version of vacuum cleaners from the popular Air Track series (literal translation - “air path”), where a special plastic container is used instead of a garbage collection bag. For its price, it has a fairly good suction power of 350 W and a power consumption of 1600 W. There is no suction power adjustment.
Samsung Easy1500
The full model name is SC52-EO. A household vacuum cleaner with average suction power - up to 370 W, and power consumption of 1500 W. The device is equipped with a fabric bag for collecting debris and an additional filter installed in front of the engine impeller. The volume of the dust collector is 2.5 liters. The cord length is 6 meters, automatic rewinding system.
Samsung VC-5853
Inexpensive, medium-power option, great for cleaning small spaces. Equipped with a 2.4 liter waste collection bag, it allows for dry cleaning only. The power consumption of this Samsung vacuum cleaner is 1300W, suction power is 330W. Equipped with a built-in fill indicator. The length of the electric cable is 6 meters, the type of winding is automatic, the permissible range is 8.5 meters.
Samsung SC6570
A modern, bagless household vacuum cleaner. In it, debris accumulates in a special plastic cyclone filter with a capacity of 1.4 liters. It has a dust bin full indicator and a convenient telescopic tube on which the power regulator is located. The weight of the device is 5.3 kg. The length of the electric cable is 6 meters, the range of the vacuum cleaner is up to 9 meters.
Samsung SC6573
Compact and convenient household vacuum cleaner with a plastic dust collector (cyclone filter). Equipped with a telescopic sliding tube and container filling indicator. A power control mechanism is built into the handle of the tube. The device weighs 5.2 kg, the volume of the dust collector is 1.5 liters. Power consumption is 1800 Watts, and suction power is 380 Watts.
Samsung SW17H9090H
A universal vacuum cleaner with an unusual and stylish design that performs both dry and wet cleaning. Dust collector type – aquafilter with a capacity of 2 liters. The kit includes an additional HEPA filter and turbo brush. Sliding suction tube with built-in power regulator. The weight of the device is 8.9 kg.
This opinion is wrong. The plastic container itself is not exposed to moisture, and can even be washed under the tap after removing it from the device. But if the vacuum cleaner is not intended for wet cleaning, then its filters do not retain moisture, and it, even in small quantities, certainly gets into the engine of the device. Subsequently, this can lead not only to failure of the unit itself, but also to a short circuit in the electrical wiring in the room.
In each of the types of vacuum cleaner discussed above, various elements and components can fail. This depends on the design of the unit and the principle of its operation.
For example, most often users encounter the following problems:
- no traction;
- there is a foreign smell;
- The device does not turn on;
- a short circuit occurs, the plugs are knocked out;
- there is no cord fixation;
- suction power has decreased;
- noise and vibration;
- other.
Next, we will consider in detail what malfunctions most often occur in various types of products, and how to fix them yourself.
If your device has broken down and the warranty period has already expired, do not rush to take it to a service center. Perhaps the breakdown is simple, and you can repair the vacuum cleaner yourself without the help of specialists.
The examples of malfunctions presented below, methods for diagnosing and repairing them will help you independently solve this or that problem with the unit.
When such a malfunction is detected, the device produces a characteristic sound in the form of a hum. This indicates that the engine is running, but is not absorbing dust.
You need to pay attention to such elements as a hose and nozzles, a dust collector, filter mechanisms, and make sure that they are intact.
To do this, you should perform a number of actions:
- Check to see if the bag or container is full of trash.
- Separate all parts from the hose - brush, tube. They may contain debris that interferes with the free passage of air flow. If found, clean the accessories under running water or using a long knitting needle.
- If the reason is not in the hose, then the blockage has formed inside the device. Check all filters (exhaust, fine). If possible, read the instructions and rinse the fine filter and dry it. After this, install the part into the vacuum cleaner body and make sure it is working.
- Inspect the garbage receptacle carefully. Fabric bags must be washed or cleaned of fine accumulated dust, which clogs the cells and interferes with the free passage of air.
Other reasons for poor dust suction may be deformed gaskets, seals, or lack of a tight connection between the hose and the product body. A worn o-ring or broken vacuum regulator bushing must be replaced with new parts.
In another case, when air passes well through the tube and brush, but debris remains on the floor, you should check the height of the brush roller.
Try moving the roller a little higher or lower - experiment. Perhaps the roller is simply not adjusted and cannot fully perform its functions
If it is not possible to achieve ideal absorption of debris, then you will need to replace the nozzle.
If during or after cleaning the smell of burnt rubber appears and the engine stops working, then the reason lies in the winding. To do this, you will need to completely disassemble the motor, repair or replace the burnt armature or stator with a new element.
Engine disassembly instructions:
- Unscrew the bolts from the product body.
- Tilt the housing cover, move the coil and wires and remove the motor.
- Unscrew the side bolts and remove the rubber seal.
- Separate the housing into two parts using a screwdriver.
- Remove the motor from the protective housing.
- Bend the flanges and separate the part, releasing the turbine.
- Unscrew the bolt using a socket head, tightly fixing the stator and the rest of the structure.
- Unscrew all connecting elements and remove the brushes.
- Knock out the anchor using a wrench and a hammer.
READ MORE: Types of boiler houses by type of location in production
Check the serviceability of the bearings and, if necessary, treat them with oil.
It is not recommended to replace the winding yourself: after the procedure, dynamic balancing of the armature will be required, which is difficult to perform on your own
After disassembly, replace the failed elements and reassemble the part in the reverse order.
Have you noticed that when you repeatedly try to turn on the device, there are no signs of its operation? Then you should check the voltage in the outlet to which the device is connected, as well as the integrity of the power cord.
As a rule, the wire breaks where the cord is attached to the plug, resulting in no contact. If you find this problem, then you will need to completely replace the cord with a new one.
For repair you will need:
- Remove the back cover of the device.
- Unscrew the screws securing the diaphragm.
- Carefully remove it without touching the wires.
- Move the block with the gasket to the side.
- Remove the spring and check its serviceability.
- If necessary, replace wiring and damaged elements.
After the repair has been completed, reassemble the unit in the reverse order according to the instructions.
Faulty switches and internal wiring may also cause the breakdown. Another possible reason is the operation of auto-protection against overheating of the device. This technology prevents engine damage due to increased load during operation of the device.
The presence of a thermal switch allows you to prevent overheating of the device in time, and additional options eliminate the cause - for example, they clean the HEPA filter from dust particles.
How to disassemble a Samsung 1600w vacuum cleaner?
On the Internet you can find many step-by-step guides for disassembling Samsung vacuum cleaners. Most of them are based on the fact that it is necessary to find and remove the device’s engine and inspect it for faults.
- The device, previously disconnected from the network, is secured in a stable position. Disassembling the housing begins with removing the protective grille and filter and checking the degree of contamination. Dark plastic membranes on the grille indicate that the filter is very dirty and may need to be replaced.
- The next step is to remove the cyclonic plastic filter. Slide the special lever on the handle to the side and lift the plastic container out. Set it aside or immediately disassemble it by removing the soft filter from the compartment.
Necessary tools and instructions for complete disassembly
Review of the Samsung sc4326 vacuum cleaner: powerful cyclonic cleaner as standard
If a person has experience in handling household appliances, he can already determine the cause of a malfunction in its operation by sound. When the bag is full, the vacuum cleaner hums or makes a characteristic hissing sound. In case of more serious damage to the engine or board, its sound becomes intermittent, dust begins to fall from all holes, and the smell of burnt wires appears in the room.
Depending on the nature of the problem, you may need:
- two screwdrivers (phillips and flat-head);
- pliers;
- sandpaper;
- awl;
- wire cutters;
- vice;
- file;
- several connectors and spare wiring.
When replacing filters, screwdrivers are needed to remove the rear grille, which is screwed on with self-tapping screws. When working with a board or wiring, you cannot do without other tools.
The problem may be discovered during disassembly of the case. Fortunately, the cause of the breakdown is not always the engine. If the relay-regulator connector is loosened or the board is simply damaged, you can fix the problem yourself.
Step-by-step instructions for disassembling the housing of a vacuum cleaner:
carefully remove the grill; put it aside; take out the filter; Check the filter membranes: if they are light, it is clean. When contaminated, the membranes become dark; remove the filter out; Unscrew the screws using a screwdriver; remove the upper part of the housing; carefully disconnect the board connector from above; remove the board and casing; unscrew the round “protector”; remove the engine and inspect it for damage
Locks and fastenings on Samsung vacuum cleaners can be screw or in the form of latches. The screw fastening is removed by unscrewing six dowels in sequence. You will find two of them on the front of the lid, and four more on the other side of the case, at the end and at the handle. The electronic board that controls the motor is protected by a top cover secured with plastic clasps. You can carefully pry them off with an old DVD or card. If you have a plastic ruler, try using it to move the latches to the side, holding them with a disk. So, they will not be able to return to their previous position, and the lid can be easily removed.
Attention!
Samsung locks are very fragile, so you need to disassemble them carefully so as not to break them.
After “releasing” the control board, inspect it. If dust accumulates on the tracks, carefully clean, fix damaged connectors or replace the wiring in the right places. De-energize the system and remove the board. Before replacing wires, mark their connectors with a marker so as not to confuse them.
Vacuum cleaner repair
Not everyone can repair an engine on their own, and we strongly recommend turning to professionals if you do not have experience in repairing such devices. If you have such experience, try to disassemble the engine itself and try to fix the problem.
- First, remove the insulating layers, of which there are usually several. You should have the metal component of the engine in your hands.
- Visually check all engine elements for integrity and the presence of debris in the housing, then try connecting each of the wires one by one.
- If you find a break in one of the wires, strip both ends and select a suitable terminal for crimping.
After all these manipulations, reassemble the device, after which you will see how successful the repair was.
Repair of power cable
The power cord of the vacuum cleaner is plugged into the socket, but the vacuum cleaner does not turn on. And it doesn’t even show signs of life. This means we need to look for the reason in the voltage supply to the vacuum cleaner. First you need to make sure that the outlet itself is working properly. You can check the presence of voltage in the outlet using a voltmeter. This is the most correct method. If you don’t have a voltmeter at hand, you can use another, known-to-be-good electrical consumer. It could be a table lamp or something similar. If the socket is working properly and there is voltage in it, we proceed to repair the vacuum cleaner. The vacuum cleaner must be unplugged from the outlet and its power cord inspected. The wire usually breaks at the junction with the plug or the vacuum cleaner itself. If the fault is not visually found, then the vacuum cleaner will have to be disassembled. You can watch the video above on how to disassemble a vacuum cleaner. Next, check the integrity of the supply wire wires using an ohmmeter. If the wire is broken, it must be replaced with a new one. If the wire is intact, then use an ohmmeter to check the vacuum cleaner switch and so on to the engine. If necessary, repair or replace them.
Vacuum cleaner prevention
To avoid breakdowns in the future, you must follow the recommendations for proper use of the product.
- Check filters regularly and change them if necessary;
- Do not use a vacuum cleaner to clean sharp fragments, metal objects, large parts and pieces of fabric;
- If you detect a burning smell, smoke, or increased vibration during operation of the device, immediately turn it off from the network and inspect and clean the external filters.
- If there are serious problems, take the device for repair.
Compact vacuum equipment Samsung SC4520 1600w, equipped with a cyclone filtration system, is used to remove contaminants in residential areas or hotel rooms. The use of a multi-stage filter reduces the amount of dust and allergenic substances released into the air. The cost of equipment in chain stores of household appliances and electronics starts from 4.99 thousand rubles.
How to fix minor damage
In case of minor breakdowns, you can try to repair the Samsung vacuum cleaner yourself. Sometimes it makes an excessively loud noise or vibrates. Most often this happens due to the following reasons:
- filling the dust bag;
- filter clogging.
A diagram for disassembling the vacuum cleaner is presented in the instructions for its use. Emptying the dust bag is the easiest way, especially if it is disposable. In the instructions you can always find diagrams and tips that may be useful. If you don’t have the skills to repair household appliances, it’s not easy to understand the circuits, but if you have experience, it’s worth a try.
Most often people encounter the following problems:
- the vacuum cleaner loses power;
- its filters are clogged;
- It doesn't turn on when the button is pressed.
Loss of power: what is the reason
When the suction power of a Samsung vacuum cleaner drops, most of the dust and small debris remain on the floor. If this happens, check the tightness of the pipe, brush and corrugated hose. You need to disconnect the corrugation, remove the tube and nozzle and carefully inspect all the elements. Turn on the unit, blow out the pipe with the hose: perhaps a piece of paper or some other object has gotten inside. If the item is detected and removed, all that remains is to reassemble the vacuum cleaner, plug it back in and continue cleaning.
Weak traction can occur as a result of a hair or fur ball wrapping around the brush. After removing the lump, the operation of the vacuum cleaner is restored. Since any attachment is curved, debris can get stuck in the curved area. You need to proceed like this: carefully disassemble the brush, unscrewing the fasteners, then remove the foreign object from the bend and put the brush back together.
Before you start disassembling the vacuum cleaner, you need to check what power its regulator is set to. Maybe you accidentally touched the lever while moving the device around the apartment. If it turns out that the lever is at the minimum, adjust it and continue cleaning.
What to do if the filters are clogged
When the filters become clogged, the Samsung vacuum cleaner also pulls weakly and makes uncharacteristic sounds. Severe clogging of the filter system can be accompanied by a complete stop of its operation. First of all, you need to clean the cyclone filter, which is made of transparent plastic. As a rule, it has several compartments. There is a sponge in the container that also needs cleaning. In some cases, it is necessary to completely replace the filters and equip the engine with an additional protection system.
The diagram for disassembling and cleaning the filter looks like this:
- click on the button;
- carefully separate the container from the body;
- open the lid;
- remove the trash;
- Insert the container back into the housing and lock it with the button.
The vacuum cleaner stopped turning on
If your home assistant stops turning on, don't panic. You need to make sure that the plug is in the socket and that the socket is working properly. Don't forget to check the power control lever.
All vacuum cleaners from Samsung have LED indicators. If the device is working properly, the lights will light green. The red color lights up when the dust bag is full. Sometimes, after checking the socket, cord, and power regulator, the unit does not show “signs of life” after being plugged into the network. There has probably been a more serious breakdown that cannot be repaired without complete disassembly. Repairing household appliances with your own hands is possible if a person has experience in this matter.
Appearance
The Samsung 4520 vacuum cleaner has a pear-shaped body, tapering towards the front. The Blue version is equipped with an upper section made of glossy blue plastic. There are modifications with an upper part made of gray-white material. Additionally, there are decorative inserts made of glossy material in a dark shade. The lower bath is made of matte black plastic. There is a groove on the bottom for installing a brush when storing equipment in a vertical position.
Required Tools
The set of tools needed will depend on the type and model of Samsung vacuum cleaner. When disassembling and repairing, preventing or cleaning the device, as well as its individual elements, you cannot do without the following devices:
- Phillips and slotted screwdrivers - their sizes are selected in accordance with the type and depth of the screws;
- pliers;
- a stationery knife, or better yet a professional construction knife;
- lubricant;
- electrical insulating tape;
- electrical tester.
The type of work performed will largely influence the choice of tools. For example, to clean the surface of a suction hose before gluing cracks, you will need sandpaper and a degreaser (acetone, solvent). It is convenient to remove dirt on the shaft of the vacuum cleaner brushes with scissors, but to remove blockages you will have to use a long, stiff wire. For gluing cracks or chips on the body, universal super glue is suitable, but for moving parts, such as a hose, a more elastic adhesive material is needed.
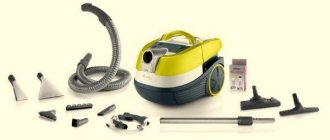
Equipment
The equipment is packed in a rectangular cardboard box, with slots for carrying on the side walls. The product is packed inside without damping spacers, so when purchasing it is recommended to inspect the elements for scratches and cracks that may occur during careless transportation. The body of the vacuum cleaner is wrapped in matte wicker, the remaining parts are located on top of the product.
The kit includes the following components:
- a vacuum cleaner with a dust container installed during product assembly;
- 2 metal sections of extension pipe;
- flexible hose with tip and switching connector;
- nozzle for removing dirt from narrow grooves;
- brush for cleaning floor coverings;
- small-sized brush for removing dirt from upholstered furniture;
- user manual;
- warranty card.
Disassembly sequence
The disassembly procedure is quite simple:
- Disconnect the device from the electrical network.
- Disconnect the hose with the nozzle from the body.
IMPORTANT! Carefully inspect the pipe, hose and pipe attachment (with a curved rim): often the vacuum cleaner stops working because large debris gets there.
- Unscrew the fixing screws and carefully remove the cover from the housing.
- Pull out the dust container.
- Remove all filters.
IMPORTANT! To check the degree of contamination of the filter, it is enough to inspect it: the dark color of the membranes indicates that the filter should be thoroughly cleaned (you can use a vacuum cleaner with a special attachment) or replaced. It is recommended to periodically clean and rinse the sponge filter after using the vacuum cleaner.
- Disconnect and remove the motherboard.
- Remove the motor casing and insulating covers.
More details in the video:
Functionality
The vacuum cleaner is designed to remove dust and small household debris from hard and carpeted floors. Collecting wet material and liquids is not allowed; moisture entering the motor will cause a short circuit. Do not clean surfaces contaminated with smoldering or hot waste or copier toner.
In addition to the standard brushes included in the kit, the user can use additional devices. The use of a unit with a brush rotating from an air turbine allows you to effectively remove hair and threads from carpet floor materials.
The vacuum cleaner is controlled using a 2-position button located on the body. There are no additional keys or indicator lights. The suction intensity adjustment is adjusted by a valve that covers the window on the handle. Some vacuum cleaners assembled after 2021 are equipped with a push-button switch that allows you to turn the motor power on and off.
Frequent malfunctions of Samsung vacuum cleaners
Vacuum cleaners from Korean and Chinese manufacturers have proven themselves to be reliable household electrical appliances. The cause of the malfunction after many years of operation may be hidden in the electrical part of the unit. Most often, with Samsung, the breakdown is hidden in the following nodes:
- jamming or breaking of bearings;
- erasing electric motor brushes;
- failure of the electronic unit;
- engine combustion.
Sometimes the cause of a breakdown may be a simply blown fuse on the electronic board. The part is easy to change, but this already serves as a signal of a possible more serious malfunction.
The reason for frequent shutdown of a running unit is the operation of the engine overheat protection. A simple problem lies in a clogged garbage container. The motor heats up due to overload and the protection turns it off.
The problem with the fuse and a dirty reservoir is easy to solve. In all other cases, the home assistant will have to be disassembled.
Technical data
The equipment is equipped with a 1600 W commutator motor; the use of a cyclone filter allows you to maintain stable suction power characteristics reaching 350 W. The motor is equipped with a special safety element that monitors the temperature of the parts. When overheating occurs, the power automatically turns off, protecting the product from damage. The warranty period is 1 year.
A cylindrical container with a front handle with a capacity of 1.3 liters is used to store dust. Inside there is a spiral element that swirls the air flow. Elements of pollution are thrown back by centrifugal acceleration to the outer edge of the container, and purified air is supplied to the engine filter. Some of the fine dust penetrates inside the turbine impeller and is fed into the outlet channel. The final removal of contamination is carried out by the Hepa element, which additionally absorbs allergenic substances.
Equipment technical parameters:
- body length - 400 mm;
- width - 280 mm;
- height (with handle folded) - 240 mm;
- power cable length - 6 m;
- weight - 4.3 kg;
- noise level at maximum performance - 80 dB;
- range - 9.2 m.
Reasons why Samsung SC 4520 vacuum cleaner is disassembled
Systematic care of the vacuum cleaner involves removing all components, from the cyclone, in the dust nest to the filters. At the same time, the compartment with the controls and the motor always remains closed, only purified air washes the engine housing, cooling it. We will have to gain access to this part, which is forbidden to the owner, by disassembling the Samsung vacuum cleaner model SC4520.
You should first carry out a complete diagnostic of the external components. Only after making sure that you can’t do without disassembling can you start opening the case.
- When you press the start button, the tool does not turn on. You need to check the condition of the network, whether there is current in the line, check the cord for a break.
- Loud noise can occur if a sock is stuck in the pipes or brush, the filters are clogged, or the hose is broken. Sometimes there is a whistle indicating a broken seal. This can cause the motor to heat up and reduce suction.
- The lines are clean, but the suction power is low, the device makes little noise, look at how the regulator is installed and whether the flap on the handle is open.
If you have established for sure that there are no external causes, remove the filters, disconnect the hose, twist the wire onto a reel and organize a workspace for disassembling the housing.
Reasons for entering a closed block:
- Loud noise with additional uncharacteristic sounds and low suction power.
- Failure of the start button, power control, cord winder.
- When communications are disconnected, filters are removed, the suction in the hose mounting socket is weak or absent, determined by applying a sheet of cardboard.
- The vacuum cleaner body heats up, the thermal relay is triggered, the smell of burnt insulation appears, and sparks are visible.
- The vacuum cleaner worked like a construction vacuum cleaner; you need to clean the internal cavity from dust.
Advantages and disadvantages
The Samsung SC4520 vacuum cleaner, according to customer reviews, has the following advantages:
- high suction power that does not drop when the container is filled;
- easy cleaning of the dust container;
- low cost of equipment and consumables;
- reliable design;
- Washable motor filter and container.
But there are also disadvantages:
- a stream of hot air blows away uncollected dust from the floor;
- there is no coupling for smooth adjustment of pipe length;
- there is no power regulator;
- from heating, the decorative grille of the air channel is deformed, which is no longer held in place by the latch;
- insufficient power cable length;
- fragile hose fastening elements;
- there is no brush with a rotating element;
- high noise level during operation;
- clogging of the hose at the junction with the handle;
- Deformations of the hose lead to the appearance of cracks.
How to repair a vacuum cleaner with your own hands
Review of the Samsung sc4140 vacuum cleaner: a durable workhorse without the bells and whistles
In order to repair all the elements yourself with a Samsung vacuum cleaner yourself, you need to determine the place where it formed. The motor may need to be disassembled if: there is a burning smell, poor dust suction power. Follow the sequence when removing the housing.
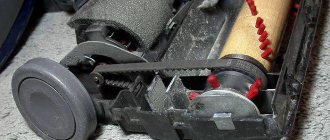
The hose in vacuum cleaners often gets clogged.
The cause of this breakdown is often poor performance of the brushes on the motor.
You need to pay attention to them. If the hose or brush is clogged. We clean them
First, remove the brush and check how the hose pulls without it
We clean them. First, remove the brush and check how the hose pulls without it.
You can replace the vacuum cleaner tube with a new one.
If everything is fine, then you need to clean the brush. If not, you can remove the hose and do the same steps. Often, a large item can get stuck inside: a chain, a watch. Clogged filters and waste container.
You do not necessarily need to replace the filters in your Samsung vacuum cleaner if the device begins to work poorly.
To determine, we take everything out and check the draft of the vacuum cleaner. If everything is in order, clean the filters. As for replacing and repairing the motor, here you need to evaluate your skills and abilities. An example of this could be a broken motor winding. To determine problems with it, you need to have the ability to use a multimeter.
The filter must be washed regularly and replaced every two years.
Only with its help can you identify the problem. Other problems that you can solve yourself include:
- Button failure;
- Broken wire in the extension cord;
- Poor contact at brush terminals and winding.
When it comes to engine repair, then you need to evaluate your strengths and financial capabilities. It's easier to buy a new component, although buying bearings is much cheaper if they are the issue.
Check the terminals on the brush.
Checking the motherboard
The control board in a vacuum cleaner does not look the same as in a computer. This is a triac. From the part to the motor there are 2 wires on one side and on the other 2 wires are attached to the socket. The triac itself is located between them.
Only a specialist can repair the motherboard.
Remove it and connect the motor to the wires from the outlet. If everything is in order, you just need to replace the board. Some owners use a vacuum cleaner without it.
Cleaning the vacuum cleaner
The vacuum cleaner also needs to be cleaned. Starting with the lint you use to vacuum, and ending with the insides. Empty your dust bag promptly, whether it's a reusable bag or a disposable one. If you were removing construction dust and it was clogged, after removing all the parts, you can clean the insides.
An odor may occur if the dust container is full and has not been emptied for a long time.
It is convenient to do this with another vacuum cleaner, but carefully. You should be careful with the boards. Do not use wet cleaning method
Do not use the wet cleaning method.
User guide
The SC4520 manual is printed on glossy paper and comes with documentation in several languages. The literature contains recommendations for assembling a new product, and there is a section devoted to the rules for safe operation of the vacuum cleaner. Common malfunctions and methods for eliminating them are also given.
The waste bin is cleaned after filling the container to the upper mark marked on the side wall.
The container is equipped with a removable plastic lid that can be removed to remove dust. The dirt is poured into a trash can or plastic bag. For additional cleaning of the unit, cold water is used; the unit must be dried before reinstallation. The container is placed in the cavity of the vacuum cleaner until the spring latch is activated.
To clean the motor filter, you need to remove the frame located under the hopper. The element is pulled out of the mounting socket using a folding plastic handle. To clean the sponge and dust filter, use running cold water; the use of detergents is not recommended. The parts are dried in the open air for 12 hours, then installed in the standard socket. Do not wash the element in a washing machine or force dry it on heating radiators.
The outlet filter, located on the rear wall, is cleaned by knocking out. Before removing dust, you must remove the product from the plastic frame; washing the filter is prohibited. Reinstallation is carried out until the latch lock clicks. The element is designed to capture fine dust and allergic substances; the product must be replaced at least once every 6 months.
Is it possible to fix a vacuum cleaner yourself?
Most of the models of household cleaning appliances from the Korean company are represented by designs that are relatively simple in technical terms. Accordingly, in most cases, repairing such products is also quite simple.
Obviously, the complexity of repair work is completely related to a specific unit or part. Thus, fixing a small break in a corrugated hose is much easier than replacing a broken electric motor bearing.
It is cost-effective to repair Samsung household appliances - vacuum cleaners. However, some individual repair cases require skills and the ability to hold a screwdriver, soldering iron and other tools in order to completely disassemble the device
Let's look at common malfunctions of Korean-made household vacuum cleaners and possible ways to eliminate such defects at home. It is logical to note: with all due respect to service workshops, the amount of payment for repairs in the service often approaches the cost of a new vacuum cleaner.
How to disassemble a Samsung SC4520 vacuum cleaner
Disassembly of the SC4520 equipment is required to clean the internal cavities from contamination or replace worn components. The upper section of the housing is held on the lower bath using screws located in the dust collector cavity and on the bottom. Additionally, there is a screw located next to the control buttons. The screw well is closed with a plastic decorative plug. After unscrewing the screws, you need to unfasten 3 latches located on the back of the case. When removing the cover, you need to disconnect the cables connected to the control button.
Inside the VCC4520 product there is a motor, closed on top with a plastic casing in guide grooves. The casing is connected with screws and latches. The motor brushes are equipped with separate housings and can be removed without dismantling the rotor. To replace the ball bearings or bore the manifold, you will need to remove the turbine impeller and unscrew the fastenings of the motor housing. Bearings are dismantled with a special puller; reinstallation is carried out using a mandrel and a hammer made of soft material.
Repair instructions for various breakdowns
The electric motor, as well as the outer cover, is attached to the vacuum cleaner body using screws. They are all located on top. Before dismantling the unit, you should carefully disconnect the wires leading from it to the vacuum cleaner switching board and speed switching. Then unscrew the screws and dismantle the metal shell in which the device motor is placed.
READ MORE: Thermite welding at home
After this, you need to remove the rubber O-ring located in the lower part - it is usually secured with bolts. The metal shell consists of two halves; you can separate them with a slotted screwdriver: insert its end into the slot and carefully separate the parts by running the slot along the perimeter.
Engine repair will depend on the type of failure. If the brushes are out of order, that is, worn out, they will need to be replaced. It will be necessary to unscrew the screws that secure the brush mounting boxes and dismantle the latter. Having purchased similar new parts from the store, install them in place in the same way.
A common engine breakdown is the failure of the armature or stator. Some of the lamellas in the armature usually burn out, causing engine speed to decrease and traction to deteriorate. The winding in the stator burns out. Both parts can be replaced with new ones by purchasing analogues in the store. Some models of Samsung vacuum cleaners do not require disassembly and repair of the motor - the unit is placed in a solid rolled metal casing. In these cases, only a complete replacement of the entire engine is possible.
The vacuum cleaner must be disassembled in a strictly defined order:
- First, remove the dust container and two filters: front and rear;
- Use a Phillips screwdriver to unscrew all the bolts under the removed filter;
- Now you need to remove the vacuum cleaner body. To do this, first raise its front part and only then the rest. The housing can be removed easily, without much effort;
- You can begin to do a little cleaning of the vacuum cleaner body and the electric motor housing. All dust is removed with a simple brush or dry cloth.
For convenience, it is better to perform cleaning work outside.
The next step in repairing a Samsung vacuum cleaner is to inspect and repair the motor of the device. To repair the motor of a Samsung vacuum cleaner, you first need to disassemble it. This is done as follows:
- Using a screwdriver, unscrew the two side bolts located at the top of the housing.
- Turn the body a little and look at the engine. If you try to remove it, you will find that the coil is preventing you from doing so. Carefully free the engine from its wires and disconnect all connectors.
- Carefully remove the coil wires so that the coil itself remains on the body, and remove the motor.
- After the engine is removed, you need to repeat the cleaning again.
- Now you need to remove the sealing rubber. To do this, you need to unscrew the two side bolts.
- Using a screwdriver, the two halves of the engine housing are separated.
- Next, the engine itself is removed from the plastic housing.
- Look at the top of the engine. You will see rolling. They need to be bent in the opposite direction. Then a screwdriver is stuck into any gap. Both halves are separated from each other. This way the turbine is freed from the housing.
- Using a 12mm socket, the bolt is unscrewed. What is important: the thread is left-handed, so when removing the bolt, it must be turned clockwise. In this case, you need to jam the engine stator with small wooden blocks. The entire structure must be supported.
- Now you can remove the turbine.
- Remove the washer and unscrew the two bolts.
- At the bottom you will find four more screws that need to be removed.
- Next you need to remove the brushes, after unscrewing all the bolts.
- We knock out the anchor. Insert the key into the hole and hit it with a hammer. The engine will jump out.
- Pay attention to the bearings. If they are in good condition, they can be coated with oil.
- Use tweezers to remove the boot. If the bearing spins with a rustling sound and remains dry, it needs to be cleaned and lubricated. You can use carburetor cleaner to clean it.
Reassemble the vacuum cleaner in reverse order.
Hose repair
In vacuum cleaners, you can easily eliminate a malfunction in the form of a burst of hose at the connection with the plastic connector. You can repair a vacuum cleaner hose yourself using copper wire, wire cutters, a screwdriver and pliers.
The vacuum cleaner has become a household necessity and has been used for a long time
If you need further assistance, please contact us. Thanks to many innovations and technological advances, the vacuum cleaner has become compact, silent and very easy to use, it is present in all households and allows for deep cleaning of the house depending on the needs of each person, vacuum cleaners and offers optimal suction, maximum filters or reinforcement accessories such like brushes. When purchasing, ask what your use will be to determine what type of vacuum cleaner you need. For example, people who are sensitive to dust or pet owners need some to have more filtration to avoid discharging particles, while others need a vacuum with quality accessories.
- Pieces about 8cm long are cut out of the wire.
- You need to form hooks from them, then use this wire to secure the hose to the plastic part and align it.
- We tighten the turns of wire and remove unnecessary excess using wire cutters.
- Sharp edges are processed using a file or sandpaper.
- The seam area is covered with tape or tape.
For another option on how to repair a vacuum cleaner hose, see the video below: