The service life of vacuum cleaners is on average 5-10 years, and warranty repairs provided by the manufacturer or distribution company are 1-2 years. During this time, equipment rarely fails. Exceptions are manufacturing defects, cheap and low-quality products.
Therefore, if the unit breaks down after the warranty period has expired, you have to contact expensive service centers. Agree, wouldn’t it be nice to learn how to fix some problems yourself? This skill will help when there is no time to wait for a master, and will also save the family budget.
Do you doubt your own abilities? We will help you cope with the problems that arise. In the article, we identified the most common breakdowns of different types of vacuum cleaners, and also provided detailed instructions for eliminating them.
In addition, we have listed the basic rules of operation and prevention, the observance of which will prevent the occurrence of any malfunctions in your device.
Malfunctions in different types of vacuum cleaners
Before you figure out what types of breakdowns most often occur in cleaning devices, you should familiarize yourself with the most popular types of units.
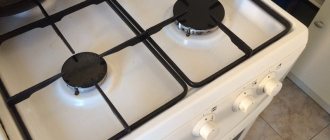
According to the specifics of cleaning, devices for dry and wet cleaning are distinguished. The first type is a more budget option, which is produced by almost all well-known brands - Samsung , Bosch , LG , etc.
Washing vacuum cleaners belong to the premium segment: their cost is much higher, but the functionality of the devices is also high.
With the help of such a unit it is possible to perform not only dry and wet cleaning of floors and furniture, but also to wash windows and use it as an air humidifier
Their design is similar to conventional dry cleaning devices, however, it additionally contains a water container, special nozzles and filters.
Based on the type of construction, the following types are distinguished:
- standard household - floor-standing appliances that move using wheels on the bottom of the case;
- vertical – battery-powered and corded units that provide comfortable cleaning due to their compact size and light weight;
- portable (manual type) – intended for cleaning car interiors, small rooms, cleaning furniture;
- robotic – devices with automatic cleaning programs without user intervention, controlled using a remote control.
Depending on the type of unit, dust particles and debris can be collected in a special fabric or paper bag, in a plastic container or a special container, passing through an aquafilter.
Features of repairing devices with a bag
The principle of operation of a unit with a dust bag is that air masses pass through it, then through an ultra-cleaning filter and the engine compartment. The HEPA filter used in such products not only traps dust microparticles, but also acts as a compressor.
Most often, in these models, filters are the main parts that fail most quickly.
If the device is not properly maintained or the bag and filter elements are not cleaned in a timely manner, the HEPA and fine filters become clogged, which reduces the suction power or leads to engine breakdowns.
Some models have a sensor function for determining the intensity of air intake: if problems are detected, the vacuum cleaner automatically turns off and the filter is cleaned.
If the device does not provide such technology, then you should independently monitor the quality of garbage suction. You should definitely be alerted to the appearance of a hum or overheating of the equipment body - this is a reason to check all the filter elements.
“Diseases” of units with a cyclone filter
The advantage of container models is the absence of the need to frequently replace disposable filters, quick cleaning of the waste container, high quality surface cleaning with additional air cleaning.
The maximum retention of microparticles occurs in the cyclone filter. Therefore, purified air masses, passing through the engine compartment, and then through the HEPA filter, do not clog it. Thus, the filter lasts much longer than in options with bags.
Users note that canister vacuum cleaners do not break down very often. Most often, problems arise with the mesh filter, which is located at the outlet of the cyclone.
During operation of the device, the filter element protects the fan motor from metal and sharp objects that could damage the integrity of the part. Therefore, you should definitely check that it is not clogged with debris before you start cleaning.
Types of breakdowns of models with an aqua filter
The dust collection process is carried out in this way: the incoming air beats the water in the container to small particles, removing it under the front visor.
Dust masses, together with a foggy vortex, continuously pass through the hose and settle to the bottom of the dust collector. Remaining dust particles pass through where moisture is trapped. Next, the purified air without water passes through the engine and cools it.
Having understood the principle of operation of the device, we will now consider the most common failures in its operation.
For a long service life of the vacuum cleaner, you must follow all instructions. It is recommended to fill the container only with purified or distilled water to the indicated mark.
It is also necessary to clean, rinse and dry all used parts. This will allow you to use the device without replacing the HEPA fog filter for 2 years or more.
If you use ordinary water and do not follow the operating instructions for the device, the filter will quickly become clogged. The filter element cannot be cleaned, but only replaced
Another problem is the failure of the fan motor due to burnout of the winding. This can be noticed if the unit begins to overheat, hum, the suction power of debris has decreased, and RCDs and automatic circuit breakers are knocked out. If a problem is detected, you will need to replace the faulty part.
How to repair an engine
As can be understood from the above, failure of the electric motor of a vacuum cleaner is classified as a rather complex malfunction. Typically, modern models use axial-type motors that have a rotation speed of about 20,000 rpm. This part is a design that requires special attention if repairs are necessary. To carry it out you will need to have the following tools:
- a pair of screwdrivers for various sizes of Phillips screws and a pair of flat-head screwdrivers;
- tweezers;
- wire cutters or pliers;
- bench vice;
- motor lubricant.
It should be noted that you should follow safety rules and under no circumstances repair the electric motor of a vacuum cleaner connected to the electrical network. If we talk directly about repairing the device, then to carry it out you first need to disassemble the device. Moreover, this should be done in a clearly established order:
- the container for collecting dirt, rear and front filters is removed;
- Unscrew the screws located under the filters with a screwdriver;
- we dismantle the device body, lift the front part and only after that the rest, the body is usually removed very easily;
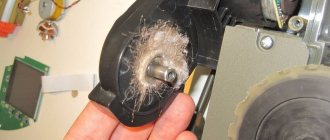
- Now we clean the body of the electric motor itself using a brush or rag.
The device should be inspected and further repaired; the latter process will be carried out according to the following algorithm:
First, use a screwdriver to unscrew a pair of side bolts that are located in the upper part of the case; turn it a little and inspect the motor (it will not be possible to dismantle it now due to the fact that the coil will interfere with this); carefully free the motor from the wires, disconnect all the connectors and remove the coil wires so that the coil itself is still on the body; Now we remove the engine, after which we repeat cleaning it from dust; Next, we dismantle the rubber seal, for which we unscrew a couple of side bolts; using a screwdriver, separate the two halves of the motor housing; now you need to remove the motor itself from the plastic housing; when examining the upper part of the motor, you can see the so-called folding, they should be bent in the opposite direction, and a screwdriver should be inserted into any gap so that the halves are separated from each other (this will free the turbine from the housing); using a 12mm socket, you need to unscrew the bolt (the thread is left-handed, so when removing the screw you need to turn it clockwise); the motor stator must be wedged using small wooden blocks, and the entire structure must be supported during operation; we dismantle the turbine; take out the washer and unscrew a couple of bolts; at the bottom there are 4 more bolts that need to be unscrewed; Next, remove the brushes, first unscrewing all the bolts; now you need to knock out the anchor, then insert the key into the hole and knock on it with a hammer; after these manipulations, it should seem to jump out; Now you should pay close attention to the bearings: if they are in good condition, they can be lubricated with oil; use tweezers to pull out the boot; If the bearing rotates with a sound that resembles the rustling of leaves and at the same time remains dry, then it should be cleaned and well lubricated (you can use carburetor cleaner to clean this part).
That's all. To complete the work, all that remains is to assemble the device in the reverse order. As you can see, repairing vacuum cleaners is a process that will depend on the complexity of the breakdown. If it is not too complicated, then you can easily do it yourself. If the problem is classified as quite complex, then it would be better to contact a specialist, since the intervention of a person with no experience can not only aggravate the problem, but also lead to injury. Especially if it concerns the electrical part.
You can learn how to disassemble the motor of a vacuum cleaner from the following video.
Repair instructions for various breakdowns
In each of the types of vacuum cleaner discussed above, various elements and components can fail. This depends on the design of the unit and the principle of its operation.
For example, most often users encounter the following problems:
- no traction;
- there is a foreign smell;
- The device does not turn on;
- a short circuit occurs, the plugs are knocked out;
- there is no cord fixation;
- suction power has decreased;
- noise and vibration;
- other.
Next, we will consider in detail what malfunctions most often occur in various types of products, and how to fix them yourself.
If your device has broken down and the warranty period has already expired, do not rush to take it to a service center. Perhaps the breakdown is simple, and you can repair the vacuum cleaner yourself without the help of specialists.
The examples of malfunctions presented below, methods for diagnosing and repairing them will help you independently solve this or that problem with the unit.
Failure #1 - the device does not suck up debris
When such a malfunction is detected, the device produces a characteristic sound in the form of a hum. This indicates that the engine is running, but is not absorbing dust.
You need to pay attention to such elements as a hose and nozzles, a dust collector, filter mechanisms, and make sure that they are intact.
To do this, you should perform a number of actions:
- Check to see if the bag or container is full of trash.
- Separate all parts from the hose - brush, tube. They may contain debris that interferes with the free passage of air flow. If found, clean the accessories under running water or using a long knitting needle.
- If the reason is not in the hose, then the blockage has formed inside the device. Check all filters (exhaust, fine). If possible, read the instructions and rinse the fine filter and dry it. After this, install the part into the vacuum cleaner body and make sure it is working.
- Inspect the garbage receptacle carefully. Fabric bags must be washed or cleaned of fine accumulated dust, which clogs the cells and interferes with the free passage of air.
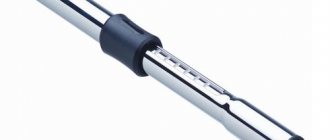
Other reasons for poor dust suction may be deformed gaskets, seals, or lack of a tight connection between the hose and the product body. A worn o-ring or broken vacuum regulator bushing must be replaced with new parts.
In another case, when air passes well through the tube and brush, but debris remains on the floor, you should check the height of the brush roller.
Try moving the roller a little higher or lower - experiment. Perhaps the roller is simply not adjusted and cannot fully perform its functions
If it is not possible to achieve ideal absorption of debris, then you will need to replace the nozzle.
Failure #2 - the vacuum cleaner emits a burning smell
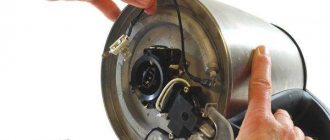
If during or after cleaning the smell of burnt rubber appears and the engine stops working, then the reason lies in the winding. To do this, you will need to completely disassemble the motor, repair or replace the burnt armature or stator with a new element.
Engine disassembly instructions:
- Unscrew the bolts from the product body.
- Tilt the housing cover, move the coil and wires and remove the motor.
- Unscrew the side bolts and remove the rubber seal.
- Separate the housing into two parts using a screwdriver.
- Remove the motor from the protective housing.
- Bend the flanges and separate the part, releasing the turbine.
- Unscrew the bolt using a socket head, tightly fixing the stator and the rest of the structure.
- Unscrew all connecting elements and remove the brushes.
- Knock out the anchor using a wrench and a hammer.
Check the serviceability of the bearings and, if necessary, treat them with oil.
It is not recommended to replace the winding yourself: after the procedure, dynamic balancing of the armature will be required, which is difficult to perform on your own
After disassembly, replace the failed elements and reassemble the part in the reverse order.
Failure #3 - equipment does not turn on
Have you noticed that when you repeatedly try to turn on the device, there are no signs of its operation? Then you should check the voltage in the outlet to which the device is connected, as well as the integrity of the power cord.
As a rule, the wire breaks where the cord is attached to the plug, resulting in no contact. If you find this problem, then you will need to completely replace the cord with a new one.
For repair you will need:
- Remove the back cover of the device.
- Unscrew the screws securing the diaphragm.
- Carefully remove it without touching the wires.
- Move the block with the gasket to the side.
- Remove the spring and check its serviceability.
- If necessary, replace wiring and damaged elements.
After the repair has been completed, reassemble the unit in the reverse order according to the instructions.
Faulty switches and internal wiring may also cause the breakdown. Another possible reason is the operation of auto-protection against overheating of the device. This technology prevents engine damage due to increased load during operation of the device.
The presence of a thermal switch allows you to prevent overheating of the device in time, and additional options eliminate the cause - for example, they clean the HEPA filter from dust particles.
Many models of washing units have a special relay installed that turns on when overheating of the device is detected.
If you notice that the vacuum cleaner suddenly turns off and its body is hot, then the relay has tripped. The device will turn on automatically after it has completely cooled down.
The reasons for overheating of the product are clogged filters, dust collector, air duct.
The most unpleasant reason for the unit not turning on is a breakdown of the electric motor. Therefore, the first thing to check is the brushes and commutator. Disassembly of the part should be carried out according to the instructions described above.
The collector assembly must be checked for moisture, which could cause a short circuit in the motor winding. If you find a damp environment inside, you will need to dry everything thoroughly.
A short circuit in the commutator compartment is also possible due to graphite dust from the brushes. To eliminate it, you will need to clean the collector with a brush and cloth.
Failure #4 - problems with battery charging
Battery devices also tend to malfunction sooner or later. In addition to mechanical damage, breakdowns of electric brushes and other accessories, users most often note rapid battery discharge, prolonged charging, or loss of dust suction power.
The reason lies in the battery pack. Depending on the frequency of use of the product, the battery must be replaced after 2-3 years. During this time, the element completely uses up its resource, and repeated charging no longer gives any results.
The suction power of the air flow decreases as the battery capacity decreases.
If you notice these malfunctions in the operation of the wireless unit, then it’s time to buy a new battery. The battery can be purchased at a service center or ordered from an online store
Replacement should be carried out carefully: opening the product case, disconnect the broken battery and install a new one in its place.
If you notice problems with the battery within 1-2 years of operation, this is a reason to submit the equipment for warranty repair.
Failure #5 - problem with fixing the power cord
In corded vacuum cleaners, a malfunction of the winding drum often occurs: the cord does not retract when the button is pressed or is constantly wound up while the device is operating.
The cause may be a burst, stretched or slipped spring. To check if this is so, you need to press the button several times from different sides
If a malfunction is detected, repairs should be carried out in the following order:
- Remove the product housing cover.
- Remove the drum and coil spring of the lever with bushing.
- Remove the brake roller and lever.
- Replace deformed elements - coil spring, support, etc.
- Adjust the tension of the cord in the drum.
- Assemble the drum and install it in place.
- Check the functionality of the stopper lever.
- Assemble the vacuum cleaner by attaching the housing cover.
After complete assembly, you should make sure that the auto-winding mechanism is working correctly.
Failure #6 - decreased suction capacity
Reduced traction can be caused by a clogged dust container, dirty filters, engine problems, or a faulty hose. Another reason is corrosion processes in the connecting cord retracting mechanism.
Which, due to long-term operation of the device, can cause periodic malfunctions and also reduce the suction power of dust masses.
You can restore the correct operation of the unit in this way:
- Remove the back cover of the product.
- Sand the contacts using 20-grit sandpaper.
- Treat them with a cloth moistened with alcohol.
- Using the same procedure, clean the slip rings in the drum mechanism.
- Reinstall the cover.
- Check for electrical contact in the winding mechanism.
After these manipulations, you will be able to use the device safely, and its suction capacity will be restored if the problem was hidden in the corrosion of the auto-winding unit.
Failure #7 - malfunction of the dust collector indicator
Jamming of the piston system of the mechanism and deformation of the indicator spring prevent its proper operation.
When the bag is full, the indicator may not work, which may cause the engine to overheat. This is fraught with even greater damage to the unit.
To repair a failed mechanism, you must:
- Remove the front cover.
- Remove the dust bag, filter, grille, ultra-cleaning filter and device handle.
- Unscrew the screw holding the indicator.
- Remove the indicator tube from the housing.
- Remove the rubber bushing and spring from the tube.
- Completely disassemble the entire mechanism in detail.
- Replace the deformed tube, plug, spring, and if there is a blockage, remove it using a sharp object and a brush.
- Assemble the elements one by one into the indicator housing and install it on the device cover.
Based on the results of the completed procedure, make sure that the indicator is working.
Failure #8 - broken brush in the washing unit
A malfunction of the wet cleaning attachment is a consequence of improper use of the device by the user. According to the instructions, the washing vacuum cleaner must be filled with water up to the mark on the tank.
When dry cleaning, the pump will run idle and for this reason its motor will fail. The pump is an integral part of the tank and cannot be repaired, only completely replaced.
The water and detergent spray tubes are located on the outside. When they are clogged, it is quite easy to determine visually: they are transparent.
To clean, you will need to pull the tube from the fitting and the spray mechanism, and then install it back. If a part is damaged, you can use any plastic tube of suitable length and diameter.
How to disassemble a vacuum cleaner
TOP 10 best robotic vacuum cleaners for the home according to customer reviews
Regardless of what kind of breakdown you encounter, in order to know its causes and why the vacuum cleaner stopped working, you should disassemble it.
Of course, each model has its own special device, but the following chain of actions will be an approximate general algorithm.
- It is necessary to dismantle the sealing grille, which is located under the cover of the dust collector area. It is secured with two screws or other threaded connections. You can unscrew the screws using a regular screwdriver.
- When the sealing grill has been removed, the control unit and the dust container cover should be disconnected.
- Depending on the type and model of the equipment in question, the dust collector should simply be removed or unscrewed. Under it there should be a garbage collection mechanism, under which the housing is connected to the motor of the device.
- To get to it, you need to separate the base and the body. In some models, this is done after twisting the hidden bolt, which is located in the handle.
- Usually the motor is protected by a special fabric-based gasket that is attached to the inlet of the receiving hose. The gasket should be removed and cleaned or, if necessary, replaced with another one.
- Now we remove the wires responsible for the power supply from the motor. To do this, unscrew the clamps secured with bolts.
- Now it will be necessary to check the bearing pairs that are responsible for the operation of the engine. The slightest evidence of wear is the presence of various irregularities and cracks. If there is something like this, then parts should be replaced.
Now let's move on to disassembling the motor. It should be said that carrying out such procedures requires experience in their implementation. Otherwise, it is better to contact a specialist.
The cover must be removed first. This can be done using a straight screwdriver, a strip or a ruler.
It fits quite tightly to the motor, so you can first gently tap it to disconnect it. This should be done carefully so as not to cause physical harm to him. When the casing is removed, you can access the impeller, which is held on by built-in nuts
They are tightly secured with glue, so you should have a substance such as a solvent on hand. There are 4 screws under the impeller that secure the motor. They should be unscrewed one by one. Once access to the motor is gained, its operation should be checked.
Note that a model that can also carry out wet cleaning will be more difficult to repair, due to the fact that it will also be necessary to carry out work with a water pump. Its main task will be to supply liquid to the dust collector, which is why the pump is usually mounted at the inlet.
Prevention of vacuum cleaner breakdowns
To increase the service life of equipment, proper care should be taken. Regular fault prevention ensures high-quality and uninterrupted operation of the unit, and also prevents sudden breakdowns or failures during use.
Periodic visual inspection of the device will allow you to identify worn parts and components and replace them in time. Timely replacement of spare parts is necessary in order to avoid more serious damage to other parts.
Preventative engine care
Caring for the electric motor and early diagnosis of faults prevents possible malfunctions in the operation of the equipment.
It is recommended to disassemble the engine once every 1-2 years, lubricate it, change gaskets, rubber seals, clean filters, and also change bearings when they wear out.
The vacuum cleaner should be disassembled in the following order:
- remove the trash container or bag, filter element;
- unscrew the housing cover;
- clean all parts and mechanisms from a layer of dust;
- Unscrew the bolts and disconnect the engine;
- disassemble it into parts, wash, lubricate, check the condition of the winding, brush-commutator assembly, bearings;
- if necessary, replace worn parts;
- Clean the HEPA filter.
Next, you need to reassemble the device in reverse order.
General recommendations for caring for the unit
Since the main function of a vacuum cleaner is to clean the room from dust, it must be regularly emptied of accumulated debris.
To prevent overheating and damage to components and mechanisms of the device, it is recommended:
- After each cleaning, check the cleanliness of the filters and clean them if necessary;
- Empty the dust bag and garbage container in a timely manner;
- store equipment in a dry place, preventing water from getting on the engine and internal parts;
- Avoid contact with sharp objects that could damage important components of the device;
- observe the operating mode of the unit and do not overheat it.
If problems with the device do arise, follow the above basic recommendations for troubleshooting vacuum cleaner problems.
Troubleshooting
It is not always possible to immediately understand that the vacuum cleaner is broken. For example, it buzzes a lot, but continues to work and perform its functions, which is why many people do not think that the device is broken. And this is already a breakdown, which will simply lead to failure of the device after some time. Of course, there can be quite a large number of problems, but usually the motor is the cause of a vacuum cleaner breakdown. Such a breakdown is typical for almost any brand and any model, regardless of the company that manufactured the equipment. Based on a number of points and subtleties of the operation of the vacuum cleaner, you can diagnose a breakdown and try to repair the equipment in question with your own hands:
- the first sign that the motor is not operating correctly will be that it is running loudly and that during operation a cloud of dust appears over the device;
- if the vacuum cleaner does not suck up dust well or does not pull at all, then this may indicate a problem with the hose;
- Another sign of a leak in the hose will be quiet operation of the device, and the essence of the problem may not be the deformation of the corrugation itself, but a malfunction of the receiving brush;
- if the suction speed is low, then the reason for the decrease in operating speed may be a problem associated with broken bearings, and from time to time the device will restore operation in normal mode;
- if the device is very noisy, then the motor is highly likely to have broken down; in some cases, the presence of a problem in the motor will directly affect the possibility of air masses being sucked in.
Of course, there are a lot of different problems; any one problem may have several causes, but the above situations allow you to quickly diagnose the presence of a problem and start doing something.
Smoke, short circuit, fire, knocked out plugs
The symptoms listed in the title of this section are evidence of a short inside your now faulty vacuum cleaner. More often this phenomenon can be observed when water is sucked in. Once water gets into the collector unit or onto the motor winding, it will cause shortening there. You need to disassemble the vacuum cleaner to dry it thoroughly. The internal elements of a vacuum cleaner are often located deep inside the structure, which does not provide access to outside air when the vacuum cleaner is turned off. Because of this, the unit can dry out even for a month!
If water did not get into the vacuum cleaner, then this is a short circuit in the collector unit. For example, graphite dust has clogged up there, which is formed from the brushes being used during their active use. After cleaning the collector from graphite, the problem will be eliminated.
Also, smoking or overheating of the vacuum cleaner occurs due to the destruction of the motor bearings or the “snail” air pump. You can find out about damage to the bearings by the changed sound when the vacuum cleaner is operating. You will hear a distinctive whistle appear, very different from the previous sound of your cleaning assistant. Later this sound turns into a nasty grinding sound. For the engine, this phenomenon means a greater danger of jamming. All sounds will disappear. Immediately after turning on, the vacuum cleaner will turn off in response to the overheating sensor, because when the electric motor is turned off, this device instantly overheats. Not everyone will be able to cope with replacing damaged bearings in a vacuum cleaner motor without experience in such work. Therefore, for those who are not specialists in engine repair, it is still better to send their irreplaceable assistant to the workshop.
Tips for proper use of the vacuum cleaner
Vacuum cleaners, more often than other household appliances, break down. Reason: the use in the design of commutator motors, characterized by an accelerated rotation speed. If you use a vacuum cleaner that does not have cooling, then pause after the vacuum cleaner has worked for a quarter of an hour. The presence of cooling will allow you to work for more than 15 minutes. This design feature gives you a couple of hours. Strictly adhere to the passport operating mode specified in the specific operating instructions. Engine heating also depends on the degree of dust in the filter.
To keep the device in good condition, you should ensure that the filter is cleaned regularly and stored dry. Avoid washing or getting filters wet, as this is a common cause of vacuum cleaners overheating. Vacuum cleaners require constant care: the grease in the electric motor bearings is changed once every two years, and the serviceability of the graphite brushes is also checked once a year.
What to do in case of the most common mechanical malfunctions of vacuum cleaners
If your vacuum cleaner does not work at all, or works with strange interruptions, then:
- check the outlet - this can easily be solved by plugging in another electrical appliance;
- check the condition of the connecting cord and plug (if you find a break, connect the ends and carefully insulate the connection);
- check the switch of your vacuum cleaner;
- inspect the connection contacts in the electrical circuit (the most problematic are the soldering areas, as well as the contacts at the points where the wires connect).
When the vacuum cleaner is running, does the dust suction be weak and the motor operates at a higher pitch? Try checking the hose - the most incredible objects may be there. They must be removed using a long, streamlined stick (a sharp stick can damage your vacuum cleaner!).