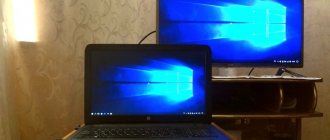
Hi all! Today we will talk about a very strange but interesting problem when you connect a laptop or computer to the TV using an HDMI cable, and on the screen you see the message “No signal”. The problem is not new and has several solutions. Most often, a connection error occurs either due to hardware problems: for example, when a cable simply comes off in some place.
In other cases, this usually indicates problems with the computer or laptop, and in particular with device drivers. We'll talk about all this at the very beginning. But first it will try again to output the signal and images to the TV.
Correct connection
The best way to fix something is to do it again, but this time correctly. So let's try to connect again, maybe you're just doing something wrong.
- Pull out the connected cable and plug it back into the HDMI port and immediately remember which one it is. I have it at number 2;
- We connect to any free port on the laptop;
- Or on the system unit of a personal computer;
- Now on the remote you must turn on the button that displays all connections to the TV. This could be a button labeled “Input” or “Source”;
- Now the following section will open in the menu, where all the ports and inputs are presented. Select the one through which you connected your laptop or computer;
- One more thing - on some TVs there is also a menu that indicates the type of device being connected. This is necessary to ensure that the image is of acceptable quality. Therefore, find the button to change the name and select “PC” or “Laptop”;
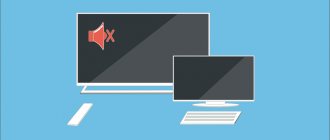
If there is no picture on the screen, but you still see this unfortunate inscription, then move on. Also, if there is still a picture, but no sound, then go to the last chapter.
Features of HDMI cables and the main causes of malfunction
The abbreviation HDMI stands for High Definition Multimedia Interface. This is a modern connector that simultaneously transmits audio and video. Almost all equipment is equipped with this interface. “Tulip” and other cables that were popular in the past are designed to transmit an analog signal. The HDMI cable broadcasts digital content with Full HD or 4K resolution (depending on version).
Therefore, if you need to connect a computer to the TV screen, then it is best to use this interface. The connector ensures data transmission in the highest quality and with minimal latency. Unlike other wires, HDMI simultaneously transmits sound and video to the TV.
The HDMI interface was introduced back in 2002. Since then, the developers have released many different modifications. They gradually increase the capacity of the cord. The developers try to timely add support for popular formats and many other useful features.
HDMI versions older than 1.4 support Internet signal transmission, 3D and 4K resolution. An Internet connection via HDMI differs from wireless Wi-Fi technology in increased data transfer speeds, as well as a more stable and reliable signal. The most popular HDMI form factors are:
- type A – classic version;
- type C – mini HDMI;
- Type D – micro HDMI.
The last two types are designed to connect mobile phones, cameras and other portable devices. What causes wire breakdowns? Mostly short circuits and mechanical damage.
No image
To see what output mode is set: you need to press the combination of the “Win” keys and the English “P” key. After this you should see a window like this. Choose one of the last three options. But the best ones are “Duplication” and “Projector Only”.
Try to disconnect everything you can from the TV. Including all sorts of TV receivers, USB drives. This also applies to connections via AV ports. In general, turn it off - that’s it!
On LG TVs, there is a function that allows you to manage connections. But she also gets in the way. Press the button with the house icon on the remote control, then select “Settings” - “Advanced.” Settings" - "General" - scroll down to the "SIMPLINK (HDMI-CEC)" function
Now set it to “Off” mode.
Screen frequency changes
Windows 10
- Right-click on the desktop. There should be two squares labeled 1 and 2. 1 is your computer or laptop, and 2 is your TV;
- Scroll and find “Advanced display options”;
- Now you need to go to the properties of the second display, go to the “Monitor” tab and set a friend’s frequency. If your TV operates at a frequency of 60 Hz, then set this. Sometimes you need to set it to 25 Hz to make it work on older TVs. Click “Apply” and “OK”;
Windows 7
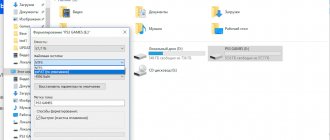
- Right-click on the desktop and select “Screen Resolution”;
- In the “Screen” line you need to select the second image. so that it is in front;
- Go to the “Advanced parameters” tab – “Monitor”, set the desired frequency and click “Apply”;
Correctly connecting the TV using HDMI
Home theater owners should know the truth - a digital media device has a playback source menu. The easiest way to illustrate the fact is with old stereo systems. Traditionally, devices had three blocks:
- Cassette decks: recording, playback.
- Radio broadcast reception.
- Laser discs.
Moreover, the blocks refused to play melodies simultaneously. It was necessary to switch sections using a special lever. Even a modern telephone is often equipped with an FM button... Can’t guess why the TV doesn’t see HDMI? Go ahead. The back of a TV typically contains half a dozen output jacks. Among the troops we will find a “tulip” formed by three petals, sometimes VGA puffs up, and certainly HDMI. Traditionally, the list is not limited to a meager list; see the instructions for more details. From the remote control, with the elusive press of a button (with only one HDMI port), you can select a source from the menu. The selection tool can be the Source key. You need to find a menu listing sources, select the cable connection port. There can be more than two HDMI connectors; it is important to track the correct number.
The computer usually avoids such tricks. There is no direct option to select the direction of signal transmission. However:
Fn+F3 or F4
- On laptops, the function keys Fn+F3 (F4) will open a pop-up system menu listing interesting options:
- Computer only. The image will not be sent to the external monitor (TV). Most people choose the named option. Don't be surprised that the TV can't see the laptop.
- Duplicate. The laptop screen will be duplicated by the TV. This is what most people need.
- Expand. Some people like to drag player and browser windows onto the TV, making it more convenient to watch movies. Let's be afraid to judge (tastes are individual), select the Expand option, lengthening the desktop.
- Projector only. The laptop screen turns off. The image will be displayed individually on the TV.
- Desktop personal computers detect TV independently. Otherwise, take the trouble to visit the driver menu and select the required broadcast port.
It is easier to control a connected TV using the desktop context menu. First, right-click on the free space, select the Screen Resolution option. Successful TV detection makes the “Multiple Monitors” button available. You will see four options that are exactly the same as the laptop options. Read the values above. It happens that the computer does not see the TV via HDMI: it makes sense to look here and look at the context menu. The monitors will be numbered; you can swap ports by simply clicking and selecting the object for changing system parameters.
There is no “Multiple Monitors” button in case of inconsistency: the system does not see the TV. Both devices must be turned on (230 volt power supply).
Driver Update
- Press the “Win” and “R” buttons. We write: “devmgmt.msc”;
- Go to the “Video adapters” section. There we find our video card, right-click and select “Update drivers”;
- At this moment you must be connected to the Internet. Next, select “Automatically search for updated drivers.” We are waiting for the driver to download and install. If the system said that the drivers do not need to be updated, then you can’t write off rejoicing, since this means that they simply do not exist on Microsoft servers;
- Therefore, we do it differently - go to the “Properties” of the video card;
- Next, go to the third tab and select “Equipment ID” in the properties;
- Copy the first value and go to the website – driverslab.ru;
- Paste the value into the search bar and click “Find”. Usually the driver will be the very first one - so download it. Next, open the archive and run the “exe” file
No sound
- In the lower right corner of the screen in the tray, find the speaker icon and right-click on it;
- Select “Playback device”;
- Now you need to select your TV, which should also be displayed on the screen and right-click, and then select “Set as default”.
If the sound does not appear, then you also need to update the driver for the video card, since the sound often comes from it. How to do this - I wrote above.