Necessary materials
To make a circular saw for your home from a drill, you do not need to use a special tool or involve an expert. If you have the desire and enough free time, you can do all the work yourself. To do this, you will need to prepare the following materials in advance:
- Wooden blocks with a section of 30x30 mm;
- ball bearings;
- plywood or OSB sheet;
- fastening hardware;
- door hinges.
In addition, you need to prepare a saw blade, a set of cutting bits for wood and a drill, which will subsequently be used as a circular motor.
For greater reliability, instead of wooden blocks and OSB sheets, it is better to use metal sheets and profiles. Due to the cost of rolled metal, the price of such a stand will be approximately 2,000 rubles higher.
The cost of consumables for the manufacture of a wooden machine is approximately 1,500 - 2,000 rubles, a drill with a power of 800 W is about 2,000. The price for a factory-assembled machine with similar productivity starts from 8,000 rubles, and the average is 13,000.
Other homemade machines
Many users are interested in what else can be done using improvised tools from a drill with their own hands? There are many answers - home craftsmen are already making various homemade products from drills in garage workshops. A drill is a universal tool, so with a certain skill and imagination you can make anything your heart desires.
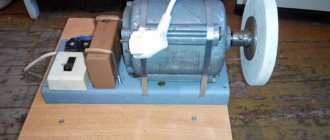
- A sharpener, you just need to buy some emery in the form of a circle and make a special holder in which the drill is attached.
- Drilling machine - there are special holders for vertical drilling or stand.
- Small lathe for wood processing.
- A mini-drill for various needs of the home craftsman.
- To easily mow the grass around your garden plot, you can make your own trimmer from a drill.
- A grinder from a drill is made quickly, just buy specific attachments.
- Garage auto repairmen install original engine replacement winches based on old, very powerful tools.
- Gardeners make holes for planting young trees using a homemade drill bit.
- When pouring the foundation for a utility room in the private sector, some users use a homemade vibrator made from a drill to quickly compact the concrete structure.
Tool selection
Using a drill as the power unit of a machine is a very profitable and convenient solution. The tool can be dismantled at any time and used for its intended purpose; in addition, it will be useful when constructing the machine.
Household drills are equipped with a low-power electric motor. Therefore, a machine with a power plant made from such a tool is suitable for cutting small-section bars, cutting sheets of plywood and OSB.
A screwdriver can be used as a drive. However, the power of its motor will only be enough to cut sheets of plywood or thin boards. Therefore, its use is advisable only in exceptional cases.
When using semi-professional and professional tools, you can increase the diameter of the saw blade and, as a result, productivity.
Making a stationary machine from plywood
There are many ways to make a stationary stand for cutting wood, we will look at one of the popular ones. The most inexpensive and easiest to manufacture is a machine with a wooden table. We will give a general manufacturing algorithm, but it is worth considering that each master makes it for his own needs, taking into account his needs. To make such a stand, you must perform the following steps:
- Apply markings to round the corners on one end of the wooden beam. It is also necessary to mark holes for the axles at the ends and in the center of the bar.
- Using the previously made markings in the center of the block, on opposite sides, use a wood saw to make recesses for installing bearings. Connect the resulting grooves with a through jumper.
- Drill holes in the end and on the edge of the beam according to the markings made.
- Press the rolling bearings into the prepared grooves. To do this, you need to install the bearing in the seat and mount them in place through a wooden plank.
- Determine the center of the mounting pin, which will act as an axis.
- Mount the pin into the mounting hole, accurately aligning it in the central position. Secure its position using nuts and locknuts. Install two profile washers on the installation side of the saw blade and secure their position with a nut.
- Prepare a small wooden beam. Drill a blind hole in one of its ends.
- From a sheet of OSB / plywood (depending on what you chose), cut two rectangular blanks. Place a block on the corner of one of them, with a drilled hole inward. Secure its position with screws.
- Using hardware, connect the prepared OSB/plywood sheets together.
- Connect the movable beam with the beam on the end wall of the future stand.
- In the OSB/plywood sheet that will serve as the other end wall, mark the position of the longitudinal groove. Its center should coincide with the center of the hole in the end of the movable beam.
- Use a jigsaw or other tool to cut a groove.
- Connect the base of the machine and the prepared OSB / plywood sheet with a groove.
- After this, screw a pin into the hole in the end of the movable beam. Screw a nut onto the protruding end. For convenience, it is better to use a wing nut.
- At the bottom of the movable bar, symmetrically to the center, install and fix a rectangular panel cut from an OSB sheet / plywood.
- Mount a metal half-clamp to the edge of the installed panel. It is necessary for fixing the drill, which will be used as a circular drive.
- Cut out the working surface of the machine from a sheet of OSB / plywood. To facilitate access to the saw blade, door hinges must be installed on one of the inner sides.
- Install the saw blade onto the drive shaft.
- Turn on the drill. Slowly lower the work surface to a horizontal position. In this case, the rotating saw blade will cut a hole in the slab necessary for work.
After the final stage, you can begin to work. Using the protruding pin, you can adjust the cutting depth of the workpiece.
You can view detailed instructions by following the link.
Another step-by-step manufacturing algorithm
If it is necessary to cut plywood, laminate or thin boards, you can make a household circular saw driven by a hand drill. To do this you will need the following materials:
- OSB or chipboard sheet;
- wooden blocks;
- working shaft from an angle grinder;
- metal sheet 1 mm thick;
- clamp;
- fastening hardware.
In order to make a mini sawing machine, you must perform the following steps:
- From a sheet of metal, a clamp and a drive shaft from an angle grinder, assemble an adapter for a drill. In addition, such a nozzle can be ordered on the Aliexpress website by clicking on the link.
- Mark the location for attaching the drill holder on the back of the working surface of the future work table.
- Secure the adapter using wooden blocks and countersunk screws.
- Make a groove for installing the saw blade.
- Install two rectangular strips on the longitudinal edges of the table and screw them to the work table of the machine; they will act as the legs of the machine.
- For safer use, a sheet of thick plywood or OSB must be screwed to the bottom of the table.
By watching the video below, you can familiarize yourself in detail with the manufacturing process of such a machine.
Step-by-step instructions for assembling a table for a circular saw
1. Manufacturing of the body. Sheet material for the body is cut to size: 400 mm by 800 mm. The parts are fastened using self-tapping screws and bars. It is better to carry out the assembly by first drilling out the external parts of the box. The result is a rectangular box without a bottom or lid. The upper part of the bars is subsequently used to secure the plywood sheet.
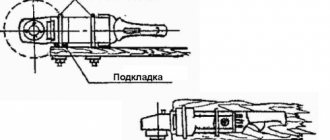
2. Preparing and securing the plywood top. Hole slot. First, a piece 800 mm by 80 mm is cut out of a sheet of plywood. Next, measurements are taken of the support shoe of the saw that will be mounted on the tabletop. Markings are made on the back side of the plywood. 2 central axles will be required. Without them, it is impossible to make accurate markings. Then marks are applied to the plywood corresponding to the dimensions of the support shoe. Then they take the measurements that the circular has: the diameter of the lower protective casing, its thickness, the maximum distance from the edges of the support shoe. In accordance with the obtained dimensions, place marks and cut out a rectangular hole using a jigsaw.
3. Attaching the saw to the plywood table top. First, 4 holes are made in the shoe. Diameter - 10 mm. Next, install the tool so that the working part fits into the cut hole. When the saw is level, you need to mark the location of the holes. Marks are made in the central part. In order for the tool to stand securely, you will need plowshare bolts with a countersunk conical head (M8) for fastening. To install them, you will have to take care of the high-quality recess of the cap; it can protrude by a maximum of 1 mm when not tightened.
The plywood is drilled from the outside, the diameter of the resulting holes should be 8 mm, and then a countersink should be made for the head. When the holes are ready, the saw itself is installed on the cutting table for the circular saw, the bolts are tightened from the inside using nuts with plastic locks or spring washers.
4. Fastening the tabletop to the body. Start button. First, holes are made at a distance of 30 mm in the corners of the plywood table top. Then a hole is drilled in the central part of the bars. The parts are connected using an M8 18 mm steel fitting. The usual “Start-Start” button is installed on the side. An electrical network is laid inside the case, and the button on the instrument itself is pressed.
5. Making a thrust beam. A simple table for a circular saw will become much more convenient if you equip it with a stop beam. The drawings contain all the necessary dimensions. The beam can be made from plywood and secured using full extension furniture rails. The resulting beam should slide above the surface at an angle of 90° to the cutting plane with a slight gap.
6. Stop for longitudinal cuts. It is made from aluminum cornice. 150 mm from the edges, first drill holes for the bolts, and then draw 2 lines from the place where the bolts are attached to the center line. At the intersection and further towards the bolts, 12 mm holes are made at a distance of 30 mm. The bolts from below are tightened with nuts. And along the drawn lines they make slits in the tonic; their width can be seen in the photo.
- Serious tool
- Assembly of a stationary structure
- Make other options
- Desktop instrument
- a necessary and useful tool in the arsenal of a home craftsman. It is especially necessary for those who work a lot with wood. To make a circular saw on your own, all you need is a great desire, the necessary tools and the ability to work with metal.
Factory-made screwdriver attachments
Today, there are factory adapters on the domestic market that can be used to turn a drill into a hand-held circular saw.
Their advantages include:
- Workmanship;
- Compatible with any type of drills and screwdrivers;
- Adjustment of cutting angle vertically and horizontally;
- Ease of use.
Despite the advantages, such adapters have a number of disadvantages. Among them are:
- Limitation on cutting thickness. This is due to the fact that such machines are adapted to a specific disc diameter. Increasing the thickness of the cut is possible only by purchasing a more efficient adapter;
- High cost, which exceeds the price of a home-made device several times;
- Expensive spare parts and their lack of free access.
Mini table saw
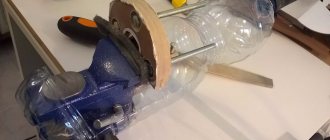
In the previous section of the article, we told you how to make a mini hand-held circular saw from an angle grinder, and now we want to share with you the secret of turning it into a stationary model for greater ease of use. This process is very simple and involves assembling a U-shaped frame for a circular saw from a pipe with a diameter of 14 - 20 mm with a movable cross arm. The structure is made so that its lower ends are bent horizontally along the direction of the cut, and they are attached to the table for a manual circular saw with bolts. The stability of the circular machine frame is ensured by additional supports, for which a swinging arm welded from a pipe in the shape of the letter “T” is placed on the horizontal jumper.
The mobility of the element is achieved by sawing the horizontal segment into two equal parts, which after installation are fastened with clamps . A circular saw is fixed to the vertical part of the frame with a clamp. An assembled hand-held circular saw table can function as a cutting machine if a standard cutting disc is installed on the grinder. It is worth noting that the through cut here will not exceed 80 mm, and to process larger lumber you will need a more serious homemade circular saw, which will be discussed further.
A selection of products from AliExpress
On the Aliexpress website, the buyer is offered various adapter options to choose from, with which you can turn a regular drill or screwdriver into a hand-held circular saw. The most optimal of them is a set consisting of a set of saw blades of various diameters and drive axle shafts.
In addition to them, the delivery set may include cutters of various diameters for cutting small grooves.
We present to your attention a selection of the 3 best offers that can be found on AliExpress.
- The best set in terms of price and quality ratio. The kit includes a disc with a diameter of 110 mm. Adapter, washer, nut and key for securing the disk. The best choice. View on AliExpress.
- The best set of different discs. The set includes 2 adapters and 5 discs (from 22 to 44 mm) for sawing various materials. Made of stainless steel. View on AliExpress.
- Another interesting set of 5 discs at a reasonable price. The set includes 5 discs with a diameter from 22 to 44 mm, differs from the previous one in price - slightly lower, because... Not many have been sold yet. So hurry up and buy. The quality is no different from the previous one. View on AliExpress.
Pay attention to the number of reviews, rating and price - hurry up to buy the nozzle while the discount is valid.
How to make a reciprocating saw from a screwdriver or drill
One day I needed a reciprocating saw. I thought about taking some simple, inexpensive one, but, as it turned out, there are no simple and inexpensive ones. Prices start at about 4 thousand. On Ali you can find such a nozzle for 1.5 with delivery.
I couldn’t find any in our large stores that sell tools. If you need a saber rarely and not in large quantities, this is quite an option. Plus, the output tool is wireless, which can be extremely convenient to use. According to reviews on the Internet, it performs its functions quite well for such a price.
sdelaysam-svoimirukami.ru
Imagine that you need to saw off a block of wood, but you don’t have a hacksaw at hand. Your favorite jigsaw is on another site or has broken down altogether, but the work process cannot be delayed. The situation is familiar to many, isn’t it? Most craftsmen know how valuable a working tool is at the right time. The work is in full swing, there are no delays, everyone is happy. It’s worse when it’s gone, and there’s simply nothing to replace it with. The homemade product we are considering today deserves attention, if only because it really helps solve the problem of sawing using a conventional drill or screwdriver. It is permissible to make it at home with your own hands. And this is not some disposable device. This is a full-fledged technical tool-attachment that expands the capabilities of the main electrical device, which, as we thought earlier, was intended only for drilling and tightening screws. With it, you can actually cut a block or even a board with a regular hacksaw blade and turn a regular drill into a reciprocating saw. Let's see how this can be done.
Operating principle of the saw
In fact, the torque of the drill does not go away. It is only transformed by a kind of friction transmission into reciprocating movements due to a crooked bearing. Its body slides between two small bearings mounted vertically on a small metal square. It is this element that sets in motion the canvas, which is tightened at its end into a special clamp. The nozzle is mounted on a shaft machined to a sufficient diameter for a drill or screwdriver chuck.
Making an attachment for sawing wood
Let’s make it clear right away that such a device cannot be assembled from improvised means. Most of it is quite accurately measured in size, machined on lathes and milling machines. However, if you doubt the capabilities of your workshop, they can always be made to order. Before starting work, it is worth making a drawing of this assembly, calculating the dimensions of each element and adjusting them proportionally. Our device is made entirely of metal, and therefore a vice is a must-have tool this time.
Making a shaft with a bearing
This element requires a metal rod. Its cross-section should be the same if possible, so it is best if it is turned on a lathe.
We clamp it in a vice, and approximately in the middle we grind off an oblique groove with a file as in the photo.
We turn the rod over to the opposite side and make a mirror groove, leaving a thickness of only 2-3mm to accommodate the bearing.
We place the bearing on the shaft seat, bored out with a file. We will need the most ordinary bearing - ball, single-row, open type. The mounting hole, as well as the diameter of the outer ring, will have to be selected experimentally.
Special clamps will help secure the bearing to the shaft. We make them from pieces of tube tightly fitted onto the shaft. These sections must be cut exactly to the angle of inclination of the bearing. To clamp onto the shaft, these tubes must be equipped with a hole with a screw for a small hexagon, similar to a stop for drills.
We fix these clamps by pressing them tightly against the bearing housing so that their walls only touch the inner ring.
We take four washers of a suitable diameter and place them in pairs on each side of the shaft. This will help reduce the friction of the shaft clamps on the side supports of our attachment during operation. The shaft and bearing are ready!
We equip the body of our device
Surely everyone understands that the shaft itself will not work separately. It requires supports on which it will rest and relative to which it will move. They should be like in the photo - two squares with holes for the free movement of the shaft on the side of the planes, and fastening holes with threads for bolts on the side of the ribs. This structure is assembled like this (photo).
We cover the structure with a small plate with four through holes along the edges and secure it with bolts. This will be the first case cover.
At this stage, our nozzle should look like this (photo)
On the opposite side we place two squares with mounting holes for bolts. They must be of such a size that the third square, which will be placed between them, can move freely relative to them.
The middle square needs to be prepared. We place two small bearings on it with screws. They will slide on the main large bearing mounted on the shaft.
We cover the squares with a lid similar to the first one and tighten it with screws. The nozzle is almost ready. You can see how the shaft and bearing move by pulling the middle square back and forth.
Making a tip for a reciprocating saw
In order to secure the hacksaw blade, an adapter-clamp is required. The tip proposed by the author has a square end groove. On the side of the planes there are clamping bolts for a hex key. When clamped tightly, they are recessed flush with the plane of the tip.
We place the clamp tip on the middle square and secure its position with a clamping bolt.
Now we insert the hacksaw blade into the tip and secure it with the next two clamping bolts.
To stabilize the work of the movable square with the blade when sawing, we add a stop angle (photo).
We fix it with two screws and center the groove on its edge relative to the blade.
The “reciprocating saw” attachment for the drill is ready. It is comfortable and safe to hold in your hands, and it takes up very little space. It’s really worth making such a tool for your workshop, since it can help out at the right time when sawing wood. All that remains is to try it in action and make sure of the wide capabilities of your instrument!
Safety precautions at work
The presence of electrical components and a rapidly rotating saw blade makes a circular saw a highly dangerous tool. Therefore, when working on it, you must follow the following safety rules:
- Use protective clothing and glasses to protect your eyes;
- Start cutting workpieces only after the saw blade has reached its maximum rotation speed;
- It is necessary to work on the machine cyclically. After 15 minutes of continuous operation, allow the tool to cool for the same period of time;
- Install the saw blade only in the direction of rotation of the drill spindle. To do this, there is an arrow on the side of the disk indicating the direction of rotation.