Samsung washing machines are reliable and durable household appliances, but there are simply no devices that would never fail.
If a breakdown occurs, parts need to be replaced, and for this the Samsung washing machine needs to be disassembled.
For information on how to properly disassemble and reassemble a Samsung washing machine, read the article.
Preparing for disassembly
Before you begin the main procedure, you need to perform several preparatory steps.
They include 3 main stages:
- Take the device out of the bathroom, as it is very difficult to disassemble it in a narrow room. In addition, the room should be well lit. The area of upcoming work should be covered with rags or newspapers so as not to spoil the floor covering (if the work is planned to be carried out in an apartment).
- Prepare tools.
- Prepare the device itself for upcoming repairs.
To completely disassemble the washing machine, you will need the following set of tools:
screwdrivers or screwdriver;- wrench and hex key;
- pliers;
- multimeter;
- hammer;
- colored markers;
- WD-40 lubricant;
- sealant;
- rag.
Sometimes it becomes necessary to cut the tank, for example, to gain access to the cross. In this case, you cannot do without:
- hacksaws,
- drills,
- drill,
- self-tapping screws and bolts.
You need to take care in advance about the possibility of taking photos or videos of the entire work process.
This will allow you to correctly assemble the device after repair. Preparing the machine itself involves going through the following steps:
- Turn off the power to the device. It is unacceptable to disassemble a machine connected to the mains.
- Disconnect the water fill and drain hose.
- Remove the drain filter and drain the water in it. If it is dirty, it can be cleaned.
- Place the device in a convenient place.
After all the preparatory work is completed, you need to study the diagram of the washing machine. You can learn how a Samsung washing machine works from this article.
What to do?
In some cases, the causes of this error can be easily eliminated on your own. This is possible if the problem arose due to a simple program failure, sticky buttons, or problems with the electrical outlet.
Program crash
The coordinated operation of the sensors sometimes fails and an overlay occurs. This causes the program to stall.
If the stoppage of the washing machine was caused by a software failure and is not associated with an electronic malfunction, it is enough to turn off the device from the network.
After a short time, the equipment is reconnected to the network. The sensors that previously caused confusion will restore their operation, and the washing process will be problem-free.
Sticky buttons
Any of the buttons on the control panel could be causing the problem. For various reasons, the button gets jammed (stuck).
The machine starts signaling an error if the power button is pressed for more than 12 seconds. For other buttons, the jamming time interval is 30 seconds.
Restore contacts by pressing and holding the problematic button for one minute. Clicking or alternately turning the button on and off also helps.
If these control parts jam frequently, another solution to the problem may help. To forget about sticky buttons, it is recommended to loosen the fastenings of the front panel. This will help the pressed plastic elements take a looser position.
Problems with electrical outlet
In rare cases, the washing machine stops working due to power failure. The socket may be to blame.
If its contacts are loose or it sparks due to overload, the household appliance can automatically turn off, protecting itself from serious damage.
The problem is solved by restoring the socket contacts or replacing the power point.
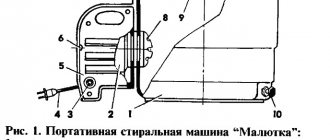
Samsung washing machine circuit diagrams
The design diagrams of Samsung washing machines may have slight differences, depending on the model. However, the general components are always the same. The diagram is shown in the figure:
The main elements of Samsung washing machines:
- the front panel, back wall, top cover and bottom of the device are all fixed with bolts;
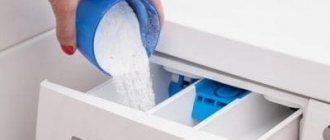
- pull-out tray for detergents;
- program panel;
- drum, coupling, tank;
- counterweights - most often there are two of them, they are located in the upper and lower parts of the washing machine;
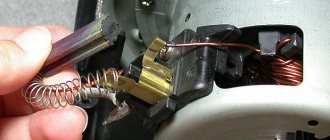
- engine;
- springs;
- pump;
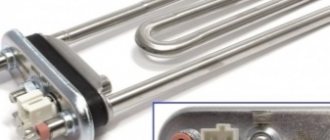
- heating element;
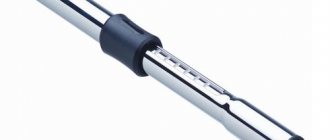
- pressure switch
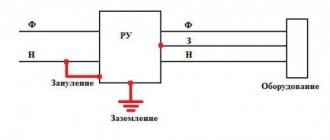
In addition to the main circuit of the washing machine, there is also an electronic circuit that is useful when checking the integrity of wires and components . It is shown in the figure:
How does automatic washing work?
The process is started by pressing the “Start”, “Start” button or something else designated. The water begins to flow through the fill valve while the drum rotates to more evenly wet the laundry. Some modifications of washing machines additionally have a device that supplies water from above the hatch to optimize this process.
As the tank fills with water, the pressure in it begins to change. Based on this parameter, a special sensor (pressostat), when the water level required for a specific amount of laundry is reached, sends a signal to the control unit about the need to stop its supply. The control module, in turn, closes the solenoid fill valve. During the pouring process, powder is washed out of the detergent dispenser and dissolved with water in the drum. If fabric softener is used, the moment it is taken out is determined by the installed program.
Under the control of the control module, at a certain moment, the soap solution is rinsed out several times. The most advanced automatic machines are often equipped with a water transparency sensor. Then rinsing will be carried out until the remaining powder and contaminants in the water are completely washed away. Everything ends with draining (the drain pump is turned on) and spinning by turning on the engine at a given speed (if the program without spinning is not installed).
Process Features
Depending on the type of load, the methods for disassembling washing machines will differ. If the procedure is performed for the first time, you must strictly follow the instructions so as not to damage the device.
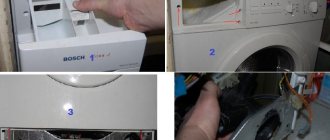
Front loading automatic machine
Disassembly must begin by removing the top cover. To do this, unscrew the 2 screws that are located on the back wall of the device. The lid is moved back 15 cm and lifted.
Further algorithm of actions:
- Removing the hopper and control panel. First you need to remove the detergent dispenser hopper. To do this, you need to press the latch located at the base of the hopper and pull the container towards you again. It will come out easily, no special effort is needed. Behind the hopper you can find fasteners holding the control panel. They are unscrewed: there are 2 screws in front and 1 screw is on the right. Separate the panel using a screwdriver, prying it off from the left side.
- Removing the front panel. You need to pull it by the bottom edge to release it from the top latches. Then the panel is carefully pushed towards itself, but without sudden movements. You can find a lot of wires at the back. You need to pull them out one at a time by snapping the latches.
- Removing the bottom panel. It is secured with 3 latches. It is convenient to pry it off with a slotted screwdriver by inserting the tool into the existing slot. First, it is pushed away in the center, and then along the edges, after which the panel easily comes off.
- Removing the front panel on which the door is located. It is fixed with 2 screws on the bottom and 2 screws on the top. They are being twisted. As a result, the panel will be held on small hooks.
Removing the seal.
If you open the door, you will find that it is connected to a rubber part. The fixing ring of the cuff is picked up with a flat screwdriver and slightly pulled towards you. Behind it there will be a tightening metal clamp in the form of a spring. You need to find its latch and unlock it using a flat-head screwdriver.Then they pass it around the entire circumference of the ring to disconnect it. You need to work with the tool carefully. Otherwise, the torn cuff will have to be replaced.
- Removing the rear panel. This process will not be difficult. It is enough to remove the 4 screws that secure it.
- Disconnecting hoses. They lead to the machine tank (fill and drain), to the pressure switch and to the powder tray.
- Disconnecting the wires leading to the heating element and temperature sensor. The heater itself is located in the front lower part of the tank, under the drum. To remove it, you need to unscrew the nuts. After this, the heating element will easily come out of the socket. When removing the wires, you need to mark their location with colored markers.
- Dismantling counterweights. There are 2 of them in the washing machine: above the tank and below it. They are fastened with bolts. Since the loads are heavy, they must be removed carefully.
- Help will be required to remove the tank. It's difficult to handle with just one pair of hands. First you need to disconnect the shock absorbers, and then carefully remove the tank from the springs and pull it out. After this, remove the belt and motor. Finally, remove the pulley by unscrewing the middle bolt. If it is rusty, lubricate it with WD-40.
- There are bearings inside the drum. To remove them, the tank must be disassembled. If it is soldered, it is sawed with a hacksaw. This process is very labor-intensive and not all craftsmen undertake such work. In this case, it is easier to purchase a new drum. Provided that the tank is collapsible, replacing the bearings will not be difficult.
By following the specified sequence of actions, you can completely disassemble the washing machine.
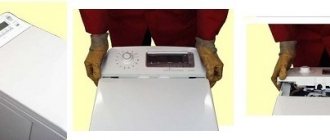
From vertical
It is more difficult to disassemble a top-loading machine. Such devices are rarely found in Russia.
The procedure is as follows:
- unscrew the screws located on the sides;
- move the block in your direction;
- disconnect all wires;
- remove the washing machine panel.
Further disassembly of the device is carried out in the same way as a front-loading washing machine: remove the tray, panels, and clamp. The process is completed by removing the drum, replacing or repairing failed parts.
How to recognize a breakdown: Atlant error codes
| Code | Decoding |
| Sel | The interface module selector is broken. This item needs to be replaced. |
| None | Increased foaming. This can be caused by three reasons:
In this case, you need to reduce the amount of powder, change the product or wash in other modes. |
| F2 | Thermal sensor failure. The sensor itself could “fly”, or the contacts or wires could fail. May indicate a breakdown of the heating element. |
| F3 | Malfunction of the thermoelectric heater (heater). The heating element needs to be replaced. |
| F4 | Damage to the drain pump (drain pump). There are many reasons for this breakdown: clogged or incorrectly installed waste water drain hose, clogged coupling, pump failure, malfunction of the electronics. Repair depends on the diagnostic results. The drain pump may need to be replaced. |
| F5 | The fill valve is the cause of the breakdown. There could be a blockage or a broken hose. The error also occurs when the pressure in the water supply system is low or the control module is damaged. Self-repair or in a workshop - it depends on the nature of the identified breakdown. |
| F6 | Electric motor failure. The motor must be replaced with a new one. |
| F7 | Electrical breakdowns. In some cases, it is enough to replace the interference filter, test whether there is voltage in the power supply, or replace the electronic board. |
| F8 | Too much water in the tank. Culprits: water level sensor (pressure switch), fill valve, wiring that could have burned out or contacts that have oxidized due to high humidity. Depressurization of the cylinder or malfunction of the controller are also quite possible reasons. |
| F9 | Tachometer failure. If you started repairs at home, you will have to check the wiring and contacts with a tester, and maybe replace the engine. A controller failure can also mean error F9, but replacing the module yourself is a difficult task. |
| F10 | Locking failure, which is also associated with board failure. |
| F12 | Motor triath failure. Requires engine or controller replacement. |
| F13 | It means a whole range of breakdowns. First you need to check the contacts and wiring, and if the cause is determined to be a module failure, you should call a specialist. |
| F14 | Software glitch. It is recommended to restart the program. In severe cases, the board needs to be repaired or replaced. |
| F15 | The machine is leaking. This is caused by a violation of the drum seal, wear of the cuff, drain hose, pipes or coupling. It is easier to determine the malfunction by localizing the location of the leak. |
| door | The lock is broken. Maybe you didn't lock the hatch properly. An error also occurs if wires come loose or the board burns out. |
Important! Self-diagnosis of SM Atlant is possible not only in models with an electronic display. In electromechanical models, an error is indicated by indicators flashing in a certain sequence or combination
Possible difficulties
When disassembling a washing machine, you may encounter the following difficulties:
The wiring is broken. When working with wires, you need to act carefully, as they are very fragile. If a break occurs, replace the damaged element.- The integrity of the cuff was compromised. To prevent this from happening, you should not try to remove it with sharp parts, such as a knife. Use a screwdriver carefully.
- The bolts have broken. If they are difficult to unscrew, you need to resort to WD-40.
- The pipes or pulley are broken.
To avoid minor troubles and additional expenses, you need to disassemble the washing machine carefully, slowly and trying not to damage the parts.
Everything about repairing Samsung washing machines is in this section.
Snail, filter, pump
A pump is a special pump that is used to pump waste water out of the drum after the pre- or main-wash process or rinse cycle. In Samsung washing machines you can find two types of pumps:
- synchronous;
- asynchronous.
The internal contents of the pump are standard: a motor and an impeller. A volute is attached to the top of the pump, to which a pipe and a drain hose are connected. In most cases, the pump fails due to foreign objects entering the system.
If there are coins, wrappers, small toys, etc. left in the pockets of clothes loaded into the drum, all this may end up in the drain pipe. Because of this, not only the filter and hoses become clogged, but also the pump itself. The garbage filter is installed in a snail, which is attached to the pump. As you can see, these three elements are very closely interrelated.
Hoses and wiring
The first hose to be removed is the hose from the inlet valve. You will need pliers. Take them and bend the clamp that secures the hose. Then remove the hose itself along with the clamp.
Do the same with the hose going to the pressure switch: loosen the clamp, disconnect the hose, clamp and cuff. Also disconnect the hoses going to the tank.
With wires everything is also easy. Disconnect them by pulling them out of their respective slots.
READ MORE: Washing machine shock absorbers: do-it-yourself replacement and repair