So, another big wash has arrived. Pre-sorted items are thrown into the washing machine, the required amount of powder is poured, conditioner or bleach is added, and a water softener is added if necessary. Select the appropriate program, press the “Start” button and…. after a while we discover that the drum in the washing machine does not spin. In this situation, the main thing is not to panic, but to determine at what exact moment the drum stopped rotating. This information will significantly help when diagnosing a breakdown:
- During the spin cycle, the items are damp or wet, but not soapy; the rinsing and draining function has worked. There is a high probability that the belt came off at maximum speed.
- When washing, things and the entire internal volume are covered in foam. Moreover, if the drum cannot be moved from its place by hand, then the reason is purely mechanical; most often, the movement is jammed by a foreign object. If the drum can be easily turned by hand, then the cause of the breakdown is in the electric motor or electronics.
There are several other reasons why the washing machine does not spin the drum:
- A foreign object has entered the space between the drum and the inner wall of the tank.
- The failed bearing is jammed.
- The belt drive from the electric motor has fallen off or broken.
- The brushes in the electric motor have worn out due to frequent use.
- The engine completely failed.
- Control module failure.
The main reasons why the drum of a washing machine does not spin can be domestic, mechanical or technical.
Household items include:
- Overload Many modern washing machines have a weight sensor and block operation if the limit value is exceeded. As a rule, an overload message is displayed on the display.
- Water pressure in the water supply. Almost all new models of washing machines are equipped with water pressure sensors. If the pressure is insufficient, the operation of the equipment will stop.
Mechanical damage is most often caused by foreign objects, which with minimal disassembly you can try to remove yourself.
Technical problems are caused by long and intensive use, as well as lack of preventive maintenance. As a rule, such damage and defects are quite serious and in most cases require the replacement of expensive parts and the involvement of specialists.
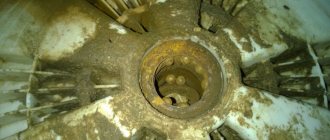
A foreign object has entered the space between the drum and the inner wall of the tank
If, when trying to spin the drum, a slight movement is felt, half or a quarter of a turn, then it is most likely blocked by a foreign object. Most often this is a bra wire.
Bra wire in drum
You need to carefully remove it with pliers. At the same time, do not swing from side to side, so as not to break off.
If a foreign object is not visible inside, it means it is stuck between the drum and the tank. To remove it from the bottom of the washing machine, perform the following steps:
- We unfold the washing machine so that we have access to the back wall.
- Unscrew the screws (bolts) holding the top cover and back panel. We remove these body elements.
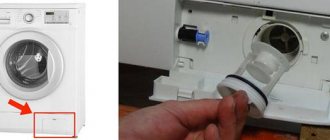
- We find the heating element, disconnect the wires from it and unscrew the lock nut. We remove the heating element.
Removing the heating element
We illuminate the hole with a flashlight. If a foreign object is found, remove it using pliers, bent wire or your hands.
IMPORTANT!
When installing the heating element back, we pay special attention to the tightness of the cuff fit.
If a blocking object is stuck at the top of the tank and it is not possible to rotate the drum so that it falls down, you must perform the following steps:
- We immobilize the pulley by wedging it with a wooden block.
- Unscrew the bolt from the shaft and remove the pulley.
- We hit the shaft with a wooden or rubber hammer. If you don’t have this in your tools, you can substitute a piece of wood to avoid damaging the thread.
- After the shaft and drum are pulled out, they will move a little, and the object that is jammed will fall down.
- Remove it through the mounting hole of the heating element.
How to remove and replace the drum
The most popular washing machines include models from LG, Samsung, Indesit and Ariston. They are distinguished by reliability, functionality and ease of repair. Each brand has its own characteristics, which are important to consider during the disassembly process.
LG
The main difference between LG washing machines and other similar units is the presence of direct drive. This causes some peculiarities when disassembling and replacing the drum.
How to remove the drum from an LG washing machine:
- The top cover is removed.
- Use screwdrivers to unscrew the rear wall fasteners
- The dispenser tray and control panel are pulled out.
- All elements of the hatch are disconnected from the front, including the O-ring. The cuff and the lid itself.
- The screws holding the front wall are unscrewed, then it is removed.
- On the front of the washing machine you can see two counterweights, which are attached to the tub with screws. You need to unscrew them and then remove the weights.
- The wiring of all upper parts is disconnected.
- At the rear, unscrew the central bolt of the motor cover, then you need to unscrew all the bolts holding the engine to the structure.
- After disconnecting all the associated equipment, the tank will simply remain hanging on special hooks. It needs to be lifted slightly and removed from the machine body.
- To remove the drum, you usually just need to knock on the corresponding tank sleeve.
After replacing faulty elements, assembly is carried out according to the same rules in the reverse order.
Samsung
When working with Samsung washing machines, you need to follow approximately the same instructions as for any other device. In this case, the top cover, front panel, back panel and all related elements are removed sequentially. It is important to disconnect all wires as carefully as possible, while recording their location in the photo.
There are counterweights located at the top and bottom of the tank, which can be removed using the appropriate key.
It can be difficult to remove the drum from a Samsung washing machine alone, so it is better to immediately ensure that you have an assistant. The design has many latches and hooks that prevent you from changing position. Before pulling out, you will need to disconnect the drive belt and remove the motor.
To replace the bearings, you will need to disassemble the washing machine drum. If it is soldered, then a hacksaw comes to the rescue. However, in this case, you will need to think additionally about the method of connecting the halves of the structure after repair.
Indesit
In their design, Indesit machines are very similar to Samsung models. It also uses a belt drive, and a set of two counterweights at the top and bottom of the tank.
The tank can be pulled out only after all elements have been disconnected from it, and it itself remains hanging on two springs. Indesit models use non-separable tanks, so to gain access to the drum and bearings you will have to use a hacksaw.
Failed bearing jammed
If the drum does not spin or turns with effort and at the same time makes very rustling sounds, then it is necessary to check the bearing. Replacing the inner bearing will almost always require more complete disassembly. This is a very long and labor-intensive process. In addition, it must be carefully documented - filmed on a phone, so that later you can put all the parts back together without any problems. If you are not confident in your abilities, it is better to entrust the replacement of the bearing to professionals, so that later you do not have to buy a new washing machine.
Change the bearing
If you still decide to take a risk, then follow the following algorithm:
- We disassemble the top and rear panels as indicated in the previous section.
- We remove the dispenser and unscrew the screws securing the control unit (the control panel does not need to be completely disconnected).
- Unscrew the hatch locking device.
- We wrap the cuff inside the drum.
- We unscrew all the bolts securing the front panel and remove it.
- Disconnect the counterweight from the tank. It can be mounted either with bolts or clamps.
- Turn off and remove the heating element. If the length of the wires allows this, the heating element does not need to be disconnected.
- We disconnect all pipes and wires from the tank, unscrew the mounting bolts.
- We remove the tank together with the drum.
- Unscrew the tank and remove the drum from it.
IMPORTANT!
At the moment, there are many models of washing machines with a non-removable tank. It is better to entrust their repair to professionals. Since at home it is impossible to carefully open the tank and then assemble it, restoring the required tightness.
Bearing replacement
The bearing is replaced as follows:
- We remove the seals.
- We knock out the bearing.
- We clean the seat and lubricate it with lithol.
- We install a new bearing and seals.
Cause and consequences of failure
The most common reason why a top-loading washing machine drum gets jammed is when the flaps open during the wash cycle.
The fact is that the drum of a top-loading washing machine has two metal doors, which must be closed with a special latch before washing. This latch is quite reliable, but over time it can still wear out and become loose, as a result of which during washing or spinning the latch breaks, the flap opens and eventually it turns out that the drum is jammed. The doors can open even in a working top-loading washing machine due to
user errors. For example, if a child gets to your home assistant and manually turns the drum while the doors are open. True, for such a case, the manufacturer provided a special stopper in the design of the washing machine, but it is also true that our children are very talented and have become accustomed to overcoming various obstacles from early childhood. If you open the flaps and then turn the drum so that the flaps are outside the barrier, you will not be able to open them, nor will you be able to turn the drum back.
Children are not the only ones who cause such unpleasant breakdowns. If an adult has stuffed a drum full of laundry and a piece of it gets caught between the parts of the latch, the flap latch will not close and the flaps will open during washing, creating a problem for you.
There may also be a manufacturing defect, so when you buy a new top-loading washing machine, make sure that the drum flap latch is in good condition.
What are the consequences of the drum flaps of a top-loading washing machine getting stuck? At first glance, this problem does not seem serious, but in fact, things can turn out very badly for your washing machine. The fact is that if the drum doors open during spinning at a speed of 1000-1200 rpm, they, like meat grinder knives, will chop everything they touch. What kind of damage does this lead to:
- the walls of the tank are damaged and water begins to flow out of the machine;
- the drum flaps are damaged (bent);
- The heating element bends and breaks.
It often happens that opening the drum flaps of a top-loading washing machine during a spin cycle immediately leads to the three above-mentioned breakdowns. Repairs in this case will be very expensive, you may even have to think about replacing the washing machine. Here are the consequences of the seemingly banal opening of the drum flaps during washing, so be extremely careful and do not allow this to happen in the future, but if trouble has already happened, then we will look for a way out.
The belt drive from the electric motor has fallen off or broken
One of the common reasons why the drum does not spin is damage to the drive belt. It is worth noting that even if the belt just slipped off, it is so worn that it will soon require replacement. Returning it to its place and further operating the washing machine is nothing more than a temporary measure until a new belt is purchased and installed.
To gain access to the drum drive and pulley, you need to remove the back wall of the washing machine, as described in the first section.
Models of washing machines equipped with an asynchronous motor use V-belts. When buying them for replacement, it is recommended to pay attention to belts made of chloroprene rubber reinforced with polyester cord. Such products are characterized by high strength and wear resistance. They are also elastic and do not lose their properties for a long time at high humidity and constant temperature changes.
The V-belt is very tight. After proper tension, even if you press hard on the belt, it should not bend more than 0.5 cm. Some models of washing machines have the ability to move the electric motor along vertical guides in order to adjust the tension force. If such a possibility is not provided for by the design, then the belt weakened during operation must be replaced. It is installed in the same way as a bicycle chain. The lower part is wound on the pulley, and the upper part is partially placed in the groove of the drum. The pulley rotates and the belt itself settles into the groove
The V-ribbed belt is used in washing machines with a commutator motor. Its working surface has teeth. Therefore, it requires careful positioning during installation. The motor pulley and drum must be installed in a certain position. These parts have a marking line that must match. The tension of a V-belt is noticeably weaker than a V-belt, so it is much easier to install.
Common washing machine problems
If unloading does not help, and the drum is still standing in place, then you should pay attention to the points listed below.
There is a foreign object in the drum of a front-loading machine that is preventing it from moving. It is impossible to turn the drum manually - there is clearly some kind of interference.
You can often deal with this problem on your own. But often it is necessary to dismantle the front panel in order to get to the object blocking the operation of the machine.
The rotation of the drum depends on the presence and degree of tension of the drive belt. It is he who transmits rotation to the drum from the electric drive (motor). Belt wear, weakening or rupture can occur both from intensive use and from prolonged inactivity. If the machine is not used for a long time, the belt material will dry out and crack.
In addition, the belt may simply fly off the pulleys, and it will be quite enough to return it to its place. You can also replace or install the belt on the axle yourself by removing the rear panel of the machine body.
Wear of motor brushes. As a result of erasing the brushes, the necessary contact is lost and the supply voltage is not transmitted to the windings.
When the washing machine operates, the graphite brushes gradually wear out, so they become shorter. Over time, the brushes become so small that they no longer tightly touch the commutator lamellas, which is why the engine power first becomes unstable and then disappears altogether.
Motor brushes are worn out
The next breakdown manifests itself externally as follows: when washing with a load, the motor of the machine does not turn the drum and runs jerkily.
Motor brushes
As a rule, this effect is achieved after prolonged use of the washing machine. The reason is worn brushes that do not reach the motor commutator. Accordingly, the electromagnetic field weakens or completely disappears, and the rotor stops rotating. The service life of brushes under normal intensity of use is 5-7 years. If replacement is necessary, always buy and use a pair of brushes.
Replacing the motor brushes of a washing machine is carried out as follows:
- The washing machine is partially disassembled: remove the top cover and back panel to gain access to the engine.
- The power supply terminals are disconnected from the electric motor.
- The mounting bolts are unscrewed and the engine itself is removed.
- The bolts holding the brushes to the motor housing are unscrewed.
Brushes on an electric motor
Before replacing brushes, they must be carefully inspected and measured. If the length is at least 15 mm, then they are quite functional. This means that the engine failed for other reasons. When replacing brushes, you must first clean the commutator in the areas where they contact to remove black deposits. For this, fine sandpaper is used.
Reasons why the washing machine drum stops and how to eliminate them
The control module is broken
The drum may remain motionless due to the lack of a signal from the “brain” to start washing. Most often, the control board fails due to voltage surges or natural wear.
Electronics fail for several reasons:
- the supply current parameters deviate from the permissible limits;
- low-quality elements of electrical circuits;
- violation of contacts;
- natural wear and tear;
- program failure.
Initially, you should try to reset the programs. Some washing machine models have a self-test function; by running it, you can determine the cause of the problem. If performance is not restored, removal and diagnostics of the electronic unit will be required.
There are three options to solve the problem - reset the programs, flash the firmware, or replace the module.
Some models have a self-test function. It allows you to determine the source of the problem. How to enable this feature? They don’t write in the instructions, but the starting method depends on the manufacturer and the specific model.
As an example, during repairs, an Ardo washing machine is tested as follows: drain the water, the tank should be empty, set the mechanical program switch vertically down, and set the temperature to zero. To start the test mode, press all the buttons at once.
Each machine has its own way of turning on auto-test: LG - by holding down the power, temperature, spin keys, and then you need to press start three times in turn to test the operation of the drum.
If there is still a need to remove the board, it can be removed quite simply. We remove the top panel, dismantle the upper part of the machine, remove the fixing strips and take out the module.
Repairing the control unit requires special skills - you need to check the parameters of the elements and monitor the chains. We carefully inspect the board.
Remove the board yourself only after the warranty period has expired, and if you do not have the skills for such repairs, you can replace the entire control unit
4 signs that serious intervention is needed:
- The paths darkened, the color changed in some places, and scorch marks appeared.
- Bumps are visible on the caps of the capacitors.
- The varnish coating on the damping coils has faded.
- The main processor has darkened at the installation site.
If any of the above is found and you have no experience with a soldering iron or multimeter, entrust the repair to a specialist.
Failures associated with sensor problems can be resolved independently. Contact groups become greasy and clogged over time; they just need to be cleaned. Remove the program regulator, disassemble the handle and clean it.
If there is a layer of soot on the power coils of the surge protector, brush it off with a dry cloth and brush. We free the hatch lock block from soap deposits.
A belt drive has fallen off or broken, how to identify and repair it
The transmission of rotation from the electric motor to the drum is carried out using a belt drive. A belt breaking or slipping off the pulleys disrupts the connection between the elements. In this case, the drum rotates freely by hand, and the motor hums when voltage is applied.
If the drive belt is deformed, the rotation of the drum will be completely stopped. In many cases, the belt may simply “jump” off its pulley due to strong vibration that occurs during spinning. To restore functionality, it will be enough to remove the back cover and install the belt in its place.
To fix it you need to get to the engine and large pulley. Washing machines use V-belts or poly-V-belts. To install, you need to loosen the engine mount and ensure that the grooves of the mating parts match.
Remove the back panel of the machine and look at the condition of the belt. If it just slipped off, put it back in place, close the lid, turn on the washer and check its operation. In case of complete wear or damage, replacement will be required.
Machines with asynchronous motors have V-belts, while those with commutator motors have V-belts. The first ones are trapezoidal in cross-section and are marked on the outside. This is exactly what is shown in the picture.
They are made of chloroprene rubber, polyester cords, and cotton material, due to which they are elastic and have increased strength characteristics.
The V-belt is tensioned when moving the engine, so you need to loosen the fastenings. When the adjustment stroke of the engine is small or such a maneuver is excluded by the design of the machine, the belt needs to be replaced.
We install the V-belt like this: we wind it around the pulley, then we place the strip in the drum groove and seat it completely there, rotating the pulley.
The tension of the V-belt should be very tight: if you press hard in the middle, a deflection of up to 5 mm is considered normal
The V-belt has a toothed section. The parameters are also marked on the outside. It changes in exactly the same way as the wedge one. But it requires careful position control after final installation.
We measure the middle of the mating part of the engine pulley and drum - the belt is installed strictly along this line. V-ribbed belts are tensioned less than V-belts.
In all other cases, stretching or breaking of the belt requires replacing it with a new one. When choosing a belt, you should pay attention to the original or a worthy analogue if you want the machine to last a long time. A Chinese fake will quickly stretch or tear.
Washing machine electric drive failure, how to fix it
If the drum not only does not rotate in the car, but also does not hear any sounds of a running electric motor, this is most likely the problem. A slowly rotating drum can also indicate engine malfunctions.
In older engine models, the problem is often the starting capacitor, which is shaped like a cylinder and mounted next to the drive. If the capacitor fails, the engine does not start, which is why the drum does not rotate. Replacing the capacitor will help with this problem.
In commutator motors, a common cause is brush wear. Over time, they wear out and become shorter, and therefore the required contact with the lamellas of the engine manifold is not achieved. And the drive does not work simply for the banal reason of lack of voltage on the windings.
To fix this problem, you will have to replace the brushes.
To diagnose and repair the engine, it will have to be dismantled. The work is carried out as follows:
- To remove the motor, you need to remove the back wall of the washing machine by unscrewing the fastening screws.
- Then the drive belt is carefully removed.
- The engine is located on the underside of the machine. To remove it, screws are unscrewed; there may be two or more of them.
- Next, the contact block connecting the electric drive to the control unit of the washing machine is disconnected. If there is a separate ground wire screwed directly to the machine body, remove it too. The removed engine is pulled out.
- Then you need to unscrew the locking screws and pull out the brushes on one side and the other. The brush is considered worn out and unsuitable for further use if no more than 15 mm of its length remains.
- When dismantling old brushes, you should remember in which direction their edges are ground - the new components should be installed in the same way. New brushes must match the model of the washing machine and be of the same quality. If brushes with different hardnesses are installed in the electric motor, it will very quickly fail again.
- After the brushes are in place, you need to spin the motor rotor. If you feel interference or make a lot of noise, the brushes may not be installed correctly. It’s better to check right away - unscrew and reinstall them correctly.
Another possible cause of engine failure is its combustion, which occurs when the winding is shorted between turns or breaks on the rotor or stator. This requires only a qualified approach.
In the event that a burning smell is felt during washing or smoke appears, the power is immediately turned off. And the engine will most likely have to be replaced. If you wish, you can, of course, try to rewind the burnt winding.
However, as practice shows, it is most often impossible to return the engine to factory quality using such measures, which means that after repair it will not last long. Therefore, if the engine burns out, it is recommended to install a new mechanism. Moreover, completely rewinding the engine is also quite expensive, and the material gain, if there is any, will be very insignificant.
The bearing is stuck, symptoms and troubleshooting
The rotation of the drum may stop due to wear of the support bearing. Depending on the design of the washing machine, there may be one or two of these elements. After long-term use, worn out oil seals begin to leak water, corrosion occurs and the bearing jams.
When water gets in or is overloaded with laundry, the drum bearings are destroyed, of which there are always two in the machine, regardless of whether it is loaded vertically or horizontally. Some models use double. But in essence, these are two bearings combined into one housing.
Sometimes situations arise when they overlap. This most often occurs with double bearings.
Determining bearing failure is quite simple. If, when trying to turn the drum manually, it does not move or turns tightly, and this process is accompanied by creaking and grinding noises, then these are the main signs that the bearing and oil seal of the drum axle shaft are damaged.
The problem is solved by completely replacing worn out elements. In addition to the bearing itself, the seals also need to be replaced. We treat the bearing installation site with lithol and return the elements back. Secure with a hammer.
The average service life of these parts is 7 years, after which they need to be completely replaced, otherwise problems will arise when washing.
The oil seal is a rubber insert designed to provide an airtight seal that protects the bearing from water ingress. However, over time, the seal wears out and the tightness of the assembly is compromised.
Moisture begins to penetrate the bearing, washing away the lubricant from it, leading to the occurrence and development of corrosion. Because of this, the rotation unit fails and the drum jams.
To replace the bearing, you will have to almost completely disassemble the machine and remove the tank.
The first step is to remove the cover of the machine - it is usually secured with two screws on the rear panel. Its dismantling is necessary so that dismantling can continue on the façade side. You can immediately unscrew the screws and remove the back wall of the machine.
After this, the upper control panel is unscrewed (or removed from the plastic stoppers, depending on the model) and removed. Here you need to act very carefully, since it is connected by cables (wire handles) to other components and devices of the washing machine. It is best to disconnect all connectors - they are usually made in such a way that it is impossible to make a mistake when connecting them back - they have different sizes and colors.
Next, the front panel of the car is removed along with the hatch door. It should also be dismantled carefully, since due to inexperience, some people forget to remove the connector from the hatch locking device (UBL). This lock is located on the right side of the door in the space behind the panel.
After the internal space of the machine is opened, the heating element is dismantled and all communications going to the tank are disconnected. Next, the massive counterweights are unscrewed and removed.
The drive belt is removed and the engine is dismantled. The heating element is removed. The tank of the machine is disconnected from the water supply and drain pipes, top and bottom.
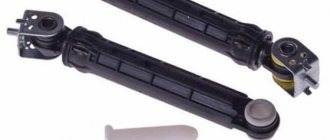
Then the lower shock absorbers are unscrewed and moved to the sides, and the dismantling is completed by removing the upper suspension springs. After this, nothing should hold the tank in the body - it can be taken out and placed on the floor with the pulley up.
The next step is to remove the drive pulley. It is fixed on the axis on splines, secured with a nut (in some models - with a screw or bolt). Usually the nut is screwed on quite tightly, and it can be difficult to remove it, especially if there has been a water leak here. Therefore, it is recommended to generously moisten the joint with a compound such as WD-40 and leave for half an hour.
Then the pulley must be stopped (for example, with a wooden block), and a striking force with a hammer can be applied to the wrench placed on the nut. After the nut is loosened, it is completely twisted, and then the pulley is removed from the axle shaft.
Now we have to disassemble the tank - otherwise there is no way to pull the drum axle shaft out of the bearing assembly. If the tank is collapsible, then all the latches are removed in a circle, and the fasteners holding the halves together are unscrewed. If the tank is a non-demountable structure, then it is better not to do anything yourself.
The fasteners are unscrewed, the stoppers are removed - and the tank is divided into two halves, opening access to the drum.
After disassembling the tank, the axle shaft is driven inside through a wooden block from the outside - it should come out along with the drum. Now the rotation unit is completely open, and you can remove the bearings and seals. This is done very carefully so as not to deform their installation socket.
After this, the seat freed from the old bearing is cleaned and treated with lithol. Oil seals and new bearings are installed in place.
The bearing is carefully pressed into the seat with a hammer. It is better to carry out this process through a wooden plate, so as not to accidentally damage either the metal part or the plastic of the tank.
After replacing the bearings, the assembly process begins in reverse order. In order not to make a mistake in the sequence, you can photograph the dismantling process.
The electric motor brushes are worn out, how to determine the replacement procedure
The motor brushes of a washing machine may, over time, stop performing their direct function - creating the proper electromagnetic field to rotate the motor rotor. During operation, they gradually, quite slowly, wear out and the induction field from them weakens.
The problem is unique to commutator motors. Currently, they are installed on 85% of washing machine motors.
Usually brushes last for 6-8 years. The service life depends on the frequency of operation of the machine, compliance with recommendations for loading the drum, and the quality of assembly of the unit.
There can be no repairs here other than replacing the brushes. If you have the skills of an electrician, you can change the motor brushes yourself.
But measure the bars first: if they are longer than 1.5 cm, the brushes are not causing the drum to stop.
Be sure to buy two identical, matching models and brushes without defects: installing parts with different hardnesses can result in engine failure.
If the machine is assembled, remove the back wall and belt. We disconnect the engine from the power supply by pulling out the connector with the wires. We dismantle the engine itself.
Next, we lay the engine on its side so that the brush housing is on top, and unscrew the mounting bolts and pull out the spare part from one side and the other.
It is highly advisable to replace them before they are completely worn out. This will help avoid a number of problems - damage to the collector lamellas or the electronic module.
Also, do not forget to clean the collector from black deposits; remove scratches with sandpaper. That's it, now you can install new elements and tighten them with bolts.
The washing machine motor burned out, how to determine it and what to do
In this case, two options are possible: the engine is completely faulty and does not start, or rotation occurs only without load. The winding short-circuits or it breaks off at the stator and rotor.
A characteristic sign of the first situation is that the empty drum rotates normally, but during a full wash the plugs are knocked out. When the second situation occurs, the drum stops rotating altogether.
Repair is possible if the drum has stopped, but the machine is humming when turned on. A complete engine replacement is needed when there is no starting at all, there is a smell of burning, dark smoke, and sparks.
An electric motor is a fairly reliable unit, but it can also stop. Main reasons for refusal:
- wear of commutator brushes;
- short circuit of winding turns;
- winding breakage at the stator or rotor;
- failure of voltage supply contacts.
For diagnostics, the motor is removed and connected directly to the electrical network. To limit the speed, a resistance is used - a heating element. If there is a malfunction, it must be replaced with a new one.
If the winding is damaged, you can rewind it or replace it with winding from another similar motor. After this, the engine will continue to work without any problems.
The fastening systems differ in different models, but the principle is the same - the retaining bolts must be removed. Also, do not forget to disconnect the motor power terminals. The picture shows the bolts
The motor is removed in the same way as when replacing the belt. If it is clamped by the tank, slightly lift the tank and free the engine. Sometimes you have to remove the side wall as well. There are three main faults - brushes, lamellas, windings.
We have already looked at how to replace brushes. You can check the performance of the windings with a multimeter by probing adjacent lamellas one by one. The discrepancy must be less than 5 ohms.
We will also check the short circuit of all windings: we will place one probe on the body, and with the second we will go through the lamellas. If everything is fine, the resistance will be high.
It is easy to determine the unsuitability of the lamellas - completely remove the rotor from the engine, inspect the collector for the presence of burrs, peeling, and broken contacts
If the windings are faulty, it is better to find the same part and replace it. Rewinding will cost more. Minor peeling of the lamellas can be turned on a lathe.
More: Which drum is good for washing?
Foreign object in the tank, signs and solutions
This state of affairs sometimes happens. Things or parts thereof are pulled into the gap between the cuff and the drum. If they are small, they reach the drain pump and block its operation. Otherwise, they are wound on the heating element, shaft or cross.
If the drum is jammed, and there is a suspicion that this was due to a foreign object, then you should try to determine the location. For a better view, you will have to stick your head into the hatch of the machine, and place the switched-on flashlight on the bottom of the washing chamber so that it can illuminate the interior space.
If the obstacle is not visible, or it cannot be reached through the hole in the drum, you can try to remove it through the niche in which the heating element is installed.
In most models, the heating element is installed under the front, but in some - under the rear part of the drum. Accordingly, to get to it, you will have to remove the front or back panel of the case.
Removing the back panel is much easier; you simply unscrew the mounting screws from it and remove it to the side. To remove the front panel, you first have to remove the top cover of the machine and remove the rubber cuff on the round opening of the hatch.
The doors opened in a vertical washing machine, how to fix it
This reason is inherent in top-loading washing machines. If you do not fasten the curtains tightly, they open when they rotate. The laundry falls out. And all this is hooked, as a rule, onto the heater. The washing machine drum cannot spin.
Before washing, the metal doors of the drum are fixed together with a reliable latch. But over time it wears out, which can lead to their opening.
The extent of damage in such a situation will depend on the moment the doors are opened.
If the opening occurred during the “Delicate Wash” mode, then, as a rule, serious damage does not occur. If the doors are opened while spinning clothes, when the machine is running at high speeds, then damage to the tank and deformation of the drum are inevitable. In addition, the heating element may also come under attack.
The worst consequences of this phenomenon can be deformation of the drum and even destruction of the tank.
After stopping, you can try to turn the drum by hand until the loading hatch appears. If the doors open at low washing speeds, you can try to return the washing chamber to its original position.
Sometimes a metal meter ruler or a stiff wire helps - its diameter should be such that it fits freely into the drum hole. The end of the wire must be bent into a hook. You need to push it between the tank and the drum, and try to close the flaps. This is not always possible to do.
General procedure:
- We unscrew the latches of the rear panel and set it aside.
- We move the side to the side and remove it too.
- We photograph the location of the wires and disconnect them.
- Unscrew the screw holding the shaft.
- Close the loading hatch and take out the tank.
- We separate the halves of the tank and take out the drum.
- We clean parts from dirt and debris.
Now we try to close the doors several times. If the retainer is broken, this part can be ordered from the manufacturer and replaced.
If that doesn’t work, try to hook or close the doors with a wire hook, pushing them through the holes and lighting them with a flashlight. In extreme cases, you will have to disassemble the tank, provided that it is collapsible.
We inspect the doors themselves, the integrity of the tank, and damage to the heating element.
Burst drain pump, signs and fix
Please note that if this malfunction occurs, the washing machine will not draw water at all and will not start the wash cycle. But damage to the pump could occur during operation. In this case, the drum does not rotate and the machine will stand still with water.
Step by step steps:
- Stop the program and disconnect from the network.
- Using an emergency drain, remove water from the tank.
- We change the pump.
- Let's restart.
Frozen program or “reset” error
If there were power surges during operation of the washing machine, the program may freeze in some mode, for example, while the engine is rotating. All elements are in good order.
To continue working, you need to reset the frozen program. This is done differently on different models. Typically, the procedure is described in the user manual or listed on the control panel.
The situation with the error is similar. But it is typical for washing machines of the Bosch and Siemens brands. After eliminating the cause of the breakdown, for example, replacing the motor brushes, you need to “reset” the error. This is done using a special procedure. Sometimes it is described in the SMA passport.
The engine completely failed
Depending on the extent of damage to the motor, it may provide partial functions of a washing machine. For example, it may well rotate the drum at half load. However, if you load the washing machine more or turn on maximum spin speed, the drum stops spinning. If during switching on you hear a very loud hum and smell of burnt wire, then with a very high degree of probability the electric motor will need to be completely replaced.
Replacing the electric motor
There are three main reasons for electric motor failure:
- Brushes - the method for replacing them is described in the previous paragraph.
- Winding - you can check for an open circuit with a multimeter set to measure resistance. The discrepancy between the resistance of the windings should not exceed 5 Ohms.
- Lamellas - failure is determined visually, based on existing experience. Minor damage (burrs, peeling, broken contacts) can be corrected directly at the place where the washing machine is used.
It should be noted that self-repair is possible only as part of the installation of brushes. Other types of breakdowns will require great skill and experience to restore the electric motor. More serious breakdowns, such as replacing an electric motor, are recommended to be performed at a service center.
Preparing for fault diagnosis
If such a situation occurs with an Indesit machine, the first thing we do is disconnect it from the network, and do not open the hatch. First, use the button on the panel, then disconnect the cord from the outlet. Cover the floor around with towels and rags, place a container underneath the drain filter, like a scoop or container, and only then open it. The plug opens counterclockwise; if it is screwed tightly, use pliers. After all the water has drained, you can clean the drum from the laundry.
After all the operations, it is worth understanding at what point the drum stopped rotating. The chronology of work will help to establish the exact reason for its stop. If a failure occurs during the spin cycle, and the laundry is damp but not soapy, then you need to check the selected washing mode. If the delicate wash is turned on or the “no spin” function is active, then this small misunderstanding can be easily corrected. The water does not drain due to a blockage in the drain system, and therefore spinning does not occur. Also, stopping the drum’s operation may be due to an overload of things, due to which an imbalance has occurred. Problems with the pressure switch or control module lead to failures during the washing process. Expressed in burnt out wiring or errors in the control module.
Control module failure
One of the reasons why the washing machine drum does not spin is that there is no signal to start the washing function. Most often, the control board processor fails due to power surges. The situation can be corrected in three different ways, depending on the degree of damage to the control module:
- Resetting the program - resetting the firmware to factory settings.
- Flashing means installing a new version.
- Complete replacement of the control module.
It is possible to determine the cause of failure - in the firmware or hardware - thanks to the self-diagnosis function. As a rule, such a function is not specified in the standard settings. And the sequence of actions to launch self-diagnosis depends not only on the company, but also on the specific model.
For example, an Ardo washing machine with analog control:
- Water is drained from the tank.
- The programmer handle pointer is installed vertically downwards.
- The temperature knob is set to 0.
- To start the self-test function, press all buttons at once.
- If the firmware does not contain errors, the washing machine will beep three short beeps.
A complete replacement of the control board is necessary if at least one of the following defects was discovered during the inspection:
- The color of the board has changed, and scorch spots have formed in some places.
- The contact tracks have darkened and become corroded.
- The capacitors are swollen.
- The protective coating (varnish) on the reels has peeled off.
- The area around the CPU went dark.
It is almost impossible to repair such a board yourself, without specialized education and special tools. In most cases, despite its rather high cost, the failed board will have to be replaced.
Methods to prevent future problems
Empty pockets thoroughly before washing. Place all small items (baby socks, handkerchiefs) and bras in special mesh bags.
Connect the washing machine through an uninterruptible power supply or at least an extension cord with a surge blocker if you live outside the city or simply have problems with power surges.
This is especially true for models with many programs and an overly smart “brain”. Pay attention to the correct grounding of the machine.
In addition, it is necessary to regularly carry out preventive cleaning of the drum - this will protect the washing machine from breakdowns and the occurrence of unpleasant odors.
Summing up
All the information in this article was provided with the purpose of identifying the reasons why the drum does not spin and what to do in this case. However, I want to warn you once again that with complex breakdowns that require complete disassembly or replacement of key parts, it is better to contact a professional service technician in half of the cases, which does not bring the required result. Since the technician is not able to bring with him all the necessary parts, test equipment and tools, the quality and speed of the repair are significantly reduced. Which will lead to repeated breakdowns in the very near future.