Causes of malfunctions
Disassembling a Beko automatic washing machine is impossible without knowledge of its structure - the instructions that come with each unit of product allow you to familiarize yourself with it. According to statistics from service centers, SM Eyelids break due to the following reasons:
- Dirt accumulates in drainage paths. Or the pump is broken - 30% of all calls.
- Problems with the electronic module - 20%. Moreover, budget-class models with an Invensys board most often break down. The element is made of low-grade material that is prone to cracking, which damages the conductive paths. The most common ones that break down are the semistors that control the operation of the heating element, filler valve, and electric motor.
- Breakdown of temperature sensors - 15%.
- Depressurization and, as a result, leaks - 10%.
- Extraneous noise - 10%. They appear due to faulty bearings or foreign bodies entering the device.
Your right choice is contacting Remtehnika LLC! want to make sure?
- Your call is accepted until 23.00 on any day, as well as on holidays and weekends.
- You get a complete diagnosis for free.
- Washing machine repair at home was carried out on the same day.
- You are spared the hassle of transporting the washing machine to the workshop, since the technician repairs it at your home.
- Your car has original replacement parts installed.
- You receive a guarantee in accordance with GOST for all performed actions and spare parts.
- You are pleasantly surprised by the affordable prices and receive preferential prices or discounts.
READ MORE: Concentrated washing powder: features and rating of the best products - Wholesale Supplier
Do you want to do without unnecessary expenses and free yourself from painstaking tedious repairs? Call!
“Symptoms” of typical breakdowns
Before using a Beko washing machine, study its instructions, and before disassembling it, study its structure. If you entrust your washing machine to a specialist, there is no doubt that he will quickly find the cause of the problem and offer the optimal solution to the problem. High prices for services force home craftsmen to figure out on their own what’s broken in the machine? Many problems can be fixed without the help of specialists, especially if you have tools, instructions and a diagram of the device at hand. Almost all modifications can be repaired with your own hands - WKB 51001 M, WKB 61031 PTYA, WKB 61001 Y, etc.
Considering the prices for repair work, why not try to cope without the participation of specialists, especially if the washing machine is 10 years old and it’s no longer so scary if it breaks completely: it’s still time to update the “park”. Below are typical breakdowns that owners of Turkish washing machines encounter:
- The water does not heat up to the value provided by the program or set by the user. Items are washed in cool water, regardless of the program. The opposite effect is also possible - overheating of water above the desired temperature.
- The liquid slowly fills the washer. Or it doesn't flood at all.
- The Beko washing machine does not start due to an uncovered hatch.
- At the end of the cycle, the liquid is not drained. This condition may be accompanied by a strong hum.
- The drum makes a loud noise as it rotates.
- Programs and modes do not start, and the indicators all blink at the same time. Or the light is on, but the SMA does not start washing.
- Pressing the start button does not start the machine, but the power cord is plugged into the outlet.
- Beko washing machine models that have a display display error codes - H1, H2, H3, H4, H5, H6 and H7. SMA does not work in this case.
These are not all the “symptoms” of problems that occur with Veko machines - we have listed the most common ones. Let's look further at how to fix the most common breakdowns.
Characteristic causes and features of breakdowns
If you notice that the washing process takes place in cold water, violating the set program, you can suspect a breakdown of the heating element or the board responsible for the control. A similar conclusion is reached when water overheats, almost reaching its boiling point. Most likely, the whole problem is in the board, but the heating element also needs to be checked.
After starting the washing program, water should begin to flow into the tank, and the intensity of this process depends on the set program. But when you visually do not observe the water in the tank, and the drum rotates with dry things, or after a while the machine simply “freezes,” then you should look for one of the following reasons:
- there is no water in the water supply;
- clogging of the filter located at the base of the intake hose;
- the water intake valve has failed;
- control unit failure.
The BEKO machine is designed in such a way that it will never start washing until the door is closed tightly and a special blocking sensor sends the required signal to the control board. If the hatch does not close at all, or seems closed, but the wash has not started, you need to inspect the lock. It may be broken and unable to hold the door. The second problem is the sensor itself. If it's all about the latch, try lightly pressing the hatch and try to activate the wash program.
When the washing process is completed, the machine must drain the dirty water and add fresh water to rinse. This process is accompanied by a hum emitted by the drain pump. The water drains out quickly enough, then the machine takes out a new amount of liquid. But if some time has passed and the washing machine has not drained the waste water and is frozen, or the pump is humming, but the water does not drain, then problems should be looked for in:
- pump for draining water;
- board responsible for managing processes;
- clogged drain hose or sewer pipe.
When the washing machine makes a characteristic clanging, grinding and knocking noise during operation, it is quite possible that the bearings have failed, or a foreign object has entered the tank, getting stuck between it and the drum. In this case, you should immediately turn off the machine and take all measures to fix the problem.
The SMA may not turn on at all, or it may blink all the lights, and turning it on again does not give a positive result. In this case, problems may be related to:
- breakdown of the machine's start button;
- failure of the control unit;
- broken power cord.
The best option is when the washing machine not only refuses to work, but produces a specific error code. With its help, you can immediately understand where the problem lies.
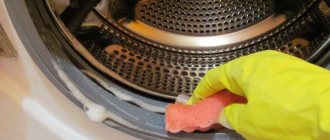
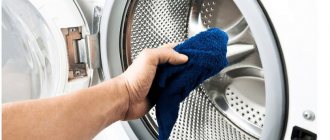
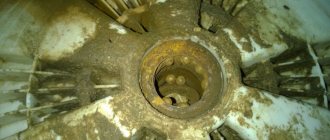
Cleaning the drain
In the SMA, dirty fluid is passed through a drain filter, which prevents hair, threads and dirt particles from entering the pump. The user's task is to clean the filter. But first you have to find him. As a rule, it is located at the bottom of the device. Before removing the filter, place a basin nearby or place a rag so that water gushing out of the hole does not spread across the floor.
In some Beko models, the filter is supplemented with an emergency hose for convenient drainage of liquid. How to clean a drain:
- Turn the filter clockwise and remove it.
- Clean the removed element from dirt and then wash it under running water.
- Use a screwdriver to clean out the pipe—it can also accumulate debris.
Wash does not turn on
Self-repair of a washing unit begins with determining where the program stops. So, in some cases it is not possible to start washing equipment.
Let's look at some possible reasons:
- The washing machine door does not close. Until the relay is activated, the washing process will not begin. In this case, it is necessary to push the door and press it tightly against the body. If this does not help, there may be a foreign object in the lock or the latch may be faulty.
- Voltage too low or no power. It is necessary to check the integrity of the cord, socket, and plug. You should check the contacts on the terminal block where the power cord is connected; there are cases of oxidation. To fix the breakdown, you need to remove the cover of the washing unit, find the block, inspect the contacts and, if necessary, clean them.
- The time relay does not work. It is very difficult to diagnose this malfunction. To do this, you simply need to switch the program several times - if at some stage the washing process begins, then this breakdown exists, and the time relay is really damaged.
- If all points are diagnosed, no malfunctions are observed, but the washing equipment still refuses to function, then the problems may be in the control board. When installing a new work board, you can identify this problem.
Maintenance of the inlet filter and hose
Since you have already taken up the tools, do one more useful thing at the same time - preventive cleaning of the inlet filter mesh. Water is supplied through it, which may contain particles of contaminants. Lingering in the mesh, they prevent normal filling of the tank. Before putting the mesh in place, look at the water intake hose - it may also be clogged.
The drum does not spin
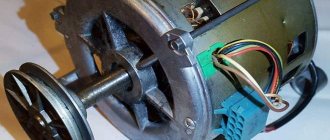
If the drum does not spin, there are several reasons. The most common is motor burnout. To diagnose, check the presence of voltage at the terminals. If it is missing, the motor is damaged.
There are other reasons, but they are not so global:
- If the washing equipment has a rotary drive, the drive belt may slip or weaken. Some models have the ability to adjust belt tension. To do this, loosen the bolt that secures the engine, pull it back a little and secure it. In this case, you need to ensure that there is no strong tension, which can cause rapid wear of the bearings.
- We put the belt on the pulley. If you have to make a replacement, you need to pull the belt away from you and turn the pulley counterclockwise. In order to remove it, you need to do everything in reverse.
- The cause may also be a foreign object that has gotten between the drum and the tank and is blocking rotation. In this case, you will need to disassemble the drum and remove interfering objects.
Checking and replacing the heating element
The problem can be solved, but you will need to partially disassemble the device. The heating element is a thermoelectric heater, one of the leaders in the list of frequently broken elements. Due to poor water quality, salt deposits - scale - settle on the surface of the heater. When there is too much of it, the heating element does not work well, and then completely fails. A layer of scale prevents normal heat transfer. The heater, deprived of the ability to transfer the generated heat to water, simply burns out and has to be replaced.
Error codes for heating element failure
But even when using ideal water or using special anti-scale agents, there is no guarantee that the heating element will not burn out. It has a certain service life, after which wear occurs. Problems with the heating element are indicated by fault codes H2 and H3. But to find out what exactly happened, you need to get to the heater. There are Veko models in which the heating element is located in the back, and there are also those in which it is located in front.
How to replace the heating element?
To remove and check the heater, you need to disassemble the Beko washing machine. Sequencing:
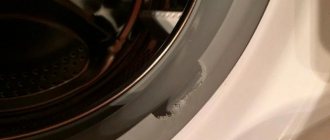
- To get the heating element located in front of the device, it is necessary to dismantle the cuff on the hatch. It should be removed extremely carefully - the cuff can easily be damaged, which will subsequently lead to leaks.
- You can see the tail of the heating element with contacts and wires going to them. Disconnect the wires.
- Use a tester to measure the resistance. The normal value is in the range of 25–30 ohms. Other values indicate a breakdown.
- Unscrew the nut of the bolted connection holding the heating element at the bottom of the drum and remove it.
- Remove debris and deposits from the installation site.
- Install the new element in reverse order. Connect the wires.
DIY washing machine repair
In many cases, the user can revive the washing machine on his own, even without special skills. Let's consider several situations:
Problems with draining water
It is clear to everyone that waste water is not crystal clear - this is the specificity of the operation of a washing machine.
To prevent dirt from accumulating in the pump, a drain filter is installed in its path - this is what gets clogged most often.
This problem is dealt with as follows:
- First you need to find the drain filter, which is always located at the bottom of the machine behind a decorative hatch or panel.
- Now you need to place a sufficiently capacious container under the machine into which we will drain the waste water.
- Some models of Veko brand washing machines have an emergency water discharge hose next to the drain filter. If there is one, you should use it - it’s more convenient to drain water than through the filter hole.
- The filter should be removed by unscrewing counterclockwise, thoroughly cleaned and rinsed under running water.
- Using a screwdriver, you can also clean the pipe into which the filter was installed - usually it is also heavily clogged with dirt and silty deposits.
Since you had to take up the tools, at the same time, for the purpose of preventive maintenance, you can clean the filter on the water supply, which can be easily found at the place where the inlet hose is attached to the body of the machine. Particles of sand and rust that accumulate in it over time can interfere with the collection of water.
After cleaning the drain filter, do not rush to put it back in place, first you need to check the functionality of the drain pump. In fact, the Veko washing machine, thanks to the built-in self-diagnosis function, in many cases can itself detect a pump malfunction, displaying the error code “H5” on the display.
But there are breakdowns that the machine “does not see,” for example, jamming of a loose impeller (the appearance of strong play can be guessed by the characteristic hum).
To check the pump, you need to run the machine in drain mode, observing the impeller through the hole in the filter plug. It should rotate. If this does not happen, the pump must be cleaned or replaced.
The machine is unable to heat water
A very vulnerable element in a washing machine is the heating element, since due to the high temperature, the calcium and magnesium salts present in the water actively crystallize on it in the form of a solid coating.
This plaque (scale) retains heat like a fur coat, so the heating element overheats and burns out.
In the absence of scale, it can also burn out - from the exhaustion of its resource, just as a regular incandescent lamp burns out. The machine can signal problems with the heater with codes “H2” (heater is broken) and “H3” (heater is constantly on).
To accurately determine the condition of the heating element, you first need to get to it. In some models of Veko machines, this requires removing the back panel, in others, the front panel.
To remove the front panel, you have to remove the sealing collar of the loading hatch. It must be removed extremely carefully - the slightest damage will lead to leaks.
The heating element is detected by two contacts at the bottom of the tank with wires connected to them. Disconnect the wires and use a multimeter to measure the resistance between the heater contacts. Normally at room temperature it should be 25 - 35 Ohms.
Other readings (usually “infinity”) indicate a malfunction: the heating element must be removed by unscrewing the nut holding it (between the contacts) and replaced with a new one, thoroughly cleaning the mounting hole from the inside from scale.
It happens that, contrary to expectations, the heating element turns out to be working properly. Then you need to check the functionality of the temperature sensor, which is located under the top cover (to remove it, after unscrewing the screws, you need to move it back a little). At room temperature, its resistance should be approximately 4.7 kOhm, and after heating with hot water it should decrease significantly.
If the thermostat is faulty, it needs to be replaced. To dismantle, you need to pull out and disconnect the powder dispenser hopper, then remove the control panel, having first disconnected the thermostat and control unit handles from it.
Checking the temperature sensor
If after checking it turns out that the heater is working, proceed to check the thermistor. This sensor is located under the top panel. Take it out and check it:
- Remove the screws to remove the top panel.
- Remove the powder container and dismantle the control panel - these elements prevent you from getting to the temperature sensor. When the sensor is accessible, disconnect the wires from it.
- Measure the resistance using a tester. Under normal conditions - 4.7 kOhm.
- Warm up the sensor - lower it into warm water, the resistance should decrease. If the resistance remains unchanged, the sensor is broken and will have to be replaced.
- The thermistor is mounted in the same way as it is dismantled - the steps are performed in reverse order.
In a horizontal (front) loading machine
In such models, the drum is mounted in one place - to the rear wall. This feature requires the following actions:
- Unscrew the screws that hold the back wall;
- remove the entire cover (including the powder container, control panel);
- pull out the hatch cuffs;
- remove the wiring and disconnect the bolt that holds the drum at the back.
It is better not to completely unscrew the control panel, but simply move it to the side to avoid damage. If removed, it is recommended to photograph the wires to make it easier to return everything to its original place.
Electrical repair
Only users with electrical repair skills can cope with this task. If there is a break or oxidation of contacts somewhere, they will quickly fix the problem. All you need for Beko electrical repair work is a circuit diagram. Where can I get it? It is enough to know the exact name of the model to find it on the manufacturer’s website.
It is much more difficult with electronics - to repair or replace the control board, you need special knowledge and skills. The cost of the electronic module is high - reaching a third of the price of the entire SMA. Therefore, it is not recommended to touch it - it is better to trust a specialist. If the repair is minor, then repairing the module will not cost much. But independent experiments can lead to complete failure of the module - you will have to purchase a replacement for it, and a simple problem will transform into expensive repair work.
Look at the button
If the power cord and noise filter pass the test, then you will have to evaluate the condition of the dashboard. It is no secret that the Beko washing machine does not turn on if the Start/Pause button is stuck. The fact is that when the power button is closed, the entire washing machine is de-energized. With modern models, the probability of fatal sticking is low, and old machines, released 15-20 years ago, often “sin” like this.
It’s easy to confirm your guess with your own hands. You need to do the following:
When checking the dashboard, the resistance is measured with the buttons turned on.
As a rule, the frequently used “on-off” button burns out. But if it is intact, then you should measure the resistance on all keys, moving from the main ones to those rarely pressed. If there are no problems with the buttons, then the problem is with the control board. Diagnosing a module is a difficult matter, so it is better to entrust it to professionals.
What are the features of the renovation?
Models from Beko have design advantages that are especially useful when replacing bearings:
- The device is much easier to disassemble than most analogues from other brands.
- Usually you don't even have to take out the tank to replace the bearing.
- Simply remove the front of the tank to remove the drum. The back remains in place.
- It is necessary to remove the entire tank when the bearing is destroyed - when it is necessary to remove its remains.
What other features of disassembly:
- To gain access to the front of the tank, remove the front panel. Next, unscrew the lower counterweight. Disconnect all tubes and wiring.
Advice. Before disconnecting the wires, fix the original position in the photo - this will help you later when you assemble the device.
- The front of the tank is held in place by 12 clamps - all of which must be removed to access it. Now all that remains is to remove the back panel, remove the pulley mounted on the drum axle shaft, and then remove the drum itself. Please note that the bearings fit on the axle shaft with an interference fit, so it must be knocked out by carefully striking it with a rubberized hammer.
The screw connection holding the pulley on the drum shaft must not be removed.
Preliminary stage
To make disassembling the machine with your own hands as easy as possible and not complicated by “surprises,” you need to start with preparation. The first step is to disconnect Beko from communications: first unplug the power cord from the outlet, then turn off the water supply tap and unhook the drain hose from the sewer. Then the equipment is moved to the center of the room so that free access is provided to both the front and rear walls.
Next, we collect the tools:
- screwdrivers (slotted and Phillips);
- set of wrenches;
- pliers;
- screwdriver;
- a set of different sized heads;
- WD-40 lubricant;
- gloves;
- puller (for dismantling bearings).
Before disassembling the machine, it is necessary to study the factory instructions and the electrical diagram of the unit.
If everything is ready, you can start disassembling. The amount of work ahead is serious, so we stock up on patience, time and an assistant.
The car vibrates a lot
How to repair a Veko washing machine with your own hands? If the washing unit vibrates strongly, then, as a rule, such a malfunction occurs in the spin mode, which is characterized by the fact that the equipment begins to jump and knock. In such a situation, independent repairs are very rarely required. Very often the reason is that the unit is overloaded or the laundry may clump together in one pile and not be completely distributed throughout the drum. In this case, we stop the washing machine, if it is overloaded, we empty it of some items or evenly distribute the laundry in the drum. After this, turn on the unit and continue the washing process.
If these reasons are not confirmed and the equipment is constantly knocking, then the following malfunctions may occur:
- suspension springs broke;
- shock absorbers are out of order;
- The ballast has become loose.
The solution to these problems is to replace the shock absorber or suspension springs and tighten the ballast bolts.
Divide the tank into two halves
It will not be possible to saw the tank located in the machine - you need to take it out. Despite the apparent lightness, this knot is very heavy, so it is better to enlist an assistant. Next, we grab the edges of the drum, swing the container to the side, lift it slightly and pull it towards us. The tank should move and leave its seat.
Having freed the tank, we inspect it. You need to make sure that the container is solid and really needs this manipulation. If so, let's get to work:
- prepare the place for cutting: put a tire on it, which will increase stability;
- Place the tank on the tire vertically, seam side up;
- take a saw or a hacksaw for metal and halve the tank strictly along the seam.
It is necessary to act extremely carefully, since the slightest deviation to the side in the future will affect the tightness of the container. Having finished cutting, remove the upper part of the tank and turn the lower cross upside down. The bearings are “hidden” right under the shaft, so we move on to the next stage - removing the seals and “rings”.
We install new bearings
To purchase suitable components for the washing machine, you need to know the full name of the automatic machine model. When purchasing bearings, you should provide this information to the manager. Another option is to contact a specialized store with the elements already removed and ask specialists to select identical parts.
A bearing of a smaller diameter is installed on the outside of the tank (this can be done through the removed rear wall of the housing). It is hammered in with a hammer and a drift. You should rest solely on the outer frame of the part and, tapping with a hammer, carefully press the element inside the tank.
Do not hit the inner race of the bearing under any circumstances, as this may lead to its destruction.
Having attached one of the parts, you can proceed to installing the second element. To begin, insert the bearing into the hole and fix its position with one blow of a hammer.
Then, using a drift, hammer the element into place. After installing the bearings, it is necessary to “plant” the oil seal in place. The rubber ring is treated with a special lubricant, this is necessary to improve performance characteristics and extend the service life of the seal.
After the oil seal is securely fixed, it is necessary to treat the drum bushing with a lubricant. Lubrication will ensure water tightness and heat resistance of the connection, extending the life of the bearings and sealing ring.
The replacement has been made, now it is necessary to put all the elements of the system into the housing. First of all, the drum is installed in place, the pulley is attached, and the drive belt is put on. Next, the rear wall of the unit is screwed into place. Subsequent assembly is carried out in reverse order. As you can see, it is possible to replace bearings with your own hands. To do this, you need to prepare all the necessary tools and strictly follow the instructions for action.
When to do repairs yourself?
Experts advise users to carry out on their own only the simplest repair work that does not require special knowledge, namely:
- Replacement of damaged parts or components.
- Removing blockages.
It is better to entrust all other cases to professionals, so as not to damage the washer even more. Typical cases that you can handle yourself:
- cleaning the drain filter;
- pump replacement;
- checking and replacing the intake valve;
- replacing the heating element.
Different models of SMA Veko have not only similar structures and characteristics, but also the same problems. In a Beko machine for 5 kg, the faults will be the same as in a device designed for 3 kg. Timely familiarization with the instructions and compliance with operating rules will help prevent problems.
Let's start disassembling the machine
To disassemble the washing machine, you need to prepare a screwdriver, Phillips and flathead screwdrivers. Using these tools, you can remove all parts of the machine and get to the washing machine tank. The algorithm of actions will be as follows:
- disconnect the device from the power supply;
- remove the top cover of the case, and to do this, unscrew the 2 screws located on the back;
- remove the powder receptacle from the unit;
- Unscrew the screws holding the control panel and move it to the side;
- unfasten the lower decorative panel from the body;
- unscrew the 3 screws located behind the decorative panel;
- Unclench the wire clamp holding the cuff, move it to the side and tuck the elastic into the drum;
- Unfasten the front wall of the case.
When removing the front panel, you will see that the hatch locking device is not disconnected from the main part of the machine. It is necessary to carefully, without damaging the contacts, reset the lock chip or simply unhook the UBL.
- unfasten the filler pipe;
- disconnect the wire leading to the dispenser and disconnect the tray from the body;
- remove the upper metal false panel that opened after disconnecting the control panel;
- lower the counterweight down a little; to do this, loosen its mounting bolts;
- disconnect the thermistor by resetting its terminals;
- remove the power and ground wires from the contacts of the tubular heater;
- remove the heating element from the housing;
- loosen the clamps holding the plastic tank cover;
- remove the cover and set it aside.
The main stage of analyzing the SMA has been completed, as you understand, you can do the work yourself, it is not necessary to transfer the washing machine to a workshop. To change the bearings, you have to remove the drum from the housing and gain access to the worn parts.
Let's prepare thoroughly
If you decide to do the renovation yourself, you should be thoroughly prepared. First of all, we collect or purchase the required minimum of tools. Fortunately, the list is standard:
- a set of screwdrivers (flat, Phillips and indicator);
- saw or hacksaw for metal;
- mites;
- pliers or pliers;
- set of open-end wrenches (8-18 mm);
- set of heads;
- puller (car version is suitable);
- socket wrenches;
- hammer;
- awl;
- chisel;
- multimeter
After collecting the tools, we begin to prepare the workplace. If the washing machine is installed in a spacious bathroom, then you can work here. In small rooms where it is difficult to turn around, it is worth looking for another option - an entrance hall, kitchen, workshop or garage. It is necessary to provide at least two free square meters, otherwise disassembling the machine will be problematic. In general, we act like this:
- disconnect the machine from all communications (electricity, sewerage, water supply);
- move the washing machine to a place convenient for repair;
- we cover the space surrounding the equipment with oilcloth, rags or newspapers;
- pull it towards you and remove the detergent tray from the body;
- Having unscrewed the garbage filter, drain the residual water from the tank.
Before disassembling, the machine must be de-energized and disconnected from the sewer and water supply!
For convenience, it is recommended to allocate a separate place for small parts - bolts, screws, clamps and other fasteners. Having completed the preparations, we proceed to directly troubleshooting the problem.