Disassembling the case
How to disassemble a Tefal iron correctly? They provide a multi-level fastening scheme
. The following features are available:
- The top cover cannot be removed along with the main body.
- To get to the electronic components, you need to unscrew the screw in the nose. It is visible in the area of the water dispenser through the translucent plastic.
Steam supply devices are accessible after removing the top cover. To do this, you need to remove the buttons that block access to the mounting screw. By unscrewing them, you can remove the top cover and gain full access to all components of the device.
The initial dismantling of the Tefal case is no different from the scheme used in other brands:
- You will need to remove the clamping screw or screws that are located under the cover at the rear of the case. They must be screwed in deeply to unlock and remove the cover.
- Under the cover there may be several more fasteners located under the water tank or under the plastic head of the thermostat.
- The plastic case must be lifted carefully. In addition to screws and self-tapping screws, it can be fixed with latches. You can find them with a thin strip of steel (knife blade or screwdriver) by running it along the body.
- To access the electrical part it may be necessary to remove the protective cover. It is also attached with several self-tapping screws, which are not difficult to find.
After removing the upper body and internal protection covers, the disassembled iron looks like this:
It does not matter which model of iron is disassembled for repair and diagnostics. Devices with a steel sole or branded Ultragliss have the same components. Problems may arise due to the failure of a disposable thermal fuse, oxidation of contacts, clogging of steam outlets, contamination and the effects of corrosion due to moisture entering live areas.
Repair Tips
An equipment owner who decides to repair an iron at home may find the following tips useful:
- The case elements of modern models (Philips, Bork, Tefal, etc.) are held together not only by screws, but also by plastic latches. Therefore, you should disassemble the device very carefully so as not to damage the mount.
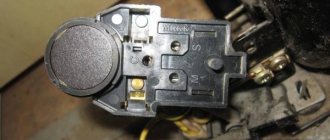
- When checking the temperature regulator, you need to make sure that it is turned on by turning the pin left and right. When turned off, it will erroneously show no resistance.
- If there is no replacement fuse, the burnt element can be removed from the circuit. The iron will still work, however, the next time it overheats, the heating element or thermostat will fail.
- To assemble the device in the required sequence (attaching the cover, body, handle, etc.), the key stages of the work should be photographed.
Compared to other household appliances, the iron has a fairly simple design. It can be repaired by a person with minimal skills in working with electrical equipment.
Reasons for lack of steam supply
First you need to make sure that the device is no longer under warranty. This is especially true for expensive iron models, for example, the Philips brand, in which the steam boost often does not work at all or functions poorly. Otherwise, it is recommended to take it to a service center without trying to solve the problem yourself.
Temperature regulator
Each iron has a temperature regulator, which is a metal plate located inside the structure of the household appliance, at its sole.
When heated to a certain temperature, the regulator is activated and the power to the electric heating device is turned off. When cooling, the thermostat returns to its original position.
The automatic shutdown function is necessary to control the temperature; if it fails, the plastic internal parts of the case may begin to melt. This inevitably leads to consequences:
- Steamer stops working
- The device does not heat at full power or vice versa,
- The water supply valve breaks, etc.
Since each steam iron has a steam chamber on the sole - a container in which water is heated to the state of steam, problems arise in this part of the structure due to a malfunction of the thermostat. The reservoir may become very hot, causing the plastic channels through which water flows into it to melt.
Valve failure
The water supply valve to the heating tank rarely stops working. If it fails, you most likely will not be able to repair it yourself. You can try to disassemble the device and examine the condition of the device, but it is unlikely that you will be able to repair it.
It is very easy to identify its malfunction: you need to fill the tank with water, turn on the device and let it heat up, if nothing happens when you press the steam supply valve, and it is pressed without force (too easily), its seal is probably broken and the “pump” does not pumps water into the steam generator.
https://youtube.com/watch?v=KnTYT_qWeXA
Formation of scale and limescale
Over the course of its operation, scale and sediment accumulate in the steam supply system, which makes it difficult to form steam, resulting in the iron steaming poorly or not generating steam at all. This is the most common cause of malfunction and the only one that can be eliminated without contacting specialists.
DIY repair
You can repair simple faults yourself, even if you have a steam generator from Tefal, because we have already written that the design of all models is the same, with the exception of certain nuances. Below is a small list of common failures and methods for eliminating them.
- Steam has stopped flowing - check the heating element, fuse, solenoid valve, clean the steam outlet tube. Clean the boiler tank from scale, replace the thermostat or the hose through which steam flows to the iron.
- Incorrect operation of the pressure switch - check with a multimeter. If a breakdown occurs, install a working toggle switch or microswitch.
- There is no response to pressing a button on the control panel - check the integrity of the wiring, if everything is normal, then replace it.
- The low water level indicator in the container is constantly lit - check the level, if it is normal, then replace the liquid volume sensor in the container.
- The station reports that it is ready for operation, but when you press the steam button, it does not come out - the button is faulty and needs to be replaced.
- Weak steam pressure from the perforations on the soleplate of the iron - check the regulator, and if it breaks, replace it with a new one.
Of course, it is impossible to predict all the cases that may occur during operation - this list can be continued indefinitely, but here are presented only those malfunctions that the user can fix independently.
It should be taken into account that the home technician has skills in working with electrical household appliances - otherwise you should not even try to disassemble or try to independently repair steam generators, for example, from such well-known manufacturers of very reliable and high-quality equipment as Tefal or Philips.
The iron turns on but does not heat
If the iron turns on (the indicator is on), but does not heat up, it means that current is supplied to the device. The cause of the breakdown may be a burnt heating element or thermostat. To determine the malfunction, you need to examine both elements.
Checking the serviceability of the heating element
As a rule, heating indicators are connected to the terminals of the heating element. Therefore, if the light continues to burn and the sole remains cold, the cause of the malfunction may be a burnt-out heating element. The element is usually tightly mounted into the sole and cannot be replaced.
To check the heater, you need to check its contacts with a multimeter. If there is no resistance, we can conclude that the part is faulty.
Checking the serviceability of the thermostat
If the iron does not heat up and the light is on, the problem may lie in a faulty thermostat. To get to this unit, the device must be completely disassembled.
After removing the housing, it is necessary to visually assess the condition of the contacts and connections for breaks and oxidation. If external damage is visible, it is necessary to clean it with fine-grained sandpaper. If not, determine the performance of the part by measuring the resistance, or checking the voltage with a screwdriver with an indicator, sequentially pressing it against the contacts
Since the iron must be plugged in to test with a screwdriver, extreme care must be taken when taking measurements.
As a rule, in models from well-known manufacturers, the thermal fuse is built into the gap in the contacts of the heating element on one side, and the thermostat is built into the gap on the other. For example, if your Philips iron does not turn on, one of the listed items may be faulty. In this case, there will be no resistance between the contacts of the heating element. Accordingly, to detect the true cause of the malfunction, it is necessary to ring each section, starting with the fuse (the likelihood of detecting a burnt-out thermostat with a working protective element is extremely low).
Reasons for lack of steam supply and their elimination
When working with steam generators, situations arise when the device refuses to supply steam. Often, the solution to this problem lies on the surface, but there are situations when the problem occurs due to a technical malfunction of the device.
Button not pressed
There will be no steam in the Philips steam generator when the button is released. If there is no steam after the device is fully heated, press the button and check again.
Some models of steam generators have a design disadvantage in the form of a steam supply button with significant play. In such a situation, not fully pressing the button will also lead to no result.
The steam generator is not hot enough
To operate, the temperature in the boiler must be higher than the boiling point of water. Tefal steam generator does not work when heating water in the boiler
To find out at what point in time the temperature in the boiler is sufficient for steam to form, you should pay attention to the light indicators on the device body
On most modern steam generators, a constantly lit LED indicator indicates readiness for operation. If the indication is off or flashing, you should wait some more time until the iron heats up.
Steam delay when first used
The first steam supply from the device occurs with a slight delay. Immediately after turning on the steam generator, you can hear the characteristic sound of the water pump, which circulates water in the boiler.
In addition to the time required to heat the water and start dispensing steam, the iron automatically adjusts the initial delay before use to increase the life of the device. On average, the steam supply delay for modern steam generators is 30 seconds. In rare cases, the time can reach several minutes.
Not enough water in the tank
If there is not enough water in the tank, the steam generator cannot operate. If, during a visual inspection, the liquid level has dropped below the minimum mark (usually indicated by a horizontal line or the inscription “MIN”), the required volume of water should be poured into the steam generator.
The tank level is refilled through a lid located on the body of the steam generator. Remove the lid and add water to the maximum mark without crossing it. Using a device with a higher fluid level than recommended is unsafe.
Automatic steam mode disabled
Intelligent automatic steam supply from the device is produced by a built-in gyroscope. Electronic systems monitor changes in the position of the iron in space and activate steam when moving. If such a system is disabled, steam will only be delivered when the manual steam control button is pressed.
The iron is stationary or held at an angle in the air
When the intelligent automatic steam supply mode is turned on, operation is ensured by electronic tracking of the position of the iron in space. Stopping the movement signals the steam generator to stop supplying steam. Also, holding the iron in an inclined position in the air turns off the steam supply.
Formation of plaque, dirt, scale
Using hard tap water in a steam generator, which is rich in various minerals and salts, leads to the formation of scale inside the device and on the surface of the soleplate. The steam generator does not supply steam if there is a long-term accumulation of plaque deposits inside the steam outlets.
To prevent the formation of plaque, dirt and scale, modern steam generators have an automatic cleaning mode. For details, please refer to the iron's instructions for use.
To do this, you need to make a solution of citric acid and water in a ratio of 4:1 (where there are 4 parts of water and 1 part of acid) and pour it into the boiler of the steam heater. Then you should shake the device several times and pour out the liquid. Repeat several times until the water coming out of the iron is completely clear.
Blockages in the steam generator chamber
Tefal steam generators do not supply steam due to blockages in the chamber. Blockages occur due to the involuntary entry of unnecessary objects into the heating chamber and the formation of scale. This may block the steam supply openings.
Hardware damage and breakdowns
In case of technical malfunctions of the iron, in which, for example, the steam generator does not heat the water, you should contact the official service center of the steam generator manufacturer. Repairing the device yourself will void further warranty service.
troubleshooting
During operation, household appliances sometimes develop various malfunctions, which can be diagnosed based on characteristic signs and repaired steam generators with your own hands. If steam generators refuse to fulfill their assigned duties, the reason may be different.
- The station does not supply steam - the heating element or its contacts have burned out. There may also be incorrect operation of the boiler switch, or the steam supply button on the device may simply be broken.
- The pressure is not regulated - the switch is broken.
- The device supplies steam at the wrong temperature - the temperature fuse has blown, the thermostat has failed.
- No voltage - one of the wires in the power cord is broken.
- Poor water heating - a lot of deposits have accumulated on the walls of the container.
- The water level indicator is constantly on - the sensor is broken.
- Steam is constantly being released through the safety valve - there may be little water in the tank.
- Water has appeared under the station - there is a leak somewhere, turn off the steam generator and localize the fault.
In addition to the listed failures, many more reasons can be named that provoke the appearance of malfunctions in the operation of the steam generator.
To carry out a complete diagnosis of the product and repair various faults with your own hands, you need to have special equipment; with one multimeter and a soldering iron you can only find and fix simple faults.
Common causes of water leaking from an iron
Water may leak from the iron if the valve of the device is broken or the device is used incorrectly.
Broken valve
Water from the water tank is supplied to the inner surface of the sole.
A steam regulator is built into the housing. They can be used to regulate the intensity of the steam jet. When the device heats up, the water turns into steam and steams unironed folds in the laundry. If there is still water in the tank and the iron has cooled down, then it may leak when the valve is closed. The cause of the leak is a broken valve.
The malfunction should be checked as follows: turn off the steam supply and, without turning on the iron, shake it, placing it in a horizontal state. If water flows out, it means the valve does not regulate the flow of steam into the soleplate of the iron. Often the malfunction lies in wear and loss of elasticity of the rubber valve gasket.
Incorrect operation
After turning on the device, if the iron has not heated up to the optimal temperature, then steam has not yet formed and water begins to leak through the holes, which the valve has “distilled” into the steam chamber.
How to avoid water leaking out of the iron during operation?
To avoid liquid leaking out of the holes on the soleplate, you should wait until the iron warms up each time.
This is done correctly like this: turn on the steam mode, set the desired temperature, turn the iron vertically, wait until the heating indicator turns off and begin ironing things.
The water filling hole must be closed after filling the tank. This way, drops will not get on the fabric and will not leave wet spots.
What to do when water flows from the iron
The iron needs to be descaled from time to time. This procedure is easy to carry out at home.
Method 1
- Dissolve citric acid powder in water;
- Pour the solution into the reservoir;
- Set the iron to maximum temperature;
- We wait until the indicator goes out;
- Lightly shake the device and add water to the steam chamber;
- Repeat until completely clean.
What will happen? Water touches the hot heating element. In this case, the hot and cold surfaces come into contact, adding exposure to an acidic environment. The scale lags behind the walls and comes out through the holes in the sole of the iron. In the same way, you can wash away any debris that has gotten into the sole of the device.
Method 2
Many appliance models have a special rod for collecting scale. From time to time it should be cleaned by placing it in a solution of citric and acetic acid for a couple of hours. After cleaning, the rod is rinsed under running water and reinserted into the device.
The first ironing after cleaning should be on an unnecessary piece of fabric. Limescale and debris will remain on the fabric.
If cleaning the iron does not help, then you should contact repair specialists at the service center. There, they will be able to diagnose the problem and fix it.
Ways to fix the problem
- Cleaning the iron yourself;
- Repair in a service workshop;
- Do-it-yourself repair (if the owner has the necessary skills).
Tools and equipment
To disassemble an iron with a steam generator, you will need the following equipment:
- Multimeter.
- Oscilloscope.
- Electric soldering iron.
- Phillips screwdriver.
- The screwdriver is flat.
- Device for pressing panels.
- Device for pressing hidden latches.
- LED flashlight.
- Magnifying glass.
- Alcohol solution.
- Rag (rags).
Panel wringing device
To disassemble an iron with a steam generator, you will need to remove several panels from the body of the device. For this purpose, manufacturers provide special gaps (seams) along the body of the steam generator.
Fixation of individual elements is carried out using metal or plastic latches.
Removing panels and latches at home is quite a difficult task. Using a handy tool such as a knife or screwdriver may result in marks appearing on the body of the device. Scratches and chips on the body spoil the appearance of the steam generator.
In service centers, a special tool is used to press out the elements of the steam generator housing. To disassemble a steam generator at home, you can make such a tool yourself.
Devices for pressing panels and latches are made in the form of a thin wooden stick with a beveled lower end. To remove small parts, one such squeezer is enough. Dismantling large elements and panels will require the use of two squeezing devices.
For your information. Flat wooden ice cream sticks or plastic coffee stirrers are ideal for making squeezers.
Such devices are easy to manufacture and convenient to use. Using squeezers will allow you to disassemble the steam generator without scratching or breaking small parts.
Devices for pressing latches
They are performed similarly to panel presses. Used to remove hidden fasteners and control buttons.
Multimeter
This device determines the overall integrity of the electrical circuit. The device is also necessary to determine the location of the cable break.
Oscilloscope
Used for detailed study of electrical voltage parameters. It will be required to determine the amplitude and phase shift value.
Electric soldering iron
Used to eliminate wire breaks in cables and places of attachment to contact plates.
LED flashlight
Necessary for access to poorly lit and hidden elements. For ease of work, use a flashlight attached to the head with a special strap.
Steam generator design
Steam generators are a device with a separate station in which a tubular electric heater is located. The steam produced by heating water enters the iron through a special tube.
The station consists of several important elements. For example, it’s worth disassembling the Philips steam generator device. A water boiler is located in the center. In it, the water is heated to the required temperature. Heat-conducting tubes pass under it, which come into contact with the surface of the boiler, transferring the heat passing through them to it. The tubes are heated by heating elements located in them.
At the end of the heating element (tubular electric heater) there is a thermostat, which is needed to control the temperature. A fuse is placed next to it. In the event of an unusual situation, when the tubes become too hot, the fuse melts and closes the electrical circuit, cutting off the power supply to the device. Operating a steam generator without correctly operating protection in the form of a thermostat and fuse is dangerous.
Checking the electric heater
The heating element in modern models is a reliable unit and rarely breaks. When this problem occurs, it is better not to buy a new heater. It's easier to buy a new iron. But first you should make sure that the problem is in the heating element.
In all models, the heater contacts are soldered to the device contacts and connected to an indicator lamp. If the lamp is on, but the iron does not heat up, then the malfunction is related to the heating element.
On some models, the thermal fuse is included in one heater circuit, and the regulator is included in another. If the fuse is faulty, then a false “diagnosis” can be made, suspecting a faulty heating element. To accurately determine the cause of the device failure, it should be completely disassembled.
Useful tips
To ensure that the iron works properly for a long time and does not have to be repaired, you should follow simple recommendations.
If the device has a self-cleaning function, you must use it at least once a month. It is important to monitor the condition of the iron sole: remove plaque and carbon deposits from it in a timely manner. To do this, use a solution of vinegar or citric acid, special cleaning pencils
Under no circumstances should solutions be poured into the tank - they can damage small parts and gaskets, resulting in depressurization of the tank. You should use only soft water: filtered, boiled, melted, distilled or special water intended for irons. This will help prevent scale formation. The cord must not be kinked. After ironing is completed and the device has cooled, the wire is carefully wound around the body.
If there are serious breakdowns that cannot be repaired on your own, you should contact Tefal service centers located in Moscow and other large cities of Russia. More detailed information can be found on the manufacturer's official website. There you can also order the spare parts necessary for repairs.
DIY repair tips
Some steam generator malfunctions can be eliminated yourself with minimal skills and tools. But keep in mind that if the cause of the breakdown lies in poor contact of the cord, heating element, or if the skates are stuck, you will have to disassemble the device.
Specialists from the service center do not recommend repairing the Tefal steam generator with your own hands if the cause has not been identified or if you do not have the skills to work with electrical household appliances.
This is due to the fact that in most cases, self-repair leads to even bigger problems .
To prevent this, if the device malfunctions, you should contact a service center. By entrusting the work to professionals, you will be able to bring your device back to life!
Problems with the thermostat
The temperature control is carried out by a round wheel. It is located in the Azur iron and in other models on the body under the handle. When you turn the wheel to the right, the heating temperature increases, and to the left, it decreases until the heating element is completely turned off.
The wheel acts on the thermostat through a special bushing or steel angle and is attached to the body using latches. In the Scarlet iron and other models, it is enough to pry the adjustment disc with a screwdriver so that it comes off.
The operating principle of the thermostat is based on the various properties of metals. In the manufacture of this unit, two plates made of metals having unequal linear expansion coefficients are soldered together. Thanks to these indicators, the plates each behave differently. Outwardly, it looks like this: under the influence of temperature, the common plate bends, causing the circuit to open, and the iron turns on.
The handle of the device and the plastic parts of the body are attached to the metal parts with latches or self-tapping screws. Even one manufacturer has many models, and they all have design features. But all species have common points.
To disassemble the iron, you need to examine its sharp part, where there is one attachment point. For example, a Philips iron hides a self-tapping screw under the steam control knob. To unscrew the screw, turn the handle all the way to the left and pull up. After removing the adjusting unit, you can unscrew the screw. In the Brown model, the screw is hidden under the nozzle cover. You can remove the nozzle by slightly pulling it towards you. After its removal, free access to the screw opens. Other screws or latches are located under the back cover of the device.
After the plastic part of the body has been removed, you should consider the iron's thermostat. In cold mode the contacts must be closed. If there is a special device, it is better to ring the node. If you don’t have the device, you can clean the contacts with fine sandpaper and then plug in the iron.
What does an iron with a steam generator consist of?
The main design elements of an iron with a steam generator are:
- Back cover.
- Block.
- Top cover.
- Frame.
- Sole.
Back cover
The rear (end) cover is attached to the body with one or more screws. Depending on the steam generator model, the design of the back cover has two options:
- the back cover is attached to the block;
- the back cover is not attached to the block.
In the first version, the back cover has a straight design. Using horizontal tenons, the top cover is attached to longitudinal grooves.
To disassemble the body of the iron with a steam generator, the back cover and block are pushed back. In this case, the top cover must be pushed with your fingers.
In the second case, the top cover is pulled up. The rotary latches unfold and release the mounting pins from their locked position.
Block
The block is designed to fix the current-carrying cable in the steam generator housing. It has two main designs:
- monolithic;
- collapsible.
The monolithic block is removed by removing two screws of the block itself and two screws of the clamp securing the power cord.
To remove the collapsible block, press out the clamps that hold the block in a fixed position.
Top cover
The top cover is secured without locking. To remove it with your own hands, use squeezing devices. The cover is removed from the rear or front end.
Frame
The body of the iron with the steam station is attached with several screws. These screws are quite often recessed deep into the body of the device.
In addition, manufacturers use screws of various shapes and sizes. In this case, you will need a set of screwdrivers, different in both shape and length.
Sole
The design of the sole provides for the arrangement of conductive and heating elements.
To check the functionality of the electrical circuit, test instruments (oscilloscope, multimeter) are used.
The principle of operation of the device and the risks of steamer failure
The device works simply. Purified, better distilled water is poured into a separate container. It is distilled water that will prevent scale from forming on the heating elements and the steam generator device. From the reservoir, using a special valve device, moisture enters the soleplate of the iron and, when heated, turns into steam. The valve regulates the amount and speed of flow, depending on the set heating temperature of the sole.
This is how a working device should work, but a situation often arises when:
- When heated, hot water is captured along with steam and the steam generator begins to soak things instead of steaming. In a few minutes, a puddle of water can form, which is dangerous when using electrical appliances;
- Poorly steamed and damp items will become wrinkled again, as the wet fabric will wrinkle as it dries. But a more unpleasant consequence may be an unpleasant smell of linen and clothes and the formation of mold;
- When the water is saturated with salts, droplets of moisture falling on the laundry can leave stains on it. At best, you will need to rewash the laundry.
The steam generator began to spit water, you must immediately turn it off from the network and understand the possible cause of the malfunction.
This is interesting: Connecting a hob + oven
Instructions and files
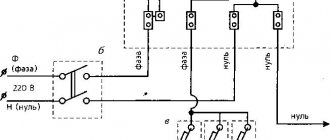
Before connecting the iron to the mains, make sure that the plug is grounded to the body, there is - that’s good. The economizer, evaporator and superheater can be designed as independent, series-connected heat exchangers.
This unfavorable property of water requires the installation of a special device in the primary circuit of the nuclear power plant - a volume compensator. If you twist the adjuster slide, you may subsequently incorrectly connect it to the external decorative handle, which can lead to devastating consequences.
All the electronics of the iron are located in its bottom, this is a heating element, a temperature sensor, a thermostat, a thermal fuse, and there’s nothing else that can break. Bimetal is a composite material consisting of 2 different metals or alloys firmly connected to each other. On the circuit diagrams presented in Fig.
There is a real compressor inside. How does the regulator turn off?
ELECTRICAL ELECTRODE STEAM GENERATORS
Let's look at the regulator itself. In this article, you were provided with one of the typical examples of failure of Philips steam stations.
Just like in direct-flow SGs (Fig. Water from the upper drum descends into the lower one through pipes 7, and the steam-water mixture rises from the lower drum to the upper one through pipes 3. In such irons, drip-type humidifiers are used. The advantages also lie in the fact that these irons prevent the possibility of scorching and melting fabrics, which is especially important now that a large number of synthetic fibers are produced, for ironing which it is necessary to strictly observe the temperature regime. The loss of active substances from the solution in the circuit makes it, including the steam generator, difficult to access for repair and inspection.
Do you need help?
After the upper, outer, decorative disk of the iron temperature regulator has been disconnected from the regulator itself, which is located on the sole of the iron, you cannot turn the regulator itself. All the electronics of the iron are located in its bottom, this is a heating element, a temperature sensor, a thermostat, a thermal fuse, and there’s nothing else that can break.
Such irons have a number of disadvantages compared to irons that have a thermostat; they are larger, heat up slowly, and consume more electricity. When the heating element cools, its temperature decreases, the bimetallic strip narrows and straightens. The heat is stored better, therefore, the temperature conditions are favorable, and you can get more steam. The water heats up turning into steam and at the right moment the steam can be released - this makes the ironing process better. What do I iron things with? Review of TEFAL steam generator – Nikkoko8
How to disassemble the Tefal Prima 2325 iron
Tefal iron model 5335. We disassemble, assemble and clean the iron. Time codes: 1:00 disassembling the iron 2:25 assembling the iron 6:10 cleaning the iron. How to identify and fix iron malfunctions at home. To disassemble a modern iron, a novice master needs to have skills. The Tefal iron repair is unique. First, he has a body.
Tefal iron repair. Here we are all at the beginning of 2. The attitude towards things that, if broken, would simply be replaced with new ones, is also gradually changing. Now it has become expensive and probably unreasonable to do this, especially since if you are smart, then a broken thing can be repaired. Moreover, the costs of repairs are not comparable, both with the cost of repairs and with the huge prices for a new thing.
A reader of the website Secret of the Master, Marina, showed engineering savvy and repaired her iron. She shares the secret of success with all of us. A steam iron is an indispensable thing in every apartment and a breakdown of the iron, especially now, can greatly disrupt financial plans and cause a serious blow to the family budget.
Sometimes the hardest part of a repair is trying to take the device apart without breaking it. Marina reveals to us the secret of how the iron fastens and, most importantly, shows us where and how to fix the breakdown.
Before you begin disassembly, you need to prepare the tool.
Scale formation
If water comes out of the steam generator when used correctly, limescale may be the cause. You can eliminate it yourself; for this, use a special solution or clean the removable rod (if there is one).
The appearance of rusty water from holes in the sole is a consequence of scale formation. Solid deposits stick to the walls of the container and the inside of the sole, and the water takes on a rusty hue. When ironing, it can get on the fabric, ruining the item.
Self-cleaning function
The easiest way to fix the problem is to use the self-cleaning function.
- Fill the tank with clean water until about.
- Turn on the sole heating mode at full power. The steam function cannot be activated.
- Place the device over a sink or other container.
- Press the button to turn on the self-cleaning mode. Keep your finger on the button and shake the device vigorously over the container. If everything is done correctly, dirty water will flow out of the holes in the sole and steam will escape.
- Disconnect the device from the network and leave until it cools completely.
- Rinse the tank with clean water and drain off any remaining liquid.
The self-cleaning function is not available in all iron models, and it does not always bring the desired result. If rusty water flows, you should get rid of the scale.
There are several ways to deal with scale. A suitable method is selected taking into account the design of the device and the type of sole.
Application of citric acid
The use of citric acid is one of the most effective and affordable. Necessary:
- dilute a packet of powder in a glass of heated water;
- pour the solution into the iron reservoir;
- set the maximum heating temperature of the sole;
- after the indicator goes out, disconnect the device from the network and activate the steam mode.
The iron is held in a horizontal position and rocked from side to side so that the solution corrodes the plaque on the side walls. If after the procedure the water remains dirty, you should repeat the entire operation 1-2 more times.
Cleaning the anti-lime rod
The second method is to descale the rod. Modern models of irons have a special filter in the form of a rod, which is easy to remove. Periodically, you should take out this element and soak it in a solution of citric acid for about 2 hours. Then rinse under running water, removing softened plaque, and install back.
Steaming the iron
Another option for dealing with sediment is steaming the iron, but this technique is not used often because it is not suitable for all devices. If the sole is metal, you can:
place the iron in a large-diameter frying pan or on a baking sheet; fill the bottom of the container with hot water (it is important to ensure that the liquid level does not rise more than 15 mm above the sole); add vinegar - 200 ml per 1 liter of water; place the container on the stove, bring the liquid to a boil; Turn off the gas and leave to cool.
Afterwards, it is recommended to repeat all the steps 1-2 more times, and then rinse the sole and leave the device to dry.
Review of the Tefal Pro Express Ultimate GV9581 steam generator
The iXBT.com laboratory regularly receives devices intended for clothing care, including steam generators or steam stations. So now we will study the Tefal Pro Express Ultimate GV9581 steam generator. During the review, we will get acquainted with the advantages of the device, which the manufacturer identified as the main ones.
First of all, Tefal positions the steam station as a device that will allow you to professionally care for your clothes. The device is characterized by a powerful burst of steam and high pressure in continuous steam supply mode. A number of functions help you safely and comfortably care for clothing and fabrics of various compositions. During the experiments, we will see if the steam generator is as good as it looks when we first meet it.
Characteristics
| Manufacturer | Tefal |
| Model | GV9581 |
| Type | steam generator |
| Country of Origin | France |
| Guarantee | 2 years |
| Estimated service life | 2 years |
| Declared power | 2600 W |
| Case color | gold |
| Tank volume | 1.9 l |
| Storage tank | removable |
| Outsole material | ceramic, Durilium Airglide Autoclean technology |
| Steam pressure | 8 bar |
| Steam boost | 600 g/min |
| Steam speed | 160 g/min |
| Steam supply modes and temperature adjustment | five modes: Eco, delicate, normal, maximum and maximum with burst of steam |
| Control type | electronic, touch panel |
| Indicators | presence of water, appearance of scale, selected mode |
| Automatic shutdown system when inactive | There is |
| Additional functions | anti-scale protection, self-cleaning system, vertical steaming, eco mode, iron locking system |
| Accessories | door hook for vertical steaming |
| Steam hose length | 1.7 m |
| Power cord length | 1.7 m |
| Iron weight | 1.13 kg |
| Device weight | 5 kg |
| Iron dimensions (W×H×D) | 28×16×12 cm |
| Weight of packing | 6.06 kg |
| Packaging dimensions (W×H×D) | 44×34×28 cm |
| Retail offers | find out the price |
Equipment
The box in which the Tefal Pro Express Ultimate GV9581 steam generator is located allows you to get a first impression of the device and its capabilities. The user can familiarize himself with the appearance of the device and its main functions. Information is presented primarily in English. However, much is clear intuitively or from pictures. Only one phrase has been found in Russian, and that is a slogan. The box is not equipped with any kind of carrying device.
Inside the package, the steam generator is securely fixed in two foam inserts. We discovered the device itself, consisting of a steam station and an iron attached to it. Also in the package was an iron part that looked like a fastener, and a set of documentation: a brochure “Safety Precautions and Rules of Use,” an international warranty card and a user manual.
At first sight
The design of the device is typical for steam generators of this type: the iron is connected to the base with a boiler using a steam hose. Streamlined shapes and a combination of white and gold colors visually lighten the dimensions of the device. The plastic is high quality, smooth, all parts and pieces of the device are tightly connected to each other. It is impossible to make a single justified complaint about the build quality - everything is really done carefully.
On the front of the steam generator we see a control panel with three touch buttons and two indicators. The power cable connects to the chassis at the bottom right side. In the same part there is a compartment for storing the cord. On the left side there is a steam hose that connects the iron to the station. During storage, the steam hose can be placed in the appropriate compartment running along the perimeter of the base.
A red screw cap is visible at the bottom of the side of the case. This is part of the flushing system that protects the device from scale. Under the lid there is a collector for collecting scale - a long narrow metal groove. The water tank is transparent, which will allow you to monitor the water level during operation. Its working volume is very large - 1.9 liters.
The iron stand is made of heat-resistant plastic and equipped with three rubber pads. In the upper narrow part there is a Lock System. To secure the iron to the base, you must first align the protrusion at the bottom of the stand with the groove in the base of the iron, and then move and click the lock, which will hold the nose of the iron motionless.
On the bottom of the device there are holes, apparently acting as ventilation holes, a sticker with brief technical information, and low legs.
The design of the iron is classic: a body with a sole and a handle with control buttons and indicators of the selected mode. The shape appears lightweight due to the color, design and thin support.
On the inside of the handle, exactly under the index finger, there is a steam button highlighted in red. The weight of the iron is rather average - it will be easy to iron, but you won’t be able to hold it there for a long time - your hand will get tired.
The connection between the steam hose and the housing is protected by a casing, which prevents damage to the hose. A length of 1.7 meters seems sufficient; We will be able to more accurately estimate this parameter only through practical experiments. The movement of the hose is limited by the hinge. In a vertical position, the iron is quite stable thanks to the stand at the bottom of the device.
The shape of the sole is triangular with rounded edges and corners and a narrowed top. The sole coating is ceramic, Durilium Airglide Autoclean technology. The surface of the sole is smooth, without nicks or scratches. Steam outlets are located both around the perimeter and in the middle of the sole. In the narrowed part of the spout you can see closely spaced steam outlets.
A metal part that looked like a fastener was found in the box with the device. It turned out that this accessory is intended for placing clothes during vertical steaming. The wide part is placed on, for example, a door, and hangers with clothes are hung on the hook.
A thorough examination confirmed the first impression of the device. The Tefal Pro Express Ultimate GV9581 steam generator is made with high quality and accuracy. The design is clear and simple, the iron is extremely elegant, the sole is smooth and equipped with a large number of steam outlets, the controls do not seem complicated. We will evaluate how convenient it is to work with a steam generator during experiments.
Instructions
A thick A6 brochure is devoted to safety measures and rules for using the device. The document is apparently intended for all countries where Tefal products are supplied, since the information is presented in a large number of languages. Moreover, the page numbers on which you can familiarize yourself with the desired option are not marked, so when searching for text in your native language, you need to look through the entire document. Information regarding safety and operating rules takes up only 4 pages. A section regarding the quality of water that can be used for the steam generator and a table listing possible problems, their causes and solutions may be useful.
Another document that looks like a comic is the user manual. There is practically no text in it, but the pictures explain all the processes and manipulations that need to be performed with the steam generator and the iron. We think that one viewing will be enough to start using the device. In the future, the document can be referred to when the user encounters a specific problem or task. And at this very moment a person realizes that studying information related to operation from pictures is not at all as easy and clear as it seemed at first.
To be fair, let’s say that operating the steam generator is simple and intuitive. Those points that may cause difficulties can be studied on the website - there the information is structured, given quite fully and presented in an understandable form.
Control
Controlling the Tefal Pro Express Ultimate Care GV9581 steam generator turned out to be very simple. After connecting to electricity, you need to turn on the device by pressing the corresponding button in the center of the control panel. Upon completion of work, pressing the same button turns off the device.
After turning on the steam station, the user sets the required operating mode. The selection is made by successively pressing the Mode button on the handle of the iron. By default, the device operates with Normal parameters. In any of the modes, steam is supplied by pressing the steam supply button, located on the inside of the handle exactly under the mode indicators. It’s easy to start and switch between operating modes, the buttons are conveniently located - Mode under the thumb, steam supply under the index finger.
During heating, the selected mode indicator flashes. Once the set temperature is reached, it begins to burn evenly.
At first we didn’t understand why the manufacturer indicated on the website that the iron was equipped with five steam generation modes. However, we later figured out that in addition to those indicated on the handle, Eco, Delicate, Normal and Max, a Boost mode can be added, the start button of which is located on the base.
If during work it is necessary to “give way to the park”, then pressing the Boost button starts a mode of increased steam generation for 15 minutes. This function is only available when the iron is operating in intensive mode. When the Boost function is launched, the iron automatically switches to Max mode, even if it was previously operating in another mode.
The device is perfectly controlled by three buttons: on/off, Boost function and Mode selection. But in trying to figure out the purpose of the OK button, we came across an interesting point, which we will describe below.
Two indicators inform the user that the boiler has run out of water or it is time to descale. We didn’t have time to bring the device to the point where it needed cleaning, but we were able to empty the boiler.
When the water runs out during ironing, the indicator lights up red and the iron stops heating. We concluded that ironing with an empty boiler is impossible and turned off the steam generator. Then we thought, perhaps the OK key resets the indicator and starts the iron working without water. However, subsequent inclusion did not confirm our assumption. The device turned on as if nothing had happened. We started the Booster mode and released the remaining steam, so that there was no water left anywhere - neither in the boiler nor in the steam generator system. However, the indicator did not light up, the iron continued to heat up, and when you pressed the steam button, it clicked ominously.
However, we think that under normal conditions the steam generator will not be subjected to such tests - the user himself is interested in a boiler filled with water. Moreover, to determine the degree of filling of the container, you do not need to wait at all for the indicator to light up.
Exploitation
Preparation for work is standard: remove the device from packaging materials, unwind the power cord and steam hose, place the steam station on a flat, stable, heat-resistant surface and fill the tank with water.
During the tests, we placed the steam generator on a specially designated area of the ironing board. But let us clarify that the ironing board for testing is wide, and the area for placing the iron has an area of 42x27 cm. In this case, the base of the steam generator is placed securely and does not hang over any side. Do not place the housing on a soft surface or ironing board cover.
During operation, some parts of the steam generator become hot, so certain safety precautions must be observed. In particular, the steam generator cord, soleplate and stand for placing the iron are very hot. You most likely won't get burned, but you shouldn't touch these parts.
Before storing the steam generator, you should allow it to cool for at least an hour. Before carrying out care activities - at least two hours. Of course, no openings (filling or descaling) should be opened while the steam generator is operating.
For steam generation, you can use tap, bottled or purified water using household purifiers. If tap water is very hard, then it should be mixed with purchased demineralized water in a 1:1 ratio. Using unsuitable water can cause deposits to form in the steam chamber, which in turn will lead to stains on clothing and rapid failure of the appliance.
In general, we did not encounter any problems or difficulties during operation. The boiler is disconnected when moving towards itself and upward. Installed backwards, respectively, in reverse motion. The click helps you understand that the part is installed correctly and securely. It is filled with water without any special equipment - the hole is very wide in diameter. When draining, thanks to the design of the tank and the location of the drain holes, all the water leaves - not a drop remains in the boiler. Again, the user does not need to perform any particularly tricky manipulations for this.
The device is controlled simply. Heating modes and, accordingly, steam generation can be changed at any time with one click of the thumb. Moreover, the process is not only obvious, but also visual - the mode indicator flashes at the moment of heating and lights up exactly when the device reaches the desired temperature.
The coating of the sole is beyond criticism - perhaps we have never before dealt with an iron that glides over fabric so easily. The shape of the spout allows you to cope with the most difficult areas of clothing to iron out - folds, narrow places and similar unpleasant design features of clothing.
Steam is supplied only when you press the corresponding button. In order for the steam to flow continuously, you need to hold the button pressed. This did not cause us any inconvenience. In Boost mode, the steam comes out with a more powerful jet. The device takes some time for the steam to reach the desired pressure - at first it flows powerfully, then the supply force decreases. During this period, you can straighten your clothes - prepare, so to speak, a testing ground for further work.
Sometimes, when steam is applied, drops of water fall on the fabric. In this case, we repeated the dry iron over the wet area. Its power was enough to evaporate moisture stains. In general, when using the Boost mode, the fabric is slightly damp after processing. Therefore, after steaming and ironing, we hung the clothes on hangers or left them flat on the ironing board.
Vertical steaming takes place in Max heating mode and Boost function. There were no drops of water under the clothes being steamed or wet spots on the clothes themselves. The hook included in the kit is very convenient. So the user does not need to try to hang clothes in the bathroom on the curtain pipe and look for a place to install the steam generator. The main thing is to make sure that the surface of the door does not deform from exposure to steam.
The power cord and steam hose are long enough for comfortable ironing without extension cords or excessive cable tension. The cord does not touch the surfaces being processed at all; the steam hose, in general, does not crush the clothes being ironed.
The device is equipped with an automatic shut-off function. The system works regardless of whether the iron is standing on the base or vertically on the board. In the horizontal, i.e. working position of the iron, heating does not stop. Apparently, the manufacturer hopes that the user will not be so reckless as to leave the heated iron directly on the fabric.
Among the features, it should also be noted that the steam generator is convenient for ironing bed linen, since you can fold it several times with virtually no damage to the final result.
Based on the results of using the Tefal Pro Express Ultimate GV9581 steam generator, we can say that working with it is convenient, easy, pleasant and, most importantly, safe, subject to a number of obvious requirements. The device itself coped perfectly with all the tasks assigned.
Care
Maintenance of the steam generator is extremely simple. If you follow a few simple rules, this process will be infrequent and not labor-intensive.
- First, after each use, you need to drain the remaining water from the tank.
- Secondly, you need to start cleaning at least 2 hours after ironing, so that the device and all its parts are completely cooled down.
- Thirdly, it is prohibited to use any cleaning products: means for preventing or removing scale (vinegar, anti-scale agents) for washing the heating element and tank, as well as sole cleaners for the iron.
The plastic parts of the housing can be wiped with a slightly damp soft cloth. The iron sole provides good glide and steam distribution, and is also self-cleaning thanks to the catalytic coating: dirt is removed under high temperature.
The boiling tank must be serviced once a month or every 10 uses. The procedure is called pompously, but in reality it consists of unscrewing the lid of the boiling tank, removing the rod attached to it and rinsing it thoroughly. Then use a jug to fill the reservoir with tap water and gently shake the stand for a few seconds. Pour out the water. To obtain the best results or when using hard water, it is recommended to repeat the operation again. If the region has hard water, then the tank needs to be cleaned more often.
Our measurements
When simultaneously heating the soleplate of the iron and generating steam, the device consumes from 2580 to 2610 W. In idle mode - 1-1.4 W. When only the iron heats up - 840-900 W. Preparing for work does not take very long. So, in Normal mode, the indicator stops blinking after 1 minute 40 seconds. In Eco mode, preparation takes 1 minute 20 seconds.
The temperature of the iron sole was measured immediately after heating. Depending on the measurement point on the sole, the temperature was:
- Eco: 97-124 °C
- Delicate: 96—113 °C
- Normal: 104—135 °C
- Max: 111—171 °C
The temperature is highest in the middle and in the upper narrowed part of the sole. The lowest temperature was recorded in the wide base of the sole. However, the temperature spread in most modes is small.
The operation of the automatic shutdown system was also checked. The automatic shut-off function worked after 9 minutes 20 seconds while the iron was on the base. Left upright on the ironing board, the iron stopped heating after 9 minutes 45 seconds. When the auto shut-off function is activated, the on-off indicator begins to flash. Leaving the iron in a horizontal position, we waited 15 minutes; Automatic shutdown did not work. We didn’t dare wait longer, although the instructions say 38 minutes of waiting.
Practice tests
We will carry out standard tests to smooth out heavily wrinkled and overdried items, and also bring a raincoat and knitted jacket into decent shape using vertical steaming mode.
T-shirt with print
The item was both wrinkled and dry from long-term storage folded in the closet. The T-shirt is made of cotton jersey. Processed in “Eco” mode from the front side. Steam was supplied only periodically.
The fabric was easy to iron. The sole slid easily and just as easily smoothed out any creases that appeared. The print did not deform under the influence of temperature and hot steam.
Result: excellent.
Linen fabric
We sometimes use a piece of flax for photography or as a tablecloth for a small table. It is stored in a closet folded, so the fabric shows both specific wrinkles that are characteristic of untreated linen, as well as creases formed during storage.
We decided to try it in “Normal” mode. The fabric was smoothed out, but not well enough. Booster mode enabled. The iron automatically switched to “Max” mode, and things went much more fun. The steam was supplied by a powerful jet, which perfectly moistened the canvas and coped with the most difficult storage marks.
The fabric ended up being slightly damp, but it looked great.
Result: excellent.
Slacks
The trousers are made of thick cotton fabric that wrinkles easily. The slacks show obvious traces of spinning and drying.
We worked in the “Normal” mode at normal steam power. Steam was supplied almost continuously. They only paused to unfold and straighten their trouser legs. As a result, there were no traces of creases or wrinkles left on the fabric.
In this experience, we continued to admire the shape and smoothness of the iron's soleplate. The narrow top of the sole easily reached and smoothed the narrowest and most difficult to reach places. Already in the second experiment it became clear that there would be no problems with ironing shirts and men's shirts.
Result: excellent.
Mixed fabric shirt
The fabric is mixed, it clearly contains more than just cotton. The shirt is very warm and comfortable, although wrinkled a lot, it usually gets ironed out without any problems. In this test, we will check whether the soleplate of the iron leaves marks on the fabric, and in what mode the fabric can be processed without the risk of damage.
We chose the “Max” mode, turned on Boost and started ironing. The place where the iron passed immediately took on a well-groomed appearance. No traces of sole or shine appeared on the fabric. We switched the iron to “Eco” mode - the result was the same. From which we conclude that the device successfully and safely processes some types of mixed fabrics in both maximum and moderate heating modes.
The narrow nose and easy sliding of the sole made it possible to effortlessly smooth out sleeves, cuffs, areas around the armholes and collar.
Result: excellent.
Organza
As part of testing, we necessarily process organza. This is a test of the iron's ability not to deform synthetic fabric. The cut was wetted, twisted and tied into a knot. Although we dried the organza on a central heating radiator, the fabric did not reach an overdried state.
Ironed in the “Delicate” mode. Both the heating temperature and the steam power were enough to smooth out all the creases and jams.
Result: excellent.
Skirt made of suiting fabric with added wool
The skirt, although not straight, is not of a very complex design. But the fabric is very delicate - thick suiting with the addition of wool. When ironing it, there is a high chance of getting shiny stains. These are the kinds of fabrics that our grandmothers and mothers taught us to iron through damp gauze.
We processed the skirt from the wrong side in the “Delicate” mode. Steam was often served. The fabric was smoothed out effortlessly—one stroke of the iron was enough.
No shine, no deformation of the fabric - just a perfectly ironed skirt. The iron's nose easily reached the depths of the folds, and the steam straightened the fibers without damaging them.
Result: excellent.
Vertical steaming
Using the vertical steaming function, it was decided to smooth out a knitted pullover. The item is simply wrinkled from storage, without deep creases. We worked in Boost mode - increased temperature and steam power.
We attached the supplied hook to the door - by the way, an extremely convenient thing if you are not afraid of damaging the door covering with hot steam, and hung hangers with a pullover on it. We started working on the sleeves. We acted in the standard way: we straightened the part, pulled it slightly, brought the iron, holding it vertically in relation to the fabric, and pressed the steam button. The steam comes out in a very powerful jet, so you need to be careful not to accidentally burn your hand. In this way, we slowly processed the whole thing. When the power of the jet weakened, the next piece of the pullover was straightened. During these few seconds, the steam generator was ready to release the next portion of steam.
The pullover fabric was evenly moistened and stretched out perfectly. It took a little time to process - about two to three minutes.
Next, we decided to steam the freshly washed and dried raincoat. The fabric from which it is made is of very high quality, so after spinning the raincoat did not have a very wrinkled, but rather somewhat unkempt appearance.
Within five minutes we carefully steamed out all the light bruises. The look, of course, is not ideal, but after ironing the coat looks much worse - the seams of the lining, pockets and other structural details of the cut stand out and begin to shine. So vertical steaming is the only way to bring the item into decent shape without long and painful passes with your hands.
Result: excellent.
If we perceive vertical steaming as an additional, and not the main function, then its implementation can be considered quite good. The steam is supplied in a powerful jet, the pauses between blows are small, and the included hook eliminates the problem of finding a place to hang things. Powerful steam eliminates long-time steaming, so your hand does not have time to get tired from the weight of the iron.
conclusions
We liked the Tefal Pro Express Ultimate GV9581 steam generator, although the author of this article does not like ironing too much. Even if the user has a strong aversion to the iron and ironing board, but for some reason is forced to iron clothes frequently, then choosing this device will be a good decision. And those who love this process will undoubtedly experience more than one hour of pleasure from interacting with the steam generator.
The steam generator is easy to control and just as easy to operate. All processes go one-two-three: remove the water tank, fill it with regular tap water, select the desired mode, and automatically descale it. The automatic shutdown feature will turn off the iron's heating and steam generation if the user has forgotten to do so. We would also like to note the excellent manufacturing quality of the iron - the comfortable shape of the sole and the quality of its coating. In addition, the iron is equipped with a self-cleaning function, optimally distributes steam and, according to the manufacturer, is resistant to damage. We never ceased to be amazed at how easily the sole glides across any fabric. It is worth mentioning the rapid achievement of operating parameters. So, on average, the steam generator was ready for operation in less than two minutes. This is quite fast for this type of device.
The disadvantages include difficulties that could potentially arise before starting operation due to unclear instructions. The second remark concerns the operation of the device itself. Despite the fact that the steam generator is equipped with a “Drop Stop” function, during tests we repeatedly noticed drops of water on the fabric being ironed.
pros
- powerful steam supply
- easy and intuitive controls
- ease of care
- auto shut off function
- ease of gliding, optimal steam distribution and good shape of the iron sole
- quick readiness for work
Minuses
- unclear instructions
- at high temperatures drops of water fall on the fabric
In conclusion, we suggest watching our video review of the Tefal Pro Express Ultimate GV9581 steam generator:
Our video review of the Tefal Pro Express Ultimate GV9581 steam generator can also be viewed at iXBT.video
The fuse and other faults are to blame
To fix your iron, you can refer to statistics that say that 50-60% of malfunctions occur due to the fact that the thermal fuse fails. This unit can be disposable or reusable. The fuses of the first group, like a kamikaze, operate only once. The unit is designed so that when the heating element reaches a temperature of 240 C, the circuit breaks. Further operation of the device without additional intervention becomes impossible.
More modern technologies involve the use of bimetallic parts. Such a thermal fuse is capable of turning off the iron in extreme situations, and then turning it on again. If the iron does not work for this reason, the easiest way is to throw away the unit and short-circuit the circuit. This can be done in different ways:
- using soldering;
- by crimping a metal rod;
- switching power wires.
In each case, it is necessary to achieve reliable contact.
Another common problem is a problem with the steam system. Sometimes in a Bosch iron the button that turns on the process is pressed hard, and no steam is supplied. Repairing a Bosch iron should begin by unscrewing the screw at the back and removing the back cover. Then you should carefully pull the two buttons that regulate the steam supply up. They are not secured with screws and are held on the bushings by friction. Next you need to unscrew the screw, after which the plastic handle should come off easily. Under the cover there are two pumps: one supplies water to the sprinkler, the other delivers water to the sole to create steam. The steam pump needs to be removed. There is a ball at the bottom, which sticks to the bottom of the chamber due to scale. To fix the problem, you need to push the ball into the chamber and reassemble the iron in the reverse order.
Whatever iron you have to repair, you need to remember safety and follow certain rules: turn on the device only when necessary; do not try to fix the problem with wet hands; During repairs, the iron must be placed on a stable, non-current and heat-resistant coating.
Repairing a Tefal iron is a task that requires at least a little experience working with the tool. You should know that some models of the brand cannot be repaired at home without special equipment and skills. Let's look at how you can repair an iron of this brand with your own hands.
Troubleshooting at home
You can repair the steam supply yourself only if the malfunction is caused by scale and limescale. Serious damage to the components of the iron structure cannot be corrected by ourselves!
We bring to your attention several methods that can be used to get rid of foreign elements in the water heating system of the iron. To achieve a better result, it is recommended to try several of them until you eliminate the reason why there is no steam supply in the iron. If steam does not appear in the iron, you will have to buy a new device.
All (with the exception of one - steam bath) methods below have the same principle: liquid is poured into the water tank of the iron, it is heated, then the system of water heating elements is manually cleaned: you need to press the steam button until the liquid will not run out.
Cleaning with vinegar
You can clean the tank from scale and deposits with 9% table vinegar, diluted in a 1/1 ratio with plain water. This composition is poured into approximately 1/3 of the tank, after which the device is connected to power. You need to wait 10 minutes, then turn on the ironing mode with steam and begin to actively press the steam valve.
The procedure must be carried out over a basin or other container for collecting water. You need to release steam until the vinegar composition in the tank runs out. After which it is necessary to wash off the remaining vinegar, to do this, pour ordinary water into the iron and supply steam until the specific odor disappears.
Mineral sparkling water
The principle of cleaning an iron from scale and sediment with mineral water is almost the same as in the method of cleaning with vinegar. The only thing is that after carrying out the intensive steam release procedure, there is no need to rinse the water heating system with ordinary water, since there will be no unpleasant odor from the mineral water used.
This option is less effective than cleaning with vinegar. It is excellent for preventative procedures aimed at preventing possible malfunctions.
Lemon acid
You need a small package of acid, about 20-25g, it needs to be diluted in a glass of warm water until completely dissolved. Then the composition is poured into the tank to 1/3 of the volume and the iron is left to heat up for 10 minutes, after which you need to release steam until the liquid is completely consumed.
After the procedure, you need to fill the iron with ordinary water and repeat the process to eliminate the unpleasant odor from the device.
Steam bath
This is rather an additional option when the steamer in the iron does not work after using the above methods.
It happens that the holes on the soleplate of the iron become very clogged with scale; they can be cleaned using a steam bath. To do this, you need to place a container on the stove, like a baking tray, so that the iron can fit into it. Place stands on the bottom that will raise the iron above the container by a few millimeters; for this you can use metal lids from glass jars. Water is poured into the container, the iron is placed and the whole thing is boiled for no more than 10 minutes.
Adding table vinegar (1/3 ratio) or citric acid (up to 10g per 250ml) to the water will not harm. After such cleaning, the iron needs to be steamed - carry out the standard intensive steam release procedure used in the methods described above.
Chemical cleaners
You can clean the iron reservoir from scale and lime deposits using a special liquid that can be bought at a hardware store. Before use, be sure to follow the instructions on the package; it will say whether it needs to be diluted with water, in what proportions and other information.
Using special products is expensive, but it’s worth it when it comes to repairing expensive appliances from the brands Philips, Redmond, Tefal and the like. The principle of cleaning with such chemicals is the same as what we described earlier: the composition is poured into the tank, the device heats up, then the iron needs to be steamed - steam is continuously supplied until the poured liquid runs out.
Common causes of breakdowns
There can be many reasons, depending both on the user and on the design of the device. The most common include:
Using dirty water . Due to the large amount of iron salts, when it is heated, a plaque forms, which is very difficult to remove.- The presence of water in the device during storage , which leads to the same plaque, plus there is a decay factor, leading to corrosion of metal parts.
- Constant use of the device at maximum mode . This leads to overheating of silicone and plastic parts, the connections of which may develop leaks due to the expansion of the materials.
- Improper storage and careless operation . Do not over-tighten the power cord, because the wires usually break at the outlet of the device.
Let's take a closer look at the most popular breakdowns.
Doesn't produce steam - what's the matter?
Common reasons:
- scale and limescale - this may be due to the fact that unfiltered water was used;
- the internal coating of the equipment has crumbled - this is most often encountered by owners of budget/Chinese models with low-quality parts;
- electrical failure (for example, a pump, thermostat or thermostat may fail) - in this case, you should take the household appliance to a service center or start thinking about buying a new one.
If it is scale, then solving this problem is simple - get rid of it using special means, for example, Anti-scale or Calgon. Citric acid will also help with this.
As for the deformation of the internal coating, it is worth contacting specialists, since the device will need to be disassembled and then cleaned the boiler and channels. Parts may also need to be replaced.
Doesn't turn on
First of all, check the integrity of the wiring . This can be done by measuring the resistance.
If the device shows it, then the circuit is working; if not, then there is a break in the cable, thermal fuse, thermostat or the heating element itself.
Do not forget to check the power button , since due to the constantly high power, the contacts could burn out and the case could become deformed, which often happens.
In any case, if you find smoke, immediately take the device for repair, as self-repair can lead to irreversible consequences.
Water leaks from the soleplate of the iron
Make sure the steam generator is not overfilled with water. Do not pour water to the very brim.
also be the cause: the sole of the iron has not warmed up, and you are already in a hurry to release steam . Give time for the soleplate to heat up to the desired temperature, and then only apply steam.
Before you start ironing, set the device to the appropriate mode, and then place the iron so that its sole is in a vertical position. Wait until the indicator turns off. And only then press the steam button.
Otherwise, water will flow out of the sole. Also, the reason for the appearance of water from the sole can be careless kinking of the hose through which steam is supplied.
Rusty water flowed
The reason for this may be a high content of hardness salts, that is, the water contains a lot of iron ; to eliminate the defect, it is necessary to use a water filter.
The steam generator itself must be rinsed with clean water, and at the same time prevent plaque and scale using Anti-scale or citric acid. In especially severe cases, you will have to figure out a mechanical cleaning device.
Stagnant water may also be one of the reasons . It is highly not recommended to leave it for a long period of time, because it will deteriorate and plaque will form. It's better to fill it fresh every time.
"Spits"
If the device “spits”, this may be due to a broken valve. To make sure of this, you need to close the valve and turn on the device (but not in the “supply steam to the iron” mode). Now you should rock it.
Are there any drops of water? So it's the valve. To solve this problem, you should contact a service center.
Features of disassembling irons with the Easycord system
Some Tefal iron models, such as Ultragliss FV4650 or Supergliss FV 3535, are equipped with the Easycord system, a distinctive feature of which is the special design of the rear panel of the device. The bolts are on a stand connected to the handle. Having unscrewed them, remove the cover covering the installation site of the cord, and then proceed to disassembling the steam supply system. The buttons are located on a removable block, which can be removed by bending special latches.
After this, you can remove the handle by gently pulling it up. The next step is to remove the screws. 2 of them are located on the back of the iron, and another one is located on the front, under the removable block. Next, disassemble the iron in the same way as standard models.