Required Tools
Before repairing an electrical appliance, you need to determine the cause of the breakdown and prepare the tools. It is necessary to take into account that models from different manufacturers are fixed with different screws, so it does not hurt to stock up on different screwdrivers - Phillips and flathead. Required:
- A multimeter is a continuity tester for an electrical circuit.
- Sharp knife, pliers or pliers, electrical tape.
- Triangular screwdriver for special screws.
Some models of Chinese-made kettles are secured with screws for bladed screwdrivers. In order not to buy a tool, you can make it yourself by cutting a flat screwdriver in the middle.
An electrical measuring instrument, a multimeter (avometer, tester), is very useful when repairing a kettle. It combines the functions of a voltmeter, ohmmeter and ammeter. Multimeters are digital and analog with different bit depths and degrees of error. The device is easy to use - you just need to set the measurement mode and check the electrical circuit. The compact device is equipped with probes for ringing and determining the point of circuit breakage or contact opening.
Triangular screwdriver
Multimeter
How to properly seal a crack in glass?
When carrying out an operation such as repairing a leaking kettle, you need to follow a few simple rules:
- Before carrying out work, it is necessary to degrease the damaged area with a solvent and then wash it with warm soapy water. Be sure to dry thoroughly, as moisture weakens the adhesion of the sealant;
- It is most convenient to insert the sealant into the cracks with a syringe;
- When working with such materials, it must be taken into account that the thicker the layer, the more the vulcanization time increases;
- After the sealant has completely hardened, you need to boil water in a kettle and pour it out. Perform this procedure at least three times. Only after this will the kettle be safe to use.
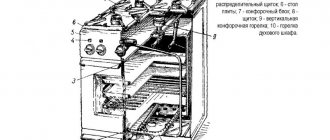
Operating principle and design of units
Household appliances with a simple design - this is how electric kettles are characterized. Despite the huge number of models from different manufacturers, the devices operate on an identical principle, and the kettle circuit for all units is only slightly different. Device structure:
- Housing-reservoir for water. In rare instances, the flask is made in the form of a separate bowl.
- Heating element of open or closed type. Heating elements are spiral and disk.
- Stand with a connector for connecting a household appliance and a cord for connecting to the network.
- Power connector pads in the bottom of the side or central location.
- The thermostat, which is responsible for turning off the electrical appliance when water boils, is installed under the button.
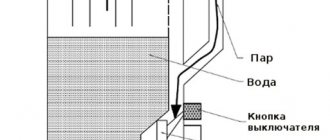
The design of an electric kettle with a thermostat is slightly different - there are more contact groups. Using temperature regulators, you can heat the water to the desired temperature and keep it hot so as not to boil the liquid again. The principle of operation of electric kettles: when you turn on the power and press the button, the heating element heats up and heats the water in the tank until it boils. Steam is generated in the housing, which flows through a channel with a steam-permeable hole onto the bimetallic plate of the thermostat. Under the influence of steam, the metal expands, acts on the lever, opens the contact group, turning off the electrical appliance.
Leak repair
Here, each case is individual, for example, you cannot repair a crack in the case and repair is impractical. The leak will appear again. But at the junction of the metal bottom of the disk with the flask, you can seal it.
It will only be possible to seal leaks with silicone superficially and the leak may appear in a new place.
In this case, it is best to disassemble the kettle completely and separate the flask. Clean everything thoroughly and apply silicone sealant to seal it. You can use a special, safe sealant such as RTV118Q or domestic VGO-1. They can withstand temperatures up to 260°C, but they are expensive. An ordinary inexpensive one that can withstand temperatures up to 180°C will do the job.
Just in case, after repairs, boil the kettle a couple of times to remove possible harmful substances.
Disassembly nuances taking into account the model
Before troubleshooting, you need to check the obvious points - connecting the device to the network, pressing the power button, the state of the power connector, the correct position of the unit on the stand. If this is not the cause of the breakdown, the components must be dismantled and the problem must be accurately determined.
How to disassemble an electric kettle with a closed heating element:
- Remove the cover from the bottom. In old-style units, the fasteners are located at the top.
- In modern models, first remove the top trim, secured in two grooves at the base of the handle.
- The grooves are carefully released to gain access to the bolts, and the fasteners are unscrewed. Sometimes the top handle is removed with the lid.
- Turn the kettle over and unscrew three more fasteners from the bottom of the device; some models may have more.
- There are locking teeth along the perimeter of the bottom - they need to be snapped off step by step by lightly pressing a screwdriver.
- When the bottom is removed, access to the heating element opens, the functionality of which must be checked with a tester.
In disc electric kettles, the heating element does not come into direct contact with water. A ringing of the electrical circuit tester already at this stage of disassembling the unit will indicate the serviceability of the heating element or its failure as a result of a break in the spiral in the tube.
To check the thermostat, unscrew the screw at the bottom of the handle and carefully remove it. There is a screw under the button that needs to be unscrewed. All thermostat connection points ring. After this, the assembly itself is disassembled. First, remove the cover, check the part, and, if possible, replace it with a new one. To remove the cover, you need to press it with your fingers and push it forward, and then clean the contacts.
Stages of disassembling an old model electric kettle:
- Unscrew the screws located on the bottom of the device.
- The side panel is removed, which opens access to the heating element and thermostat.
- Unscrew the screws to get to the main components.
- If the button is located on top, the kettle must be completely disassembled.
- To check an open heating element, first remove the cover.
If the cause of the malfunction is not a broken heating element, you should check the stand. The kettle is disconnected from the network and removed from the base. Turn the stand over and unscrew the mounting bolts. Disk models have three screws that can be easily unscrewed with a Phillips screwdriver. Remove the lower part of the stand, allowing access to all elements. This system is easy to disconnect from the kettle body.
The device is disassembled slowly, since some manufacturers install special plastic latches to improve the quality of joining the parts. To avoid breaking them, first check for the presence of additional fasteners, and then disconnect the structural elements.
Removing the lid of the kettle
Unwinding the kettle
How to remove the handle
Removing the housing
Case bottom
DIY kettle repair
In this article, we will analyze in detail methods for troubleshooting and repairing an electric kettle with common faults such as “ does not boil ” or “ does not turn on ”. Most teapots in the price category up to 3 - 5 thousand rubles are most likely made in China. Therefore, their reliability, as a rule, is at an appropriate level.
The electric kettle, the repair of which will be described below in the article, worked for about 11 months and failed.
People often think that if the kettle does not turn on , it means that the heating element (heating element) has burned out and the kettle can be thrown away, especially if it also happens to be a disk type.
The spiral heating element could still be replaced if the reason lay in a faulty heating element, but now such kettles are quite rare.
So, if your kettle suddenly stops turning on and its warranty period has expired, then you can safely begin diagnosing the malfunction of the electric kettle.
malfunctions of an electric kettle , we will consider here purely electrical malfunctions, that is, we will not consider here mechanical repairs of a broken part of the kettle structure, all kinds of water leaks, and similar malfunctions of a non-electrical nature.
- What do you need to repair an electric kettle?
- We need the following tools: a Phillips or flat screwdriver (depending on the type of screws) and a multimeter (tester).
- Let's start repairing the electric kettle
The first thing you need to do is make sure that there really is 220 volts in the household electrical network. It’s stupid and trivial at first glance, but this is one of the troubleshooting algorithms. How to determine. It is enough to plug another electrical device into the outlet and check the voltage in the outlet. This is not particularly difficult.
Next you need to ring the electric kettle stand using a tester. We take the tester and ring the circuit one by one from the electrical plug and the socket on the kettle stand.
On the stand in the socket you may have 3 conductors, the third is ground, in my case this protective ground electrically connects the body of the kettle and the side (ground) terminal on the Euro plug. We check the presence of the circuit with a multimeter and the absence of signs of carbon deposits on the contacts.
If the circuit in the stand is not broken (which is rare) and there is no carbon deposits, you can proceed to disassembling the electric kettle. Although it would be more correct to immediately measure the resistance on the kettle itself, I believe that the operation performed will not be superfluous and will not take much of your time.
If everything is in order with the stand for the electric kettle, then the fault lies in the kettle itself .
Here it is appropriate to ring the chain again from the side of the kettle without disassembling it, although it was possible to immediately start ringing from the kettle itself. We take a multimeter and measure the resistance of the current-carrying contacts.
If the device (multimeter) shows infinity, in other words, an open circuit, proceed to disassembling the kettle.
Fault diagnosis
To determine the cause of the breakdown of household appliances, you need to disassemble the kettle and check it with a multimeter or avometer. The point of testing is to alternately ring the electrical circuit from the plug to the heating element.
The test begins with the voltage at the outlet. You can connect another unit to the network or use a tester. Before repairing electric kettles, you must:
- Set the multimeter to voltmeter mode (V), and insert the probes of the measuring device into the socket.
- If there is voltage, proceed to diagnosing the kettle, checking the serviceability of the plug, cord and contact group.
- One probe of the measuring device is sharpened with the pin of the fork in the ringing mode.
- The second probe alternately touches three contacts (two conductive wires and ground to the body) on the base connector.
- The signal from the device corresponds to the pin of the plug being tested. They also check the cable cores and contact groups for the other pin of the plug.
If the tester gives ringing on three contacts, the stand is working, you need to look for another cause of the breakdown. It is necessary to remove the bottom cover by unscrewing the screws and ring the terminal block of the power connector. It is located at the base of the kettle, combined with a thermostat and fixed with a layer of thermal paste.
First, disconnect the supplied cable. Then the left and right contacts of the block ring - when they are shorted to the corresponding elements of the kettle connector, each contact should ring on its inner or outer ring. The absence of ringing indicates the need to disassemble the block and clean the contacts, removing carbon deposits and oxidation. The block is collected and ringed again. If there is a signal, the cause of the breakdown has been eliminated, you can assemble the electrical appliance.
The next diagnostic step is to check the button. One probe of the tester touches the wire connected to the switch, and the second touches the wire going to the heating element. In the off position there is no dialing button; when the mode is on, the multimeter will emit a sound signal indicating the serviceability of the part. If the signal does not sound, then the switch is broken and needs to be replaced or repaired.
Lastly, check the performance of the heating element. To do this, you need to test the spiral output contacts to which the base connector wires and switch wires are connected. If there is a sound signal, the spiral is in good condition. To check whether the heating element for the kettle is shorted to the body of the device, it is necessary to seal one terminal of the heating element with the body. If there is ringing, the spiral is broken, there is a breakdown in the unit body.
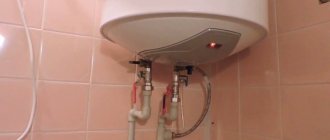
Electric kettle stand repair
The reason for a non-working electric kettle may also be hidden in the stand. There's nothing special to break there. There is only a contact group and leads from it, to which the electrical cord is connected. All this can break here - the wire falls off or the contact point oxidizes.
There is nothing particularly broken in the stand of an electric kettle
In most kettles, the wires from the cord are not soldered. Contact is achieved using copper contact connectors, which are placed on the terminals of the contact group. We carefully examine it and give it a good tug. If there is an oxide film (it is dark) or burnt areas, remove everything and clean it to clean and smooth metal.
If the contacts are clean but “moving”, remove it, press it with pliers and insert it into place. If the kettle is no longer under warranty, you can solder the contacts for reliability.
Although outwardly similar, cylindrical contacts may be different. Available with movable contacts between plastic protrusions
And also, it is worth taking a close look at the contact group. Despite the fact that they are similar, their structure may be different. There are those like in the right photo - with movable contacts that are located between cylindrical plastic protrusions. When pressed (with a toothpick, the end of a screwdriver, etc.), the contacts should move smoothly down. After the force is removed, they should return to their original position. Perhaps an oxide film or other contaminants are preventing the contact from moving, which is why the kettle does not work.
The second type of contact is with a pin in the center. There are usually fewer problems with it, but we look here too. You never know what could happen.
We remove even minor traces of dirt
In any case, we check for the presence of a dark film. This is an oxide deposit that acts as a dielectric, worsening contact. We remove dirt and plaque during repairs.
Checking a kettle with a thermostat
A useful option for an electrical appliance is to maintain the water temperature in a given mode. The design of the teapots is different, which complicates diagnostics. The thermostat can be located in the stand or on the handle. The base contains five contacts - a pair is added to the thermostat. The procedure for checking with a multimeter:
- Determine the correspondence of the contacts to the cores of the power supply cable and the grounding circuit.
- The first core - one probe of the tester is grounded with the pin on the plug, and the second one is alternately touched to the contacts of the base connector.
- Similar actions are performed for the second cable core and the ground wire.
- The contacts that belong to the electrical circuit of the thermostat are tested for a resistance of 100 kOhm.
- If the value is much lower or the meter shows infinity, the thermostat circuit is faulty.
After checking the base contact connector, the kettle itself is ringed according to the same principle as described above. To test the individual components of the circuit (button, heating element, terminal block), first disconnect the thermostat electronics and temperature sensors.
see also
Comments 132
We dropped the kettle on the floor, soldered the crack with a soldering iron and continued to work normally
... glued it in a second and worked fine
Where is it flowing? There's a stainless steel flask there! There are a couple of silicone pipes, but this can be easily fixed. In general, I wouldn’t glue it, in case it starts leaking again, the board is on the bottom, and the thermostat is always online... It’s easier to buy a new one. He just spent his cheap time, that’s what happens. I once changed the motor, and after a month the plastic on the lid fell off.
This is the third time I've changed the plastic under the lid is falling apart.
We need to take the company, not Scarlets and Polaris. I had Philips for 2 years until they dropped it, then Vitek for 3 weeks (the plastic fell apart), my mother-in-law asked for stainless steel. I gave up and took it in for repairs, where they eventually gave me money and bought a Bosch in return, it’s been in service for 2 years now
I’ve been using Vitek for more than 2-3 years and it doesn’t last
The thermopod is metal inside
I glued it with a soldering iron. The material is the kettle itself, it is full of places where you can take the filler. I buy new kettles for the home, but the current ones, sealed, survive at work!
In the garage, before buying an iron kettle, I sealed the cracks with a regular soldering iron; if the crack was large, then I also soldered the mesh from the outside. The teapot got a lot from moving. Dosihpor serves to warm up the water, wash your hands. I soldered it according to the principle of gluing bumpers)))
I won’t glue peppers with cyanoacrylate? Why is it unclear... What remains is cold welding and epoxy resin. Everything else will not be kept checked repeatedly on the garage kettle.
Checking the spiral
To assess the condition of the heating element, you need to calculate the resistance of the spiral. The power of the device in watts (indicated in the technical specifications) is divided by the standard voltage in the network, and the current is obtained. To calculate resistance, divide the voltage by the current and perform a multimeter test. The actual value should not differ greatly from the calculated resistance. Remove the bottom cover from the kettle, set the tester to operate in ohmmeter mode, and check the resistance of the device. If the actual parameter deviates greatly from the calculated value, the heating element spiral has become unusable.
Checking the heating element for functionality
Scale on the heating element
General rules for gluing
No need to guess how to seal a teapot. The technology for such repairs has long been known and tested by home craftsmen. First of all, degrease the surface and use:
- vodka;
- White Spirit;
- solvents.
The remaining solvent is washed off with warm water. Wait until the surfaces to be glued dry. Moisture impairs adhesion—the bond of glue (sealant) to the surface of the kettle. The adhesive is injected into the crack with a syringe.
Each sealant has a characteristic - vulcanization time. It is indicated in the instructions for use and depends on several parameters:
- room temperature;
- air humidity;
- thickness of the applied layer.
After sealing the crack, the kettle should sit for the required time. When the sealant is completely dry, boil the water. They don't drink it. Drain into the sink. Repeat this 3 times. This procedure prevents harmful substances from entering the body.
Possible problems and repair methods
After a certain time, the electric kettle may break down. This is not necessarily due to improper use or care. Heating unit parts wear out and must be replaced or repaired. If the electric kettle does not work, you can fix it yourself by determining the cause of the malfunction.
Doesn't turn on
An annoying nuisance: when the device is connected to the power supply in the morning, the button is pressed, but the unit does not turn on. The reasons may be the following:
- Damage to the power cord and plug. The elements need to be ringed - one probe touches the contacts of the plug, the second touches the connector on the device stand. The absence of a signal indicates an open circuit. The cord needs to be replaced.
- Poor (weak, intermittent) contact in the base. During prolonged operation of the unit, the conductivity of the current is disrupted due to burning of the contacts. They need to be cleaned with fine-grained sandpaper. If the contacts are melted, the base connector is replaced.
- Damage to the internal switch of the device. This part is constantly exposed to heavy loads - the power of kettles varies from 1500 to 2000 W. Melted contacts prevent the device from turning on. You need to check their condition by disassembling the handle.
When carbon deposits form on two contacts, the kettle does not turn on, since the circuit does not close when the switch is on. How to fix: carbon deposits are cleaned with sandpaper, thin nail file or a nail file. Before troubleshooting, the unit is checked with a multimeter to accurately determine the location of the contact opening.
A malfunction of the power plug or power cord is determined by checking with a tester
Carbon deposits on the contacts of the connecting device of the stand and the kettle are eliminated by cleaning the contacts with fine-grained sandpaper until they shine
Heats up slowly
It usually takes a few minutes to boil water with an electric kettle due to the high power of the device. If the appliance heats slowly, the problem is in the heating element.
Despite the use of filters, over time scale forms on the spiral, which prevents the rapid boiling of water - the thermal conductivity of the heating element decreases. The scale must be removed so that the coil does not burn out. How to do it:
- Fill the electric kettle with water.
- Add 1-2 sachets of citric acid.
- Boil water and leave it for half an hour.
- Pour the liquid out of the kettle and rinse.
Citric acid removes scale well; you can repeat the procedure 2-3 times. If the layer of scale on the heating element is very dense, you need to buy a special cleaning agent, for example, “Antinscale” or Major Domus.
Descaling products
Doesn't turn off
Sometimes users are faced with a situation where the electric kettle heats the water, brings it to a boil, but does not turn off. This is a dangerous problem because you can forget about the kettle being turned on, the water will boil away and the coil will burn out. The main reasons why the device does not turn off:
- The most common problem is a loose lid, which prevents the formation of a sufficient amount of steam in the device’s flask.
- The second reason is a clogged steam hole. It is located under the lid of the kettle at the junction of the handle and the body. The steam hole should be cleaned with a toothpick.
- Melting of the contacts of the bimetallic plate, which is responsible for turning off the button when water boils. To check, you need to remove the lid of the electric kettle body and the cover on the handle.
The plate is located under the terminal box (together with the thermostat) and on the button. The switch contacts should open when the platinum touches them and turn off the device. If a pin has melted or the contacts have stuck to each other, you need to eliminate the problem - clean them.
When the parts cannot be repaired, the button (switch) is replaced, the electrical appliance is reassembled and checked again. The thermostat is located at the bottom of the case, and to replace it, the device is completely disassembled. Repairing the kettle button is carried out as follows:
- Disconnect the device from the network and remove it from the stand.
- Unscrew the screws on the bottom panel (bottom).
- Pry off the cover on the handle with a thin screwdriver.
- Remove the mounting screws and disconnect the handle.
- The body of the unit is carefully separated from the bottom.
- Access to the contact group, relay, and heating element is provided.
The bimetallic plate is replaced with a new part if it looks worn out. Assess the condition of the thermostat (button), check the contacts, and clean them from burning. They assemble the device, check it - if all else fails, the button needs to be replaced and the kettle reassembled.
A faulty shutdown button can be replaced
It is worth checking the functionality of the stand
Doesn't heat water to boiling
If the electric kettle turns off before the water boils, the cause may be scale that has formed on the heating element. The heating element is equipped with a fuse against overheating; scale on the surface of the coil prevents heat transfer. As a result, it is not the water that heats up, but the coil. When the fuse trips, the kettle turns off, but the water never boils. To solve the problem, you need to clean the scale. How to repair a kettle with a disk or spiral heater? To do this, you need to boil in a flask:
- Water with citric acid – 2 sachets of 20 g each.
- Baking soda solution – 3-4 tablespoons per 1 liter.
- Coca-Cola contains phosphoric acid.
- Special cleaning agent for descaling.
After this, the flask is emptied along with the remaining solid deposits. Scale can also remain on the walls, especially in models with an open type heating element. Boil the water several times to avoid sediment, and use the kettle as usual.
Also, the reason why the device turns off before boiling is a loose spiral or a broken thermostat.
Water leaks out
The simple design of the kettle allows you to troubleshoot many problems yourself. Sometimes users encounter the problem of leaking electrical appliances. You need to find the location of the leak:
- A gasket installed at the junction of the closed disk heating element with the inner walls of the housing. To eliminate the leak, remove the bottom cover of the kettle and disconnect the top protection installed on the latches. Squeeze out the heating element with the gasket. How to repair a kettle with a disk heater: wash the electrical appliance, the O-ring and the heating element. If the gasket is very worn, it needs to be replaced. The dismantled fragments are dried with a hairdryer and reassembled in the reverse order. After this, the kettle is filled with water and left on a dry towel for 15-20 minutes. If there is no leakage, the device can be used.
- Leakage through the mounting location of the open type heating element. Water can easily leak through a loose connection between the tank and an open-type electric heater. You need to tighten the fastening that holds the heating element - remove the housing cover and the handle cover, tighten the spiral bolts. After this, the flask is filled with water and checked for leaks. If tightening the heating element fasteners does not help, the electrical appliance is disassembled to replace the rubber gasket according to the same principle as described above.
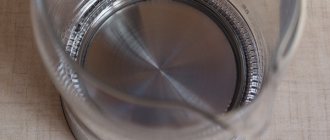
- Leak in the place where the glass fragment, which shows the water level, is attached to the body. Microcracks can form in the plexiglass itself or water leaks in the place where the silicone gasket is installed. The seals need to be replaced, and the glass of the level gauge must be sealed with a sealant for gluing plexiglass/plexiglass - Acrifix116 or 117 116 or 117, "Moment", as well as adhesives Cosmofen or Colakril.
Microcracks in the structure itself are the most common problem; cheap models are especially prone to leaks. You can try to use the device more often so that small cracks are filled with scale, but this is not the best solution to the problem. If water leaks through the body, you need to return the device under warranty and purchase another kettle. Cracks more often form on plastic models or devices with a disk heater.
It is not recommended to glue the body together - when water boils, toxic substances will enter the liquid. If water flows through the bottom, there is no point in repairing the device, since all the important components are located in the lower part of the unit. If water gets in, it will short out the contacts, and repairing such a breakdown at a service center will be expensive.
The location of the leak and the reasons for its occurrence are often the same for all models of kettles
Leaking water meter window is a common occurrence
You can try to seal the crack in the body, but it is better to replace such a kettle with a new one
You can try to seal the crack on the kettle with hot glue
Heating element burnout
When scale accumulates on the heating element coil for a long time, the heating element fails. Open-type spiral heaters that are in full contact with water are more susceptible to such failure than disk elements. If you forgot to pour water into the kettle and plugged in the device, this also leads to burnout of the heating element. Before repairing, you need to ring the kettle with a tester. First, the device is disassembled to gain access to the heating element. Then the multimeter probes are connected to the heater contacts. If there is a signal or the tester light comes on, the spiral (disk) is working.
You can check the heater without a measuring device. To do this, you need to connect the mains neutral to one contact of the heating element, and the phase to the other. Then take a 220 W lamp and insert it into a socket from which two insulated cables are removed. The stripped ends of the wires touch the contacts of the heating element. If the lamp lights up, the spiral is working; if not, the heating element in the kettle needs to be replaced. How to replace the spiral:
- The tester is switched to ohmmeter mode and the resistance of the heater is measured.
- If the indicator is 1 or infinity, you need to install a new heating element.
- The electric kettle is disassembled by removing the bottom, lid and handle trim.
- Unscrew the screws securing the heating element, and disconnect the spiral from the wires.
- The heating element is removed from the kettle, a silicone gasket is installed on the new heating element, and the electrical appliance is assembled in the reverse order.
If the user is faced with the problem that the kettle light indicator is on, but the device does not heat the water, the nichrome spiral may have broken or the heating element output wires have burnt out. The heating element needs to be replaced or the contacts cleaned.
Sometimes the cause of a kettle breakdown is a jumping or failure of the switch spring. The button does not lock in the desired position, so the spring must be inserted into place, and if it breaks, the part must be replaced. To do this, disassemble the handle of the device, unscrew the fasteners and dismantle the switch. The spring is inserted or replaced, the kettle is assembled in the reverse order.
Electrical appliances with disk heaters cause more problems. As a result of contact with water, rust forms on the heating elements. Corrosive processes lead to wear of the heating element. To solve the problem, the disk needs to be replaced: unscrew the screws on the bottom, snap it off and remove the bottom of the kettle. After this, the heating element is squeezed out together with the silicone gasket, and all components are disconnected from it. The structural elements are installed on a new disk - terminal block, thermostat - and the unit is assembled.
Checking the heating element of the electric kettle for a breakdown on the body
Electric kettle button
The reason that the electric kettle does not turn on may be the power button. It is on the handle. To check it, you need to remove the protective plastic. It is usually held in place by one or two screws, which are usually located somewhere at the bottom. We unscrew all the screws that we found, remove the plastic and examine the button.
Checking the button
This button is also called a thermal switch or thermal fuse. She turns off the kettle when it boils. There is a bimetallic plate that changes shape when heated. Having increased, the plate presses on the button and turns it off. And since a considerable current flows through the contacts of this device (up to 10 amperes or more), the contacts often burn or oxidize. Because of this, the device does not turn on at all, or turning it on again helps. But sometimes you have to hold the button until the kettle boils. If this is your case, the button is the reason.
For the most part, such a button needs to be replaced, but it will be difficult to find. So let's try to repair it.
Having pulled out the button, you need to ring it. We take a multimeter, press the button and measure the resistance by attaching the probes to the two terminals. It should be equal to zero. If a break or very high resistance is measured, the problem is in the contacts.
Checking the thermal switch of an electric kettle
Electric kettle button repair
If you discover a button malfunction, you can try to repair it. The contacts are hidden under a plastic cap and must be removed. Often the lid moves to the side, and then it can be pulled up and removed. Sometimes there are plastic latches. In general, we act carefully and remove the plastic part.
If the button on the kettle does not work, the contacts are most likely burnt
When we see oxidized or burnt contacts, we clean the metal until it shines. You can do this with fine-grit sandpaper, a needle file, or a metal nail file, but be careful not to scratch the plates too much. They should be smooth. It is better to remove the oxide film with a strip of felt.
After this operation, we again check the resistance of the switched on button. If it appears, you can try to assemble and turn on the kettle. If it helps, we consider ourselves lucky. If not, you will have to disassemble the kettle further.
It happens that the contact group has melted, then the button must be replaced completely. Finding exactly the right size is difficult. So, most likely, you will have to “collectively farm” something.
For what kind of breakdowns can you return an electric kettle under warranty?
High-quality household appliances are expensive, so the warranty on the device allows you to get your money back if the unit breaks down. But not with any malfunction you can return the kettle back to the store. Under warranty, they will accept a device that has significant defects. These include:
- Faults that cannot be corrected.
- Constant breakdowns of the same unit.
- A breakdown that is very expensive to repair.
- A malfunction that cannot be quickly corrected.
- Serious mechanical damage to the housing.
- Poor gasket quality causing leaks.
- Failure of the heating element during proper operation.
To return an electric kettle to the store, you must submit a written complaint. It indicates the reason for the return - a breakdown that is associated with expensive or time-consuming repairs, or other serious damage. The store administration will suggest contacting the manufacturer's service center. After the 20-day period, the breakdown must be repaired. If this does not happen, the buyer is refunded the money or offered another electric kettle in exchange.
The seller (store) can pay for an examination of the product to determine the cause of the malfunction - the buyer’s fault or a manufacturing defect. If a defect in an electrical appliance is caused by the fault of the manufacturer, the consumer has the right to demand compensation for moral damages, but in court.
Electric kettles have become an integral part of kitchen equipment. Convenient, compact devices boil water quickly, take up little space and attract attention with their beautiful design. You can’t do without a kettle, and to ensure it lasts a long time, you need to choose quality products.
How can you seal a glass electric kettle?
Sometimes there is no money to buy a new kettle. Sometimes there is no time or desire to go to the store. In such cases, you can revive an old but favorite kitchen gadget. You can seal a leaky flask with a substance that satisfies a number of requirements:
- non-toxic;
- there are no restrictions for use in the food industry;
- withstands high temperatures;
- elastic;
- dries quickly at room temperature;
- has adhesive properties.
On forums, craftsmen give advice on what and how to glue a leaking teapot. You cannot use recipes that include:
- epoxy resin;
- dichloroethane;
- BF-2 glue;
- cosmofen.
During operation, they release substances into boiling water that are harmful to health. In addition, they are not plastic and become brittle when exposed to high temperatures.
Food grade silicone sealant RTV 118Q
The lower limit of the operating temperature range is -60 °C, the upper limit is +260 °C. RTV 118Q sealant is used to glue glass, ceramics, metal, rubber, and plastic. It is approved for use in the food industry. It takes 72 hours to dry completely. It is convenient to use the product. The paste-like mass is easy to apply to the surfaces to be bonded.
OTTOSEAL S27
The lower limit of the operating temperature range is -40 °C, the upper limit is +180 °C. OTTOSEAL S27 is approved for use in the food industry. This silicone sealant glues glass together without applying a primer. It takes 24 hours to dry completely.
Dow Corning 732 clear
The lower limit of the operating temperature range is -60 °C, the upper limit is +180 °C. It takes 24 hours for the sealant to dry completely. Times are based on certain conditions:
- indoor air humidity 50%;
- air temperature 22-25 °C.
Dow Corning 732 clear is approved for use in the food industry by NSF International.
Silicone food-safe sealant "Titan"
Bonds perfectly smooth surfaces well, including colorless glass. The lower limit of the operating temperature range is -40 °C, the upper limit is +200 °C. It takes 24-120 hours to dry completely. The time depends on the thickness of the applied layer.
Brief contact with food is allowed.
CHEMLUX 9014 food grade
The sealant glues glass, ceramics, stainless steel, plastic, aluminum. The lower limit of the operating temperature range is -40 °C, the upper limit is +180 °C. There are no restrictions on the duration of contact with food. The adhesive layer dries quickly.
What should you absolutely not use?
On craftsmen's forums, you often find advice on repairing such damage with epoxy resins, dichloroethane, cosmofen, BF-2 glue and even dental cement compounds. This is categorically not recommended, since all of these substances are toxic to one degree or another, and the latter are fragile, non-plastic masses that are not designed for high temperatures.
The best way to seal the glass on a kettle is only with sealants specifically designed for food use. Do not experiment on yourself or the health of your loved ones. Approach the renovation process wisely!