BytTechService » Washing machines » Repair and replacement » How to check the washing machine motor
If your washing machine stops working, the reason may be a faulty motor. Before buying a new part, you need to check the SMA motor and determine the cause of its failure. In most cases it can be repaired.
In the article we will look at what types of engines there are and what is special about checking them yourself.
How a washing machine engine works: types
Before carrying out diagnostics, you must understand what type of motor is in your washing machine and how it works. There are three main types: asynchronous, commutator and inverter centrifuge motors for automatic and semi-automatic washing machines.
- Asynchronous is installed in Bosch, Siemens, Millet, Ardo and Kandy washing machines. The cheap and quiet motor has a simple design: a stator and a rotor. Large dimensions and low performance have left the asynchronous motor a thing of the past. Therefore, it was used in early models of the above machines.
- The commutator motor is now actively used in the brands SMA Indesit (Indesit), Ariston, Zanussi, Electrolux, Samsung, Veko. The belt-type motor has compact dimensions and sufficient power. Transmits revolutions using a belt to the drum pulley. Its design is a little more complicated than the previous type: a stator, a rotor, two brushes and a tachometer that controls its speed.
- The direct drive (inverter) modern engine has just begun to conquer the user. Installed on LG and Samsung models. The motor does not have a belt, but is directly attached to the drum, transmitting speed to it. Its structure is similar to an asynchronous motor, but the direct drive motor is compact, powerful and rarely fails.
Troubleshooting
Before you repair the motor at home, check which of the three types of motors is used in your washing machine.
Asynchronous
Obsolete type. Despite its simplicity, magnets on the rotor and stator windings, without rings and brushes, have been forced out of the market of modern household appliances due to low power output and impressive dimensions. It has found application only among users as a generator - the assembled installation can operate for 30 years or more without repair. As a consumer, it is useless: it produces half as much energy as it takes from the power grid, the rest is spent on losses in operation.
Types of devices to check
In addition to the standard set of tools (pliers, a set of screwdrivers and wrenches), you will need an electrical device that performs the “diagnosis test” of the motor.
Multimeter
Previously, a multimeter was called an avometer - it was a pointer device that measured resistance, voltage and current. Today, pointer instruments have almost completely disappeared from the market - with the exception of miniature, modern versions, which are difficult to find. They have given way to digital counterparts that allow you to check diodes, capacitors, inductors and windings, and even the health of transistors.
Tester
The same as a multimeter, but can be made independently - from any pointer galvanometer. To carry out measurements, the tester switches to the resistance measurement mode (values on the sector with the designations Ohm and kOhm).
The device received the name “continuity” because of its buzzer mode: when the resistance is below 200 Ohms, an audible alarm is activated.
How to call: conditions
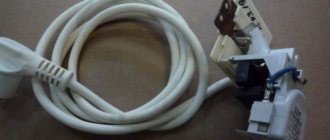
Before checking the electric motor for malfunction, you must make sure that the cord and plug of the device are absolutely in good working order. Usually, the absence of a disruption in the supply of electric current to the device can be judged by a glowing indicator lamp.
After making sure that electric current is supplied to the electric motor, it is necessary to dismantle it from the device body, while the device itself must be completely de-energized while performing this operation.
Checking the armature and stator of the electric motor is done with a multimeter. The sequence of measurements depends on the model of the electrical unit, and before ringing the electric motor, you should make sure that the measuring device is in working order.
The most common “breakdown” of multimeters is a decrease in battery charge, in which case you can get distorted results of resistance measurements.
Another important condition in order to ring an electrical unit correctly is to completely suspend any other activities and devote full time to performing diagnostic work, otherwise you can easily miss any section of the electric motor winding, which may be the cause of the problem.
How to diagnose an electric motor at home?
The easiest way to check for proper operation is the commutator motor.
It is easier to remove it at home and can be checked without the use of expensive professional equipment. As for electric motors with direct drive, a control system is needed to diagnose them, and it will have to be removed along with the tank, since it is an integral part of it. The stator is bolted to the frame of the automatic washing machine itself; the rotor also has a rigid mount, which in most cases is not dismountable. Repair of such washing machines is most often carried out only in service centers.
How to check a direct drive motor?
Most often, such an engine can only be checked by analyzing the errors displayed on the display or the service menu of the washing machine. Using the error code that appears on the display, you can detect a turn short circuit, diagnose a power supply break, or brush failure.
More complex and professional testing and repairs are carried out by qualified craftsmen using special laboratory and bench equipment.
How to check a commutator motor?
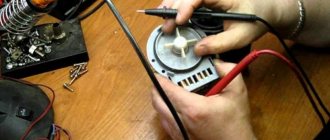
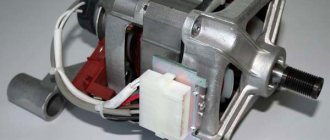
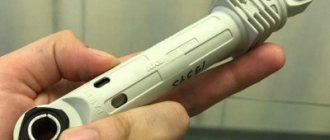
The most common motor used in modern models of washing machines. You can check the commutator motor of your washing machine yourself at home. First, the electric motor must be removed from the machine body. First, the back or front wall of the case is unscrewed (depending on the model of the washing machine). The motor itself is located under the tank on the rear side and is attached to the metal frame with studs or bolts. The electrical connection is equipped with terminals that can be easily opened.
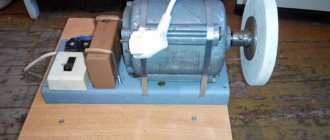
After the motor is removed, it is necessary to make a series connection between the stator and the rotor, and apply a mains voltage of 220 W to the ends. It is best if it is supplied through additional ballast. You can use a heating element as it, the main thing is that the power of the equipment with active resistance is at least 500W. If, after connecting to the mains, the motor rotates and the autotransformer does not heat up much, at this stage it is possible to diagnose the normal operation of the motor.
Other engine parts
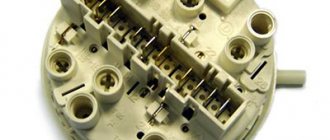
The lamellas and winding also require checking. The first are metal plates that transmit electricity to the rotor. They are glued directly to the shaft, but over time they can peel off, interfering with the transmission of current. In case of minor detachment, grinding is indicated; in case of severe detachment, only replacement of the engine is indicated.
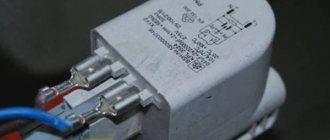
Next in line is the winding. If there is a break, a short circuit occurs, the motor overheats, the thermistor is triggered and the mechanism is switched off. Check the integrity of the wiring with a multimeter:
- enable resistance measurement;
- place the probes on the motor shaft;
- we compare the result with the norm of 20-200 Ohms (if less than 20, the fault is a short circuit, more than 200 - a break).
The stator is also tested, only with a buzzer. Having detected a broken winding, repairs are not enough - the motor needs to be replaced.
Interesting:
- How to change the belt in a Bosch washing machine?
- How to repair a Bosch washing machine
- How does a Zanussi washing machine work?
- Should I buy a direct drive washing machine?
- Electrolux washing machine does not wash
- Which Bosch washing machine is better to buy?
Reader comments
- Share your opinion - leave a comment
Verification methods
There are two ways to independently check the health of the washing machine motor. In order to be able to use them, you need to have at least a basic understanding of the structure of the engine and how it is powered. On the Internet you can find many diagrams that display this important information in an accessible form.
- The first test method involves applying voltage to the starter and rotor windings of the engine, after first connecting these elements alternately. The disadvantage of this method is that it does not guarantee a 100% result, since even if the motor rotates under voltage, this does not mean that it will function properly under different operating modes of the washing machine.
- The second method will require special equipment, namely an autotransformer with a power of 500 watts or more. Using this device you need to power the connected windings of the starter and rotor. This method is safer as it allows you to keep the speed of rotation under control.
About engines
To quickly fix a breakdown, first of all, you should determine which motor is located in the device.
Important! The washing machine, depending on the manufacturer, has a certain type of engine, which has its own characteristics, so checking each model will be significantly different.
There are 3 main types of motor units:
- Direct drive - used in modern automatic machines (LG, some SAMSUNG models). Such a three-phase electric motor is connected to a drum, has a multi-pole commutator, a rotor surrounded by permanent magnets, and also a high level of efficiency, so the price of machines with such an electric motor is high.
- An asynchronous motor has a simple design, which consists of a starter and a rotor, but its large dimensions and low efficiency make the motor unprofitable, which is why it is not used in modern machines.
- The commutator motor has many advantages that facilitate its use in modern washing machines (small size of the device, high speed does not affect the operation of the motor). The improved motor design allows the belts to transmit rotation from the motor to the drum. You can repair all the parts yourself.
How to check engine health with your own hands
Since today only commutator and inverter motors are used, let’s consider diagnostic methods using their example.
Direct drive type
It is difficult to check its serviceability at home. You can use system testing if it is provided for your washing machine model. Self-diagnosis can also display a fault code on the machine display. Having deciphered the code, you will understand what the problem is and whether it is worth contacting a workshop.
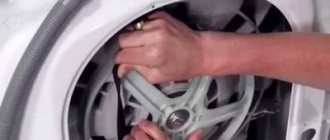
If you do decide to remove the engine, do it correctly:
- Disconnect the washing machine from power.
- Remove the back cover by unscrewing the bolts around the perimeter.
- There are screws under the motor rotor that secure the wiring. They need to be unscrewed.
- Remove the central bolt holding the rotor. To do this, use a 16mm head (for the LG model).
- When unscrewing the bolt, hold the rotor with your other hand to prevent it from rotating.
- Remove the rotor assembly.
- Behind it is the stator assembly, which is held in place by 6 bolts.
- To unscrew them, take a 10 mm socket.
- Disconnect the wiring connectors from the stator.
You can begin the inspection and check the performance of the engine.
Collector type
There are several ways to check a brushed motor. But first, remove the motor from the housing:
- Remove the back cover of the CMA.
- Disconnect the wires from the engine.
- Unscrew the bolts and pull the motor out of the housing.
Start diagnostics. Connect the stator and rotor winding wires as shown in the diagram below. Then connect the winding to 220 Volt electricity. If the rotor begins to rotate, the device is considered to be working properly.
This method has disadvantages. First, you won't be able to accurately confirm the functionality of the engine, especially how it will perform in different modes. Secondly, a direct connection threatens to damage the motor if it shorts out.
Based on the above, this circuit can include ballast, which serves as protection. You can use a heating element from a washing machine as ballast. Connection according to the diagram:
In this case, when closed, the element will begin to heat up, protecting the engine from combustion.
Since the commutator motor consists of several elements, they all need to be checked.
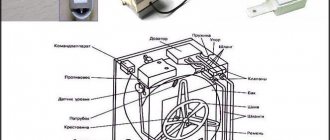
Electric brushes
There are two brushes on the sides of the motor housing. Since they are made of soft material, they will wear out over time. Remove the brushes from the housing and, if they are worn, install new parts.
You can find out that there is a problem with the brushes when you connect the motor. If you connected its wiring to the network, and when rotating it began to spark, then the problem is with the electric brushes.
You can buy new items in the store by showing the old brushes or naming the machine model.
The problem is in the slats
Electricity is transmitted through the lamellas via brushes to the rotor. Since the lamellas are glued to the shaft, they can peel off when the motor jams. Minor delamination can be dealt with using a lathe by turning the manifolds. The shavings are thoroughly cleaned with fine sandpaper.
When inspecting the lamellas, pay attention to peeling and burrs, which indicate operational problems.
Rotor and stator windings
If there are problems with the winding, the SMA motor becomes less powerful or stops working altogether. This happens because a short circuit occurs in the windings, the motor overheats greatly and the thermistor is triggered, which turns it off for safety.
You can check the windings with a multimeter. Set it to resistance measurement mode. Place the multimeter probes on the lamellas as shown in the picture. Normally, the readings should be from 20 to 200 Ohms. If the resistance is less, it is a short circuit. If more, the winding is broken.
To check the stator, turn on the buzzer mode on the multimeter and apply the probes to the ends of the wiring one by one. If the device is silent and does not emit a signal, then everything is in order.
To find the location of the short circuit, connect one multimeter probe to the wiring, the other to the housing. Normally there should be no sounds.
If you find a breakdown, do not attempt to repair it yourself. To do this, you need to re-create the winding. In this case, it is easier to replace the electric motor.
As you can see, checking the engine with your own hands is not difficult. In some cases, you can repair the engine yourself or contact a service center.
The most common causes of engine failure
- Failed electric brushes;
- Broken winding in the rotor and stator;
- Collector lamellas.
Replacing electric brushes
These are conductive graphite cubes with wires that rub against the commutator.
The reason for replacing motor brushes may be:
- loss of rotational force of the drum or its complete stop;
- unusual noise when the washing machine is operating.
The most common cause of failure is tank overload. Also, electric brushes wear out quickly when spinning at maximum speed or due to a short circuit in the turns of the electric motor winding, a problem with the belt that connects the motor to the drum, it can jump off the pulley or break.
A visual inspection of the brushes will also help you understand the need for replacement. If they spark during operation or there is a black coating on the surface, the parts need to be replaced.
Of course, this is an inexpensive engine element, and repairs can be done at home. It is enough to purchase a suitable brush model from a specialized store or service center. The main thing is to choose and replace the brushes on the washing machine correctly; they must fully match the type of motor and it is better if it is an original set from the washing machine manufacturer.
Slats need replacement
This is precisely the component of the commutator along which the electric brushes slide. They transmit current through the rotor winding to the motor. The plates themselves are rarely subject to wear; the cause of failure can be the breaking of the cord in the winding in the places where the lamellas are attached or their detachment.
This happens, most often, also due to improper operation of the device, for example, in a top-loading machine, the washing process was started with the drum flaps open or failure of the bearings.
If the delamination is small, repairs are made on a special machine by grooving the collector. At home, you can get by with simple fine sandpaper. The principle is the same - the lamellas are sharpened, then the space between them is thoroughly cleaned of dust and shavings.
You can check the electric motor for this malfunction by slowly turning the rotor; if a characteristic sound appears, then most likely the reason is in the lamellas.
We check the entire stator winding of your engine
If you find a break or short circuit in the windings, then there is no point in starting to repair such an engine. Naturally, there are options to rewind the winding, but this action will cost somewhat more than purchasing a new one. That is why, in the event of such a malfunction, your motor must be replaced completely or the very part that is faulty. The latter option is available subject to the possibility of purchasing one, for example, only the rotor or only the stator.
Adviсe
- Once every six months to a year, check the lubrication condition of the motor bearings. If it is running low, clean the shaft of any remaining old lubricant and add new one. Do not use industrial oil - it dries quickly at 50-80 degrees.
- Do not overload the car by driving it to the limit. If the model provides 7 kg of laundry, load it by 5-6 kg.
- Reduce speed during spinning, especially when there is a lot of laundry (around a certain weight). Instead of 1000 rpm, it is better to use 400-600.
- Light items require a refreshing wash - one main cycle, one rinse, one spin. Do not delay washing for 3 hours when the laundry is lightly soiled. If you have a dryer and an iron, you don’t have to use the drying and light ironing mode.
- Secure the machine by placing it in a small recess, “sinking” the legs into the floor a centimeter. At high speeds it will not budge.
- Do not hang the SMA on brackets above the floor, even if the wall is made of reinforced concrete. If you catch the resonance when shaking while spinning clothes, you can fill up the house.
- If the supply voltage in your network changes frequently, use a high-power stabilizer or UPS that produces a stable 220 volts.
- When checking the engine for operability, turn it on in series through the heating element of the machine - the faulty windings will be saved, since if they have low resistance or short circuits, the spiral of the heating element will quickly heat up.
- An additional circuit breaker must be used in the wiring (line) of the socket into which the SMA is plugged in.
A washing machine, like any appliance, needs careful handling and timely maintenance. Then it will work for 10-20 years without any problems.
For information on how to check the washing machine motor, see below.
Removing and testing the motor
Almost everyone can check the engine of a Bosch washing machine, but before starting work it is recommended to get acquainted with the “object”. All Bosch models are equipped with compact and powerful brushed motors, which, unlike inverter motors, require a drive belt. An elastic band connects the drum pulley and the engine, allowing the mechanism to unwind.
The internal structure of the motor consists of a rotor, stator and winding. Electric brushes are attached to the body, and next to them is a tachogenerator that controls the acceleration speed. Having become familiar with the design of the engine, you can begin to check it. But before testing, you will have to remove the device from the washing machine.
Before disassembling the washing machine, read the factory instructions and electrical documentation.
Then we move on to checking the motor. We throw a wire from the rotor winding to the stator, and then apply a voltage of 220 Volts to the circuit. The start of rotation of the engine will indicate the operability of the unit, the lack of reaction will indicate that a breakdown has occurred.
Testing an engine with voltage also has its drawbacks. For example, in this way it is impossible to test the ability of the motor to operate at different speeds. The second “minus” is a high risk, since a direct connection is fraught with overheating of the device, followed by a short circuit. True, you can reduce the likelihood of damage to the electric motor by connecting a heating element, which will heat up when a current leaks, thereby protecting the engine.
Engine testing is not limited to just one check. It is also necessary to evaluate the condition of the electric brushes, lamellas and windings.
Let's check the condition of the brushes
Be sure to pay attention to electric brushes. They are located on both sides of the housing and smooth out the friction force emanating from the engine. The carbon tips take the hit, which wear out over time and require replacement. To check them, we take the following steps:
- unscrew the holding bolts.
- compress the spring and remove the brushes.
- disassemble the body of each brush.
- We evaluate the condition of the carbon tips. If their length is less than 1.5 cm, we replace them with new ones.
Electric brushes are always replaced in pairs, even if one of them is completely new.
If the brushes are worn out, you need to purchase new ones. Ideally, you should take old samples to the store and buy similar parts. The electric brushes are installed in the reverse order according to the already familiar instructions.
Checking the slats
Small plates - lamellas, which transmit current through the brushes, are not subject to wear, but if the engine jams, they can peel off from the shaft to which they are glued. In case of minor delamination (0.5 mm), a collector groove can be made. To do this, you will need fine sandpaper, which you need to sharpen the lamellas well and clean the entire space around from chips.
There may also be a more serious problem where the wiring of the lamella from the rotor breaks, then you need to solder the wiring in the right place with a soldering iron.