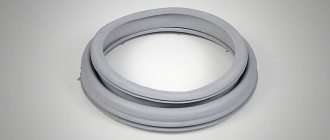
In case of wear or damage to the rubber cuff of the washing cuff, equipment owners can independently replace such an element. The cuff serves to ensure a tight fit of the door to the body of the washing machine and avoids leaks. When replacing, it is necessary to install a cuff with full tightness to ensure further normal operation of the equipment.
It is better to entrust the repair of washing machines to professionals!!!
We present to you our unique catalog of private craftsmen and service centers —
Select your city and artist in the filter: by rating, reviews, price!
How do you know when a replacement is needed?
During intensive use, the rubber cuff may be subject to physical wear, damage, or break due to stress. In such a situation, you need to replace the rubber band yourself. Due to damage to the rubber seal, water leakage may occur, which is why it is important to monitor the condition of the cuff and take action if damage is detected.
The reasons for replacing the cuff are the following factors:
- physical wear and tear during operation. Rubber is exposed to temperature changes, exposure to hot and cold water, and chemicals. Vibrations and friction of the drum, the intensity of washing have a significant impact on the wear of the cuff;
- friction. The rotation of the drum with things has a mechanical effect, especially when setting high spin speeds;
- damage from small sharp objects and clothing items. Locks, zippers, and decorative details often damage the cuff, after which leaks occur.
Causes of damage
The cuff is most often replaced due to the appearance of ruptures or cracks in the seal that allow water to pass through during washing. As a result of the formation of such damage, the owner of the machine will see water leaks under the hatch, and upon examining the cuff itself, he will notice cracks or tears, which may have different sizes. The reasons for this situation are the following factors:
- Natural wear of the seal. During operation of the machine, the cuff is constantly subject to friction between the drum and the laundry. It heats up during washing and then cools down. In addition, it is affected by detergents. Over the years, this leads to brittleness and brittleness of rubber.
- Poor quality washing powder. Under the influence of cheap powder and detergents of dubious quality, the rubber of the cuff begins to deteriorate, so saving on powder leads to expenses for replacing the seal.
- Excessive dosage of detergents. If you use an excessive amount of powder or liquid, the structure of the sealing rubber may also be damaged, which will require the cuff to be replaced.
- Parts of clothing that could damage the seal. Such elements can be metal and plastic fittings. In addition, screws, nails and other objects can get into the machine from clothing pockets, which can cause tears in the cuff.
Over time, if the sealing collar is not cleaned, mold may grow on it. Therefore, it is necessary to periodically clean the washing machine. You can see how to do this in the following video.
Related article: How to make a brick barbecue oven with your own hands
Preparation
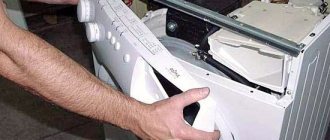
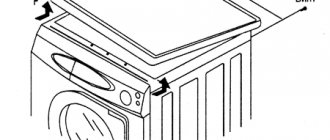
To simplify the procedure for installing a new cuff, it is recommended to carry out preparatory work and remove the front panel from the washing machine. In different models, it is secured with latches or self-tapping screws, which must be unscrewed from the grooves with a screwdriver.
Replacing the rubber band is also possible without removing the front panel, but this task will be more difficult to complete, especially if the user does not have experience in disassembling equipment.
First, inspect the cuff seat. After several years of active use, dirt, blockages, and scale accumulate in the holes and on the internal surfaces of the devices. It is necessary to wash the circle around which the cuff is placed with a sponge and cleaning agent to ensure maximum tightness and prevent the development of mold and mildew. At this point, the preparation of the seat for the new cuff is considered complete.
How to choose a cuff?
In order to correctly replace a deformed cuff, it is necessary to pay attention not only to the features of dismantling and installation, but also to the rules for selecting a new part. To ensure the maximum level of tightness, only original products or the most similar analogues, such as Diamond, are allowed to be installed. You can purchase products exclusively from official representatives of the company or in large retail chains, the products sold in which meet international standards and have quality certificates.
If the repair of the washing machine is carried out by a service center, then it is its specialists who must take care of purchasing the necessary components for repair. And also specialists from these organizations will help you choose a high-quality analogue that will become a full replacement for the original part.
Many novice craftsmen buy a cuff to replace other brands, relying only on external similarity. The presence of even minimal differences will lead to difficulty in installation and lack of tightness.
By giving preference to a high-quality analogue, you can significantly reduce financial costs and time spent on delivery. Original components not only have a high price, but also a long delivery period.
What will you need?
To remove and install the new rubber, you will need small pliers and a small flathead screwdriver with a blunt tip to avoid damaging the rubber seal. For self-replacement you will also need:
- a new cuff, which must fully correspond to the parameters of the old one and be suitable for a specific model of washing machine;
- internal and external clamps. If the previous clamps are not worn out and are subject to further use, you can install them. However, if there is damage, it is better to purchase new ones, especially since they are inexpensive;
- fine abrasive sandpaper, soap, water and sponge. These items will ensure the preparation of the seat and simplify the installation of a new cuff.
Using a soap solution, you can lubricate the place where the cuff will be installed; thanks to this lubrication, the elastic will clearly fall into place. Never use machine oil or WD-40! They can subsequently stain things and make it difficult to remove.
Purpose of the rubber seal
In any model of washing machine, the rubber seal performs the same function - it serves as a sealant. It reliably isolates the space between the body and the tank. If the integrity of this part is compromised, then water can leak onto the electrics - the control board.
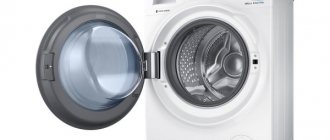
The second rubber band - the one you see every day - is located on the door. It prevents water from overflowing from the drum and prevents short circuits.
Step-by-step removal instructions
The procedure for removing the rubber cuff is not difficult. For accuracy, we will provide a step-by-step algorithm of actions:
- disconnect the device from electricity, water supply and drainage pipes;
- using a flat screwdriver, remove the metal or plastic clamp from the door cuff, which in most models is removed in the same way;
- find the latch or clamp spring on the fastening circle (it is located at the bottom of the door or near the lock);
- Using a flathead screwdriver, pull the spring towards you and loosen it. If there is a bolt, unscrew it from the groove and also release the locking latches;
- remove the ring by prying it up with a screwdriver, but try to avoid punctures and damage;
- Unclench the metal ring on the water fill hole and remove it;
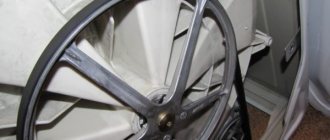
- remove the sealing collar and tuck it in the direction of the drum;
- Locate the triangular mark on the rubber band and drum.
These marks must strictly match to avoid leaks and other malfunctions.
- To completely separate and remove the rubber cuff, disassemble the front panel of the washing machine;
- remove the cover by unscrewing the bolts at the back;
- remove the powder container;
- Unclench the latches securing the control unit, remove the panel and carefully place it on the body;
- remove the lower closing panel and unscrew the bolts, provide access to the inside of the seal;
- To completely remove the cuff, remove the fixing clamp from the back using a flat-head screwdriver;
- after this, the cuff can be easily removed, and a new sealing rubber is installed in the vacant space.
To help you understand the cuff removal procedure, watch the video below.
Purchase rules
When replacing the cuff yourself, it is advisable to purchase a new part in advance . This will allow you to combine the dismantling with the installation of the elastic band, and you can start using the washing machine literally right away.
You can buy a cuff in an online store or at specialized retail outlets. The elastic band is selected taking into account the serial number of the model. This is an important point, since not all seals are suitable for washing machines, even among products from the same manufacturer.
One of the options for correctly choosing a part that has become unusable is to remove the old one and bring it to the store with it. If you plan to order online, you should focus on the markings of the machine.
This information is in the documents for the device , but it can also be found on a sticker that is present on the back of the hatch.
If there are difficulties with identification, the sticker with useful information can be photographed and presented to the manager, who will help you choose the right product. The cost of cuffs for TM Indesit washing machines averages from 1,000 rubles and above, taking into account the model and place of purchase.
It is absolutely impossible to select an elastic band “by eye” , as it is easy to make a mistake.
Installing a new rubber band
Installing the cuff is one of the most critical stages of repair, since it is necessary to maintain a tight fit and tightness. The step-by-step algorithm of actions is as follows:
- unpack the clamps and set aside the inner and outer ones separately;
- use the markings to position the cuff in the correct position. In most models, the triangle corresponds to the top of the seal, and the bottom has a hole for the hose;
- insert the rubber onto the tank in strict accordance with the markings, insert it into the drum;
- unscrew the two screws and remove the locking lock;
- insert the tip of the screwdriver into the lock, this will help fix the clamp motionless;
- install the inner clamp;
- put the lock in place;
- spread the rubber along the outer circumference of the body;
- use a soap solution to treat the surface and joint area;
- install the outer clamp and install the door in place.
Try closing the hatch, and if it comes out without force, then you have installed the sealing collar correctly. To check the tightness and tightness of the fit, run a test washing program. The rubber is installed tightly if there is no leakage.
It is better to entrust the repair of washing machines to professionals!!!
We present to you our unique catalog of private craftsmen and service centers —
Select your city and artist in the filter: by rating, reviews, price!
Replacing the cuff on the washing machine drum
First you need to carefully inspect the seal and make sure that it is damaged. In order to fix the new element, you will have to dismantle the old one by unscrewing the fasteners.
It would seem that we can get to work. But, before starting the process, you need to perform a few more steps:
- Unplug the washing machine.
- If there is water left inside the appliance after washing, it should be removed.
Before carrying out repair work, you should unplug the unit from the outlet, and only then should you begin the process of replacing the rubber band.
Step-by-step instructions for replacing rubber bands
Step 1. Remove the front clamp. It should be taken into account that the clamp fastenings are different on different devices. This depends on the material from which they are made.
Mounting options:
- latches;
- springs;
- screws.
The first method is found in plastic clamps, while the others are found in metal clamps. Regardless of the type, a screwdriver will be required during installation. Further actions will differ depending on the design of the fasteners. So, the screw fastening is unscrewed, the spring is stretched, and the plastic ring is pulled at the joints of the fasteners.
On almost any model of washing machine, first remove the clamp - to do this, you need to bend the edge of the seal to see what material it is made of
Step 2. Remove the top panel from the front side. To see the screw fastening, you first need to remove the box intended for loading powder. To do this, pull it on and then press the button located inside.
Next, you will need to open and disconnect the hatch, which is located on the front side of the device. For such purposes, it is necessary to unscrew the screw fastening of the bottom panel, and then move it to the side and forward (until a characteristic click is heard). Now you can open the door and remove the clamp that secures the rubber band on the front panel, thanks to which the rubber band can be pulled out of the recess.
Removing the powder tray will allow access to the screw fastenings
Step 3. After dismantling the clamp, you should remove the seal.
This must be done as follows:
- Gently tighten the front of the elastic.
- Find the mark on the surface (it is on the cuff).
- Use a felt-tip pen to make a mark on the tank.
- Remove the inner clamp using the same principle as the first one.
The manipulations performed allow you to quickly pull out the elastic band (it should be pulled)
Step 4. After dismantling, you should carefully examine the condition of the seal - if there is noticeable damage on the surface, it will have to be replaced.
When choosing a new seal, please note that it should only be intended for your device model. It won’t be possible to take a similar cuff, because it still won’t seal the hatch hermetically.
The new rubber band must match the previously established pattern.
Step 5: Prepare to replace the cuff. Often, after dismantling the old rubber band, dirt remains around the edges of the tank, so you will need to do some cleaning first.
When cleaning, it is recommended to use a concentrated soap solution and a soft sponge. At the same time, it is not necessary to wipe it off after completing the procedure, because the soap will serve as a lubricant.
During the washing process, use a soap solution and a sponge.
Step 6. Install a new seal. This is not as easy to do as it might seem at first glance - you will have to make an effort to stretch the cuff.
This process has a certain sequence:
- It is necessary to attach an elastic band to the edge of the tank from above so that the marks match. Now you should press the seal tightly with two fingers.
- If after cleaning there is no soap left on the surface, then you need to rub it on the bottom edge, since this is where it can be difficult to pull the rubber band onto the drum.
- Finally, you need to check the tightness of the elastic band. There should be no holes left, otherwise water will leak through them.
Install the new rubber band carefully so as not to damage it.
Step 7. Install the clamp.
Here the fixation method will depend on the fastenings:
- If the clamp is mounted on a spring, then you can install it with a screwdriver. So, the tool is placed in the locking opening and a spring is attached to it, which allows you to loosen the clamp and put it on the cuff.
- In the case of a screw fastening, installation is simplified - all you need to do is put it in place and tighten the screws with a screwdriver.
- If the clamp is a wire, then its ends are carefully bent with pliers, and then the ring is installed. After which the connection point can be hidden in the opening.
- It will be much easier to attach a plastic clamp where there are already latches. After which a seal is installed on it.
Once this process is complete, the functionality of the seal must be checked. To do this, start a long washing mode. If there are no puddles near the unit, then the cuff is sealed.
It is permissible to install a clamp only if it is free of dents and other damage; in other cases, you will need to buy a new one
Checking work
After installing the rubber cuff and the door into the latches, you need to check whether everything is fixed correctly and whether there are any leaks during the washing process. To do this, run the wash in test mode and make sure there are no leaks under the door.
If there is a leak, it is necessary to disassemble the door again, remove the cuff and reinstall it, observing all the requirements. Check around the entire perimeter to ensure that the rubber fits snugly and does not bulge. The new rubber band should provide a complete seal.
Repair process
In order to quickly and efficiently carry out the process of sealing the hatch cuff, you should prepare everything that may be required at such a moment:
- a small piece of thin rubber;
- scissors;
- gasoline or alcohol to carry out degreasing;
- glue for rubber, for example, “Moment”;
- cotton wool or soft cloth.
In order for the repair to be as long-term as possible, and for the patch on the cuff to hold tightly, you need to adhere to the following algorithm.
- At the first stage, the patch itself is prepared. If it is rubber, then it should be carefully cut to the size of the damage. If a condom or rubber gloves are used as a patch, you should glue each layer and then cut out the part to the required size. The patch should be 1.5-2 cm larger than the hole on each side.
- The damaged area should be thoroughly degreased with gasoline or alcohol. The sealed cuff should be kept straightened until completely dry.
- Then a thin layer of glue is applied to the surfaces to be glued. Subsequent steps must be carried out in accordance with the instructions that come with the glue. There may be two options. Sometimes you need to connect the parts right away, and sometimes you need to wait a while and then glue them together.
- The glued surface should be positioned as naturally as possible, and then fixed until the glue dries.
- The part is left for at least a day so that it sticks well.
Well, that's all, the hatch cuff has been repaired. But you shouldn’t hope that there won’t be any more trouble with him. This measure is only a temporary solution, therefore, if possible, it is necessary to purchase a new part and replace it as soon as possible. After all, due to the constant movement of the drum, the patch can quickly fly off.
After the glue has completely dried, you can begin assembly. After installing the part, you should perform a test wash to check the effectiveness of the repair. If you follow the instructions for using the glue correctly, there should be no problems and the machine will work without leaks for some time.
How to extend the service life?
To increase the service life of the rubber cuff and avoid its premature replacement, you must follow simple rules:
- After washing, it is recommended to wipe the rubber seal dry to avoid it drying out and the appearance of fungus; also remove small blockages and sand from the fold of the cuff;
- reduce the use of gel detergents, as they settle on the seal, forming a thick layer of mold over time;
- use citric acid for cleansing and prevention.
If these rules are followed, the cuff will last a long time. And if damage is detected, the best solution would be to replace the cuff to avoid further damage to the washing machine.
Possible faults and solutions
The rubber cuff is one of the elements of the washing machine that cannot be restored or repaired. That is, if the rubber is damaged or worn, it must be replaced with a new one suitable for this device model.
We told you in detail, provided photos and video materials for replacing the rubber cuff yourself. If you have difficulties with replacement, contact the service center, the technician will quickly replace the rubber seal at your home without wasting time and energy. If you notice damage to the rubber band, we recommend that you immediately take measures to replace it, since further use of the washing machine with a damaged cuff can cause serious malfunctions.
Why is replacement needed?
An automatic washing machine is a modern mechanism, a malfunction of which can cause even minor breakdowns and malfunctions. One of the reasons for the malfunction may be deformation of the rubber seal. The hatch cuff of a Samsung washing machine is a rubber gasket that provides the maximum level of tightness of the device and prevents liquid from leaking out during washing. This element is made of special elastic silicone, which has a long service life, a high level of flexibility and resistance to temperature fluctuations.
Prolonged and intensive use of the device often leads to deformation of the cuff, a decrease in its elasticity and contamination. Experts recommend replacing this element in the following cases:
- deterioration of the draining process;
- the appearance of drips near the hatch during washing;
- accumulation of large amounts of pollution;
- the appearance of a specific and unpleasant odor.
Depending on the device model, the cuffs may differ in shape, size and design features, which indicate the presence of additional functions in the device.