Washing machine leaking: what to do
If you discover a malfunction, strictly adhere to this action plan:
- If you see that the washing machine is leaking during the next startup, immediately disconnect the unit from the power supply and do not even enter the room where it is located. You may receive a severe electric shock. If you cannot do without entering the premises to disconnect the device from the network, then turn off the electricity in the entire house (apartment);
- After this, turn off the tap through which water enters the device;
- Then open the filtration compartment and drain all the water from the machine through it;
- Take things out of the drum.
Only after performing all these steps step by step can you inspect the washing machine to determine the cause of the malfunction.
How to clean the seal
Before you start cleaning the rubber seal, you should prepare the necessary tools.
- A great option would be to use baking soda. It not only cleans the parts, but also allows you to get rid of stubborn dirt and mold.
- Various antibacterial and disinfectants . They can be found among household chemicals, and they can be used for the toilet or for cleaning the bathroom. Any type of cleaning agent with antibacterial additives is suitable for combating mold in a rubber cuff . You can even get by with regular laundry soap.
- Another option is to use copper sulfate . Although copper's main use is to treat plants against pests, it also deals with dirt and fungal colonies on the walls of the washing machine.
- You can use the available tools that you can find in the kitchen. For example, treat with vinegar, soda, peroxide, citric or boric acid .
Important! Be careful with aggressive products that corrode rubber parts. Make sure that the product you choose is suitable for interacting with rubber.
How to choose a product based on pollution
- To remove stubborn stains and plaque apply baking soda moistened with water. It will help you easily get rid of dirt and will not damage structural elements.
- If plaque and scale have formed on the body under the seal from prolonged use , you can use citric acid or anti-lime tablets . They will dissolve the scale in the sealing casing.
- Acetone or a special nail polish remover is perfect for removing rust . Apply it thoroughly to problem areas of the washing machine.
- To cope with the unpleasant odor inside the washing machine , you should pour eucalyptus or lavender essential oil . You can also use regular bleach or lemon juice . Long-lasting aromas will eliminate the smell of mold and mildew.
The most common causes of washing machine leaks
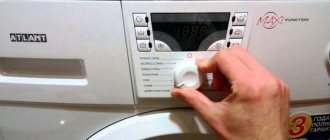
If your LG, Samsung, Indesit or Ariston, etc. washing machine fails this type for the first time during washing, the reasons may be different, for example:
- Failure of the pump, which is responsible for removing used liquid from the machine;
- Violation of the integrity of the tank (formation of holes in it as a result of mechanical damage);
- The water supply hose or liquid discharge hose is damaged;
- The rubber seal, which prevents leaks from under the door, has become deformed;
- The channel (pipe) in the form of a curved corrugated tube that connects the drum to the pump is broken;
- The integrity of the channels through which the liquid passes from the inlet flap into the powder receptacle is damaged;
- The oil seal has failed. This is the element that ensures the rotation of the drum;
- The powder receptacle is clogged.
Inlet or drain hose
When you discover that your washing machine is leaking, the first thing you should do is inspect it visually. The cause of the leak may be deformation or breakage of the hoses for water intake and drainage. In addition, when drawing water or draining, a leak sometimes appears from the joints between the hose and the machine.
This is not a serious breakdown, but it can be fixed by simply replacing the rubber band.
If you see that the hose itself (for drainage) is torn, then seal it with a special agent and a rubber patch. All this can be bought at a plumbing store. If possible, then simply replace it. It is better to change the fence sleeve completely, because the pressure in it is always strong, which is why the load on this element is too high.
The cuff of the washing machine hatch is torn - how to fix it
Without a washing machine, housekeeping becomes much more difficult, since clothes have to be washed by hand, and such washing takes a lot of time and requires a lot of labor.
That is why any malfunction of the washing machine is perceived by housewives, to put it mildly, negatively.
This fully applies to the violation of the integrity of the cuff of the washing machine hatch, which in everyday life is more often called rubber or elastic.
If the cuff from the washing machine is torn, this is manifested by the fact that water constantly flows in the area of the hatch during washing. This malfunction makes further operation of the machine almost impossible, and therefore, it is necessary to immediately resolve the issue of repairing the cuff or replacing it with new rubber.
Residents of Moscow in such a situation can and should turn to a service center for help, whose highly professional, experienced technicians will immediately arrive at the client’s home and, in the shortest possible time, carry out the appropriate repair work to eliminate the malfunction, that is, they will repair or replace the cuff, after which the washing machine can be used further.
Causes of cuff damage
Note that damage to the hatch cuff of a washing machine is a common occurrence. If such a problem happened to your washing machine, then it is important to understand what exactly caused it in order to plan your next steps. Knowing the causes of the problem will allow you to understand whether it makes sense to repair it, that is, for example, to seal the sunroof cuff or whether you will have to change it.
Violation of the integrity of the cuff can be due to a number of reasons.
| Cuff damage | Causes of damage | Solution |
| Cuff cracks | The occurrence of cracks is associated with strong vibrations of the washing machine drum. | Regardless of what decision you make: seal the cuff or replace it, you must eliminate the cause of the increased vibration of the drum; |
| Wiping the cuff | The cuff is worn out due to malfunctions in the washing machine, as a result of which it rubs against some part. This often occurs due to the drum being misaligned. | The problem must be corrected before you make a decision: repair or replace the cuff, otherwise very soon the cuff will be damaged again. |
| Rupture or cut of the cuff | In the vast majority of cases, the cuff breaks or a cut appears on it due to the fault of the users of the washing machine, or rather, due to their negligence. The fact is that breaks and cuts are caused to the cuff by foreign objects, which, as a rule, fall into the drum from clothing pockets that were not checked before washing. | If you want to ensure that the hatch cuff of your washing machine is not damaged by various foreign objects, be sure to check the pockets of the clothes you put in the wash and check the drum itself, since foreign objects can be “placed” in it by children or pets. |
In case of all the listed damages, it is possible to seal the cuff, but you must understand that we are talking about a temporary measure that will only postpone the need to replace the cuff with a similar new part for some short period of time.
Moreover, you should be aware of the existence of “incurable” injuries, when it is most likely impossible to seal the cuff, and there is no point in doing so. We are talking about heavily worn cuffs, on which cracks will appear again and again.
How to repair the hatch cuff of a washing machine yourself
Today on the Internet there are many descriptions of what needs to be done if the cuff is torn. Sealing the cuff
Sealing a cuff - you will find a lot of materials on this topic on the Internet, and most importantly - advice from “sofa” craftsmen on how and with what to repair a cuff.
Advice
In principle, it is possible to seal the cuff - nowadays there are a sufficient number of effective adhesives, another issue is that they cannot withstand high temperatures (from 40 to 90 degrees), vibration and an aggressive environment, which is an aqueous solution of detergents.
Our experience
For more than 10 years, he has been closely involved in repairing washing machines. Despite their efforts, its craftsmen were never able to find a reliable means for gluing the cuff, despite the fact that they tested a variety of means: Moment, Superglues, Silicone adhesives, special adhesives, automotive adhesives, Permabond Rus, etc.. Your experience
However, taking into account the peculiarity of the mentality of Russians, who like to learn from their own mistakes, we will still tell you how to seal the cuff.
- From a prepared piece of thin rubber you need to cut a patch, which should be 1.5-2 centimeters larger than the damage along the entire perimeter.
- Thoroughly degrease the surfaces to be bonded with gasoline or alcohol.
- Apply a thin layer of glue to them.
- Connect the surfaces to be glued.
- Then the cuff is carefully unfolded in the most natural position for it and left for at least 24 hours.
- Test the patch by trying to tear it off. Then heat the patched cuff area with a hair dryer and try to tear off the patch again. The last stage of the test should be to place the “repaired” cuff in a large container of water, which must be brought to a boil or at least to a temperature of 90 degrees.
If you don’t believe it, you’re doing the right thing. Check it out for yourself if you don’t mind your time and washing machine. Cuff repair by suturing
There is another way to repair a cuff - by stitching. Service technicians will share their experience. Our experience
This repair method is very simple: the damaged area is sewn up and sealed with sealant. The cuff will hold water, but not for long.
What's happening
Under the influence of the vibration of the drum, the threads cut through the cuff, and the sealant completely flies off - it does not stick to the cuff at all.
Mechanical contraction
Mechanical tightening is, unfortunately, the only working way to repair the cuff. On the other hand, it is effective only for minor damage that is not located on the bend. Under these conditions, you can try to pull the hole through two coins pre-drilled in the middle.
Materials
To repair a cuff by mechanical tightening you will need:
- screw with nut and locknut;
- 2 coins;
- 2 washers;
- red high-temperature silicone gasket sealant (ABRO has proven itself well, its operating temperature is up to 343 ° C).
Repair algorithm
- We drill a hole in the middle of the coins, generously coat the hole, coins and screw with sealant.
- Place the washers on top of the coins and apply the resulting “devices” to the outside and inside of the hole.
- We insert the screw from the inside so that the smooth head of the screw is on the inside of the cuff, after which we tighten the entire “structure” with a nut.
- There is no need to remove the excess sealant that is squeezed out when screwing, it will fill all the pores, and the structure becomes monolithic and reliable. There is also no need to tighten it too much, so as not to damage the product itself.
There is also no need to immediately test the reliability - the sealant should dry well. You will end up with a patch that looks like a car gasket, firmly secured between two clips, with the edges of the coins forming the gasket.
Troubleshooting and repairs
Some damage can be repaired without the help of a qualified professional.
As we have already described above, you can carry out minor repairs yourself if:
- The water supply hose or liquid discharge hose is damaged;
- The rubber seal, which prevents leaks from under the door, has become deformed;
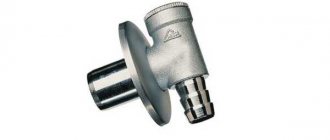
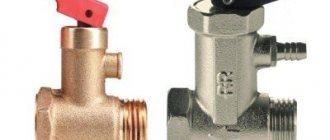
- The washing machine filter is leaking;
- The powder receptacle is clogged.
Ways to do this have already been described above and are available to everyone. You can detect other types of breakdowns yourself, but a specialist will be better able to handle the repairs.
These include:
- Damage to water intake pipes;
- Leakage from the bearing and seal side;
- Tank leaking.
Preventive procedures
After you have gotten rid of the stubborn dirt, you should think about preventive measures to prevent the recurrence of mold:
- After each wash, open the door and thoroughly wipe all parts of the structure with a dry cloth.
- Once a month, thoroughly clean your washing machine.
- Remember to remove large particles of debris and dirt remaining after washing.
- Before loading things, carefully check the pockets for extra items that may get stuck in the sealing rubber.
- Provide the machine with a flat surface. Then all the water from the drum is removed through the hose and is not retained inside.
As you can see, nothing complicated. And as a thank you for the extra work, we get a washing machine that does the job without any problems.
Subscribe to our Social networks
Prevention of breakdowns
Based on the reasons described above why a washing machine leaks, we can draw logical conclusions on how to prevent this unpleasant phenomenon and significantly extend the life of your washing machine:
- Never put laundry that weighs more than the specified weight into the device;
- If the products have large sharp metal parts. It is better to first place the clothes in a special case;
- Drips can be prevented by using only high-quality detergents specifically designed for washing;
- Often the cause is too hard or dirty water. If you are aware of this problem, it is better to install the filter before connecting the machine;
- Unplug the device when you are not using it.
Why does the seal require special attention?
All machine parts require periodic cleaning and maintenance. Sealing rubber is no exception. The fact is that high humidity due to direct contact with water. In addition, if you “open” this casing, you will definitely find debris there. Not the best place to store any contaminants, you know!
Important! Debris accumulated under the rubber band can lead to the formation of mold, rotting and the appearance of an unpleasant odor in the body of the machine.
In general, there is no choice: you must clean it! But this needs to be done correctly. Will learn!
Useful tips
- Before the washing process, make sure that you firmly put back all the parts that were washed for preventive purposes (filters, pipes, hoses, etc.);
- Always remove items from pockets before placing items in the machine;
- If you discover even a minor breakdown or poor operation of the machine (humming, strong vibration, unpleasant odor, etc.), begin to correct it and do not continue to use it until the problem is completely eliminated;
- Use products to remove dirt and scale and carry out empty washing in a timely manner to prevent clogging and breakdowns;
- Don't neglect safety rules. Install a special fuse on the socket, and if you see water near the device. Immediately disconnect from power by any means possible.
- How to wash a blanket in a washing machine
- How to wash something so that it shrinks
How to prevent water from accumulating?
The design features of the rubber seal cause moisture to accumulate in the folds. There is no point in trying to prevent this. But it is necessary to thoroughly wipe the cuff after each use of the machine. Otherwise, mold will appear in the device and an unpleasant odor will arise.
Important! To ensure that the seal dries well, the machine door must be left ajar after washing.
If dirt has already accumulated on the cuff or mold has formed, the part should be cleaned. Regular wet cleaning with a cloth and water is not enough. Special cleaning agents must be used.
How to check the performance of the heating element?
If you are making repairs yourself, it doesn’t hurt to make sure that the water heater is the cause of the lack of water heating. After all, other breakdowns are possible. Read about them “The washing machine does not heat the water.”
The performance of the heating element is checked visually by the amount of scale on it, as well as with a special device - a multimeter.
In the heating element, both the spiral and the dielectric are checked.
First you need to solve a physics problem.
It is required to calculate the resistance of the heating element using the formula R=U?/P.
The resistance of the heating element is equal to the square of the voltage supplied to it, divided by the power of the heater itself.
It is known that:
- U is the voltage supplied to the electric heater. Usually in household sockets 220 V.
- P is the power of the heating element . It should be indicated in the instructions for the washing machine or on its body. For example, the power is 2000 W.
We substitute the data into the formula and get: R=220?/2000 W=24.2 Ohm. This is the normal resistance of the heating element. If it is working properly, the multimeter will show exactly this figure or close to it.
To measure the resistance of a heating element with a multimeter you need:
- Set the multimeter to resistance measurement mode and set it to 200 ohms.
- Simultaneously touch the two probes of the multimeter to the terminals of the electric heater.
- Look at the multimeter display.
If the display shows “ 1 ” or “ ? “—the heating element is broken, “ 0 ”—internal short circuit. Conclusion: the spiral in the heating element is not working.
If a figure close to the calculated one is displayed (in the example it is 24.2 Ohms), the heating element is working , the spiral inside it is intact.
To check the dielectric of the heating element (it may cause a breakdown of current on the machine body), you need to:
- Switch the multimeter to dialing mode and set it to the “Buzzer” mark.
- Touch the heating element terminal with one multimeter probe.
- Use the second probe to touch the body of the heating element or the ground terminal.
If the device beeps , the dielectric passes current to the body of the washing machine, the heating element is faulty . If there is no sound, everything is in order and the problem of lack of water heating should be looked for in another unit of the washing unit.
Problems with the hatch cuff
More often than not, a puddle under the washing machine appears due to the rubber seal. It is also called a cuff and is located around the circumference of the drum, ensuring the tightness of the system. But if the rubber wears out and becomes damaged, then cracks and holes form on its surface. As a result, the water is not retained in the machine, but flows out in portions.
Another possible cause is a leaking powder receptacle. Sometimes a trickle starts from the detergent tray, and then goes around the dashboard and down to the drum hatch. As a result, it seems that the rubber band is leaking. Sometimes a leak occurs due to a foreign object getting stuck between the sunroof glass and the cuff. The door does not slam tightly, the seal is broken, and some of the water flows out onto the floor during washing. Fixing a leak is simple - remove the item and slam the drum.
But more often the problem is in the cuff, especially if the washing machine has been in use for a long time. In this case, it is better to check your guess: inspect the seal for integrity and flexibility. If the rubber band is chipped or cracked, the system is not sealed and water is not retained in the drum. The gasket is not always torn - sometimes it is a matter of severe wear. Old rubber loses its smoothness and elasticity, which invariably leads to leakage.
Operating a washing machine with a leaking cuff is dangerous!
To understand why it is leaking and what to do to fix the problem, you need to stop the cycle and inspect the hatch door. If the cuff is visually intact and flexible, then it is enough to clean the elastic and the surfaces in contact with it from accumulated debris, plaque and dirt. If the seal is damaged, there are cracks, black traces of mold and chips, there is no alternative - only replacement.
You can replace the rubber seal either at a service center or at home. The procedure for dismantling the old cuff and installing a new cuff is complex, but quite realistic. The main thing is to prepare for repairs and not deviate from the instructions.