Have you ever been in a situation where you need to finish a job urgently, and one of your most essential power tools suddenly breaks down? In this case, the first thing that comes to mind is to run to a repair shop or, at worst, purchase a new device. Trying to fix a breakdown on your own seems impossible to many due to incompetence.
In some cases, of course, you cannot do without the help of a specialist or the purchase of a new tool, but quite often the problem is not so great that you cannot solve it on your own. You just need to first familiarize yourself with the information regarding the internal structure of the device and methods for eliminating possible malfunctions.
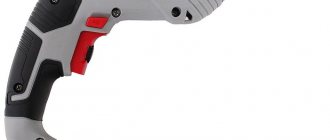
As an example, I would like to present a sequence of actions on how you can repair a screwdriver with your own hands if one of its common malfunctions occurs. We will talk about a specific model of a cordless screwdriver Einhell as 18-2 GA, the chuck of which has stopped, despite the proper operation of the drive mechanism, and can be easily rotated by hand.
What could be the reason?
Sometimes the problem lies in the speed switch, which may be in an intermediate position or the lever it moves has not fully moved the ring gear. This can easily be fixed by switching it back and forth a couple of times. If this does not help, then the fault most likely needs to be looked for in the gearbox. Don't worry about repairing your screwdriver gearbox being a difficult task. In fact, the design of this power tool is quite simple and you don’t have to go into the weeds like a nesting doll.
Screwdriver design and malfunctions
All screwdrivers are designed approximately the same. They consist of the following functional units:
- start button;
- pulse width regulator;
- electric motor;
- transistor;
- planetary reductor.
A screwdriver of any model consists of five main functional units.
All components of the device are located in a durable and aesthetic case, which has a rubberized handle, control and adjustment buttons, as well as a socket for installing a battery (if the screwdriver is designed only to operate from a 220 V network, it has a battery No).
The screwdriver has a beautiful ergonomic body on which all the necessary controls are located
When you press the start button not all the way, the screwdriver may squeak. This is normal for DC motors during startup and at low speeds.
Why and how to adjust the ratchet
A screwdriver ratchet is a clutch designed to limit the force when rotating the chuck. Its presence in a power tool can be determined by a rotating ring with numbers. Some users do not understand the meaning of the clutch and do not touch it. Using a ratchet, you can adjust the depth of screwing in the screw. If the material is too soft, the head of the fastener is easily recessed and can pass right through. When using small fasteners, very high torque can destroy it. The ratchet prevents cutting off the slot of the screws and wear of the screwdriver bits . To determine the desired value on the adjusting ring, make several passes, starting with the minimum.
Each number on the ratchet corresponds to a certain torque value - the higher the number, the greater the force and vice versa
If the screwdriver has a drilling mode, then the last icon on the coupling will be a pictogram with an image of a drill. This position uses maximum torque.
Frequent screwdriver malfunctions
Since all modern screwdrivers have a standard device design, their malfunctions, as a rule, are also typical. The main defects of this tool include:
- battery failure;
- brush wear;
- button failure;
- cartridge runout;
- lack of response to attempts to turn on or off;
- work intermittently.
You can fix all these breakdowns yourself if you have experience working with measuring and soldering instruments. In some cases, you will have to change the components completely, since not all parts are sold separately . If repairing a gearbox or motor is too complex an operation for you, these elements can be completely replaced or taken to a workshop.
Inside design of the Einhell as 18-2 GA screwdriver
To get to the gearbox, you need to disconnect the battery and remove the upper part of the power tool body, after unscrewing the 9 mounting screws using a Phillips screwdriver.
After removing the top cover, you will see several mechanical and electrical units and parts interacting with each other, including:
- Permanent magnet electric motor;
- Three-stage planetary gearbox;
- Two-position speed switch;
- Spring lever driven by speed selector;
- A transistor that regulates the voltage supply to the engine and is responsible for the smooth speed of its armature;
- A start button having a wide-pulse regulator designed to transmit control voltage to the transistor;
- Engine rotation direction switch (reverse);
- A lever that moves the reverse switch;
- Terminals for connecting to the battery;
- Ratchet that limits the level of load on the cartridge;
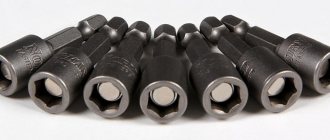
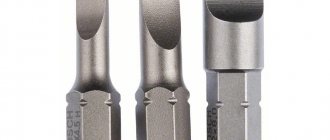
- Chuck with self-clamping mechanism.
Screwdriver cartridge version
The mileage of the screwdriver chuck indicates problems with the serviceability of the gearbox tool, which is located directly behind the electric motor. This is another reason why the full return screwdriver does not work.
Spare parts for planetary screwdrivers
The output shaft of this gearbox is where the chuck is mounted; therefore, if we talk about cartridge mileage, we must remember the gearbox shaft mismatch. The reasons for this may be the following:
- A) curvature of the gearbox shaft;
- B) wear of gearboxes;
- B) failure of the gearbox shaft support bearing;
- D) maximum production of pins on which the planetary gears are installed.
All of the above factory-made parts are not subject to this repair. The problem of beating the screwdriver chuck in this case is solved by replacing the gearbox parts with new ones.
Removing the gearbox
To get inside the gearbox, you must first disconnect the electromechanical filling of the screwdriver from the lower part of the housing, which can be easily done, since the parts are not secured.
Then you need to unscrew the 4 screws that fasten the two halves of this mechanical unit, but it is better to do this by placing it vertically.
When the fasteners are unscrewed, you should carefully (so that the contents do not fall out of the plastic case) disconnect the two parts of the gearbox from each other, trying to ensure that the demarcation washer separating the first two stages of the gearbox from the third remains on the half that interacts with engine.
Thus, by maintaining the integrity of the first and second stages, the design of which makes no sense to interfere with in the event of a given breakdown, you can focus on the third stage, the condition of which will help you understand what the problem is and how to repair the screwdriver on your own.
As can be seen in the previous photo, three small gears (satellites) belonging to the third stage of the planetary mechanism are in a chaotic state. Their pins (axles), possibly due to strong vibration, became loose and fell out of the holes intended for them, so the shaft driving the cartridge does not interact with the gearbox and therefore rotates freely.
How to repair a screwdriver with your own hands? + (Video)
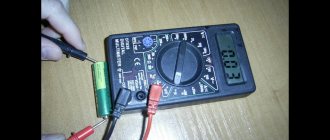
For example, if the tool stops turning on, then you first need to check the health of the battery. If the breakdown does not disappear when you place the device on charge, then you will have to arm yourself with a multimeter and start scanning the device in search of the root cause. First of all, take a look at the voltage value indicated on the device body and compare it with the measurement readings on the battery. The data should be approximately the same. If the voltage is too low, then most likely the problem is hidden in the charger or battery pack.
For example, the charger can be checked using a multimeter by plugging it into the network and taking measurements at the terminals of the device at idle. It is important that the voltage criterion is slightly greater than the nominal one. In a situation where there is no voltage, then the culprit of the breakdown is definitely the charging unit. Interskol screwdrivers suffer from this fairly common problem. In general, correcting the defect will require specific knowledge of electronics or require the purchase of a new unit.
If you discover a battery problem, for example, with a Makita screwdriver, you can open this block with your own hands, where the power elements are located. As a result of the opening, you should conduct an examination of the connecting wires and ensure that the soldering is of high quality. If no visible defects are detected, then using a scanner you should measure the voltage in each element. The values should show 0.9 - 1V voltage power. If a block with a low voltage reading is found in a row, it must be replaced.
Troubleshooting a detected problem
Further actions will be aimed at returning the pins to their place, for which they must first be removed from the gears.
Then it is advisable to wipe the axles, as well as the holes for them, from grease and treat them with cotton wool soaked in a solvent.
Then drive the pins into the holes using a hammer and a metal guide.
When the axes are in a stationary state, you can put gears on them and begin the process of assembling the power tool in the reverse order to that described above.
Of course, other types of malfunctions may also arise, so in each specific case you need to additionally look for information on how to identify the problem and how to fix the screwdriver in case of a given breakdown, and if you are determined, then your efforts will most likely not be in vain, since how you can save time and money.
If the battery and charging unit are working, but the screwdriver does not work
If it turns out that the charging unit and battery of the tool are working, then you should look a little deeper for the cause of the electrical malfunction. To do this, you need to disassemble the screwdriver. Further steps to identify breakdowns and eliminate them are as follows:
- Measure the presence of voltage coming from the battery to the terminals of the “Start” button. If there is voltage, then power is supplied to the button. If there is no voltage, it means the wire is damaged or the contact is broken. We follow the chain further to find the fault
- Check the start button. First, you need to remove the battery from the tool - this is necessary to check the serviceability of the button. After removing the battery, you should short-circuit the contacts (connect the wires that go from the battery to the input terminals of the button). You need to connect the multimeter probes to the output contacts of the button and set the device to resistance measurement mode. To measure the resistance value, you need to press the tool button. If the button is working properly, then the device readings will tend to zero. If it malfunctions, the device readings will tend to infinity (break)
The button can be replaced or repaired. If the part is collapsible, then you can disassemble it and clean the contacts. Very often, the cause of button malfunction is burnt contacts. If you clean them with sandpaper, the device will operate as before. If the button is not removable or its contacts are badly burned out, then you will need to buy a new part. Its price is not high, so everyone can afford to buy it to avoid repairs.
This is interesting! The button consists not only of contacts, but also of small springs, which can fly out at the slightest wrong movement. To prevent this from happening, you need to disassemble the button carefully and slowly.
Main causes of malfunctions
Screwdrivers are either corded or cordless. Their main faults are almost the same, and the differences are related to the type of power supply.
Corded screwdriver
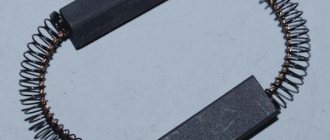
If the device does not turn on, first check the condition of the socket, and then, if it is working, inspect the plug. Often the screwdriver does not start because the contacts burn out. If both nodes are intact, you should inspect the cable to make sure that it is intact and not broken or bent. Possible causes may also be a faulty power button, worn out electric brushes, or a burnt-out motor winding.
If the equipment sparks, you need to look for a defect in the armature, electric brushes or motor commutator.
A self-starting screwdriver indicates that the power button has broken down.
If the cartridge is loose, the cause is damage to the gear shaft. If the chuck is jammed and the drill bit or bit cannot be removed, the clamping jaws are jammed. The reason is lack of lubrication or breakdown of the internal components of the cartridge. If this mechanism spins, the problem is the gearbox is faulty.
If the ratchet is defective, inspect the petals of its locking device, the spring and the pins.
Cordless screwdriver
If the equipment does not turn on, check the charger and battery health. When discharging quickly, its condition is diagnosed using a special tester.
Other malfunctions of a cordless screwdriver are similar to network equipment.
How to disassemble
Disassembling the screwdriver is performed on a table or other flat surface to avoid loss of parts or fasteners.
Screwdriver
To disassemble the screwdriver, you first need to remove the battery and then unscrew all the screws. Then the case is carefully opened, trying not to damage the structure. If difficulties arise, you need to inspect the device again. There may be fasteners left somewhere or the parts are connected by staples that need to be removed.
After the case is opened, remove the parts one by one and lay them out on the table in the order in which they were removed. You can take several photographs so as not to make mistakes during the assembly process of the equipment.
Gearbox
A breakdown of this unit is indicated by strong vibration during operation, unusual noises or other signs. For repairs, you will need to disassemble the screwdriver gearbox. It includes ring gears, satellite gears, and carriers. All parts are removed from the housing one by one, then thoroughly cleaned and lubricated.
The procedure is carried out on a flat surface, removing all the parts, laying them out in the correct order so as not to experience problems during reassembly.
The disassembly itself looks like this: the cartridge is removed, the housing is disassembled, the gearbox is separated from the engine. Next, the plate is removed, all parts are removed from the housing, and the bolts connecting the halves of the gearbox are unscrewed. Use pliers to adjust the diameter of the spring to improve gear engagement. Next, the coupling is disassembled - the retaining ring, washers, and bulk bearing are removed. The shaft is removed.
After disassembly, faulty elements are replaced with new ones. Sometimes, for example, when a shaft is bent, it is necessary to purchase a new gearbox.
Engine
If the motor does not work, the problem is usually associated with the brushes, or less often with the armature winding. In the first case, the brushes are replaced with new ones. In the second, you will need to change the engine itself. The gear pressed onto the shaft of this unit remains intact; it must be disconnected with a special puller or improvised tools. The part is then placed onto the new engine using a hammer and a hard surface.
button
Repairing a screwdriver button is usually impractical, but sometimes it is enough to simply disassemble it and thoroughly clean it. Conventionally, it includes three nodes:
- control button for turning on and off, as well as speed adjustment;
- soft start lever;
- reverse button.
If the part is collapsible, to separate it, you need to find the plastic latches and bend them. The button that cannot be disassembled is replaced with a new one.
Causes of breakdowns of different brands of screwdrivers
Typically, screwdrivers break for common reasons, regardless of their brand and cost. Most often they are associated with incorrect user actions. Among them:
- Operation errors. The equipment is used only for its intended purpose. If you start drilling concrete with a low-power device, it will only work for two to three days.
- Exceeding the permissible operating time. Screwdrivers are intended for home and professional use. The former should work no more than a couple of hours a day, the latter can be used longer.
- Failure to comply with storage rules. The equipment must not be kept in damp or cold areas. Moisture causes mechanical and electrical parts to oxidize, and cold damages batteries. In addition to dampness, the devices are afraid of direct sunlight. Overheated screwdrivers are highly likely to burn out during operation.
- Batteries are not charging correctly. It is not allowed to leave them discharged for a long time, or to exceed the charging time. At least four to eight times a month, start the tool and allow it to work for a short time.
By following the recommendations for care and use, the owner of the equipment will ensure its long service life, regardless of whether it was produced in China or Europe.
If a screwdriver breaks down, you can diagnose the device and repair it yourself. Most broken parts cannot be repaired or are quite difficult, so they will need to be replaced with working ones. When purchasing spare parts, you need to check that the new elements match the old ones. If this is not the case, at best the equipment will not be assembled, and at worst it will be completely damaged.
Source