Level calibration
When the flask is secured with screws, calibration is quite simple:
place the rack against the wall and position the bottle strictly in the center. Mark and draw a line from below.
turn the level over to the other side and combine it with one of the ends of the segment. Again, make sure that the bubble is in the center. Draw a second line.
Now all that remains is to divide the resulting angle in half and draw a third line (bisector) between the two
apply the rod to this line and adjust the flask with screws until the bubble is centered
The correct vertical is plumb. Moreover, the plumb line must be made of non-ferrous metal.
Steel can be affected by magnetic fields if the cord is long enough. In addition, magnetized sawdust often sticks to the plumb line itself, and this is again an unnecessary error and deviation.
If the bulb is glued in, you can try to adjust it by gently tapping it with a screwdriver attached to the edges of the bulb.
You need to hit the elevated part. True, good accuracy is difficult to achieve in this way.
Either way, you have little to lose. After all, your level is already shamelessly lying. If this method helps, you need to glue the joints of the flask with superglue.
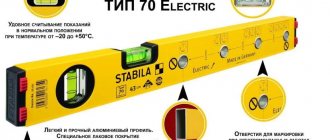
What do the divisions on the flasks mean?
Most of the divisions at the construction level are quite understandable to a novice user. On various models there is a familiar ruler for measuring distances or marking segments. Some manufacturers offer offset blocks for marking holes according to a template.
The most questions are raised by divisions at the construction level, seen on cylinders with bubbles inside. Let's look at what these marks are below.
- Marking marks needed to determine the accuracy of the horizon. When the device is placed on a flat surface, the air in the corresponding flask will be placed strictly between the marks, the edges of the bubble will come close to them.
- Error marks. They are located behind the horizon accuracy marks, closer to the edges of the bulb. Present in products of the middle and expensive categories. Each of them comes with instructions that indicate the division price. When the bubble is displaced to such marks, the slope of the surface can be determined in millimeters per linear meter.
Important! In levels with rotary flasks, on which the risks of determining the error are marked, it is proposed to measure angular deviations. All data necessary for calculations is given in the operating instructions for a particular device.
Types of levels
To correctly adjust the level, you must first decide what it will be.
Manufacturers today offer:
- A hydraulic level (water) is the usual type, which consists of 2 individual flasks connected using a hose. Its length is 5−25 m, and a scale is applied to the flasks for ease of use. There is no need to adjust this level; it is used only for the horizontal plane. The price of the equipment is low; this type of mechanism is designed to install other types of equipment.
- Bubble device - makes it possible to carry out precise work. In appearance, it is a ruler of various lengths, which contains 3 flasks filled with liquid (most often alcohol). A tool is used for vertical and horizontal measurements, but it must be installed before starting work.
- Magnetic - is special equipment with magnetic inserts; it guarantees a high level of convenience when working with iron surfaces.
- Pipe - has a light weight and small size. Perfect for measuring pipes, profiles and similar materials.
- Laser is a clear, special equipment with small dimensions. The range of its beam, with the support of which the measurement is carried out, is 100 m. The device system can be different, most often it is inserted on a tripod, but there are also magnetic types. The modifications themselves are presented in a wide variety; it is possible to choose directly the type you need.
- The electronic laser mechanism is digital special equipment; special instructions are used to configure it. The price of the equipment is higher, but the quality is excellent.
Bubble level design
Even those who picked up the device for the first time know what a bubble-type building level is. The body of the instrument has a rectangular design, and it is made of materials such as plastic, metal, aluminum, wood and others. The lower edge on devices of medium and high quality is milled, which allows you to remove irregularities on the surface to which the tool is applied.
The second name for the bubble level sounds like a spirit level. The design of the body of this measuring device contains a glass bulb (one, two or three), through which measuring manipulations are carried out. The flask is filled with liquid, which is alcohol or distilled water. Oil is used less often.
Ordinary water is not used, since it tends to evaporate at high temperatures and freeze when the thermometer is below zero. The flask is filled 95% with liquid, and the remaining 5% is air. It is this air that is the main reference point of the measuring device - it is called a droplet.
Why are different numbers of flasks used in the design of the instrument? The presence of 2 or 3 glass flasks in the design of the device expands the capabilities of the instrument.
- One flask is used to measure a horizontal plane with a dimension of 180 degrees
- Two bulbs are needed to measure not only the horizontal plane, but also the vertical guide at 90 degrees
- Three flasks on the device are needed in order to perform more complex work. The third flask allows for measuring inclination angles. The third flask is mounted at an angle of 45 degrees or can have a rotation function
The flasks are attached inside the body, and to take accurate measurements, markings in the form of marks are applied to the glass of the ampoule. The movement of air beyond the marks indicates a deviation of the surface from a straight line. The photo below shows a bubble level with designations of the main structural elements.
This is interesting!
This type of measuring instrument is called a bubble one because the main measurement element is an air bubble located in a glass flask.
Frame
When choosing a level, first of all you should pay attention to its body. It must have thick walls (minimum 1.5-2mm thick) or be cast
If there are inserts at the ends, it is difficult to determine the thickness of the metal “by eye”. Therefore, focus more on weight. Thin-walled ones are very light and can literally be pressed through with your fingers.
Even T-rails do not always have greater rigidity compared to a rectangular profile. Here a lot depends on class=”aligncenter” width=”720″ height=”322″[/img]
A defect in the form of bending of the profile may appear if you carry it not in a separate case, but in a simple bag with the rest of the tool.
It would be very good if there were shockproof rubberized inserts along the edges. It's rubber, not plastic. When dropped, the plastic simply breaks off.
For home needs, the most optimal length of the building level is 60cm.
Sometimes it is very useful if the level has magnetic inserts.
And if there are also holes for the size of the 220V socket block, then this greatly facilitates the electrician’s work.
Of course, you can have several tools of different lengths. One is small for installing a block of sockets, the other is larger for large switchboards, boxes and cable channels.
What is a building level and how to work with it
We have almost come close to the second tool, which is called the building level. This is the ideal ruler with water bubbles.
Let's lean our level (ruler with bubbles) against the heads of the self-tapping screws, which we previously screwed plumb into the wall:
By reading my blog, you are probably making repairs.
this page to your bookmarks .
This is where all the useful home improvement stores are located. If you are going to plaster the walls yourself, then you will definitely need a building level! Buy or borrow from friends a level 2 meters long. Notice the bubble that is at the top of the ruler. Let's take a closer look at it:
The bubble should be clearly in the middle of the boundaries. If so, then your level is in excellent condition. By the way, this is how the level is checked. However, it would be nice to immediately check it in 2 dimensions: vertical and horizontal. You can read about this in detail in the article: How to check the building level. If you plumb the heads of the screws and carefully lean a level against them, and the bubble is clearly in the middle, then everything is in order, then you can continue to work with this level.
| If the bubble is located far from the borders on the left or right, then quickly change this level to another, if purchased in a store. There is nothing worse than starting to do precision work with a broken level. It will be very disappointing that you will spend a lot of effort and time, do what is called everything step by step, and at the same time get a crooked result! In the catalog on the left you can find suitable levels, plumb lines and other measuring instruments. |
Read also: Homemade plywood grinder
Well, if your level doesn’t lie, then you always have a vertical in your hands. Now, to check whether something is vertical, simply lean the plane of the level against the plane of the object being examined and watch the bubble. If the bubble is in the middle, then the object is standing upright!
I told all this for the purpose that further, in the following articles, we will begin to place beacons using a level and plumb line, which means you should have an idea of how this is done!
I highly recommend that you practice on your curved and untreated wall and try to set one vertical, and at the same time check your level. The very next article will be devoted to attaching the plaster mesh to the wall, and after that we will install the first beacon. It will be less convenient to place it on a grid, so practice placing the vertical simply on a bare and crooked wall.
I wonder if any of the experienced craftsmen can do without a plumb line?
Bubble, electronic, laser or water levels can be called a must-have tool for a builder. With their help, they check the correct installation of equipment or finishing elements, and the angle of inclination of the pipes. Such a convenient tool can also be used at home. For example, it will be needed to hang shelves evenly. But what to do if the device produces incorrect data? The most difficult situation is when the laser level has gone wrong; the device is expensive and quite delicate. In some cases, adjustment can be done independently.
How to use a laser level at home, advice from experts
Laser levels have long been popular among professional builders. Thanks to the gradually decreasing prices for these useful devices, home craftsmen have also begun to use them. However, it is difficult for a builder without experience to master this rather complex tool. We will help you understand the variety of models and the rules of use and adjustment.
- Alignment of walls,
- Production of floor screed,
- Wallpapering,
- Laying tiles,
- Installation of door frames and window frames.
All this can be done using bubble and laser levels, but with a laser device this work is performed faster and more accurately. The laser-drawn line can be of any length, does not require a stepladder or an assistant for marking, and instantly reaches ceilings of any height. Once you turn on the power, coordinate lines will instantly appear throughout the entire area of the room.
Most laser levels can draw multiple intersecting lines at once, with the angle selected by the user.
Types of laser levels
By installation method:
Of course, you have to pay for convenience. Therefore, the auto-tuning level is more expensive.
According to the principle of beam formation:
In addition to the highest level of accuracy and convenience compared to mechanical devices, laser levels allow you to perform work that is inaccessible to mechanical devices.
According to the method of placement at the work site:
How to check a laser level for accuracy
The laser level should be checked every 2-3 months of use. You can entrust this procedure to a service center by paying a certain amount of money. However, when used at home, you can easily evaluate the accuracy of the device yourself.
To do this, you need a free room with a flat floor and a distance between the walls of about 20 meters.
We place the tool near the first wall, align it horizontally and make a mark on the wall
We turn it 180 degrees, make a mark on the opposite wall
Then, without changing the height of the tripod, we move it to the opposite wall and install it opposite the mark
Rotate it 180 degrees. The marks on the first wall must match. If not, you need to make adjustments according to the instructions for setting up the device.
We check the vertical alignment in a similar way.
The measurement error increases with the distance from the device to the measurement surface. Discrepancies of 1-2 mm at a distance of 10 m can grow to 1-2 cm at a distance of 100 m. If you do not work with such areas of premises, there is no need to spend money on a professional device.
Preparing the laser level for use
Before using the device, the following preparations should be made:
- Check the charging of the batteries or batteries in the device. It will be a shame if they run out of charge at a crucial moment,
- Remove all foreign objects in the path of the laser beam. A stepladder installed at a distance of 1 meter from the level will provide a shadow up to 2 meters wide on the opposite wall,
- The surface on which the device will be installed must be level,
- Take care to protect your eyesight and warn your colleagues at the construction site about laser measurements,
- If the level line covers the entire perimeter, the device should be located in the center of the room.
How to check the evenness of tiles and other surfaces
Finishing and construction work has reached its final stage. The walls are leveled and covered with wallpaper, there are ceramic tiles in the bathroom, and laminate, linoleum on the floor, and so on. Did the builders perform the renovations in your home to a high standard? Are the walls, floor, and ceiling smooth? This can be easily checked using a building level...
- Apply it to the surface on which the tiles are laid and check with the eye. In case of high-quality installation, the air bubble will be within the borders in the center.
- Attach a building level to the wall or floor. Using it you can make sure the walls are even. Small discrepancies are allowed, approximately 0.2 centimeters.
During construction and repairs, a building level should be used. This tool will save time and money. If the repairs in your house are being carried out by a construction team, then when accepting the work performed, you should also refer to the level. If you find unevenness in the walls, floor, or ceiling, then you will be able to voice your complaints in a timely manner and demand that the repair be redone at the expense of the construction team.
Solving problems with daylight and sunlight
Sooner or later, every user of a laser level needs to mark the street; this can be any construction on a personal plot, in the landscape design of a plot of land or during the construction of a garage.
And at hour “X” you turn on the device on the street in the daytime, and are disappointed to discover that the beam is completely invisible even at 5 meters, and it doesn’t matter at all whether they are expensive or cheap laser levels. Yes, alas, solar daylight is the most destructive for a laser of this class, but there are several ways out of this situation, see them below.. In this case, a laser beam receiver will undoubtedly help you! Most laser levels have a key that switches the device to a special pulsating mode, in which the lines begin to burn an order of magnitude dimmer
It is this function that allows you to work with a laser level outdoors in any degree of illumination.
In this case, a laser beam receiver will certainly help you! Most laser levels have a button that switches the device to a special pulsating mode, in which the lines begin to burn an order of magnitude dimmer. It is this function that allows you to work with a laser level outdoors in any degree of illumination.
A laser radiation receiver is a separate, small device; they come in different sizes, designs, with or without an LCD display. Laser radiation receivers are practically not supplied complete with laser levels and are purchased separately.
Receivers are included with almost every rotating laser level; these are levels designed to work over long distances up to 1000 meters! The laser radiation receiver has a special built-in photocell that detects the laser beam and shows its location with a visual and audio signal, at a time when the beam is not visible to the human eye. The range of operation with the receiver for each laser level (having this function) is different, but the minimum starts from 30 meters! See technical specifications in device reviews.
But there are other ways
in addition to the detector itself, which will allow you to work outdoors during the day with a laser level. Not all methods can be called a full-fledged alternative to the receiver, but there is one really very similar and affordable option. Let's look at each method in more detail.
1. Method
This is to use some object with a reflective surface, a simple metal ruler is best. If you turn it at a certain angle, the laser line will be clearly visible.
2. Second option
Suitable only for those whose devices have additional laser points, for example, like an inexpensive Chinese level (the point of this particular model is pictured in the photo). The fact is that the beam concentration at a point is much greater than in a line, so the laser point is clearly visible during the day on the street at a distance of up to 15 meters in one direction.
3. Method
Suitable for everyone, with any model of level. As you probably already guessed, this is marking in the dark, and the darker it is, the farther the laser beam will be visible.
Therefore, if you are thinking about or are planning to purchase a laser level, I recommend that before purchasing, you immediately determine for yourself whether you will need to do any work outdoors in daylight, and based on this, consider a level with or without the function of “working with a receiver.”
4.
The most interesting method
for determining the location of a laser beam over long distances. Moreover, marking can be done at a much greater distance than with a receiver, if your level has such a mode.
Yes, it should be noted that this method works with absolutely every laser plane builder, no matter whether it has a receiver mode or not!
So, to mark on the street, for example at 100 meters, we need a simple cell phone with a front camera, which almost everyone has today.
Next, to detect the laser line, turn on the front camera of the phone and begin scanning the area where the line supposedly passes. When the laser beam hits the front camera accurately, a bright dot will be visible on the phone screen, which will fade when the phone is slightly moved up or down.
At the moment when the glow of the dot on the screen is the brightest, we make a mark exactly opposite the camera’s eye.
This way you get markings with minimal error, with the same operating principle as a laser receiver.
For a better understanding of the method, we recommend watching the following videos:
What you need to know when choosing a construction spirit level
Before you learn how to use a construction bubble level, you should first buy one. Finding a point where to purchase a tool is not at all difficult, but choosing a measuring device that is suitable for its parameters is much more difficult. What you need to consider to select the right bubble type level is listed below.
- What material is the tool made of? It can be plastic, metal, aluminum.
Wooden and polystyrene foam spirit levels are less common. Plastic has an advantage over its competitors in that such devices are much cheaper, but they are intended exclusively for household use. Plastic has larger measurement errors than metal and aluminum levels - The length of the device depends on where and what you plan to do with the tool.
For external construction and finishing work, levels of 1-2 meters in length are used. The maximum length of the devices is 4 meters. Levels with dimensions of 30 cm or more are suitable for interior finishing work. - The number of ampoules located in the instrument design affects the functionality.
Usually, for home use, two ampoules on a spirit level are enough, while construction specialists use devices with three flasks. The difference in price between devices with one or three flasks is insignificant, so it is better to immediately buy a spirit level with three ampoules - How firmly the ampoules are fixed - they must be firmly attached to the base through a plastic or rubber base.
If the containers wobble or fall off, then it is better not to buy such levels - Where are the control marks located - they should be applied to the inner surface of the glazing, which will eliminate the likelihood of their abrasion during operation
- The presence of additional functions - this affects the cost, but at the same time facilitates the operation of measuring instruments.
Additional features include the presence of magnets, backlight, and a telescopic mechanism to increase the length of the device - The presence of handles for ease of operation of the device - usually such handles are presented in the form of rubberized recesses in the body of the instrument.
Such handles are found mainly on expensive models of instruments.
It is on the basis of these criteria that it is necessary to choose a measuring instrument - a spirit level. When purchasing, it is recommended that you take a few steps to ensure that the device measures correctly. Let's look at how to check the accuracy of the bubble level below.
This is interesting!
Analogues of bubble levels are electronic ones, which use an electronic display instead of a glass bulb. The display shows digital values in the form of deviation from the linear surface. With their help, you can find out the magnitude of the deviation, which is sometimes very important.
Preparing the laser level for use
Before directly turning on the LED that creates the laser beam, the device must be prepared for operation. Preparation consists of installing the device on a tripod or simply on a flat surface. Many models are designed so that their working position can only be adjusted on a tripod - it contains bubble levels for initial alignment and all the rotary levers for fixing the beam in the desired position. Rotary instruments are equipped with additional types of mounting to the wall or ceiling. This is due to the fact that their use often requires installation in a suspended state, for example, when installing a large suspended ceiling.
Before turning on the laser level, it must be installed on a stationary tripod.
The main task during installation is to give a stable position to the laser level. Its vibrations or falls during operation are unacceptable, so the tripod is positioned at the desired level with the maximum leg opening, then the mounting location is leveled, and only after that the level itself is secured.
Construction laser levels are usually powered by replaceable batteries or rechargeable batteries
Instruments with a pendulum leveling device are designed so that the pendulum locking mechanism is only released when the power is turned on. For additional control of the vertical position, many models provide a sound signal that stops as soon as the device is in the desired state.
Electronic equalization also occurs after power-up. It is necessary to give the sensors a certain time to self-align. The level's support consists of 3 legs, by adjusting the length of which servomotors bring the instrument to a horizontal position. The laser beam turns on only after the hum of the motors stops. The same thing happens with a rotating level mounted on a wall or ceiling, only instead of the horizontal position of the supporting legs, the vertical axis of rotation of the LED is adjusted.
Electronic level
The electronic level is an improved version of the bubble level. It has three familiar flasks for checking the horizon vertically, horizontally, and at an angle of 45 degrees. In addition, the device has a digital display on which the rotation angle values are displayed according to the readings of the position sensors.
A rough check when purchasing in a store is done in the same way as in the case of a bubble level. That is, place the device on a flat surface and rotate it 180 degrees. If the readings on the display do not change, then everything is in order. But this rarely happens.
Read also: How to make a stove out of Lego
Calibration of the electronic level is mandatory by the manufacturer. According to the recommendations, it is done:
- before starting critical measurements;
- before first use;
- after the device falls onto a hard surface;
- after exposure to shocks or vibrations during transportation;
- after a temperature change, transition from a cold zone to a warm one.
The calibration procedure is described in detail in the instrument's operating instructions. In general, one of the display buttons is called CAL. To calibrate the level, you need:
- place it on a flat surface;
- squeeze for 10 seconds;
- press the calibration button, the display shows 0;
- wait another 10 seconds and press the button again;
- after one appears on the display, rotate the level 180 degrees;
- wait 10 seconds;
- press the calibration button and remove the device from the surface.
Important! For the calibration to be correct, it is necessary to select a guaranteed horizontal plane. In a construction site, this could be a sheet of foam floating in a trough filled with water. Other surfaces may not be horizontal, in which case calibration will cause the electronic level to read incorrectly.
What should you know to conduct a quality level accuracy check?
Basic functions of a household laser level.
If we take into account a laser level that has manual leveling based on a bubble level, then there is a possibility of inaccurate measurements and inspections. To check the horizontal plane, you will need the laser level itself, mounted on a special tripod with a height adjuster lever
To check the accuracy, the device is installed near the walls on which marks need to be applied.
The level works in two planes. One is horizontal and is designated by the letter X, and the second (vertical) is designated by Y. Instrument manufacturers often mark these letters on top of the body of the measuring devices. If there are no markings and you need to check the device for the first time, you should mark the letters on the case yourself.
The horizontal plane must pass at the top of the level; it is designated by the letters X and Y, respectively. These two axes are marked accordingly on the top of the device cover. Each beam must have a verified axis. It is calibrated if necessary using the instructions or contacted by a measuring instrument service center.
What is a plumb line and how to use it
A plumb line is a small weight tied to a string and used to accurately determine the vertical plane. Below is a picture so you can see it clearly:
How to use it? Imagine that in front of you is a bumpy wall with many potholes and bumps. In this case, it can be piled towards the room or away from the room, i.e. it cannot stand vertically. And we need to level this wall. To do this, we definitely need to get a VERTICAL, i.e. some standard, relative to which we will begin to align the wall. Let's look at the drawing of our curved wall in profile:
Right under the ceiling you need to screw in a self-tapping screw and attach a plumb line to it (thread + weight). For some time this structure will sway peacefully, but soon the plumb line will freeze in place, and now - before us is the ideal vertical, which is determined by the thread! (You, of course, remember that you cannot simply screw a self-tapping screw into concrete; to do this, you must first install a dowel; for more details on how to do this, see this article).
Great, you say. And what should we do next with this vertical? The thread sways a little and again there is no vertical line. Everything is correct, we have defined it, and now we need to fix it somehow.
I will now show you one of the methods that I use myself. To do this, we begin to tighten the screws along the length of the thread, also from the ceiling to the floor at certain intervals. We screw them in so that the heads of the screws barely touch the thread. You can tell the thread to slide over the cap:
Now the plumb line can be removed, and the screw heads will store our vertical. What will these self-tapping screws do? And the fact is that if you take an absolutely even stick or ruler and lean it against the hats, then this stick or ruler will stand absolutely vertical.
Checking the inclination of the entire plane of the laser level relative to the horizon
For those who have just started using a laser level or are just planning to purchase one, we recommend that you familiarize yourself with the general errors found in laser levels.
We install the laser level exactly in the middle between two walls located approximately 5 meters from each other. Turn on the laser level and mark the point indicated by the laser cross on the wall. We rotate the laser plane builder 180 degrees and mark a point on the opposite wall, placing the point at the intersection of the vertical and horizontal planes.
Next, we move the laser level to one of the walls and install it at a distance of 0.6 - 0.7 meters from the wall, and make the same marks on the walls by analogy as described above.
We measure the distance between points a1 and a2, also between currents b1 and b2. We subtract the resulting distance from the other (a1 and a2) - (b1 and b2), compare the resulting value with the declared accuracy, if the resulting value does not exceed the stated accuracy in the instructions, then your laser level shows the horizontal plane correctly.
Example: When checking the accuracy of a laser plane plotter, the distance between the points was: (a1 and a2) = 4 mm, and (b1 and b2) = 6 mm. Thus, the resulting error of the laser level is: (b1 and b2) – (a1 and a2) = 6 – 4 = 2 mm. We compare the resulting error with the error declared by the manufacturer.
This applies to laser levels that do not have a 360 degree horizon.
To check the horizontal plane of levels with cone prisms, such as Hilda 3D, or levels with cylindrical prisms, but also having a horizon of 360 degrees, such as ADA 6D Servoliner, the easiest way is to pass all sides of the horizontal plane through a point at a distance of 5 - 10 meters. Here you should also remember how the error is calculated correctly.
What to look for when purchasing?
Craftsmen prefer metal or aluminum levels with rubber handles. The cross-section of the strip can be rectangular, I-beam, or cross-shaped. The tire walls should be thick, the ideal body is cast. A rectangular section is stronger than an I-beam.
A good sign will be the weight of the instrument - it is believed that a moderately heavy level provides greater accuracy of readings than a light one. Sometimes one of the sides of the body is marked in the form of a ruler , which allows the tire to work as a construction meter, expanding the possibilities of use.
When inspecting the level when purchasing, pay attention to the integrity of the ampoules .
A new device must be checked before purchase for accuracy of readings . The glued bulb is not adjustable, such a tool cannot be corrected. To check, the body is applied with the working side to a horizontal surface and the location of the bubble is remembered. When you rotate the tool 180 degrees, the position of the bubble should remain the same. Do the same by checking the vertical sight.
Large tool stores are often equipped with
a special inspection stand . Indicators of a quality bubble level:
- measuring marks are applied inside the flask and will not be erased during operation;
- the tire metal is additionally processed to increase strength or powder coated;
- shock-resistant housing, such a device will not suffer damage if accidentally dropped;
- Magnetic fastening system holds the level on metal surfaces, allowing you to work hands-free;
- rubber plugs at the edges;
- adjusting bolts on the edge of the “eye”.
For home use , a medium-priced device with a body length of 40-60 centimeters is sufficient. To measure horizontally and vertically, two “eyes” are enough. As a rule, even professional builders rarely use a flask located at an angle of 45 degrees.
A device with one working surface is not suitable for use on the ceiling. In an upside-down position, the values are displayed incorrectly; in such cases, use a tool with two working sides.
Read also: Rules for installing a dishwasher
A professional tool is always double-sided and has a higher cost. The manufacturer indicates the measurement error for each side on the bar. The housing is selected according to size for specific tasks and work. Usually masters have several levels of different lengths.
How to make a columnar foundation with your own hands quickly and easily
Casting concrete columnar structures will require lengthy and rather dirty work with mixing cement mortar, installing and strengthening columnar formwork, leveling and cleaning working surfaces. You can take a simpler route and buy ready-made blocks with a length of 40 cm and a cross-section of 20x20 cm. A foam concrete block of the structural grade D1200 or heavy expanded clay concrete grades are best suited.
For heavier versions of the house, granite blocks can be made. To do this, blocks are cast on a manual machine for pressing cinder blocks filled with heavy rock. Such a block will be able to withstand a load of 300-400 kg, which corresponds to the weight of the walls of a timber house. If you have experience working with your own hands with laying stone on cement mortar, then you can build 6-8 columnar supports in half a work shift.
In addition to standard rectangular blocks, massive hollow blocks in the form of a truncated pyramid with a reinforcing frame are cast on the machine. A pin or threaded rod is placed in the upper base of the pyramidal columnar support, which allows you to tie the installed pillars with a wooden beam or steel profile. It is enough to compact and fill the horizontal platform in order to install a finished foundation field of columnar supports along stretched cords.
How to check a building level for accuracy using a simple method
During the construction process, a building level is often used and it is extremely important that it shows accurate results. Otherwise, it will be difficult to carry out a number of necessary works, and what can we say about professional craftsmen who are faced with the need to use it every day.
What should you focus on?
During the selection process, it is important to study the body of the product; it is best that the walls are at least 2 millimeters thick, and better yet, that it is cast. If the ends have additional inserts, then it is difficult to determine the wall thickness. It is also extremely important when choosing to pay attention to products from a trusted manufacturer, in which case the risk of purchasing a low-quality product is minimal.
The flask is also an important element; it is best that the bubble inside is large, and the distance between the risks should be 1 millimeter. In this case, measurements can be taken with great accuracy. Cheap models don't have this. It is also worth knowing that in most cases the manufacturer uses ethanol as a filler; the thing is that at sub-zero temperatures it does not freeze, so you can use the level at any time of the year.
It is also best to have at least two flasks on the level, horizontal and vertical; even professional builders do not need an angle of 45 degrees.
How to check accuracy?
Of course, if a tool is required for rare use, then there is no need to purchase an expensive level, you should pay attention to more affordable models. But when purchasing, you need to know how to quickly and easily check the accuracy.
Horizontal
It is important to remember two basic rules:
- Even the new level may not be accurate.
- Even an expensive and high-quality instrument can lie.
In order to perform the test, you need to find a relatively flat surface to which the tool will fit tightly. It is important that the plane is not deformed. Applying a level, you need to make marks on both edges, then remove the device, turn it over and attach it again to the same place. If the readings are the same, then you should safely purchase the tool.
If there is no flat plane, then you can use a match; for this you need to place a building level on any plane, not necessarily a flat one, and place a match under one side of the level. After this, you need to move the level until the bubble comes close to the risk. After making a mark with a pencil, you need to turn the level over and apply it again. A similar result indicates that the instrument is accurate.
Adjustment, configuration, repair of building level. How to adjust it?
There are levels in which adjustment is possible. The sensitive element (flask with liquid) is fixed with a bolt at such levels. If the bolt is loosened, you can rotate the sensitive element, thereby adjusting the level. Setup is usually done in one of two ways. Either we simply move the flask by hand (this adjustment is less precise), or there is an adjusting bolt, by turning which we adjust the position of the flask (more precise adjustment is possible). Not all hydraulic levels are suitable for adjustment. There are those in which the bulb is glued in. If such a tool is faulty, it must be thrown away.
Adjusting the level is not a problem if you have a strictly horizontal surface. But a vicious circle arises. To repair a building level, you need a horizontal surface, and to find a horizontal surface, you need a working level. Let's get a horizontal surface using a broken spirit level.
Cut a stack of small pieces of paper, such as newspaper. Let's find a stable (immobile) approximately horizontal surface. Let's put our faulty level on it. Place several pieces of paper under one end of the level so that it shows horizontality. Let's remember how much paper we put in this (first) time. Let's turn the level horizontally so that its right end is now on the left, and its left end is on the right. If the level is working, then it will continue to show horizontality, since a working level shows the horizon, and there is only one horizon, from right to left, and from left to right. If the level needs to be adjusted, then as a result of turning it over, the air bubble in the flask will shift, the level will show that it is no longer horizontal.
Let's place a few more pieces of paper under one of the ends of the level so that it again begins to show horizontality. You may have to place the paper under the same end as last time, perhaps under a different one. At the same time, we count each piece placed. Now we will remove exactly half of the pieces of paper placed in the second stage. If there were an odd number of them, then we round them up. Congratulations, we got the true horizon.
But the level shows a deviation. Loosen the fixing screw, turn the flask so that it shows horizontal, and tighten the fixing screw. The setup has been completed successfully.
Adjusting the vertical flask is done in exactly the same way. But to perform it you need an assistant, since it is performed on an approximately vertical wall. But on such a wall, pieces of paper and a level will not hold on their own. An assistant will have to hold them.
From a mathematical point of view, the proposed method is not entirely accurate, but for construction purposes the error is acceptable.
(read more...) :: (to the beginning of the article)
| 1 | 2 | 3 |
:: Search
Unfortunately, errors are periodically found in articles; they are corrected, articles are supplemented, developed, and new ones are prepared. Subscribe to the news to stay informed.
If something is unclear, be sure to ask!Ask a question. Discussion of the article.
More articles
DIY built-in closet. Instructions. Scheme. Drawing…. Built-in wardrobe - we design and install. How to do it yourself, with your own hands...
Examples of adhesives. Poxypol, liquid nails, universal superglue. Armir... Typical gluing errors. The right technology. Additional techniques - arm...
LED lighting lamps 220 volts. Features, impact on vision... Use of LED lighting lamps in everyday life. Properties, features. Review….
Knitting. Royal crown. Drawings. Pattern patterns... How to knit the following patterns: Royal crown. Detailed instructions with explanations...
Insulation to keep it warm... Insulation, typical mistakes, how to do it right...
How to install a coal boiler? Choosing a location, location?... Tips for choosing a location, installing a coal boiler, connecting a chimney...
Barrel steel, iron, metal. For sale. We buy, we buy, p... Iron barrel - choice, protection against rust, corrosion. How to buy and extend the term...
Knitting. Air diamonds. Drawings. Pattern patterns... How to knit the following patterns: Air diamonds. Detailed instructions with explanations...
Features of the building level
The bubble level is the most indispensable equipment when leveling objects during construction. He is able to very accurately determine the deviation of a particular surface from the norm. The level tool usually has a rectangular shape, into which special flasks with air bubbles and markings are built.
Before purchasing this equipment, it is very important to consider its features:
- Susceptible to impacts . Under no circumstances should the building level be dropped. Any drop may result in decreased accuracy or complete failure of the instrument.
- There are corner levels . They help measure the position of objects that are at an angle. In this case, the accuracy of the measurement also depends on how correctly the level is positioned.
- Malfunction of the newly purchased level . Even store-bought tools may initially show incorrect data. This occurs due to careless transportation. Therefore, it is recommended, at a minimum, to carry out at least an initial check of the equipment for visible deviations in the store.
Construction level device Source tdrimspb.ru
Before using the level, you need to carefully inspect it and take for comparison two other tools that are definitely in working order. You need to handle the tool very carefully, since any mechanical damage will damage the equipment and you will have to buy a new building level.
Checking the level when purchasing in a store
The level is indispensable in construction; using this device, screed is poured and beacons are installed to level the walls.
If you have never encountered determining the accuracy of a tool, then you can ask a specialist to help you check the building level. Do not forget that the evenness of your surfaces will depend on the accuracy of the level.
When purchasing, you can check the level on a special stand; if it is missing, you can check it yourself. Place the level on a flat surface and note the bubble readings.
Then turn the level 180 degrees and check. If you adhere to this rule, you will buy a high-quality building level.
If the readings are the same in both cases, then the level is suitable for use.
The vertical level in the store is checked in the same way, but more accurately, the level can only be checked at home. If it turns out that the device has a large error, it can be replaced with a new one within two weeks.
How to check the level for accuracy?
One of the important tools in construction is the bubble level. This tool helps the builder make the walls of the building smooth and neat. In addition, thanks to the level, it is much easier to carry out even electrical wiring around the apartment, hang a picture and other work that requires strict conditions. Therefore, it is important to know how to check the bubble level before purchasing from the store.
What is important to pay attention to
Before you buy a tool, you need to carefully inspect it. To begin with, you can compare several levels to ensure the accuracy of the tool. You can also check the level by examining all its parts.
Frame
The tool body is of great importance when choosing. It is made at least 2 millimeters thick. It is recommended to choose a cast housing. Often tools have inserts at the end ends, which makes it impossible to see the thickness of the body walls. The quality of the case can be determined by the weight of the level. A tool whose body is thin will be much lighter than a thick-walled device.
It is important to remember that the accuracy of the performance expected from the instrument depends on the health of the case. Therefore, it is important to carry the level in a special case, but under no circumstances put it in a common bag where other tools are located. They may damage the device casing.
A good tool should be equipped with rubber inserts and holes for socket blocks. At the same time, for home use the level can be taken no more than 60 centimeters. If desired, you can purchase several devices of different parameters that will be used for different purposes.
Flask
The bulb is no less important in an instrument than the body. It must be of sufficient size, and its risks must be at least a millimeter apart. The bubble inside the flask should also be as large as possible. Thanks to these parameters, the tool will show as accurately as possible.
If you choose a cheap model, then the bubble in it is most likely small, which is very inconvenient when measuring. In this case, level adjustment is done by hand. To do this, the user removes the flask from the body and uses an insulin syringe to withdraw a small amount of liquid to expand the bubble.
In order to check the building level for accuracy at home, it is recommended to use ethanol as the liquid for the flask. Then the substance will not freeze in severe frosts and the bubble will move quickly during the testing process. The hole through which the substance was pumped out must be sealed with hot glue.
Number of flasks per level
There may be one or more flasks on a level. Builders most often use only two - horizontal and vertical. But there is another cone that shows an angle of 45 degrees. It is rarely used.
Error
Before buying a level, you need to consider the error it shows. Cheap instruments most often “lie” by 5 millimeters along a length of one meter. If you choose expensive devices, then their error is only one hundredth of a millimeter per running meter. Unfortunately, the parameters cannot be independently adjusted to the exact indicator.
How to check the level correctly
If the level is purchased for use in a single case, then you can buy the cheapest tool. But, it is necessary to check his testimony.
Before checking the indicator of the horizontal flask, it is important to remember that cheap instruments may have errors even if they are completely new. Expensive levels are also not immune to inaccurate readings. Therefore, you should always check before purchasing a product.
Checking on a flat surface
To check, use a flat surface. Then you need to carefully inspect the level body and make sure that it is not deformed. It is imperative to examine the surface to ensure there are no gaps between the planes. To do this, use a metal ruler. And only after this the instrument is installed on the selected surface to take readings. The outlines of the device should be marked with a pencil. Such an event is necessary in order to accurately set the level to the same place several times in a row.
How to check the level if there is no flat surface
If the surface raises doubts about its evenness, then you can use ordinary matches. To do this, place the instrument on the counter and slip a match under one side. And move it until the bubble reaches the mark. The contours of the level are again drawn on the surface and the tool is rotated the same 180 degrees. And without touching the matches, the instrument is installed in its original place, following the contours. The readings must match.
Checking the vertical flask
The vertical bulb of the instrument is checked in the same way as the horizontal one. If the indicators do not match, calibration must be done.
The tool must be applied to the wall, making sure that the bubble in the flask is strictly in the center. A straight line is drawn. After this, the device is turned and applied to the wall, placing one of its horses on the line. Again you need to install the bubble in the center of the flask. Again you need to draw a straight line and draw a third line in the middle of the formed angle, which in this case will serve as a bisector. And having placed a level on it, you need to use screws to level the flask in order to install the bubble in its center.
Checking the level is important to ensure that it gives correct readings during operation. It depends on them how smooth the wall or internal electrical wiring in the house will be.
How to quickly and accurately check the correct operation of a construction bubble level?
Working surface of the level
Please note that for many levels, especially cheap ones, only one side is working. This is due to the fact that the inner surface of the flask is not symmetrical and has a barrel shape.
Therefore, such levels are calibrated relative to the side opposite the flask.
Because of this, calibrating and checking the level on the ceiling is not considered the correct method.
On more expensive models, calibration is carried out on both sides, and for each, its error is indicated on the body.
Remember that the more cylindrical the sight bulb is, the more sensitive the bubble level will be. But there are also disadvantages here.
If the flask had a strictly cylindrical surface, then the bubble would always go either to the right or to the left. Because there are no perfectly horizontal surfaces in everyday life.
Except for the surface of the water in a calm state.
How to identify deviation?
Even at the stage of selecting and purchasing a product in a store, it should be checked for accuracy. There are several ways to identify deviations. For example, you can compare the performance of a selected level with the performance of one or two other levels . It is recommended to do this by applying the devices one at a time to the same horizontal or vertical surface. If the indicators of the selected level differ from the indicators of the other two, this means that the first one works with deviations.
If the level has already been in use for some time, then it must be checked for correct readings in order to avoid the negative consequences of working with such a device. The check is carried out for all planes: vertical and horizontal.
Horizontal check
The main thing that is required from a building level is the accuracy of the readings.
How to check them when purchasing directly in a store or at home? There are two basic rules to remember here:
- the level can lie even if it is new
- the level can lie even if it is very expensive
Therefore, always check it, despite the price tag and the assurances of the sales consultant.
To check the accuracy of the building level you need to find a more or less flat surface. That is, the surface that the tool will touch with the entire plane.
Before doing this, you really need to make sure that the plane of the rail itself is smooth and has no deformations. To do this, just apply a metal ruler to it and see in the light that there are no gaps.
So, after such a check, apply the device to the surface and mark the landmarks with a pencil. They are necessary to set the level to the same place every time.
Remember the readings and location of the bubble. After this, turn the tool 180 degrees and put it back according to the marks.
If the readings have not changed, then the level can be safely used.
Vertical plane
Checking the level for accuracy in measuring the vertical plane is done in a similar way. The only difference is that the device does not unfold, but is turned over and applied not with the working side, but with the opposite side. Differences in readings will also indicate that the level is off.