Drill-driver POBEDA DShS-475, 220V mains
1499 ₽ More details
Impact drill POBEDA, DU-13/990
2249 ₽ More details
VICTORY
A screwdriver is one of the most necessary tools for a modern person. You can use it to do a lot of different jobs around the house. It is indispensable both during global construction and during local repair work. However, many parts of the device may sooner or later fail. This is most often due to improper operation of the power tool. Sometimes you may need to repair a screwdriver yourself.
Diagram of a cordless screwdriver.
Yes, of course, in most cases it’s easier to contact a specialized workshop, but this can take a lot of time, and the repairs can cost a pretty penny. In any case, minor damage can be repaired yourself. For example, you can repair the start button. It often breaks down. How to repair a screwdriver button with your own hands will be discussed further.
The simplest and most practical method
Electrical connection diagram of a screwdriver button and a power transistor.
First, you should think about how you can easily make repairs while spending a minimum of money. Of course, a complete replacement of a structural element, and in this case a button, will save money and bring the operation of the device to its original level.
The screwdriver itself is quite easy to disassemble. To do this, you just need to take a Phillips screwdriver and unscrew all the screws around the perimeter that are located here as fastening material. Having disassembled the device, you can find that it has a fairly simple structure. There is a motor, a gearbox, a button with two wires that connect it to the battery, as well as 2 wires that connect it to the motor.
So, the simplest repair method is to replace the button; it is simply unsoldered from the motor. Then the connector that connects it to the battery is removed. This design element is quite inexpensive. Today it can be purchased for approximately 300-500 rubles. Next, the wires from the motor to the button are soldered in place, and those that go to the battery are installed together with the connector. Now you can reinstall the battery and check the functionality of the tool. If everything is in order, then we can safely state the fact that all repair work was carried out correctly and competently. Now you can assemble the screwdriver. There is an even less expensive repair method in which the button is not replaced, but restored.
Remote control screwdriver
In addition to performing basic functions, I want to use a screwdriver as a motor for a device (lift). For ease of use, you need to move the control buttons a meter away from the screwdriver body. The main thing is to do the feed/reverse, speed control is also desirable.
Questions arose: 1) is it possible to duplicate buttons?
2) is it possible to use buttons from car window lifts?
3) other options?
An active search both on the forum and on the Internet did not produce results.
This refers to a wired connection.
I would be grateful for any help.
Theoretically, the easiest way is to take the shurik, disassemble it and see that the button with an incredible pile of wires is attached to the engine with just two wires. Accordingly, if the button with reverse accumulator is amputated from a screwdriver, and the wires from the button to the motor are extended, you will be happy. Let me just draw your attention to the fact that you need a THICK wire for these purposes.
Tsip wrote: is it possible to use buttons from car window lifts?
Good idea, but speed control will be lost.
Tools and materials
Electrical diagram of a screwdriver button.
Of course, before you begin directly carrying out repair work, you should definitely select all the most necessary tools and materials. These include:
- knife;
- flat screwdriver;
- Phillips screwdriver;
- soldering iron with rosin and solder;
- cotton wool
Basically, these are all the tools and materials that may be needed to carry out the work. The list is not that big. Any man can have all this at home.
Design and diagram of a screwdriver button
The screwdriver button is the main control element that performs several functions at once:
- Switching on/on the tool;
- Switching direction of rotation;
- Smooth engine start;
- Speed adjustment.
Moreover, each of the controls built into the button block cannot work correctly on its own.
With the exception of the rotation direction switch, which is often a separate functional block. The case in most cases consists of three conventional compartments in which working units and mechanisms are located.
- At the bottom of the housing there is a control unit for turning on/off and adjusting the speed of the electric motor.
- The soft start “trigger” itself is located in the middle part (the deeper you press it, the higher the rotation speed of the cartridge). When pressed, the button slides in a special block along the guides; a variable resistor is responsible for adjusting the speed.
- At the top there is a reverse button - a switch for the direction of rotation of the cartridge. The direction changes by changing the polarity of the voltage supplied to the switch.
All control units of screwdrivers of different brands are designed approximately this way. To familiarize yourself with the design of the button of a specific tool model in more detail, we recommend studying the diagram of the screwdriver button (it is in the instructions).
DIY button repair: tips
Diagram of the gearbox of a cordless screwdriver.
Well, now let's move on directly to the recovery process. As a rule, a button is not so easy to purchase. Often you have to pre-order it from a service center and then wait several weeks for it to arrive. That is why repairing a screwdriver button with your own hands is relevant.
It can be immediately noted that there is no need to solder the wires that come from the button. They will not interfere with the process of assembling and disassembling the structural element. So, the screwdriver is disassembled using the same technology that was indicated above, which means that the button is in close proximity, that is, various repair work can be carried out with it. First you need to remove the pressure mechanism. This must be done extremely carefully so that the base is not damaged.
The clamping mechanism is often red, but this all directly depends on the specific model of the power tool.
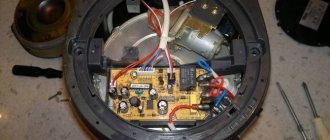
Electrical components of a screwdriver.
Do not remove the clamping mechanism with a sharp jerk. It is best to use slow rotational movements clockwise or counterclockwise. Here, too, everything depends on the specific model of screwdriver. Now you can proceed directly to the repair, or more precisely, to identifying the problems that led to the malfunction.
Any push-button product of this kind has a protective mechanism. It also needs to be removed. To do this, you will have to use available tools, namely a flat screwdriver and a knife. Moving in a circle, you need to release the latches. This is done extremely simply, so it should not cause any problems in the work. Now you can remove the push-button cover, under which the reverse mechanism is located. In fact, the inclusion element itself is not yet visible. You still have to get there.
To do this, you need to pick up a soldering iron and rosin. It helps to heat up the soldering area, which leads to separation of parts. In this case, you need to separate the two compartments from each other. First, the soldering iron is immersed in rosin, and then leaned against the disconnection point. As a result of these manipulations, the mechanism from a single whole is divided into two parts. Only now you can try to get to the switch. To do this, remove the cover from the corresponding compartment. Now the screwdriver switching compartment becomes completely open to the human eye.
Stages of disassembling the screwdriver button.
Next, you need to carefully remove the mechanism from its rightful place, while holding the return spring, which is installed here without fail. Now you can look inside. Each person at this moment is able to see with the naked eye that all contact pads have been erased during operation. The main reason for this is most often the low quality of the metal that is used to create these platforms. As the material breaks down, dust gradually settles between the contacts. This leads to the fact that those surfaces that were once dielectrics become electrical conductors. This is often the reason why a power tool starts spontaneously.
Since the cause has been identified, all that remains is to eliminate it. This is done quite simply. Using the most primitive and simple materials, it is worth removing dust from the surface of dielectrics. For this you can use the most ordinary cotton wool. It is advisable to pre-moisten it in alcohol. If this method does not help remove residual dust, then you will have to use a knife. You can use it to try to scrape the contacts. Some people use sandpaper for these purposes, but this is not recommended, since irreparable damage may be caused to the contact surfaces. That is, in this case, it turns out that the repair is not beneficial, but reduces the entire result to a negative value.
Electronic screwdriver speed control
The rotation speed of the screwdriver attachment can be adjusted mechanically or automatically. Automatic speed control occurs using a processor. You can set the desired operating parameters using the speed selection toggle switch. It is located on top of the body. In many models, speed control is realized through the start button. The stronger the finger pressure on it, the higher the speed will be.
After reading this article, you received information on how to assemble a screwdriver speed controller with your own hands, became familiar with the design of the force regulator, and understood the function of electronic adjustment of the tool. We hope you found the article useful.
Source: pro-instrument.com
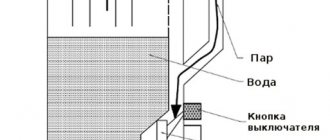
Screwdriver motor speed cannot be adjusted
Lack of control of the speed of the screwdriver motor significantly reduces the ease of use of the tool, and also makes high-quality work impossible. The controller is located close to or integral with the start button, but the speed control transistor is connected to the engine, where it is cooled through the radiator grille.
Engine speed governor location (7)
As practice shows, if such a problem occurs, it would be better to completely replace the speed controller with a new one. Luckily, they are available and relatively inexpensive. All attempts to fix this have led to the same conclusion, unless of course you are an electrical expert.
Screwdriver reversing switch
The reversing switch of the screwdriver plays an important role when performing work on screwing in self-tapping screws, as well as removing them if necessary. The reverse motor circuit is located in the same housing as the speed controller, and the reversing speed switch button is located in a convenient location on the handle.
The start and reverse buttons are located next to each other
Switching is done by changing the polarity on the terminals by moving the reverse button. Repairing the entire return circuit, including the PWM generator located on the board, consists of cleaning the switch contacts and replacing the return circuit with a new one.
Faulty battery or screwdriver cable
Everyone understands that regardless of the “steepness” of the blow, without an energy source, its operation is impossible. Therefore, first of all, you need to check the battery if you have a mobile hammer and it does not depend on a power source. The main cause of battery failure is its discharge or prolonged use. The second reason is eliminated by completely replacing the battery, and the first. Simple recharging with a rectifier, which is included in the sale of the tool.
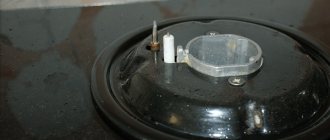
Battery screwdriver disassembled
As a rule, one kit includes two batteries: one is working, i.e. It works, and the other one is recharging. If the charger fails, it would be more rational to replace it with a new one, unless, of course, you are an expert in the field of radio electronics.
If you have an electric screwdriver, first of all, if the motor does not rotate, check the entire drive circuit: the socket, the plug and the cable itself. Believe me, it often happens that the socket fails (the contacts burn out), the cable plug may not work for the same reasons, and the cable itself may be damaged due to careless handling.
Post navigation
Screwdriver force regulator The force regulator is a clutch that limits the force when rotating the chuck. The torque control clutch ensures that rotation stops when the screw is screwed in, as it is accompanied by an increase in rotational resistance.
It is made in the form of a rotating plastic drum. If the speed controller does not work, it means the transistor has burned out and needs to be replaced.
For this purpose, you can gently lift the lid, noting the clear placement of the spare parts on the paper. When replacing, you need to ensure that the capacity and type of power element match. DC power is supplied from a battery, which is a set of elements housed in one housing. The diagram shows that when the contacts of the electromagnetic relay are closed, the positive voltage through the diode VD7 1N is supplied to the zener diode VD6 through the quenching resistor R6. The gearbox is driven by the rotor sun gear. Using a specialized chip Manufacturers of screwdrivers are trying to reduce prices for their products, often this is achieved by simplifying the charger circuit.
This means you should make sure to clean the device after each use - this is the only way to reduce the risk of failures during operation due to contamination of the tool. If the battery is good, then the next step is to check the power button.
If the elements of the printed circuit board are in good working order and do not raise suspicions, and the charging mode does not turn on, then you should check the SA1 JDD 2A thermal switch in the battery pack. Gearbox parts can be made of both plastic and metal.
By the way, the speed control button and the reverse control button are located in different places, so they will have to be inspected separately. The higher this indicator, the longer the screwdriver works.
In the first case, they are capable of exploding, and in the second, they will no longer be able to restore their capacity. If such elements are found, they should be dismantled and replaced with new ones. Screwdriver battery repair