How to check the battery for a screwdriver yourself using a multimeter? This question is often asked by the owners of the named tool when they notice that the charge is being used up too quickly. Typically, the battery life is no more than three years. If it is used very rarely or improperly, the operating time is noticeably reduced.
What does the battery consist of?
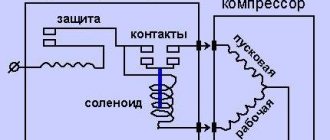
The internal structure of the battery of any screwdriver, regardless of the country of origin, is absolutely identical. If you disassemble a plastic block, there are always “cans” inside, assembled in a certain sequence. The battery voltage indicator as a whole is added up based on the U level that each battery has individually. The battery also has four contacts, two of which provide charge-discharge cycles, the third is connected to a temperature sensor, and the fourth, which has a service purpose, is responsible for equalizing the charge potential in all batteries.
So, the interconnected “banks” of a power tool battery are nothing more than a constant current source in which chemical reactions are constantly converted into electricity. This is how the battery releases its accumulated energy into the circuit. And when it charges, the process occurs in the opposite direction: the battery simply takes energy from the network.
How to check a screwdriver battery - basic principles
To make sure that the problem is with the battery, you need to check its performance characteristics. It is advisable to carry out testing only after the end of the charging cycle, otherwise the data will be incorrect.
It is also important to take into account such an unpleasant moment as the memory effect. It occurs due to the fact that the user charges the element without waiting for the accumulated energy to be completely exhausted. Even several such cycles can significantly reduce the battery capacity. This disadvantage is mainly characteristic of nickel-cadmium elements. To a slightly lesser extent - nickel metal hydride.
To neutralize the memory effect, before checking it is necessary to completely drain the battery and then recharge it to capacity.
The main parameter of any battery is capacity. It is checked with a special device, but generally this need arises only among professionals. Therefore, finding a device for free sale is almost impossible.
However, the “volume” of a can can be easily calculated based on weekend measurements:
- voltage;
- current.
General recommendations before checking the battery
Before you check the screwdriver battery with a multimeter for possible faults, you should remind yourself that the nickel-cadmium batteries installed in most power tools have a so-called “memory effect”. Briefly, its essence is that due to frequent and irregular recharging, the capacity of the battery “cans” decreases, and the battery does not use its resource to its fullest.
Before testing the battery, it should be fully charged so that the readings taken by the tester are as accurate as possible. Keep in mind that testing will be optimally accurate if it is carried out under load. It is for this that the battery will need a sufficient amount of charge.
The set of tools you will need is simple:
- tester (or multimeter);
- screwdriver;
- knife;
- soldering iron;
- pliers.
Load testing
This method involves the use of several light bulbs or small electric motors that are connected to each power element in the screwdriver battery system.
First, the entire battery is fully charged. Then one 3-4 V light bulb or a low-power “motor” is connected to each “can.” The method allows, without measuring instruments, to identify inoperative elements in the system that are the earliest to lose their charge under load. Blocks that have lost capacity will certainly reveal themselves.
First stage of testing
Checking the screwdriver battery at the first stage is the simplest; current and voltage readings are taken from the battery while it is charging.
Readings are taken several times, at certain time intervals:
- 30 minutes after charging has started, U will be about 13 volts ;
- another 30 minutes U will increase to 13.5 volts ;
- two hours after the start of the process - 14 volts ;
- a fully charged battery will produce a voltage of 17 volts .
As for the increase in current (amperage) during charging, if the operating condition of the battery is in order, then the current increases steadily during the first hour. In addition to the voltage, measure the current an hour after the start of the process. If the indicator has passed the “mark” of 1 ampere, your battery is in good health and does not need to be disassembled and repaired.
Battery design and types of cans
The battery for screwdrivers is made as a small unit that is connected to the tool from the back, usually on the underside of the handle. This is done for the optimal location of the center of gravity and comfortable holding in the hand. The block is easily removed and fixed in its socket. Everything is done for convenient and fast work.
The unit itself is a plastic case with batteries inside. Since existing chemical current sources do not provide the typical power supply voltage for a screwdriver (12-18 V), they are collected in a series battery. The terminals of the elements are connected by a metal flat busbar, which is welded to them by resistance welding. This method heats the elements the least during assembly.
Thus, the battery is non-repairable. In developed countries they are disposed of without repair. The elements, or “cans” as they are simply called, are also non-separable, and sometimes contain harmful substances. The shape of the elements is cylindrical or rectangular.
Types of batteries
For cylindrical elements - usually Ni-Cd or Ni-MH - the electrodes, together with the active mass and separator, are rolled into a roll, and for rectangular ones they are collected in a bag, or sometimes also made in a roll. The goal of any of the methods is to maximize the area of the electrodes, which gives maximum current taken with minimum heating. This ensures high power density of the element.
Lithium-ion cells are produced in both cylindrical and flat cases, and lithium-polymer cells with ribbon or wire leads are produced in flat ones.
In general, the design is similar to oil capacitors, only there the electrodes are called plates, and they are separated by a non-conducting dielectric - oil. In the case of batteries, on the contrary, the filler conducts current; it is an electrolyte solution.
Battery operation is associated with corrosion of electrodes and other irreversible chemical processes. Gradually it loses efficiency and becomes unusable. Incorrect charge-discharge mode accelerates these events.
REMEMBER: Nickel-cadmium batteries must be discharged to the minimum voltage, and only then charged. On the contrary, lithium-ion batteries need to be recharged more often. This extends their service life.
Corrosion disrupts the shape of the electrodes, leads to ruptures and punctures of the separator and further short-circuiting of the cathode and anode. This increases self-discharge. The formation of poorly soluble compounds in large quantities leads to an irreversible increase in internal resistance. Such compounds are obtained through adverse chemical reactions, which are inevitable and limit their service life.
Express testing method: measure U at the battery poles
This method is even simpler, but with its help you can get an initial idea of whether the battery is ok. If we measure U without connecting a load, we get an indicator equal to the “idle speed” of the tool.
For example, if we have 12 cells in the battery with a voltage of 1.2 volts each, and the operating U is 14.4 volts, the “idle” U will increase to 17 volts. If the “idle” voltage is less than specified, this means that there are “banks” in the combination that have failed and need to be replaced. Also, a decrease in idle voltage may mean that the battery is not fully charged.
Types of storage devices in batteries and their properties
There are three main types of storage devices that are most often used in batteries.
Nickel
Quite often there are models with nickel-cadmium storage devices. Their voltage is 1.2 V. The main advantages of such elements include the following:
- cheapness;
- prevalence;
- resistance to low temperatures;
- long-term storage even after complete discharge.
Despite a considerable number of advantages, these drives also have disadvantages:
- fast discharge;
- small capacity;
- have few charge and discharge cycles.
Additional Information! The manufacture of nickel storage devices is very harmful. Therefore, many countries have abandoned their production.
Lead
Some types of batteries use lead batteries. They have the following advantages:
- slow self-discharge;
- many cycles;
- environmentally friendly production.
The main disadvantage of such batteries is their high cost. They cost several times more than nickel drives. Another disadvantage is that during prolonged storage some of their characteristics are lost.
Lithium
Lithium batteries are considered the highest quality and most durable.
Another common type of battery is lithium ion. Their voltage is 3.7 V. These storage elements have a huge number of advantages:
- complete absence of self-discharge;
- large capacity;
- many charge and discharge cycles;
- compactness and light weight;
- there is no “memory effect”.
Lithium batteries have a serious drawback - high cost. It is almost three times higher than the price of other types of drives.
Checking performance under load
This means that we will check how long it will take for the screwdriver battery to be completely discharged if an additional load is connected to it - for example, a light bulb.
The load level must be selected based on the power of the battery. If it is not indicated in the operating instructions, it should be calculated independently. It will be equal to half the current supplied by the battery during operation, multiplied by U of the current source. Typically this figure is from 35 to 40 Watts, which means that the load can be a headlight from a 35 Watt car, or a 12-volt light bulb.
To take readings, the battery must be connected to the lamp via an ammeter, and the readings themselves must be taken with a voltmeter. The connection time is two to three minutes, after which we measure U. If it is less than 12.4 volts, some “can” is definitely out of order. A significant decrease in the brightness of the light bulb may also indicate a battery malfunction. If it goes out quickly within two to three minutes, the battery is clearly not in order and its capacity is very low.
How to test a battery with a load fork
Testing the battery with a load fork allows you to make the most accurate conclusion about its performance under load. The load fork is a voltmeter, parallel to which a resistance is connected, simulating the load of the starter on the car battery (simulating the engine starting mode). Thus, if you have a load plug, you can check the battery without a digital multimeter.
Before checking the battery with a load plug, you need to switch it to voltmeter mode (turn off the load resistance) and measure the voltage at the battery terminals. The result obtained will allow you to evaluate the degree of charge of the battery (we provided a table above showing the dependence of the charge level on the voltage in an unloaded state).
After making sure that the battery is fully charged and the electrolyte level and density are normal, you can check it under load. To do this, connect the load to the load plug and measure the voltage at the battery terminals again.
Please note that when testing the battery under load, the voltmeter readings are taken at the end of the fifth second of measurement!
After removing the load from the battery, the voltage at its terminals should return to its original value.
Depending on the voltage measured at the end of the fifth second of the load test, you can make final conclusions about the performance of the car battery by checking the results with this table:
| Voltmeter readings under load | >10.2 V | 9.6 V | 9.0 V | 8.4 V | <7.8 V |
| Battery charge percentage | 100% | 75% | 50% | 25% | 0% |
To summarize, we would like to once again note four main parameters that you need to pay attention to when checking your car battery for performance:
- The voltage at the terminals without load must be at least 12.7 V.
- Voltage under load is at least 10.2 V.
- The electrolyte level in battery banks is 10-15 mm.
- Electrolyte density is 1.27 g/cm3 (for the northern regions of Russia – 1.29 g/cm3).
For more accurate values of these parameters, regarding the results of testing your battery, see the tables above.
Checking the elements in a disassembled battery
So, if preliminary testing has shown that the screwdriver may have faulty elements, the battery should be carefully disassembled and the batteries unsuitable for operation should be identified. As already mentioned, the normal voltage of each battery individually should be 1.2 volts. If this indicator is less, the “can” is carefully removed from the chain using pliers. It also doesn’t hurt to carefully inspect the entire bunch for external damage: rust, leakage of electrolyte.
If the voltage on all “banks individually” is within normal limits, you need to use load testing again, checking the level of internal resistance. This value is determined as follows: the voltage is divided by the current, and then the load resistance is subtracted from it.
To find out the voltage, immediately connect the load. This time you should use a resistor with a power of 25 watts and a resistance of 10 ohms . We check each battery, measuring the operating current and U.
The calculations should be something like this: let’s say, when taking measurements under load, we got the operating voltage of one element to be 1.19 volts and the current to be 112 milliamps. Before calculating, it is necessary to convert milliamps to amperes. It turns out 0.112 amperes, therefore: divide 1.19 by 0.112 and subtract the resistance of 10 ohms. The result is a value of 0.63 Ohm - this means that the indicator is normal.
Checking the performance of a screwdriver battery yourself using a multimeter is a useful skill that allows you to find out whether the battery needs repair or complete replacement of the batteries. Measurements of voltage indicators in general, without disassembling the battery pack, should be carried out from time to time. This will help to avoid sudden failure of the tool and eliminate the malfunction in time. Also, to avoid the accumulation of “memory effect”, do not neglect to fully charge your battery. This will help avoid premature loss of its capacity.
Screwdriver battery repair work
So, during the checks, non-functioning batteries were identified. What to do in this case? There are two ways out - an attempt to “reanimate” the elements or simply replace non-working “cans”.
“Reanimation” of storage elements
It’s worth mentioning right away that trying to “reanimate” ion batteries is useless. This type of battery cannot have a memory effect, and therefore, the reason for its failure lies in the decomposition of lithium . But first, it’s worth finding out whether the control circuit may be faulty. There are two methods you can use here.
- The control scheme should be changed. If the batteries work, then the circuit itself needs to be repaired.
- The battery is supplied with a voltage of 4 V with a current of approximately 200 mA using a regulated charger. An increase in the voltage on the “bank” to 3.6 V indicates the serviceability of the element and, therefore, either the control circuit or another power element is to blame for the malfunction.
To “reanimate” the battery of a screwdriver, two methods are used:
- Restoring the functionality of “cans” by compression or compaction.
- Supply of high voltage and current to the storage element. In this case, it will be possible, although not completely, to eliminate the lost capacity and get rid of the “memory effect”.
However, these methods cannot completely solve the problem of battery failure. They will only delay the inevitable. Sooner or later, you will still have to change banks.
Replacing “cans” in a screwdriver battery
To carry out repairs, new batteries are required. Currently, they can be easily purchased either in specialized stores or ordered online. The price is affordable for anyone. For example, the price of a nickel-cadmium battery with a capacity of 2000 mAh will be about 1000 rubles. When buying a new “can”, you should make sure that the parameters of the capacity and dimensions coincide with the elements being replaced .
The task itself is simple. It's good if you have experience in soldering. When connecting the elements, the faulty battery is cut off, a working one is put in its place, and then soldering is performed. As you can see, nothing complicated.
However, several important nuances should be taken into account:
- you need to solder quickly so that the “cans” do not heat up - this may affect their performance;
- to connect elements, it is better to use original plates, or copper ones, but of the same size;
- When adding a new element to an old one, do not confuse the plus with the minus. In a series connection, the negative from the previous battery goes to the positive of the new battery.
After soldering, you should carry out a charge-discharge cycle, and then measure the voltage on the “banks”. It should be around 1.3 V.
Primary measurement
Before the initial measurement, you should try to carry out the charging procedure to the rated voltage. After this, you need to wait about an hour to stabilize the self-discharge processes and measure the battery voltage. It should be equal to the voltage indicated on the case, but you should not trust this figure 100% - it is often of a marketing nature and may be somewhat overestimated. Therefore, it is better to determine the voltage this way: take the voltage of a single cell (it depends on the type of battery) and multiply it by the number of cells in the battery. If the quantity is unknown, then the multiplicity must be taken so that the final voltage does not exceed that indicated on the case.
| Battery type | Open circuit voltage, V | Voltage limits of a serviceable element, V |
| Lithium-ion | 3,7 | 2,7 – 4,2 |
| Nickel-cadmium | 1,2 | 1..1,4 |
| Nickel metal hydride | 1,2 | 1,1-1,25 |
So, if on the body of the screwdriver it is indicated that the lithium-ion battery has a voltage of 20 V, most likely this means that in reality there will be 3.7 * 5 = 18.5 volts on a fully charged battery.
“Twenty-volt” lithium-ion battery.
If the voltage is lower, it means the battery has lagging cells. Another option is that one or more cans are broken and, when connected in series, do not allow the others to charge (the charging current flow circuit is interrupted).
If the voltage of a battery that has undergone the charging procedure is lower than expected by a multiple of one or more cell voltages, there is reason to assume that there are completely faulty cells. So, if a NiMH battery with a nominal value of 14 volts (expected 1.2 * 11 = 13.2 volts) actually has 12.0 volts at idle, then there is reason to assume that one bank is faulty, and if 10.8, then two.
Preparation for repair
There are two ways to repair the battery: try to restore the functionality of the cans or replace them with new ones. In the second case, a logical question arises - where to get spare parts? There are options:
- If the tool was equipped with two batteries, and both failed, then you can assemble one working one from them. Since it is cheaper to rebuild a screwdriver battery than to buy a new one.
- Individual elements can be purchased in a retail chain or on the market. They are not in short supply.
As for resuscitating the battery, this operation is only possible for those devices that are equipped with a memory effect. The process is to “flash” the battery with current and voltage values exceeding the nominal values. This eliminates the memory effect, but restores normal capacity. However, restoration does not give long-term results; sooner or later the screwdriver battery will have to be repaired. Watch the process of renewing the battery in this video:
Battery banks are shorted - symptoms
Here is a classic lead acid battery consisting of 6 cans. Each of them is composed of pairs of oppositely polar plates. Their contacts are collected into a common collector, connected in series and connected to the cover with two terminals. Modern cans have a different design, but the layout of the cans and cells is the same.
With a series connection, the cell voltages are summed up, and the capacity is determined by the most clogged bank. To charge the battery, voltage is applied to the terminals and current flows through the storage areas. Why do banks short circuit in a lead-acid battery? If for some reason the plates in the jar get closer together, the walls swell, a jumper is created, and the cell is closed. It happens that a contact bridge is created by a piece of crumbled putty or scale.
How can you check if the battery is short-circuited? When measuring the voltage at the terminals, a dip will be detected. For example, a 12 V battery consists of 6 cans with a total voltage of 2.16 = 12.6 V. The voltage drops to 10.5-11.0 V - look for a closed can.
One of the plates inside the jar is lead, and the other has a layer of active substance applied to it. If the electrolyte level is violated or overcharged, the mass may crumble and short-circuit the plates.
Mechanical damage from the outside can lead to deformation. It is possible that the battery case is swollen, and then internal short circuits of the plates in the banks are possible. This can happen when the electrolyte freezes and from overcharging a maintenance-free battery.
Symptoms of a shorted battery bank are loss of voltage, heating of the battery case. The battery does not charge to 12 volts, is unable to crank the starter, and requires replacement. Sometimes when charging you can hear the smell of rotten eggs - hydrogen sulfide gas is released.
Recovering a shorted battery bank
Once it has been possible to understand that the car battery banks are shorted, it is necessary to evaluate the work to restore the cell and compare it with the purchase of a new device. If more than one can is shorted, there is no point in wasting time and effort on repairs. How do you know if there are still jumpers in other elements? They can appear if the layout of the case is disturbed or the connections are loosened.
Step-by-step instructions on how to restore a shorted battery bank.
- Identify a non-working jar based on the listed characteristics.
- Extract the electrolyte using special means, working in glasses and rubber gloves.
- Cut the plastic around the top of the cell.
- Disconnect the jumpers with adjacent elements and carefully remove the package of plates, rinse them from acid.
- Determine the location of the short circuit - a piece of metal, a bent plate, remove sediment at the bottom.
- Place the structure in place as it was, fill in the electrolyte, and secure the lid with glue.
- Fully charge the battery.
This is how lead batteries of older models and those produced in Europe are restored. Maintenance-free batteries must be protected from deep discharge. It is difficult to repair them yourself.
Checking by resistance value
The ability of each battery to function properly can be checked by comparing the “banks” by internal resistance. The value is determined by dividing the operating parameters voltage by current and subtracting the load resistance.
The operating voltage must be measured under load. As a load, you should take a 10 Ohm resistor with a power of 25 W. Every battery is tested. Operating current and voltage are measured.
For a better understanding, here are some example calculations. Let’s say that during measurements under load, data was obtained for one “can”: operating voltage - 1.19 V and operating current - 112 mA. Before making the calculation, do not forget to convert the current value from mA to A - 0.112 A. We perform the appropriate actions (1.19 / 0.112) - 10 = 0.63 Ohm. Recall that the subtrahend in our expression is the load resistance of the resistor (10 ohms).
Amps and multimeter: what is it
Ampere is a unit in which the force present in an electric current is measured in the SI system. The meters for determining it are called multimeters, which can be digital, analog or pointer.
There are differences between them. In the first case, the information is displayed on a liquid crystal screen, in the 2nd case there is a dial scale. An analog device has a very high measurement error. When working with it, it is necessary to eliminate the smallest vibrations. Otherwise, the result may be inaccurate. Digital more:
- successful;
- reliable;
- multifunctional;
- comfortable;
- universal.
The design of the device is simple
In the charger
The charger must be inspected if there is a need to find the reason why it is faulty. The current strength is different for each specific device. For example, on telephone and tablet devices it is monotonous, but on a car it is much more.
READ How to Check a Stihl Chainsaw by Number
For your information. The permissible limit is indicated on the product label or applied to the body as a marking.
The principle of action is exactly the same. The difference is that with small pin sizes on the connector, it is difficult to connect probes.
How to measure amperes with a multimeter in a charger if the connector does not include probes:
- Steel sewing needles are inserted into the contacts.
- To do this, use pliers and put gloves on your hands.
- The probes must be connected to the tips of the needle through a load.
- If this is not possible, then it is necessary to disassemble the unit housing. This way you can connect the probes to the output of the charger in the place where each tip of the electrical wire is soldered.
It is necessary to follow safety precautions well and pay attention to advice from the manufacturer. In some products it is forbidden to open the lid, while others are completely disposable, in other words, cannot be repaired.
What operations does the repair process consist of?
In production, batteries are assembled by spot welding. At home, repairing a screwdriver battery involves soldering, so for work you need to prepare:
- electric soldering iron with a power of 40-60 W;
- alcohol flux on rosin;
- tin.
Before soldering, the joints and contacts must be tinned.
Carefully cut out the faulty part that was identified earlier from the series circuit. In its place we solder a new element. During the repair process, you must follow some rules:
- to avoid other breakdowns, the soldering process should take place quickly, without heating the battery;
- for connection it is more reliable to use plates of the same size and quality that were in the battery;
- the cross-section of the wires must also match;
- We carefully monitor the sequential connection of the pluses and minuses, otherwise the whole work will be ruined.
After soldering new elements, check the quality of the connections of the remaining ones. If necessary, they need to be corrected. Then we clean the joints from flux residues with alcohol. We put the chain in the casing, secure it and charge it. After fully charging, the battery must also be completely discharged. This event will help equalize the potential at all banks. If everything is done correctly, then checking with a multimeter will give the same result at all points.
When packing a new chain, you may have to adjust the internal cavity of the case.
Thus, with our own hands we gave the screwdriver battery a second life. There are no difficulties in this work. It is enough to own a soldering iron, be able to use a multimeter and find suitable spare parts. Repairing a screwdriver battery is much cheaper than buying a new power source or the tool itself.
Checking by resistance value
Multimeter device diagram.
The performance of each battery can can be more accurately assessed by comparing the cans based on their internal electrical resistance. This parameter clearly indicates the reliability of the battery. The resistance value is determined by calculation as the result of dividing the operating voltage by the operating current minus the load resistance.
The operating voltage must be measured under load, and a resistor with a precisely defined value of its own electrical resistance should be used as a load. We can recommend a resistor with a resistance of 10 Ohms and a power of 25 W to create a load. The check is carried out for each bank separately. Operating voltage and current are measured.
For example, we can consider the average test. For a new battery bank, the internal resistance is 0.1 ohm. In general, the lower the internal resistance of the can, the better quality it is. In real conditions, an operating voltage under load of 1.19 V and a current of 112 mA for one bank and 1.18 V and 70 mA for the second bank were obtained. The resistance will be 0.63 Ohm and 5.71 Ohm, respectively.
A significant excess of resistance indicates the unsuitability of such a battery.
READ How to Cut Plastic Pipes
Checking amperes with a multimeter
Every electrician knows how to check amperes with a multimeter. This is a device that works like a voltmeter and other similar devices. Using this technique, it is possible to determine such characteristics as constant voltage, alternating voltage, current strength, resistance power, diode performance, transistor usability, signal transmission frequency.
In battery
You can check the lithium-ion battery in your car by doing the following:
- The multimeter is set to voltmeter mode, which tests the voltage.
- Set the spectrum to 0-20V.
- It is better to measure the battery only when the vehicle is disconnected from the power supply.
- The reddish probe is applied to the positive socket.
- The dark probe is placed on the negative socket across the load.
- The acquired readings must be recorded.
Bad battery won't start the car
- Voltage = 12.6 volts. The device is suitable for operation. There is no need to exercise.
- The voltage is less than 12 V. The car battery must be charged. She was discharged.
- Readings are more than 15 V. Such a device is prohibited from being used. This will damage the generator. You need to purchase a new battery.
For your information. To obtain clear data, they must be determined 6 hours after disconnecting from the car.
In the car
To determine the suitability of the vehicle generator for operation, it is necessary to check its charge level. The rules for using a device are the same as with a battery. If the data is incorrect, you need to check each component of the device:
- brushes;
- rings;
- diode bridge;
- voltage regulator;
- stator device;
- rotor.
Work with gloves
Signs of a shorted battery bank
Since charge is being redistributed inside, the battery case heats up, which is one of the signs of an internal short circuit. If the battery is serviceable, you can determine the shorted bank during charging. At the moment the voltage rises, the plugs on the cans are open, hydrogen is released from them, and the cans boil. If one does not show signs of life, it is closed. You can check and find the cause of undercharging of the battery in a ventilated area or outside.
If a voltage drop occurs in a maintenance-free battery, the device does not charge to operating voltage, as you can determine if the bank is shorted, or for another reason. Experts advise closing the contacts for 1-3 seconds. A copious discharge will begin from the non-working jar.
READ How to Check the Coil on a Chainsaw with a Multimeter
Even a maintenance-free battery allows you to see the electrolyte level in the jars through the translucent walls. Signs of a closed jar will be a reduced level of electrolyte - it boils away, sometimes a noticeable change in color to black.