A drill is a tool that is present in the inventory of every master. A drill can be used instead of a machine for polishing products, a mixer for building mixtures, or simply for creating holes in walls. To make drilling faster and more accurately, use a stand for an electric drill. Thanks to such stands, you can turn a regular drill into a machine that looks like a professional one. Below we will describe in detail how to make a stand for a drill with your own hands.
Drill stand
What should a drill stand be like?
The machine should be easy to use and not limit the capabilities of the drill, but rather expand them. The right stand allows you to not only drill holes in walls, but also mill parts.
Also, a drill stand for a drill, made by yourself, must be stable and correctly guide the drill. It should not move during operation, otherwise the holes will be made at an angle. But at the same time, using a high-quality bed, it is possible to drill holes at an angle. Some commercial models allow you to create holes with an inclination of up to 65 degrees.
Other qualities that a drill stand should have include:
- Possibility of adjusting the tool height
- Ability to absorb vibrations and vibrations emanating from the drill
- Solid base for stability
- Fixed hole depth
Not all tools presented in stores can combine power and reliability. And those that are capable of this will be very expensive. You can combine several functions at once by making a drill stand with your own hands.
Device
Design
The design of the rack consists of basic and additional elements, which include fastenings, guides and other parts and components of the rack.
Essential elements:
- The bed is the main supporting part of the device.
- Stand - used to fix the tool and move it with the help of auxiliary elements.
- The movement mechanism can be lever or hinged. The mechanism allows you to control the direction of movement of the drill when drilling. The control part is a handle or lever.
- Holder - holds the tool suspended during operation.
Material selection
To choose what material to make a stand from, you need to decide what qualities the future device should have. If the device will only be used to create holes, then you can make a guide from wooden blocks. In other cases, the drill stand is made of metal material. It is better to use steel, then the stand will be more compact and durable. For additional strengthening, you can combine metal with wood.
drill stand
Block of information! The greater the power of the drill, the stronger the structure should be. Chipboard panels are suitable for creating stands only for low-power drills.
Often the support is made from the steering rack of cars. It can act not only as a stand, but also as a lift. It is better to choose racks from used Soviet cars, as they are cheaper. The base of the drill stand can be made from wood with your own hands.
Area of use of the machine
If you decide to make a stand for a drill with your own hands, you should first study the instructions
However, it is important to understand whether you need such equipment. In general, a drilling machine is used to create individual items that can be difficult to purchase in a store
Some craftsmen like to create everything with their own hands, even if some products are easy to find on sale.
Craftsmen quite often face the need to drill the most accurate holes in workpieces. It can be quite difficult to perform such work by weight or on your knees. For this purpose, a holder is used, which allows you to fix the tool with the equipment. Everything will depend on you - which drill to use. The choice will be influenced by the nature of the actions performed.
Radio amateurs, for example, make electronic circuit boards using drills from 0.3 mm. If there is a deviation from the right angle, the drill will simply burst. Only a miniature drilling machine can solve this problem, but it is quite expensive. There is only one way out - a universal stand for a drill. You can do it with your own hands. Using available materials for the machine, you can make blind and through holes, cut threads and drill a perpendicular hole in a thin workpiece.
Pros and cons of a DIY stand
In addition to the possibility of producing a structure from materials available at hand, self-made drill machines contain many advantages. These include:
- Low price compared to products presented in stores.
- A large number of varieties of designs.
- Availability of instructions for creating a rack in the public domain.
- The ability to combine several functions in one device to create an improved machine model.
The disadvantages include the fact that specialized equipment will be required when constructing the rack. For example, not every craftsman has a lathe or welding. Also, the disadvantages may be the following:
- The appearance of a gap between the two components of the rack due to poor fit of the parts.
- Lack of some functions that store models have. For example, due to a stationary tripod, it will not be possible to make holes at an angle.
- Advanced models require expensive parts to create.
drilling machine for drill
Also, the disadvantages include the difficulty of creating a machine. Beginners will have to turn to professionals for help, for which they will need to pay extra.
Advantages and disadvantages of a homemade stand
A homemade drill stand has a number of advantages, the most significant of which include the following:
- manufacturing such a drilling machine costs much less than purchasing a serial model of such a device;
- You can make such a tripod for a drill from improvised materials, using components from old and unused equipment, which can always be found in any garage or home workshop;
- drawings of similar devices of various designs and even video instructions for their manufacture are in the public domain, finding them will not be difficult;
- If you wish, you can always create a machine from a drill of your own design, which in its characteristics and ease of use will surpass all existing models.
The simplest factory rack made in China can be bought very inexpensively (from 1,200 rubles), but its functionality and quality will not satisfy all craftsmen - too often there are complaints about significant play in budget models
But, of course, making your own device for securing a drill also has its disadvantages, which include the following:
- in order to produce some parts of such racks, the use of lathes, welding and other equipment is required, which naturally increases their cost;
- due to the fact that the structural elements of such drilling devices are not fitted very well, play often occurs in them, and this negatively affects the accuracy and quality of the processing performed with their help;
- a homemade stand for a drill is quite limited in its functionality; for example, it cannot be used to make holes located at an angle.
Main parts of the frame
The main part of the drill stand is the supporting frame. It is the basis of the entire device on which other parts are attached. Its size depends on the power of the tool. So, for vertical drilling, a stand measuring 0.5 * 0.5 meters is suitable, but for other operations it is better to choose a design with dimensions of 1 * 0.5 meters.
DIY drilling machine from a steering rack
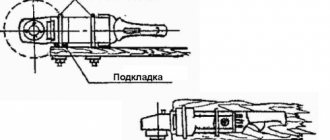
Next, you should pay attention to the guide for the drill itself. Thanks to this part, the drill is mounted on the machine and can move in a vertical direction. The clamp located on the stand is also responsible for securing the tool.
The carriage can be of two types. In the first case, the drill is secured to the machine using clamps that are threaded into special holes in the carriage. The second option is to fix the tool using a block. It is attached to the carriage at a right angle. To ensure that the drill holds firmly, a hole with a smaller diameter than the diameter of the drill is created in the block. Next, a slot is made where the tool is installed.
Device bed
The frame for the drilling device from the drill is made of metal (10 mm thick) or wooden (more than 20 mm thick) sheet. The massiveness of the bed that you will use as a base directly depends on the power of the drill used. The dimensions of the frame for a drill machine depend on the specifics of the work performed on such equipment. You can use the following recommendations for choosing frame dimensions:
- machines for vertical drilling - 500x500 mm;
- equipment for performing various technological operations - 1000x500 mm.
The metal frame is a thick plate with welded corners
The frame, made of metal or wooden sheets, is a very simple structure. A stand is placed vertically on it, the stable position of which is ensured by a special support. Such structural elements can be secured to each other using screw connections.
How to make a drill stand yourself
First you need to take care of preparing the material for the machine. It is important that the base for the stand is rectangular. Several holes should be made in it and the base should be attached to the workbench to avoid errors due to random movements of the material.
instructions How to make a stand for a drill yourself
The guide can be made from an aluminum tube half a meter long. It must be welded to the base. To lighten the load on the structure, it is advisable to use several guides.
To allow the drill to move freely, you need to make a special stand. To do this, clamps are attached to a piece of chipboard or metal, and anti-slip material is placed under them. And in order for the tool to lift automatically, springs are additionally used.
Next, the finished stand is fixed onto the prepared guides. Afterwards you need to take care of laying and installing the drill. The tool is secured using clamps. The drill can be controlled using a handle. It is installed on the guide.
After preparing all the elements, the assembly of the entire structure begins. This must be done very carefully, avoiding the formation of gaps. At the end, you can add additional elements to the design in the form of a ruler, protractor or clamps. In the same way, you can make a stand for a drill yourself from plywood.
How to secure a drill to a table
- The simplest guide attachment for a drill with your own hands
- Manufacturing process
- Guide for making straight holes
It is difficult to make a straight hole in the wall with just one tool; a DIY guide for a drill simplifies the work. It is not easy to even make a hole at an angle of 90°, and engineering solutions often require holes at an angle of 45°, and such work with a drill without special training is even more difficult to perform.
A drill guide is needed to make a straight hole.
Difficulties often arise if the material that needs to be drilled is too hard: the drill constantly slips, risking injury to the worker and others. Drill guides greatly simplify the work, and you can make them yourself in several different versions.
The simplest guide attachment for a drill with your own hands
Diagram of a guide for a drill.
This version of the attachment will not cost a penny and is very easy to manufacture, but at the same time it will not last long and cannot be considered a full-fledged addition to the tool.
But when the work is being done far from the workshop and there is nothing else at hand, this device can be very useful.
It is also suitable for those who use a drill very rarely.
- plastic bottle
- plastic cover
- drill
- stationery knife
- felt-tip pen
- universal glue
- ring drill
- sandpaper
- drill.
Manufacturing process
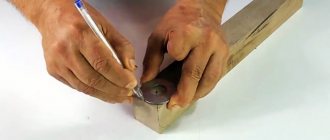
On the plastic bottle it is necessary to mark the diameter of the nut holding the drill bit.
You need to unscrew the nut that holds the drill from the drill and mark its diameter on the plastic bottle closer to the neck.
The circle that marks this diameter is transferred with a felt-tip pen, drawing a complete circle.
The circle to be cut is also marked on the bottle cap, which must be wide enough for this.
The bottle or jar is trimmed.
The depth of the holes drilled using a guide depends on the height of the structure being cut.
To ensure safe work, it is better to sand the edges of the jar, as they must be even and smooth.
The holes marked on the bottle and its cap are carefully cut out using a stationery knife. The edges of the cuts are thoroughly sanded. The lid is inserted with the front side into the jar until it fits snugly and glued in this place.
To make a stronger connection, most adhesives require firm compression before drying. Since it will be quite difficult to do this manually, you can put several thin elastic bands on top that will provide the necessary pressure.
As soon as all the glue has completely dried, a quick and budget version of the drill attachment can be considered ready.
You can insert a drill into it, then secure it using a plastic nut and start working.
It is not adjustable in depth, but you can make several of them and replace them as needed.
Guide for making straight holes
To drill a hole at a 90° angle, you will need a square piece of wood.
When working by hand with a heavy drill, the biggest challenge is making sure the resulting holes are as close to a 90° angle as possible without being oval.
If there are no suitable tools at hand to make a guide, its semblance can be made using scrap materials.
Before you start drilling a hole, you should prepare a square block of wood or other available materials.
The block is placed against the wall close to the hole to be drilled, and the edge of the drill touches it, which ensures smooth work.
But you can work even more conveniently and accurately if you combine two even bars at right angles, and place the drill in the inner corner formed by them.
If the bars are combined in the shape of the letter #8220 T#8221, it will be more convenient to hold it in the desired position without fear of injuring your hands.
How to make a drill press
A stand for a drill for vertical drilling is not difficult to make. More effort will be required when constructing a drilling machine. This device is large in size. But if you follow the recommendations, you can make an improved compact device.
To make a drilling machine yourself, you need to use a stand, the creation of which was described in the previous paragraph. Next you need to complete the following steps:
- Disassemble the drilling tool and remove the motor and starting device from it.
- Secure the engine to the stand using clamps.
- Prepare a separate box in which to install the starting device.
- Increase the length of the wires from the starter and install the box on the base of the stand.
- Firmly secure the cartridge by first placing it on the shaft.
The small drilling machine is ready. You don’t have to disassemble the tool, but then the machine will turn out to be bulky. Or it is possible to use engines from any household appliance. In this case, you will need to purchase an additional cartridge.
Drilling machine device
Holder with two degrees of freedom
The device has two swivel joints between the clamp (clamp) and the clamp for fixing the drill.
The axes of rotation of the hinges are located at an angle of 90°, and allow you to position the tool at any angle to the working plane of the workbench. This can be seen in the illustration. Of course, such a holder can no longer be attached directly to a workbench (stationary); it only works with a clamp. It is not possible to quickly direct the axis of rotation: for safety reasons, first one hinge is fixed, then the second.
Nevertheless, this device makes it possible to use the drill as a milling cutter, with an arbitrary shaft arrangement. Or you simply position the rotation axis in a way that is convenient for you at the current moment.
Advantages:
Increased freedom of rotation axis position.
Flaws:
- Inconvenient position adjustment; you have to fix the hinges one by one. In addition, there are certain restrictions on the size of the power tool (a large drill cannot be secured in such a holder).
- There are questions about reliability: the more hinged joints, the lower the accuracy and strength of the fastening.
Homemade jack stand
Stands made on the basis of a jack are characterized by high strength and good fixation of the height of the tool. Before starting the manufacture of the device, it is necessary to prepare the welding machine. To make your own stand for a drill or screwdriver from a jack you will need:
- Metal rectangular base;
- Metal pipe;
- Pipe sleeve;
- Pin with metric thread with a diameter of 16 centimeters;
- Nuts suitable for thread diameter;
- Disk;
- The handle with which the tool will be moved;
DIY drill stand
First you need to make a vice for the tool. After which they must be welded to the bushing. On the other side you need to attach a nut. In order for the sleeve and nut to move without problems, the tube and pin must be positioned at a sufficient distance from each other. The pipe is carefully fixed, and the pin is inserted into pre-prepared grooves, which allow it to rotate relative to its axis. The handle is attached to the edge of the disk, and the middle of the base is connected to the pin.
After the main work is completed, a durable fabric or rubber material can be used to cover the edges and joints of the pieces.
Making a mobile drill stand for a drill with your own hands
The drill stand has been known to home craftsmen and professionals since the times of the USSR. The mobile design of the rack is very convenient to use, so recently such a device has been made independently. Making a drill holder with your own hands is not at all difficult. It is enough to purchase inexpensive materials, as well as prepare the basic tools.
Materials and tools
For self-assembly, different types of materials can be used. Depending on the type of material used, the tool is selected:
- hardwood or metal plates;
- homemade or factory-made handle;
- furniture guides;
- steel squares;
- electric drill;
- hammer and file;
- screwdriver or screwdriver;
- tape measure and protractor;
- marker.
Making a stand for a drill
To make a part, it is best to use a thick metal or wooden plate:
- the dimensions of the steel plate are 500 x 500 x 150 mm;
- The dimensions of the wood plate should be 600 x 600 x 30 mm.
These types of beds are used in the manufacture of machines exclusively for drilling work. To manufacture a multifunctional unit, the dimensions need to be increased to 1000 x 500-600 x 20-30 mm. The main stand with supports is attached to the wooden frame. Screws are used to connect parts.
Mechanism for moving the drill in the vertical direction
The design is based on a handle and springs, and the design of the mechanism can be represented by:
- return mechanism fixed in close proximity to the handle;
- a pair of springs fixed in the grooves of the carriage.
The first option involves placing the handle axis between two plates screwed to the post. The spring device moves a few millimeters. Moving the handle down causes the spring to return to its original position and move the carriage to the starting point.
The second design is based on securing the pin and side plates at an angle of 90° to the carriage. The springs are fixed in the grooves of standard furniture guides. As a result of pressing the lever, the drill moves down and the springs are compressed. Once the handle is released, the carriage assembly is thrown upward. The spring elements are fixed with metal squares.
Drilling machine installation
The drilling machine must be assembled in accordance with the drawing documentation. The mobile version of the drill stand, with high versatility, consists of the following elements and structural parts:
- supporting frame for fastening all the necessary elements of the machine;
- a guide that allows you to secure and move the tool with the carriage in the vertical direction;
- a special handle that controls the vertical movement of the tool.
To improve functionality and performance, additional components and special elements are used. Assembly and installation of the device must be carried out in accordance with the following instructions:
- fastening to the frame is strengthened by supports;
- screwing the vertical stand to the support;
- vertical fastening of a pair of guides;
- mounting on the moving part of the carriage with an electric drill.
For correct operation of the machine, it is necessary to check the guides for any play. The tool can be secured using special clamps or using a block.
Return mechanism
The main control mechanism of the machine is called the return mechanism. It regulates the operation of the carriage and is responsible for returning it to its original position. It consists of two parts: a spring and a handle. There are two ways to create such a mechanism.
The first method involves using a pair of springs under the carriage. These springs are fixed in the grooves, and the handle is mounted to the end side of the stand.
do-it-yourself drill stand drawings
In the second case, the spring is attached near the handle. Metal plates are installed on both end sides of the machine (two per side). Holes are made in the two front plates into which an axle with a diameter of 1 centimeter is inserted. It can be made from a regular bolt. The spring is placed between the second pair of plates and secured with pins on the handle. In order for the design to work correctly, a slot is made at the junction of the pin and the spring.
In both cases the system works the same. After pressing the control handle, the springs are compressed and the tool tilts. After the handle is released, the springs tighten and return the drill to its place.
Manufacturing instructions
We make a stand for a drill according to the drawings with our own hands.
In principle, the assembly of almost any stand for a drill occurs according to the same scheme. After the frame has been selected and the corners have been attached to it, if necessary, the support for the rack is fixed to it. At the next stage, the stand itself is connected to the base using screw connections. Then each rail must be mounted on a stand, which is convenient to do using furniture fasteners
It is important to mention that the guides must be without lateral play
The dimensions of the carriage depend on the size of the drill. The drilling device can be secured using two methods. Firstly, these can be clamps that will pass through specially drilled holes in the carriage. To securely fasten them you will have to tighten them very tightly.
Secondly, the device is secured using a special block - a bracket.
It is usually made from a wooden plate, attached to the base carriage at an angle of ninety degrees and reinforced with metal corners. In the block itself it will be necessary to make a circular cutout for the drill, the diameter of which is half a millimeter smaller than the diameter of the drill, as well as a slot to secure the drill in the hole. The hole is created either with a cylindrical nozzle or by following simple instructions. First, the diameter of the drill is measured and a circle is drawn on a wooden plate. Next, several holes are made along the circumference from the inside. The gaps between the small holes are cut off with a file or a special tool, and the resulting hole is processed with a file.
The latter can either be docked with the handle, or placed separately at the bottom of the carriage using special grooves. In the second case, when the handle is pressed, the carriage with the fixed device moves down, and the workpiece, accordingly, is drilled. At this time, the springs store energy, and when the handle is released, the carriage will return to the top.
Horizontal drilling machine
Typically, machines involve drilling holes with a drill in a vertical position. But sometimes it is necessary to make holes in a long part. Even with expensive store-bought stands, you won’t be able to drill vertically efficiently; there will always be errors. To avoid this, you can make a machine for horizontal drilling.
horizontal drilling machine
First you need to prepare a circular saw, a screwdriver or drill and a standard set of tools, including screwdrivers, a hammer, a chisel, etc. You can use ordinary chipboard panels as the material for manufacturing. Supplies you will need:
- Impeller nut;
- self-tapping screws;
- guides;
- lever;
- sleeve;
- bolts.
First you need a frame. Chipboard is used as the base, and the edging is made from wooden blocks. From the same plywood it is necessary to assemble a table that can change its height using screws. The table needs to be thoroughly polished. By rotating the handle, you can raise the table to the desired height. Next, draw a bright line running in the direction of the drill. This will help you drill holes more accurately. The guides are installed in such a way that they can be moved apart depending on the size of the tool, and then secured with screws. For the drill you need to make a support to which the structure is attached. To make the part move better in the machine, you can attach pieces of laminate at the points of contact with the structure.
Manufacturing
Regardless of the modification of the rack and the material of its manufacture, the basic design algorithm for assembling the device is the same. The production process consists of preparatory work and the main process - assembly.
Preparatory work includes:
- rack design planning;
- transferring the plan to the drawing;
- compiling a list of necessary materials from stock and those that need to be purchased. Drawing up a work estimate.
Step-by-step algorithm
- Bed production. The main support member must be strong enough to support the weight of the workpiece and the additional stress of drilling. This indicator is calculated individually depending on the type of work. The recommended minimum thickness of a wood frame is 300 mm, a metal frame is 200 mm.
- Installation of supports and racks on the frame. The elements are made of the same material as the frame. The parts are fastened perpendicular to the frame using screws. The height of the support depends on the height of the instrument.
- Cutting the block - its size should be identical to the dimensions of the tool. A cavity for the tool is cut out in the block. If the block is wooden, use a drill, cutting tools, and sandpaper. If the block is metal, you need a grinder to create the hole. A metal strip curved around the circumference of the drill and secured with a screw can be used as a block. It is also attached to the stand with a screw. In this case, such a part of the assembly must withstand the weight of the tool in operation. The use of metal in the production of a machine increases the cost of the device, as it requires the use of additional equipment.
- Installation of the carriage and guides. The carriage is used to install the tool, the guides ensure the vertical movement of the drill during drilling. The most durable way to secure the block is with iron corners. Fastening the drill to the carriage using clamps is less reliable.
- Fixation of a moving element, which consists of a handle and springs. This structural unit can be installed using top and bottom methods. Mounting near the handle is more practical, but the second option can also be implemented.
- Installing additional rack parts. If it is necessary to perform work other than drilling, parts of the machine are attached to the machine according to the drawing. For example, for corner drilling, the stand is modified with an additional plate with holes that will help fix the stand at different angles. Milling requires the installation of a horizontal stand with a vice, which is attached to the bed.
Important! Lay linoleum on the metal base of the bed so that the metal workpieces are not damaged when drilling.
Equipment for additional functions
To use a drill stand as a milling machine, you need to use the horizontal version of the bed presented in the previous paragraph. To such a machine you need to add a rotating plate. This is where the tool will be located. Then a hole is made in the stand stand into which the carriage with drill will be inserted.
Next, holes are drilled on the rotating plate at the most popular angles. Connect the rotating plate and the stand exactly along the holes. Bolts are used for connection. You also need to make three holes on the stand post into which pins will be inserted to install the rotating plate.
To use such a machine, you need to rotate the plate into the desired position, secure it with pins and start working.
Branded drill holder
The multi-position tool from the German company Kandil is considered by craftsmen to be a very high-quality and convenient device. This product is equipped with a system that allows you to change the position of the tool. In addition to the drill, the machine provides for fixing an angle grinder (). The branded holder is characterized by ease of installation and reliable fixation of tools. This machine can be used for drilling, sharpening, grinding and polishing work at any angle. The holes on such a device are drilled in vertical and horizontal planes. In the manufacture of these German holders, high-quality steel and aircraft-grade aluminum are used, so the tool is characterized by high strength. The Kandil holder is widely used today by professional craftsmen in carpentry shops.
Source
Conclusion
Do-it-yourself drill stands have a number of advantages over purchased ones. Not only do they cost much less, but they are loaded with features. Making such a device will not be difficult even for inexperienced craftsmen. And if you have questions, you can always use the detailed instructions for creating a drilling machine with your own hands.
Summary
Article Name
DIY stand for drill - detailed instructions, drawings, video
Description
✅Article on how to make a stand for a drill yourself ➜—✅ Homemade drill stand made of wood for a drill with your own hands ➜—✅ Drawings ➜— ✅ Video
Author
Sarychev Alexander Viktorovich - forensic construction and technical expert, candidate of technical sciences
Publisher Name
Wikipedia of construction tools
Publisher Logo
- Related Posts
- Wood cutter for drill - review, instructions for use
- Drill attachments for car polishing
- Drill attachment for sharpening drills - review, how to choose
« Previous entry
How is the stand made?
Drill holders must be equipped with stands. The quality of drilling work will depend on the quality of manufacturing of this unit in the future. To prevent the drill from deflecting, and, therefore, from damaging the workpiece and breaking, it is important for the craftsman to maintain a strict vertical line in relation to the bed when making the stand. You can make a vertical guide post from a block, plywood plate, pipe or metal profile. It all depends on imagination and the availability of the necessary material.