I can do it myself 5. Dez. 2018
The relevance of the question of how to make a router from a drill with your own hands is explained by the fact that not all home craftsmen can afford to purchase expensive serial models. Meanwhile, the usefulness of such a device and the need for its use in many situations (construction and repair work, manufacturing of all kinds of structures from wood, decorative design of products from various materials) are undeniable.
Simple milling of wooden parts can be done on a homemade drill stand
Using a router equipped with the appropriate working tool, you can successfully mill wood products, form edges of various configurations on them, prepare seats for door locks and hinges, create grooves on wooden parts, and also solve many other technological problems.
Structure and purpose
In simple words, the structure of a milling machine can be described as follows: the electric motor of the unit imparts rotation to the shaft on which the cutter (specialized attachment) is located.
When installing a manual device, the cutter is placed in a special chuck, either a cam or a collet.
The key task of the device is the processing of plastic, iron, wood, glass, ceramics or organic glass.
An example is the preparation of technological holes for a door lock in a wooden panel.
In addition, this can be processing the edges of parts or cutting threads, milling cavities and grooves.
Rotation is provided by an electric motor operating from an alternating current network. A wide variety of attachments can be used depending on the material that needs to be processed.
The simplest material for milling processing is wood, therefore, in general, milling cutters for its processing will be especially common and inexpensive. For metals of different levels of strength and toughness, attachments must be used that differ in their properties depending on the characteristics of the material being milled.
Of course, cutters for metals or wood are not suitable for processing ceramics or glass; for such materials it is necessary to select a cutting tool with other parameters.
This is interesting: Equipment for the production of fuel briquettes from sawdust and other types of raw materials
Design features and device of the milling cutter
A milling cutter is a unit for processing wood or metal, designed primarily for cutting technological recesses. The device consists of a housing in which key components are located, a motor and a holder for installing collet adapters for cutters. At the bottom of the unit there is a platform made of cast or stamped metal.
When turned on, the electric motor of the milling cutter imparts rotation to the shaft and sets the milling attachment in motion. The tool allows you to make grooves and cavities in wood, process the edges of parts or create threads without wasting time and extra effort.
Milling cutter from a drill
Do-it-yourself milling cutter from a drill: photos, videos, drawings. In a home workshop, there is often a need to sharpen, smooth an edge, or perform some other operation on metal or wood. Having a milling machine solves these problems. But what to do if there is nowhere to put such large equipment or there is nothing to buy it for?
The solution is a milling cutter from a drill. A homemade device will greatly facilitate the processing of various materials at home.
How to make a vertical milling machine from a drill
Another simple algorithm suggests making a manual milling machine that is as similar as possible to a purchased unit. The diagram looks like this:
- Two identical polygons with small protrusions on three sides are cut out of plywood or a thin sheet of chipboard using a jigsaw. The parts are fastened together using glue and self-tapping screws.
The screw heads must be recessed so that they do not protrude above the surface of the wood. - A hole is drilled in the center of the workpiece, the diameter of which should slightly exceed the width of the cutter. On one side, the part is sawn from the edge to the center of the hole. A circle is cut out of a large piece of plywood and a wide hole is also made in its central part.
The holes in the round and polygonal workpiece must be the same in size - Two identical vertical stands with guides along which the drill will move are made from wooden dies and boards. The supports are fixed on the sides of the large circle, and then stops-limiters are additionally installed in their lower part.
Stops will prevent the drill from going too low - In the notched part of the polygonal workpiece, a through hole is drilled for a long screw with an adjusting nut. The milling cutter from the drill is inserted into the platform and tightened so as to eliminate vibrations and backlash. Grooves are cut on the sides of the racks in the lower part and screws are passed through them. You need to screw the fasteners into pre-prepared side holes on the platform.
At the top of the router, install an additional stop with your own hands to eliminate vibration of the drill
Videos about a DIY drill milling machine show that it should be used for processing small parts.
The platform is slowly moved along the workpiece, holding it by the racks, and smooth and neat recesses and grooves are made.
Assembling the base
First of all, think about the structure of the workbench and the layout of the router on it. You don’t have to worry about the lid, but buy it in a special store, but it’s relatively expensive. To make it yourself, use the drawings. A high-quality table guarantees comfort and makes it possible to speed up the process of working with a router. The base is a slab of strong plastic or chipboard with a thickness of at least 12 centimeters. Plastic is not afraid of dampness, however, it is easier and faster to make a lid from chipboard.
The lid is placed on the guides. Provide the ability to adjust them to customize the position of the table to suit you. Also keep in mind that the area around the work area must be fenced off. This is of great importance when working with a hand router. In addition, the workpieces require a clamping device.
We create an adjustment elevator and install a drill
Cut out a small panel from chipboard and make 4 support bars for it. The materials used must be of high quality and strong. Cut a semicircular hole on the table top with an electric hacksaw or jigsaw. Make slots for the thrust sheet and clamps. Attach the panel to the motor using bolts or special fasteners. The router must be secured to the table using bearing units. In order to increase the quality of fixing the electric drill in a vertical position, you need to add a block of wood to the top of the stand. It will act as a stop for the electric drill. At the final stage of creating the router, sand all its wooden surfaces. The work site must be on a strong and durable base.
Materials and tools
To assemble the device, you will need the following materials and tools:
- motor operating from the mains;
- electric jigsaw (if not available, a hand saw);
- drill;
- screws, locknuts, self-tapping screws, clamp;
- cutter;
- cartridge;
- 4 blocks of wood;
- quick clamps;
- Chipboard - for the base of the unit.
You do not need to be an expert to operate these tools. First check the functionality of electrical tools and take care of compliance with safety regulations.
This is interesting: Milling cutter for cutting door locks and hinges: setup, templates and cutters, video
Features of application
Of course, just installing a router from an electric drill is not enough - you need to properly care for it so that it functions for a long time. Experts make the following recommendations.
- All wood surfaces must not only be thoroughly sanded, but also treated with a protective coating in order to increase the ability to resist various adverse influences from the outside.
- The control system of the device should be carefully designed so that it is extremely comfortable.
- Certain additions can be made, such as a system for cleaning the work area from chips. For example, install a small pipe that you can connect to a hose from a simple vacuum cleaner.
The principle of operation of the milling cutter
The milling device works like this:
- the motor provides rotation and transmits it to a spindle made of durable and rigid metal;
- the spindle has an attachment for working on metal or wood - a milling cutter;
- it processes material that is fixed on the working plane.
Note! In the manual version of the router, the nozzle is attached to the chuck.
A drill router can also work on ceramics, glass, and plastic. For each material there is a separate nozzle with its own characteristics:
- For wood - simple cutters, not high-strength and without a large number of revolutions.
- For metal - reinforced nozzle. Brass is especially difficult to machine with a router.
- For glass and similar materials - cutters made of special alloys.
Using such a tool, you can screw threads, turn grooves and cavities, smooth and give the desired shape to an edge, and turn out holes. The drill will provide the manual machine with an electric motor of suitable power. When selecting it, take into account the power and rotation speed. The second parameter affects the quality of the cut: the more revolutions, the better.
The power depends on the material to be processed. For wood blanks, 0.5 kW is sufficient. But even in this case, experts recommend looking for a more powerful device of 1-2 kW. Such a router will be universal and convenient for working with various materials.
Device operation
It’s not difficult to make a router from a drill, but you still need to know the operating principle of such equipment. It is worth noting that it is quite simple. The main element is a motor that rotates and transmits this rotation to a spindle made of durable material. An attachment - a milling cutter - is put on this part. It can be designed to work not only with wood, but also with metal. The cutter processes workpieces that are laid on the frame of the device. It is worth paying attention to the fact that if we are talking about a manual router, then the element for processing will not be attached to the spindle, but to the chuck. Depending on the material being processed, the type of cutter itself also changes. As for working with wood, the simplest models are suitable. The strength requirements are not too high, and the speed can be low. For metal, you will have to use already reinforced models, especially if you need to process brass. To work with glass, you will have to purchase a part made of high-quality hard alloy.
Will need
To transform a drill into a vertical router, before starting work, we will prepare the following materials and products:
- round pipe;
- steel strip and plate;
- foundation or anchor bolts;
- four nuts;
- electric drill;
- three locking bolts;
- wood cutter.
To make the equipment and assemble it, we will need: a circular saw, a lathe and a drilling machine, a grinder, various files, a boring machine with two cutters, a tap with a driver, welding, a caliper, etc.
Vertical device
The simplest model to assemble is a vertical wood router made from a drill. It is possible to make it yourself. Its use will help solve most household problems. In order to successfully assemble a milling-type machine from equipment such as an electric drill, it is necessary to have the following tools and materials on hand:
- pieces of thick plywood or chipboard;
- a clamp is used as a fixing part, which holds the drill in a vertical position;
- Bolts, screws, and nails are needed as fastening elements;
- you need a feather drill or a drill bit 40 mm in diameter;
- The tools you will need are a regular plumber's set.
Assembling the base for a homemade router from a drill
First, think about the structure of the desktop and the layout of the router on it. You don’t have to assemble the tabletop, but buy it in a specialized store, but this is quite expensive. To make your own, use the drawings. A good table will provide comfort and speed up the process of working with a router. The base is a sheet of durable plastic or chipboard with a thickness of at least 12 cm. Plastic is not afraid of moisture, but making a table top from chipboard is faster and easier.
Note! There are other options: MDF or phenolic plastic.
The tabletop is placed on guides. Provide the possibility of adjusting them to adjust the position of the table for your convenience. Also note that the space around the work surface should be protected. This is important when working with a hand router. In addition, the parts require a clamping mechanism.
Helpful advice! Any holes in the tabletop are cut with a regular hand drill.
Installation of a regulation elevator:
- Cut out a small panel from chipboard and make 4 bars for support. The materials used must be durable and reliable.
- Cut a semicircular hole on the countertop using a jigsaw or electric hacksaw.
- Make slots for the clamps and thrust sheet.
- Attach the panel to the engine using bolts or special fasteners.
- The router must be fixed on the table on bearing units.
- In the final stage of making the tabletop, sand all its wooden planes with sandpaper. The work surface must be located on a strong and durable base.
How to make a milling table from a drill
The milling table is the most convenient to use. When using it to make holes, you do not need to move the tool itself - it is in a fixed state. The diagram for making a simple table looks like this:
- The workbench lid is turned over and a large hole is cut using a jigsaw. In diameter it should be 5 mm larger than the dimensions of the cutter. A bar is installed perpendicular to the table - it must be positioned parallel to the long side. The part is secured with corners and screws.
The strip should be located exactly in the center of the prepared hole - At the bottom of the workbench cover, long screws are used to attach clamps for a drill, hand-cut from wooden blocks, to the surface. The design should allow you to freely adjust the position of the homemade router. It is also necessary to provide a movable clamp designed directly for fixing the power tool.
To adjust the position of the drill, screws with wing nuts are mounted in the clamps - To prevent sawdust from interfering with the grinding of workpieces and lifting the cutter itself, you can immediately attach a vacuum cleaner to the table. There is no need to build a complex structure - just position the unit hose closer to the rip fence and the moving element, and then fix it.
To fix the vacuum cleaner on the layout, you can use either metal clamps or regular tape.
A DIY milling table made according to the above diagram allows you to grind both small and very long parts. Its main disadvantage is its low speed. The speed of a standard drill does not allow processing wood quickly and in large volumes.
Advice! If you need to build a compact table for a router with your own hands, you can use folding legs from an ironing board as a support for the workbench.
Making a router from a drill
Making a milling cutter from a drill with your own hands is easy and quick, since this tool already has a chuck into which you can clamp the cutter shank. But since the drill develops low speeds, about 3000 rpm, it will not be possible to achieve good quality machining of the part.
For comparison: a milling machine reaches speeds of up to 30,000 rpm.
A vertical drilling device, which can be purchased at a power tool store, is ideal as a stand for securing the drill. You just need to change the equipment, and the homemade router is ready.
Also, a similar stand can be made from laminated chipboard, as shown in the following figures.
For example, with such a homemade device you can make a groove in a laminated chipboard board under a T-shaped PVC edge no worse than using a ready-made router.
Manual device
It happens that it is not possible to find a place for a large-sized machine. In such situations, a manual milling cutter from a drill comes to the rescue. It can be made by almost anyone who is willing to spend several hours studying the drawing and becoming familiar with the materials, and then devote time to assembly. However, here it is necessary to understand that a home-made model is not capable of replacing a serial one 100%. There is one significant difference here. A milling cutter from a drill involves the use of a conventional electrical device, the chuck of which can reach a maximum speed of 3000 rpm. Factory models of machines are capable of reaching speeds of up to 30,000 rpm, the difference is obvious. It is also worth considering that the gearbox of a conventional drill is quite weak and it is not designed for long and intensive work. You can operate it this way, but this will lead to rapid wear.
How to make a router from a grinder
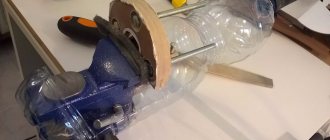
It's no secret that an angle grinder is often used for grinding, polishing and milling various surfaces with disc and cup attachments. But if you screw a collet onto the spindle of the unit, you will get a grinder milling cutter that can work not only with disk cutters, but also with any equipment that has cylindrical shanks.
If you clamp a cutter made of carbide material into a collet, you will get a metal milling cutter.
Also, to make a router, you can attach a regular jaw chuck from a drill to the grinder spindle.
The photo above shows an attachment for an angle grinder that turns it into a manual milling machine. You can understand how to make the device from this video.
DEWALT DW625
Advantages
Excellent balancing, good visibility of the cutter during manual milling.
Flaws
- To install the included 8mm collet, you must first remove the 12mm collet from the nut, then insert the 8mm collet into the nut; we would like each collet to have its own nut.
- The hole in the sole makes it difficult to use cutters with a diameter of more than 63 mm.
- The speed controller with numbers from 1 to 5 does not allow you to know the real speed. You have to find it out from the table in the manual.
Additionally
Although the motor of this router lowers smoothly, it is fixed by force by turning the lever. This is less convenient than the Bosch and Porter-Cable 7539 models.
FESTOOL OF2200EB
What is a manual milling machine
Small wooden parts are processed at home using a manual milling machine. Let's look at what types of cutter sets there are and what they are used for.
Main Application:
- For installing doors
- For mounting window frames (frame cutters)
- When turning small bars and planks
- When creating holes for installing door and window locks
The router is used only for spot work on small wooden areas.
The power of the tool is:
Easy
The lightweight model has a power of up to 750 W. Suitable for small jobs at home.
Average
With a power of 750–900 W, the model is in demand. This is an indispensable assistant during the installation of furniture frames and the creation of shaped parts from wooden blocks.
Heavy
The heavy model is used to make professional products. It has a power of 900–1200 W.
Milling cutter from a washing machine engine
Very often, craftsmen make various machines from a washing machine engine: wood lathes, drilling, sharpening, circular, as well as stationary milling machines. To make the latter, you will first need to make a table using the method described above. Next, you need to install a collet on the motor shaft to clamp the cutters.
Since it will not be possible to attach it to the motor shaft without an adapter, you will have to order one from a turner.
You will also need to make a lifting mechanism for convenient adjustment of the tool reach. It is made from two pipes that act as stands on which the engine is mounted, and a threaded rod.
One end of the pin enters the nut fixed to the bottom of the table, and the other rests against the lower part of the motor. A swivel wheel is rigidly fixed to the stud, with the help of which the height is adjusted.
To prevent dust from getting on the motor when the machine is operating, you can place a small piece of foam rubber on top of the motor.
Design options: making a milling machine from improvised means
The equipment can be constructed from a drill, an angle grinder, or a washing machine. These are the most popular household options. The devices are produced with less power and are of a manual type, but are suitable for minor work.
How to make a functional wood router from a regular drill
Here a stand is built and the equipment is changed. These are the main criteria for creating such a router option.
The cutter shank is fixed in the chuck. You can make a vertical and horizontal router (example 1 and 2). The stand is made from laminated chipboard.
Example 1:
Example 2:
Advantages and disadvantages of a drill router
The advantages of such a device:
- Easy to use.
- Little dust from work.
Minuses:
- Poor quality of the result due to low speed (3000 rpm).
- Very narrow range of functions.
How to make a router from a grinder
There are two ways:
- A collet is screwed onto the tool spindle. Work can be done with all accessories that have cylindrical shanks.
- A standard jaw-type chuck (from a drill) is attached to the spindle.
Milling cutter from a washing machine engine
A table is created using the described method. The motor shaft is placed on a collet. For this, a special adapter is ordered.
A lifting system is created to control the output of the tool: a motor and a threaded rod are mounted on two pipes.
One end of it goes into the nut fixed to the bottom of the table, and the other ends into the lower side of the engine. The rotating device – the wheel – is firmly fixed on it. The height is adjustable due to this.
Additional accessories
Do-it-yourself accessories for a hand router include:
- portable table;
- parallel stop (allows you to make straight and curved cuts);
- guide rail (allows you to move the router during work in all directions in the horizontal plane);
- copy rings and templates;
- compasses, etc.
All of them make working with the device much easier.
Making a hand router yourself is a completely achievable task. Even a beginner can handle it. The main thing is to follow the instructions exactly and observe safety precautions. And if you are not confident in your own abilities, then you can buy the device.
CNC router
A machine with computer numerical control (CNC) is used mainly for engraving and figured wood carving. It is controlled using a computer, thanks to which very complex patterns can be cut out on workpieces with high precision. In China you can buy ready-made mini CNC machines for making souvenirs at a price of about 10,000 rubles.
Of course, you can purchase all the parts for the machine and assemble the CNC router yourself. But if you look at the cost of all the components, it will be much cheaper to purchase a finished product with already configured software.
Thicknesser and jointer from a milling cutter
The purpose of a surface thicknesser is to calibrate wood blanks to one size in thickness.
On the basis of a milling cutter, you can also make some semblance of this unit.
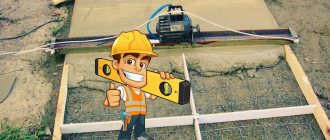
You can make a thicknesser from a milling machine yourself from a pair of guides mounted on a flat surface and a platform on which the milling machine is mounted. The part that needs to be equalized in thickness is fixed on the table, under the platform with the unit. The milling cutter first sets the required offset of the equipment, after which the entire surface of the part is processed.
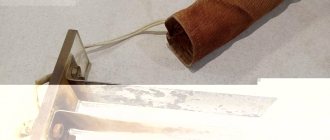
Using a milling machine as a drive, you can also make a mini-jointer for processing small-sized workpieces. The picture below shows what parts a portable jointer consists of.
You can also make a stationary jointer from a router for processing long workpieces. You can learn how this is done from the following video.
Components and assembly algorithm
It is possible to make a milling machine from a drill, which almost every home craftsman has, but you should keep in mind that such a device cannot fully replace the serial model. This is explained by the fact that the chuck of a conventional hand drill is capable of rotating at a speed of 3000 rpm, while a serial milling cutter is able to ensure rotation of the tool used at a speed of up to 30,000 rpm. In addition, the gearbox of a household electric drill is not designed for intense loads, which will quickly cause it to fail.
Vertical router from a drill
Diagram of the simplest vertical stand for a drill
Meanwhile, the simplest milling cutter, made from scrap materials at minimal financial cost, is capable of successfully coping with many technological tasks. To make your own router from an electric drill, you should find the following materials and tools:
- several pieces of chipboard or thick plywood;
- a clamp with which the drill will be fixed to the base of the device;
- bolts, screws and other fasteners;
- feather drill or drill bit with a diameter of 40 mm;
- standard set of locksmith tools.
Scraps of slats, pieces of plywood, metal corners - all this can be used to make a simple milling stand
The process of assembling a homemade router takes place according to the following algorithm.
- The base of the future router is assembled from sheets of chipboard or plywood, which includes a horizontal base and a vertical part on which the electric drill will be fixed. The dimensions of the sheets of chipboard or plywood from which such a structure will be made are calculated depending on the dimensions of the electric drill used as the basis of the homemade machine.
- A hole with a diameter of 40 mm is drilled in the horizontal base of the device, which is necessary to provide access for the tool to the processing area.
- A clamp is attached to the vertical stand of the device using a bolt, in which the electric drill is fixed. The drill should be positioned in such a way that the lower end of its chuck is a few millimeters from the horizontal base of the router.
- To make the position of the drill on a vertical stand more stable, you can fix a small wooden block in its upper part, which will act as a stop.
Drill mounting options.
1 von 3
Adjusting the depth of cut when using such a router is carried out by changing the position of the electric drill in the clamp that secures it.
Stand with height adjustment via lever
How to make a milling machine of the design described above more convenient and functional? To do this, it can be equipped with a simple microlift, which will be responsible for moving the electric drill in the vertical direction. To make such an elevator you will need the following consumables and components:
- two metal rods that will act as guide elements;
- a platform (carriage) for fixing an electric drill, made of chipboard or thick plywood;
- a threaded axis and a nut, which will be responsible for moving the electric drill in the vertical direction;
- elements that ensure the fixation of the electric drill in the required position.
Stand with height adjustment via threaded rod
1 von 6
The principle by which such a homemade router works is quite simple and is as follows.
- When the threaded axis rotates, the carriage with the drill attached to it moves in the vertical direction.
- After the electric drill and the tool secured in its chuck are set in the required position, the carriage is fixed using fasteners.
Naturally, the entire design of such a homemade router, the operation of which is well demonstrated in the video, must be fixed on a reliable basis. The latter can be the surface of a desktop or workbench.
Machine made from an old electric motor
A homemade milling machine, with the help of which many technological operations are quite successfully performed, can be made without the use of an electric drill. In order to make such a device, you will need the following consumables and components:
- drive electric motor, which can be used as an electric motor from an old washing machine and other household appliances;
- a cartridge in which the cutting tool used will be fixed;
- an adapter with which the drive motor shaft will be connected to the cartridge;
- sheets of chipboard or thick plywood for making the base and vertical guide of a homemade router.
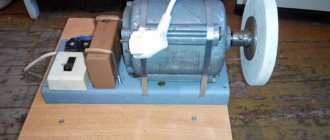
Homemade machine based on a Soviet three-phase motor
When choosing an electric motor for a homemade milling machine, keep in mind that the power of the latter should be in the range of 500–1100 W. The higher the power of the drive motor, the greater the depth that can be processed with a milling cutter.
A very important requirement when making a homemade milling machine is the absence of play in the contacting elements of the device. If you neglect this requirement, you may encounter the fact that the processing performed using such a milling cutter will not be of high accuracy and quality. In addition, the quality and accuracy of processing performed even on a homemade milling machine is seriously influenced by the characteristics of the cutting tool used.
550 Aufrufe 23 haben geteilt
How to make a wood lathe with your own hands: drawings and technology
The easiest way to make a tool yourself at home is to construct a lathe or milling machine from a drill or electric motor removed from another tool. This process is not that complicated, so every master can handle it. To do this, you will need an electric motor, the power of which does not exceed 500 W, and available materials. A drill can also be used as a drive. Of course, making a lathe will require some skill.
The device of the tailstock of a homemade wood lathe
To build the machine, the following elements are required:
- metal frame;
- electric motor;
- handyman;
- tailstock.
It wouldn’t hurt to get a drawing that will help you navigate the dimensions and correctly manufacture all the structural elements for its subsequent assembly.
How to make a homemade drilling machine with your own hands with a motor
First you need to prepare the electric motor shaft. To do this, a faceplate is installed on it; a steel center with a thread is also suitable. Installation of the second center is carried out in the tailstock tube. To make the frame, you will need a pair of corners measuring 5x3 cm, their length is 15 cm. A motor is attached to the frame using a bolted connection.
An example of a homemade drilling machine
At the next stage of making a homemade machine, you assemble the headstock yourself. This element is formed from a pair of horizontal and a pair of vertical corners. A pipe intended for the spindle is attached to it. You need to insert a bolt into it, the diameter of which is 1.2 cm. First, its head is sharpened at a right angle. Thus, the central part of the spindle is designated. After this, the headstock is installed on the bed. On the top post, which connects to the horizontal corners, it is necessary to secure the tube by welding.
To make a tool rest, you need to take a steel rod with a chamfer. This element must also have a hole that will be used to secure the support ruler. It is necessary to vertically weld the tube with the locking screw to the long angle. Then the tool rest rod is inserted into it.
The motor rotor on which the faceplate is attached will be used as the headstock spindle. You need to make several holes in it. A fork will be inserted in the central part. The holes along the edges are intended for fixing the part with screws.
Even with the help of simple tools you can create interesting wooden products; for this you need to study the technology of working with the tool and practice
General information
Tools and accessories
A vertical router, unlike a standard drill, has a flat base, namely a sole on which it will stand and move along the table or part being processed. The body will be fixed and begin to move vertically along the guides. In order to make a homemade router based on a drill, you need to make a stand and attach an electric drill to it.
In addition, the manufacture of the simplest design may require the following materials:
- A sheet of plywood, the thickness of which is from 1.2 to 1.5 cm.
- Metal clamp.
- Self-tapping screws.
- Bolts and nuts M6.
If you wish, you can replace the plywood with laminate or chipboard of the same thickness. A cutter made from an electric drill will be much more convenient for work if the sole, that is, the base, is made of organic glass with a thickness of 1 to 1.2 cm. In this case, the work area will be clearly visible, as well as the markings on the board. Metal clamps and fittings should be used as simple as for water pipes.
The size should be selected according to the diameter of the drill body, just above the chuck. Secure the wood router with screws 0.5 cm in diameter and 2 cm in length. Self-tapping screws of this size are very often used to make crafts from wood. They can be used to attach brackets, shelves and hooks. Often, after repairs, screws remain, and they can be replaced with self-tapping screws, the diameter of which is 0.55 cm and the length is 1.8 and 2.2 cm.
In order to make a wood milling machine from an electric drill, you need the following:
- Wrench.
- Electric drill.
- Drills 0.4 and 0.8 cm.
- Spade or core drill.
- Electric jigsaw.
- Screwdriver.
As a rule, in a home workshop or garage you can easily find all the necessary tools, and a screwdriver can be replaced with a Phillips screwdriver, a jigsaw with a hand hacksaw for wood.
Milling design based on a conventional drill
Considering the power and speed, you can only make a light cutter from an electric drill. For high-quality processing of wood and boards, the working tool must be fixed on the table and the workpiece must be moved. The design with the top arrangement of tools will make it possible to make parts with complex configurations. Each home craftsman comes up with his own design, and they all differ in fastenings, as well as the placement of the electric drill.
Details
Tabletop for router
To make a manual router from a drill with your own hands, you will first need to understand the table. It will be more convenient to process the ends, as well as milling grooves for joints using the tongue-and-groove method, using a milling table with protruding tools. They have a simple design, and the drawings will be easy to develop yourself. A small bench-type table will also work. The lid should flip over and a hole should be cut in it.
Its size should be approximately 0.5 cm larger than the maximum diameter of the cutter that will be used. A bar will be installed perpendicular to the table, which will be parallel to the side at such a distance that the spindle axis of the attached electric drill will perfectly coincide with the center of the hole. The body of the electric tool should be attached to the bar with stops and clamps; in the normal state of the table, the chuck will be located under the cover, and the cutter inserted into it will protrude. During processing, the wood part will move along the surface of the table and rest against the template, as a result of which milling will occur.
In addition, the tool can be secured in other ways. The main thing is that the center of the hole perfectly coincides with the axis of the cutter, and that the chuck and switch are accessible. All machine elements must be attached rigidly, without any distortions.
The simplest machine
The machine design for creating a manual router based on a drill with your own hands will consist of three main parts, which are cut from plywood:
- Rack.
- Sole.
- Kerchief.
They must be located strictly perpendicular, that is, at an angle of 90 degrees. A hole should be made in the sole for the exit of the tool. The width of the stand will be equal to the dimensions of the body of the electric drill and 2 cm longer. A drill will be attached to it using a clamp located above the chuck. It will additionally be fixed with a stop, which will press the back side of the body on the other side of the spindle, or with another clamp lower than the handle. The gusset will provide rigidity to the structure, with one side adjacent to the sole, and the other to the stand itself.
When cutting out the sole, or rather the base of the structure, you should draw a square on a sheet of plywood, and its sides should be equal to the width of the body of the electric drill. On both sides that are adjacent to it, you need to add strips that are equal to the thickness of the plywood. Mark the center of the tool and make a hole using a slotted or core drill bit.
Next, you should cut the sole along the contour, and the corner opposite the connection of the scarf and the stand should be rounded. On the reverse side, drill a 0.4 cm hole and make recesses that will be hidden under the screw heads using a 0.8 cm drill. Otherwise, the screw heads will again scratch the table when protruding, and also disrupt the fit of the sole. There will be a skew.
You can stick a thin rubber band or even a piece of linoleum on the bottom of the sole. This will ensure smooth sliding while the router is operating. Using a square, set the stand in place and screw it into place. The gusset will be attached with one side to the base, the other to the stand, which will ensure the rigidity of the structure. Afterwards, you need to mark the position of the electric drill when the tool begins to fall lower than the sole. Screw on the stop and clamp, and for ease of work, the sole can be made of organic glass.
Machine with vertical cutter movement
A hand router from a drill can be made differently. The disadvantage of a conventional machine is the inability to make blind keyways, as well as selections. The tool will only be able to enter the board from the end. A small addition will enable the drill to completely replace a vertical lightweight router. Here you will need to make the sole longer than usual. Screw a massive board to it with a U-shaped profile fixed in a vertical position - these are a couple of pieces, guides. A drill should be installed on the bar on one side, and a couple of slats will be screwed on the other, which will be inserted into metal profiles. Install a screw at the bottom of the sole, which will act as a stop when moving the body of the electric drill down.
Assembly algorithm
Before you start making a hand router based on a conventional electric drill, you need to prepare all the necessary materials and drawings, indicating the dimensions and
how the drill will be attached, which will replace the hand router:
- Mark the center of the spindle axis on the soleplate or table.
- Cut a hole for the outlet of the electric tool.
- Next, place the electric drill on the stand and mark the position of the stop and clamp to secure everything.
- The gusset and stand should be screwed strictly at right angles.
- Secure the tool body to the base.
The machine, which will be made by hand, must be durable and free from distortions and backlashes. In this case, it will be possible to work on it like a regular router.
How to make a simple milling machine
The simplest do-it-yourself machine, based on a drill, can be made from three simple parts - soles, scarves and stands. The tool creation scheme is as follows:
- On plywood, with a pencil or marker, draw a square with sides equal to the width of the drill, and then add strips on two adjacent sides, similar in diameter to the thickness of the sheet material. In the main part, mark the location of the cutter and cut a hole.
The hole for the cutter in the sole can be made with a core or feather drill - The sole and racks, as well as the scarf, are cut along the drawn line. A small triangle should give the structure rigidity. The stand is attached to the sole with self-tapping screws, the caps are properly recessed so that they do not protrude and scratch the table. The scarf is mounted so that its short sides are adjacent to the two main parts.
The stand for the router should be approximately 20-50 mm longer than the drill - Using a clamp, the drill is secured to the stand, pulling it just above the chuck. For reliability, you can install a second lock above the handle, then even at high speeds the tool will not vibrate or tremble. If it is inconvenient to put on another clamp, you can limit yourself to installing a rigid wooden stop above the handle.
The drill power button should be located so that the elements of the machine do not interfere with its pressing
At this stage, a do-it-yourself milling machine made from a drill can be considered ready for work. If desired, you can glue a piece of linoleum to its sole to ensure smoother sliding.