What is decoupage? To briefly describe the process of this creativity, it is the transfer of images from various paper media to objects. To translate a drawing, there is a special paper that can be found on sale; it already contains images of various formats and colors. You can also transfer a picture from napkins or other paper.
Why might a person need to decoupage a refrigerator? All units that are on sale have a boring, monochromatic color, which gets boring over time. Also, a single-color refrigerator will not suit all people’s interiors; if the entire kitchen is designed, for example, in a vintage style, an ordinary unit will be striking in its simplicity. Read on in the article to learn how to decoupage a refrigerator with your own hands and make it the “highlight” of your kitchen interior.
What you need to have for decoration
First, you need to have an idea. Sticking randomly flowers on, this, you know, is not ice. It will look like transfer stickers in Soviet times. And the effect of transforming the refrigerator with your own hands will be sad.
Therefore, think through the composition inside and out. It should be in harmony with the rest of the furniture and interior items. Moreover, we draw your attention to the fact that you should not combine the design of the refrigerator with curtains, tablecloths, chair covers and other short-lived items. You change them, but the refrigerator will remain...
If you have already come up with everything and are ready to get started, then you need to purchase the following things:
- Napkins for decoupage (four-layer)
- PVA glue
- Scissors
- Fine abrasive “skin”
- Acrylic lacquer
- Craquelure paint (optional)
- Gilding paint (optional)
- Acrylic paints
- Glue brush
- Paint brush
- Foam roller for smoothing
Now you can get down to business.
This work is painstaking and requires patience. The volume is still considerable. Don’t rush, it’s better not to do it in one day, slowly, but in such a way that the guests will simply gasp! See also -
How to defrost a refrigerator correctly: expert advice
Decoupage using film
An old refrigerator can be decorated not only with napkins or magnets; for original decor, you can use the original adhesive stickers shown in the photo. Today you can find stickers on sale on different themes and in different styles. The range also includes stickers of different shapes, sizes and color combinations. It is recommended that you carefully select these items, as each option differs in price, appearance and quality.
A master of fine art will tell you in the video how to make beautiful decoupage of an old refrigerator with your own hands.
Eventually
For an original transformation of an old refrigerator, you can use a simple decoupage technique. To decorate with your own hands, it is recommended to choose napkins or wallpaper with a beautiful pattern. By following the steps of the master class, anyone can easily decorate an old refrigerator or other piece of furniture.
Preparing the surface for decoupage and drawing a picture
The refrigerator must be thoroughly washed and wiped dry. Then, wipe with alcohol the places where you plan to glue the applique. There is no point in degreasing with acetone; there is no need to sand the surface either.
There is no risk that the application will “come off”. And, it will be better for you if you leave yourself the chance of reversing. You never know, it won't work out? Or, after a certain number of years, you will want to sell it, but with decoupage no one will take it, that’s a fact.
After this, cut out your design with scissors without separating the layers of the napkin. After the part is cut out, you can separate the very top part from the bottom.
Then, apply a thin layer of PVA glue on it and attach the design to the surface. After 20 seconds, roll the roller in different directions, carefully expelling the air and smoothing out wrinkles.
Instructions for repainting the device with your own hands ↑
After choosing the paint, you need to prepare the refrigerator itself - remove all the shelves, wash the body with soap. Old paint, chips or cracks can be removed using sandpaper to ensure better adhesion for the new coating, then remove debris with a rag, degrease and prime all surfaces. Now all that remains is to protect the handles, decorative inserts and door seals with masking tape, and you can get to work.
If you do not cover the fittings, you will have to wash off paint splashes with a solvent, and this can cause glossy coatings to fade.
Advice! Before starting work, it is worth carrying out a test by making a few strokes on the back wall or other inconspicuous area of the refrigerator to evaluate the color and properties of the paint (whether it lays evenly or if there are any drips).
The process of painting the device depends on the tools used and the type of paint:
- Working with a brush/roller
Pour some of the dye into the tray, roll the roller so that it is evenly saturated, and remove the excess on the ribbed surface. The paint can be applied in vertical movements, or from left to right. It is better to treat corners and areas near the fittings with a narrow brush. The second, and if necessary, the third layer can be applied only after the previous one has dried (the time depends on the type of paint and should be indicated on the packaging).
Important! If drips or other blemishes cannot be avoided, you can remove the defect with a solvent.
- Use of aerosol products
The spray can is held at a distance of 25-30 cm from the surface, spraying paint evenly from left to right. The main thing is not to linger in one place and not to leave unpainted “islands”. But even if there is a “gap”, it can be easily eliminated by re-processing. Aerosol paints usually dry quickly - after half an hour you can already apply a second coat.
With the help of a spray, the paint goes on smoothly and without drips.
More ideas on how to update an old refrigerator with your own hands are in the photo. We will consider decoration techniques in detail below.
DIY refrigerator
- Wash the surface with soapy water or wipe with any degreaser.
- Decide on the location of the decor (you can stick it to the corners with tape and see from afar whether the decoration looks good).
- Stickers consist of three layers: backing, design and protective film. If the design is small, no more than half a standard sheet, you can immediately remove the opaque bottom layer, press the sticker to the refrigerator and carefully smooth it with a dry sponge from the center to the edges to avoid the appearance of bubbles and wrinkles.
- To paste a large fragment, it is worth involving an assistant. First you need to bend the bottom layer a few centimeters and secure the upper part of the sticker to the surface. Then one person will pull the backing down while the other person will smooth the design at the same time.
- When the sticker is completely transferred to the refrigerator, remove the top protective layer of transparent film.
Sticker
On a note! If bubbles still appear on the surface, you can pierce them with a knife or needle and smooth them out with pressure, releasing the air. A small picture can be re-glued - you just need to warm up the sticker with a hairdryer and carefully remove it.
Pasting with film ↑
You can decorate the entire refrigerator by hiding its entire body under stickers. To do this, use a special self-adhesive film. It is produced in rolls (usually 50 or 100 cm wide), but stores sell cuts according to the required footage. Finished drawings most often imitate more expensive materials - wood, stone, metal. Floristry and images of birds, animals, butterflies, and ladybugs are also popular, but there are also options for “kitchen” themes - various vegetables/fruits, dishes, spices.
You can decorate the entire body or individual areas, such as a freezer.
On a note! If you don’t find a suitable design among the ready-made self-adhesives, you can order printing on film from a photograph.
The decor is applied similarly to vinyl stickers - by smoothing it over a degreased surface. If, instead of painting, you decide to cover the refrigerator with film, look at the photos of the finished work, perhaps they will inspire you to experiment with decorating yourself.
Oranges perfectly complement orange furniture
The film can also be used to update kitchen facades
Colorful ornaments will help disguise a massive device
Magnetic panel ↑
And among all the ways to quickly decorate appliances, the leaders are undoubtedly the newfangled magnetic panels on the refrigerator. They are made by companies specializing in photo printing by applying a pattern to a thin magnetic sheet.
The panel is very easy to attach - it simply sticks to the body like a regular magnet
Advantages:
- Huge selection of colors and realistic designs (including 3D effect).
- Possibility of adjusting fragments taking into account the dimensions, height of the doors and the location of the freezer compartment of the refrigerator.
- Easy to maintain - after printing, the panels are laminated or varnished, so they can be washed with a damp cloth without fear of damaging the design.
- Easy installation - magnetic film on the refrigerator does not require special surface preparation.
- Excellent camouflage - the thickness of the material varies within 0.4-0.5 mm, which allows you to hide minor defects on the device body.
- You can save money and order panels only for the front of the refrigerator, and paint the side walls in the usual way.
It is easy to make holes in the canvas for fittings and technological openings
Important! The length of the panels can be any, but their width is limited by the size of the rolls in which magnetic film is produced - 60 cm.
Applique design styles
There are exactly as many styles as there are styles of interior design. We are not talking about what styles there are. We are sure that you are aware of this without us. I just wanted to remind you that if you have a “Provence” style, then you shouldn’t decorate in the “ethnic” style.
Everything should be in harmony so that the refrigerator looks like a single ensemble with the rest of the furniture. Sometimes it looks very good if the refrigerator is decorated in such a way that it is practically invisible, it takes on the appearance of a cabinet in a given style.
Sometimes it’s the other way around. Your kitchen is white, in high-tech style, for example. And often, a very good solution turns out to be to highlight the refrigerator with a bright spot that contrasts with the rest of the decor.
Let's take a closer look at some of the “powerful” ideas. Perhaps you will take something into account.
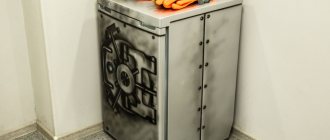
Refrigerator decoupage “Phone Booth”
This is a very cool design. The refrigerator looks like a classic red phone booth, of which there are so many on the streets of London. But you can’t do it with napkins alone to implement it. Here you will need paints and a fairly high level of skill.
To begin, draw a drawing on the refrigerator so that you know exactly how and where to glue the parts. The windows in the booth will need to be framed with wooden frames to give the composition volume and a natural look. Some details will need to be drawn, not forgetting about the shadows.
Such refrigerators look good in almost any kitchen, with the exception of the obvious “Country” and the notorious “Provence”. There they will be completely inappropriate, since this is a more strict style.
Refrigerator decoupage “Antique cabinet”
But this is clearly for “Provence” and others like it. You can depict the wardrobe absolutely any way you want; you don’t have to try to make it match the main furniture. Moreover, it is even undesirable, since it will still be different, and the appearance will be rough.
It’s better if you make a completely different cabinet, simply, in a given style. And, yes, this is also not a level for a beginner. And here you will also need paints, craquelure, aging effects, etc., etc....
Decoupage refrigerator “Patchwork”
A very interesting idea. Patchwork is a classic patchwork quilt, as you know. Absolutely anyone can do this design.
There are napkins with a ready-made patchwork pattern, and with the effect of stitching with threads. There are simple plain napkins that you can choose to suit your taste and “sew” the patches yourself. In this case, the divisions will need to be painted over, simulating machine stitching.
But, please note that this is a catchy and bright design. It will “play” if the kitchen itself is not bright. If your walls are painted, or your furniture is of different colors, then it is better to abandon this idea.
Decoupage of refrigerator “Front door”
Also, great solution. By the way, decoupage can be done not only with napkins, but also with photo wallpaper, for example. And, indeed, there are a lot of motives for such a plan.
Refrigerator decoupage “Flowers” and “Grapes”
In this case, everything is quite simple. Find good options for flowers or grapes and glue them on. But, do not forget that you need to paint the branches. If you don’t do this, the look will look rather sparse.
Decoupage of the refrigerator “Peas”
A funny design, but at the same time a rather bold decision. The refrigerator looks like a piece of cotton fabric. Unpretentious and very cute.
You can choose absolutely any colors, but the polka dots should be monochromatic and not very large, otherwise the fabric effect will not work.
Painting or airbrushing
If your kitchen is decorated in Provence style, against a background of delicate beige, olive, pinkish shades, sunny bright colors, a refrigerator of a classic solid color will look like a “white spot”. You can correct the situation by painting it using special permanent dyes produced in the form of spray cans. However, this piece of furniture will become much more attractive after airbrushing.
A master class on decorating household appliances for the kitchen will help you do it correctly, avoiding common mistakes. Provence style provides sunny positive shades, so give preference to yellow, delicate light green, olive, orange and pinkish shades. Please note that sometimes only a specialist can apply a three-dimensional drawing. In order to do everything yourself, you need to make sketches in advance. If you have the skills of an artist or are just good at drawing, you can apply a pattern to the surface using a marker and then airbrush it.
Give preference to large volumetric drawings that will not get lost in the general background. Also use masking tape where the paint border will be.
Artistic decor
It is not necessary to involve a skilled artist to perform original surface decoration. It is enough to purchase special devices that will help turn a dull, boring refrigerator into a real work of art.
Decoupage technique
A very affordable and easy method to transform a refrigeration unit by gluing the image you like to the door or side wall of the unit and then securing the result with varnish.
Any available items can serve as blanks: Useful! The thickness of the workpiece affects the final result: the thinner the material used, the more accurate the design looks.
The procedure is as follows:
The decor created in this way is resistant to mechanical stress and wet cleaning.
Painting with paints
In this way, it is possible to create entire storylines and thematic paintings. An excellent option for those who are good with a brush. On the other hand, you can purchase ready-made templates with which you can create a masterpiece, even without possessing the appropriate skills. It will be enough to fix the stencil in the right place and fill the fragment with the desired color. You can also use anti-stencils: they are glued in a certain area, the rest of the surface is painted over, and after drying they are removed.
For application, use both acrylic paints with a brush and aerosol cans. The result is best secured with varnish for durability and resistance.
Interesting! Airbrushes, called air brushes, allow you to create spectacular, realistic paintings. For such a transformation it is necessary to have artistic talents, otherwise the idea will turn out to be a failure.
Decor with self-adhesive film
One of the most budget-friendly and easiest ways to update the appearance of a refrigerator, which does not require any creative talent from the performer. You can easily buy a suitable color in a store. The manipulation is performed in three elementary steps:
Despite all the advantages, this method has disadvantages, which are the rapid abrasion of the pattern and the appearance of irregularities when applied to a deformed and rounded plane.
Magnetic panels with photo printing
They differ from the previous version in that they allow you to turn the unit into a realistic decorative item, for example, a telephone booth or a bottle of your favorite drink. In addition, such material makes it possible to apply your favorite photograph or an image of your own authorship.
Magnetic panels with photo printing have a number of advantages:
Healthy! If you want to remove the panel, this can be done without much difficulty; no marks remain on the product. In essence, this is a regular refrigerator magnet, only larger.
Photo panels are vinyl sheets 0.5 mm thick with a magnet on one side and a pattern on the other. The parameters are immediately matched to the dimensions of the equipment and are suitable for gluing to the door and side walls. The surface must first be degreased; the entire application process is carried out similarly to pasting with self-adhesive.