What is required for repair work
First of all, a person who undertakes the repair of household appliances must have at least minimal knowledge in the field of electrical engineering. Without this, it is simply impossible to carry out repairs correctly. In addition, before starting work, you must comply with all safety rules.
Important: in order to bring equipment back to life on your own at home, it is not enough to correctly find the cause of the breakdown, but also to carry out special repair measures that will bring the equipment back to life.
For these purposes, it is important to have the necessary tools. If you need to dismantle the hob, you will definitely need a set of screwdrivers. These should include:
- cruciform;
- flat.
In addition, you should make sure that they are all of different thicknesses, since each model of glass-ceramic hob from different manufacturers has different fastenings.
Also, to dismantle the panel and its further repair, you should prepare the following tool:
- open-end and ring wrenches;
- pliers;
- wire cutters;
- soldering iron;
- side cutters;
- insulating tape.
You will also definitely need special equipment that is designed to measure voltage and resistance.
Repair equipment
Let's sum it up
In the modern market in Moscow, repairing household appliances can cost an amount that is sometimes equated to more than half of its cost. It turns out that in order to repair a minor breakdown, for example, a panel or burner on an electric stove, you need to pay an amount for which, if you pay extra, you can purchase a new similar item. This pricing policy gives rise to the natural desire of ordinary users to independently diagnose and eliminate faults that cannot be avoided when using household appliances. But turning to a master or learning on your own is a purely personal matter.
Damage to burners in an electric stove
Depending on the equipment model, there may be a different number of burners. With a minimum configuration, there are only 2 of them. Typically, in standard electric hobs, the manufacturer installs 4 burners.
Heating elements may differ:
- classic version: the burners are installed on an enamel panel, the heating element is located inside.
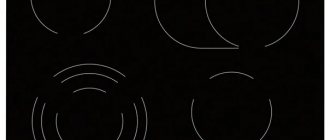
- modern look: the panel is a solid ceramic plane into which various types of heaters are installed inside.
Before you begin repairing household appliances, you should definitely determine what type of burners those that are out of order belong to. There are several main types:
- old burners that were produced back in Soviet times. Their main distinguishing feature is cast iron elements, which heat up rather slowly and subsequently cool down;
- tubular spiral. They are based on a special tube, which is equipped with a hollow plane. Thanks to this, warm air circulates, which significantly increases operating efficiency. Burners of this type are very difficult to repair at home;
- ceramic burners. They have a fairly simple design, so independent repairs should not cause any difficulties;
- halogen burners. The emitter is installed in several different places, which allows the panel to quickly heat up while maximizing energy savings. But it is better to have such equipment repaired by a qualified specialist. Since one wrong move can completely damage household appliances. This will lead to either expensive repairs or the purchase of a new hob.
All modern models use a power wire with a special cross-section to ensure a full supply of current to the burner. It must also be connected to devices such as a regulator and a thermostat. This ensures reliable protection against possible overheating in the future during constant use of the hob.
DIY electric stove repair
In this article we will offer instructions for repairing an electric stove at home. An electric stove is the most powerful household electrical appliance. And its operating conditions are not the most comfortable. The following factors influence its performance:
- High temperatures cause the insulation to dry out and become damaged;
- Currents switched by controls lead to wear and breakage of switches;
- Contaminants from cooking food that get inside the stove, in sufficient quantities, can lead to breakdowns.
Do-it-yourself electric stove repair: main difficulties
Repair of electric stoves becomes more complicated depending on:
- Number of burners;
- Presence of an oven;
- The number of steps or smooth adjustment of the power of the burners.
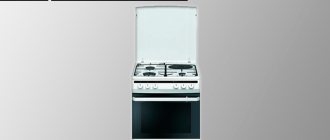
Stove with two burners and oven However, anyone who can hold a screwdriver in their hand and understand the electrical circuit of the electric stove can repair the stove.
Four-burner stove with ovenFor those who already have repair experience, a diagram is not always needed. It is also not needed when searching for most common faults found on electric stoves. Here they are:
- Breakage of conductors, oxidation of contact connections;
- Burner failure;
- Broken switch or regulator.
Diagram of a four-burner stove with an oven. Let's look at how to find and fix these faults.
The stove does not work - where to start? Instructions
First, check the supply voltage . You need to start with the outlet: single-phase or three-phase, to which the stove is connected. When powered from three phases, the voltage is measured between all phases and the neutral working conductor (should be 220 V), as well as between all phases (should be 380 V). With single-phase power supply, we make one measurement - between phase and zero. If the socket is working, we carry out the same measurements on the input terminal block of the electric stove. If there is something missing on it, then the power cable is to blame. The housings of electric stoves are grounded . But if for some reason there is no grounding, then if the plates break down, you need to immediately check whether a “phase” has appeared on the body. For this, a single-pole voltage indicator is used. Since the body is painted, it is advisable to do this on the bolt heads and on the burners, having first turned them on. If a “phase” is detected, then the repair must be continued with caution. If a grounded stove “beats” with current, then you will have to look for two reasons: first, where the connection with the ground loop has disappeared, and then, where in the electric stove there is a leak. the voltage is normal, you will need to determine the extent of the breakdown . If a separate element (burner, oven) does not work, then you need to look for the fault in its circuit. If the entire stove or part of the burners does not work, you will need to check the general power circuits. If there are several operating modes for the burners and oven, you need to find out in advance whether they all turn on. This will take time, since the burners will have to be heated and cooled several times. The absence of an indication of the operation of the burner does not always mean that it is faulty. The indicator light may not be on. So, the search area has been narrowed to a minimum. We de-energize the stove by unplugging the power plug from the socket and disassembling it. For portable stoves, for this purpose we remove the cover at the bottom; for stationary ones, we unscrew a couple of screws and lift the top cover. We do an external inspection . We pay attention to the reliability of fastening of detachable electrical connections, the condition of the wire insulation, the presence of odors of burnt insulation and the condition of the surfaces of the switching elements. Some faults are determined in this way. If this does not help, read on. About connecting an electric stove, read the article: “Connecting an electric stove: basic questions”
Repair of contact connections
Since the currents consumed by the heating elements of the stove are large, the requirements for the quality of contact connections are high. And there are many connections in a kitchen stove: the heating elements are connected through switches, and they are connected to each other in a common circuit. Switching is done using connectors, the wires to which are connected by crimping . You cannot solder - the temperature will destroy the connection. The connectors themselves must be tightly fixed to the terminals of the elements. As soon as they weaken, transition resistance appears in this place. Under the influence of load current, it heats up, the surface oxidizes, and contact is broken. You can find the location of the break by the blackened connector and burnt wire insulation. The connector will have to be cut off and replaced with a new one, and the wire insulation will have to be restored. You cannot use electrical tape to repair wires in electric stoves - it will melt and burn. Special fiberglass tubes sold in electrical goods stores are suitable for this. A new connector can be purchased there; car connectors of the same size are also suitable for this purpose. Brass products are sold that have more disadvantages than advantages. The most important thing is that you won’t be able to crimp it on a wire without a special tool. You can use two pliers to tighten its clamps, one pair of which clamps the wire, and the other its insulation. But this process will require maximum perseverance. The most unsuccessful tip Their second drawback is that while it is still possible to clamp a flexible wire, then a rigid wire with a cross-section of up to 6 mm 2 is unrealistic. If a strong crimp does not work, after a while you will have to do it again, but again with a new connector. The situation is better with insulated tips . To crimp them you will also need press pliers ; they are inexpensive and will come in handy in the future.
Pliers for crimping insulated lugs. There are many types of lugs available:
| Types of insulated tips | |
| RPI-M | Flat insulated connector (female) |
| FIR-P | Flat insulated connector (male) |
| NKI | Round insulated tip |
| NVI | Insulated fork tip |
The boards use RPI-M ,
The RPI-Mno tip is used for screw connection by both NKI and NVI .
NVI and NCI tip
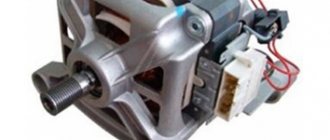
Diagnostics of heating elements
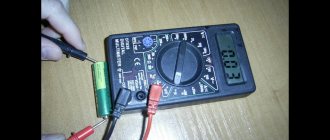
Heating elements (heating elements) are checked with a multimeter , for which their resistance is measured. It is in the range of hundreds of ohms . Low resistance indicates a short circuit in the heating element (in this case, the automatic power switch of the electric stove should be turned off), infinity indicates a break in the element. In both cases it will have to be changed.
Spiral heating element The burners can have 4 terminals, in which case they contain two heating elements . This is necessary for stepwise power adjustment. The elements have different power and different resistance.
Burner with two heating elements The heating element should not have electrical connection with the housing. If it is detected, the element is changed.
Burner switch
Switch diagnostics
The operation of the switches is checked with a multimeter . To do this, sometimes you have to compare its operation diagram with an adjacent working one or look at the circuit diagram of the stove. Detected burnt contacts are cleaned with sandpaper by disassembling the switch. But, if it is severely damaged, it is better to replace the element with a new one. If the stove has a temperature regulator, then its contacts are also checked with a multimeter. When cold they are closed. Rate the quality of the article:
For repair work you will need:
Types of faults
If the electric hob is constantly in use, then it may experience certain types of breakdowns. They appear regardless of the manufacturer or the service life of the equipment. The main types of breakdowns include:
- Burning smell when turned on. First of all, this may indicate that there is burnt food left on the burners. After thoroughly washing and drying them, there will be no trace of the unpleasant odor. If you start to smell like burnt plastic or rubber, it is better to immediately call a professional appliance repair technician.
- The heating element has stopped heating. This usually means that the burner is out of order, meaning it’s time to replace it with a new one. But in some cases, the cause of breakdown is wires that have poor-quality contact connections. Therefore, you need to know how to correctly ring an electric stove burner, and then solder back the loose wires.
Checking wires - The burner does not support adjustable temperatures. In this case, the cause of the malfunction is faulty contacts between the switches. Usually this part cannot be repaired, so it must be immediately replaced with a new one.
- The burner does not heat up at all. If this happens in a model that has a spiral installed inside, then it is better to immediately replace it with a new one. In more complex and modern equipment, it is better not to start repairs yourself, but to seek help from a service center.
Broken burner
Important: if you install the equipment yourself, you may not follow all the instructions correctly. Therefore, it is necessary to check all actions and connections strictly according to the diagram in the attached instructions.
Replacing burners
DIY hob repair
Users prefer electric, induction and gas stoves for cooking. If they malfunction, it is better to contact specialists. But, if you have the skills, knowledge and ability to work with tools, you can repair household kitchen hobs yourself. A hob is a stove with a ceramic or glass-ceramic coating
Types and design of hobs
The hob is an electric or induction hob covered with ceramic or glass ceramics. The following surfaces are currently produced:
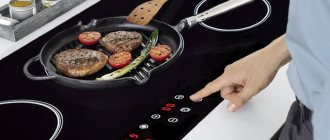
- induction They work on the principle of electromagnetic induction. Cookware made from special materials and the burner create a circuit with electrical oscillation;
- spiral. Current passes through the spiral element, then heat is released, which heats the cookware;
- corrugated tapes. The operating process is similar to spiral devices. The only difference is the accordion heater;
- halogen. A stove with a tubular heater filled with halogen vapor heats up in 2 seconds. After warming up, the heating element turns on.
To quickly detect problems during the repair process, it is important to know the structure of the equipment.
How does the hob work?
The main components of the device are burners with contacts for connection and a thermostat. The burners are connected to the control panel via contact wires. Using a thermostat, heating is controlled and power is turned off. The control unit is responsible for executing the main programs. To turn on, use a button, a gas tap or a cord with a plug. The main elements of the hob are the burners and the control panel
Types of heating elements of cooking surfaces
Several types of burners are used in hobs:
- induction - they only heat the dishes, while the work area itself is practically cold. Temperature and power can be adjusted from minimum to maximum;
- rapid - spirals that heat up and cool down in 10 seconds;
- halogen - a spiral with a red backlight that heats up in 2 seconds and releases a large amount of heat;
- Hi-Light is a very thin spiral tape that heats up instantly. The high-resistance resistance of the alloy ensures minimal energy consumption - up to 2 kW per hour;
- gas burners - automatically supply fuel, are smoothly regulated and heat up gradually;
- electric - cast iron pancakes, the heating of which is indicated by a red circle in the center.
Interesting to know! Depending on the diameter of the heating element, the flame of gas models can burn in 2-3 rows (“crowns”).
Hob fault groups
Regardless of the type of heaters, the main failures of the panels are similar. Repair of your hob is needed when typical faults are detected. A malfunction of the hob requires immediate repair
Damage to heating elements
Parts damaged mechanically are repairable. For halogen models, the heater needs to be replaced, and the induction winding is almost not subject to failure.
Failure of switching elements or conductors
You can troubleshoot contacts, thyristor switches, relays in 1 day. Repair work will not be difficult for you if you know the design of the slab and have the appropriate skills.
Electronic circuits
If the user does not know how power supplies, controllers, generators and transformers work, it is better to entrust the repair to a specialist. The burnt element must be dismantled and replaced with a new one. Important! Before starting work, you should check the power from the outlet, the presence of moisture on the panel or dirt on the sensor unit. They may interfere with button sensitivity.
Electric hob - common faults
During operation, the equipment may malfunction due to voltage fluctuations, improper care or manufacturing defects. In case of any breakdown of the electric hob, you should first check whether the power supply is normal. Repair of a built-in electric kitchen hob is relevant in the following cases:
- The hob does not turn on. The phenomenon occurs due to a lack of voltage in the outlet or faulty parts. The socket is checked with a multimeter. If everything is fine with it, there are risks of fuse burning, contact breakage, cord chafing or squeezing, heating element breakdown;
- One or two burners on the hob are not working. The heater contacts that can be soldered have broken. The burnt-out heating element is replaced with a new one. If the contacts are broken, the control unit switch is repaired or replaced;
- The burner does not heat up well. The problem is due to overheating of the heating element, thermostat, or thermostat. Some parts are repaired, but the thermostat needs to be replaced;
- The fuse has blown. The failure occurs when the voltage fluctuates in apartments without ultrasonic systems on electric mains. The part is replaced, especially since its cost is inexpensive;
- the sensor does not work. The element is checked with a multimeter. If it does not respond to the device, the panel is changed completely. Sensor breakdowns occur due to improper operation of the stove or burnout of the control unit after cleaning with saline solutions;
- The hob gets very hot, works, and does not turn off. In 95% of cases the thermostat fails. The part is not repaired, but only replaced.
Glass on glass-ceramic surfaces sometimes cracks. The cause of the breakdown is a manufacturing defect or improper operation. Repair work is carried out exclusively by a master. Important! Before inspection, electrical equipment must be disconnected from the network.
Induction hob
Despite the build quality, innovation and technology, induction cookers fail. The main device failures include:
- The stove does not turn on or turns off immediately. This is not a breakdown, but a feature of the functionality of the equipment.
There is a blockage on the hob due to unsuitable material or utensil diameter. When removing the pan, the burner switches off automatically.
- heats for a long time and weakly. Incorrectly selected dishes;
- turns on automatically. You need to remove metal products from the stove and remove salt from it. If there is no switch on, the control unit is broken, which is repaired or replaced at the service center;
- the panel doesn't work. The fuse has blown, the power circuit has broken, or parts have burned out.
The main failures of induction cookers occur due to failures in the induction generator circuits. The problem is related to improper operation and is rare.
Gas hob
In a gas hob, you can only repair the electric ignition and gas control system yourself. Gas stoves are complex and explosive equipment. If you discover at least one of the following breakdowns, immediately begin repairs:
- The burner does not light or turns off. The cause of the failure is clogging of the injectors with product residues, cracks, problems with the spark plug insulation, solenoid valve, thermocouple combustion. Models with automatic ignition do not turn on at low mains voltage;
- The burner goes out during operation. Self-repair consists of cleaning the injectors and adjusting the intensity of gas fuel supply. Extinction is possible due to thermocouple combustion;
- Electric ignition does not spark or click. There is no voltage in the network, the ignition unit has burned out, or the contacts of the connection keys have oxidized. The contacts should be cleaned with alcohol, and the ignition element should be replaced;
- low flame or smoking burners. The jet is clogged or the air damper needs to be adjusted or the injector cleaned;
- It is difficult to turn the adjustment tap. There is grease stuck to the rotary system, which can be washed off with soapy water. The second point is that the graphite grease on the tap has dried out. It needs to be updated;
- The oven does not turn on. The spark plug has worn out, but you should not replace it yourself;
- you can smell gas. Connection failure. The user needs to ventilate the kitchen immediately. Breakdowns can only be repaired by specialists;
- The burner turns off when the handle is lowered. Malfunctions in the gas control system or thermomagnetic valve. The part is being replaced.
Timely detection of gas stove failure is the key to your safety.
Do-it-yourself diagnostics and repair of a hob
Assessing the degree of damage and repairing an electric, induction, or gas kitchen hob is carried out sequentially with your own hands in several stages. Dismantling the hob is carried out after disconnecting the wires and unscrewing the fasteners
Required Tools
For repair work you will need:
- screwdrivers with tips of different diameters for dismantling;
- a screwdriver with an indicator to check the voltage;
- a stationery knife for stripping cable cores or trimming them;
- pliers for cutting wires.
To measure the electrical current parameters, you will need a multimeter. A soldering iron is also used during the work process.
Diagnostic measures
Diagnostics are carried out with or without disassembling the device. In the first case:
- check the voltage with a multimeter;
- inspect the power cord of the switched off stove;
- the cable is tested for integrity and breakdowns;
- contacts are checked - untwisted and inspected for oxidation;
- the fuse is located at the input and inspected;
- The terminal block is tested for damage with a multimeter.
Important! Check the cable and inspect the fuse by turning off the device. For diagnostics with disassembly you will need:
- disconnect the stove from the power supply;
- remove the panel with screwdrivers;
- lay it on the table, remove the fasteners, and, supporting it, remove the surface;
- inspect the wire for breaks;
- check the thermal relay by tracing it along the wires;
- check the transformer and thermal fuse with a multimeter;
- measure the resistance of the burner - increased resistance indicates burnout.
Important! The contacts of the electromechanical relay are inspected with the cover removed. When carrying out repair work, precautions should be taken
Specifics of repair work
Activities for repairing electric stoves are carried out in several stages:
- Removing the lock. How to properly unlock the working hob? Press the key button and hold it for several seconds. The indicator becomes active and the lock disappears from the panel.
- Disconnecting the device from the network.
- Dismantling the device using screwdrivers, laying it on a clean surface.
- Removing fasteners, carefully removing the surface.
- Checking parts for damage.
- Installing screw terminals or rivets on a burnt coil.
- Replacement of parts - thermostat, power relay, halogen burners.
- Replacement of wiring - an identical wire is selected, assembled and installed with end switches.
- Installing a new power supply.
- Changing the control circuit of the hob through a manual unit located outside the body.
- Assembly and installation of the hob.
Important! Electronics fail due to unstable voltage, local overheating occurs when using the wrong utensils, and moisture on the surface leads to cracks and chips.
How to eliminate the main breakdowns of gas stoves?
In case of problems with the gas hob, you will need:
- install traverses and tighten the screws when the burner axis shifts;
- remove the handle and use a screwdriver to stretch the slots on the rod if the switches are loose;
- disconnect the door cover, tighten the spring and place the axle in the eyelet if the oven does not close tightly;
- repair the tap and nozzle if the oven heats up poorly.
Advice! If there is a smell of gas, check the tightness of the contacts with a soap solution, tighten and lubricate the taps.
Recommendations from experts for repairing hobs
- Screw terminals and spiral rivets are used as temporary measures.
- The cause of breakdowns of hobs is non-compliance with the manufacturer's instructions.
- Induction hobs should only be repaired by a specialist.
- If you don’t have a multimeter, you can use an induction screwdriver for individual sections of the circuit.
- The hob is dismantled after disconnecting the wires and unscrewing the fasteners.
- Thermocouples are soldered to the chip or connected via a cord.
Watch a video about the construction of the hob and its repair November 16, 2021, 20:47 Oct 30, 2021 01:06 About offenses Link to current article
Attention, the following verification methods are contrary to the user instructions, which prohibit turning on the electric stove when the housing is disassembled, so you should be very careful!
How to find a fault in an electric hob
Before you start looking for a problem with your burners, you should pay attention to the equipment model and year of manufacture. Each stove has its own subtleties and features that should definitely be taken into account before disassembling the equipment. But in most cases, you should adhere to the following algorithm of actions:
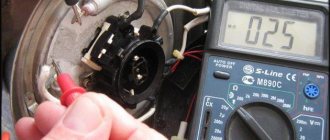
- Using a voltmeter, check the voltage in the equipment itself and the outlet to which it is connected.
Checking with a voltmeter - If the stove does not work, but the indicator on the display or control panel is on, this indicates that the entire stove is not working. As a result, the current does not reach the burners. If this damage is detected, the hob should be completely disassembled.
- Examine the control module. It can be mechanical or electronic. In any case, you need to use a special device to check whether current is flowing to the terminals of the burners.
- In cases where the coil burns out, you should check the heating element in each burner.
A heating element
If no malfunction is detected, the following parts must be checked and visually inspected:
- temperature sensors;
- relay;
- regulators.
Important: further repairs will depend on how correctly the breakdown is identified. If everything is done correctly, then within a short period of time, household appliances can be used in full again.
Installing new burners
First, unscrew the screws that secure the lid of the electric stove. In our case, these are four screws on the back side...
Unscrew the screws securing the electric stove cover
...and two screws at the bottom, under the panel with the toggle switches.
Plus two screws from below, under the panel with toggle switches
And plus four more fasteners, access to which appears if you remove the front part.
And plus four more fasteners
In other models, the top cover is often fixed with screws on the sides.
So, we lift the hob and support it with any available material. For example, wooden blocks.
Raise the hob and support it with wooden blocks
Then unscrew the bottom bolts on the mounting studs of the burners.
Unscrew the bottom bolts on the mounting studs of the burners
Remove bolts and washers. As you can see in the photo, on the back side of the panel there are two metal brackets, each of which holds two heating disks at once. And the grounding cable is attached to the studs of the two far burners.
The grounding cable is attached to the studs of the two far burners
We remove the grounding terminals and brackets.
Removing the grounding terminals and brackets
Unscrew the clamps of the four cables. Important! It is first necessary to mark the sequence of wires (mark with tape or screw the wire), since the most important thing is not to confuse them when installing new burners.
Unscrew the clamps of the four cables, having previously noted the location of the wires
What happened in the end? Cables are disconnected; grounding, mounting brackets and round stands fixing the “pancakes” from below have been removed.
The round stands fixing the “pancakes” from below have been removed
Now you can finally remove the faulty elements. You can remove faulty items
It's also time to give the top panel a good wash and cleaning, especially in areas that were previously inaccessible.
Most of the work is finished. We install new burners in their sockets.
Installing new burners into their slots
We put on the lower fixing supports and brackets, which we tighten with bolts.
We put on the lower fixing supports and brackets
We suggest you familiarize yourself with Replacing superphosphate
We screw four wires to the new burners in the same way as they were previously screwed to the old ones.
We screw the wires to the new burners
If the ends of the wires are charred or damaged, they must be cut, stripped of insulation, and tinned before attaching them to a new burner. But in this case this was not required.
Then remove the marking tape. We put the grounding cable terminals on the studs and tighten the fixing screws to the end.
So, the new burners are installed. Now we assemble the plate in reverse order. We lower the top panel and fix it with self-tapping screws in front, behind and under the front part with toggle switches. All that's left is to heat the new burners for four minutes at maximum power. At this time they will smoke and emit a specific smell. So it's better to use a hood.
OK it's all over Now. The stove is ready for use again.
Text: Oleg Abramov
How to repair a burner in an electric cooktop yourself
To bring equipment back to life, you need to know how to properly repair or change a burner on an electric stove. This determines how long the equipment can operate in the future. The main steps that will help restore the hob include:
- Unscrew the nut, thereby removing the grounding from the equipment.
- A ring or bracket may be located here. They help press the required element to the base.
- The burner can be attached to equipment in 2 ways. Among them:
- thread;
- insert into a special hole.
Removing the burner
In the first case, the threads should be lubricated with oil and cleaned, after which the burner can be carefully removed. In the second, pry it with a screwdriver and take it out.
If the old-style burners are burnt, then the best option would be to replace them with new ones after they have been removed several times. This can guarantee a long service life for kitchen appliances. The main thing is to choose the parts of the right size.
The newer the equipment, the more electronics it has built-in. Repairing such products is much more difficult and costly, so if you are not sure that the repair yourself will be done correctly, it is better to contact a special repair shop.
ECH. Electrical diagram.
The power of the elements may not be the same. Quite often there is a diagram on the underside of the burner in the form of an imprint. However, what you need to know so that you can check all the spirals and determine the scheme (because it may differ from the one proposed, although most often it looks exactly like this). So, if you use a multimeter in dialing mode (or checking resistance) to dial pins 2 and 4, then you will get the highest resistance, because in this chain all three spirals will be connected in series, and with a serial connection, the resistances are summed up. If you close 4 and 3 together, and then 1 and 2 and measure the resistance between these pairs of contacts, you will get the smallest resistance, because all the spirals will be connected in parallel. And in a parallel connection of resistances, the total resistance will be less than the smallest. Accordingly, you can measure the resistance of each spiral:
- No. 1 - contacts 3 and 2
- No. 2 - contacts 3 and 1
- No. 3 - pins 1 and 4
If any of the spirals burns out, then the burner in some positions will not work at all, and in others it will not develop maximum power.
Hob device
The main components of the hob are the burners and the control panel. Each burner has contacts for connection and a control relay (thermal relay). Through contacts, the burner is connected to the control panel, and the thermostat monitors the surface heating temperature and turns off/on the power. Problems with burners are most often associated with incorrect operation of the remote control or loose/burnt contacts.
Burner structure of a glass-ceramic hob The control unit and burners are connected to each other using wires. This is another source of problems. You can deal with breakdowns of these devices without special skills. You will need a multimeter and a soldering iron. Because if any element is damaged, you will need to unsolder it, buy an equally good one, and install it in its place. When carrying out this work, you should not rely on memory. It's best to take pictures of everything before starting work. Later in the process, also take photos periodically. In any case, every time before you change anything in a node, take a photo of it. It will be easier to install a new element or replace the old one.
General structure of an electric hob The most difficult thing to understand is the breakdown of the control unit. This requires serious knowledge of circuit design. If they are not there, it is better to contact a specialist on this issue. The location of the parts and their shape may be different and depend on the manufacturer and model, but in general the structure of the hob with electric burners is very similar.
Induction cooker repair instructions are provided in the video:
Convection option
Convection stoves and hobs contain the following main components:
- burners, usually four of them;
- sensors for detecting heated kitchen utensils;
- temperature sensors;
- burner control board;
- general touch control board.
As you can see in the image of the hob above, if a fault occurs, a lot of work will need to be done to find it. If all the burners are not working correctly, you will need to check all the elements on the control board with a tester. Diodes and capacitors are checked first. Each relay must be checked for operation and serviceability of contacts.
But since the burners have a power ranging from 1 to 3 kW, the load on the wire connections is high. If the screw connection of the terminals becomes loose, the resistance in this place begins to continuously increase and the heating of this connection also increases. Therefore, first of all, it is necessary to inspect the condition of the connections, both externally and using a screwdriver. The metal of the terminal becomes flattened over time due to strong compression. It is necessary to tighten the screw in the connection as much as possible. But be careful not to damage the thread.
On the control board, the tester checks the DC resistance of the elements. In this case, for more obvious test results, the circuits are broken by soldering or removing adjacent elements from the board. This has to be done to ensure that current flows only through the element being tested. In our case, the diode bridge turned out to be faulty. After replacing it, the operation of the hob was restored.
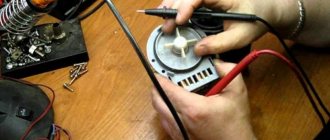
If one of the burners does not work, you need to check its serviceability with a tester. Knowing the power of the burner and measuring the resistance value, you can assess its technical condition. The quotient of the network voltage divided squared by the resistance of the heating element should give a value close to the electrical power of the heating element. If the calculated power is significantly lower or if there is no tester reading, it can be concluded that the heating element is malfunctioning. It needs to be replaced with a new one.
If the heating element is working properly, you need to trace the electrical circuit through which voltage is supplied through the wire connected to it. This circuit must have a relay. The relay discovered in this way must be removed from the board and checked. Typically, relay contacts wear out irreversibly. Their surfaces lose the ability to create reliable contact because they are cut by the switching spark. Wiping or cleaning does not give results. Only the relay will need to be replaced.
- When searching for a relay using connecting wires, it is necessary to check the result of a visual search with a tester in order to avoid errors.
If a malfunction occurs, you must first refer to the operating instructions for the electric stove or hob. It always contains a list of typical problems and how to fix them. When repairing electric stoves, compliance with safety rules should not be neglected. Before disassembling the housing, you must disconnect the product being repaired from the power supply and use an indicator screwdriver to make sure there is no potential. You should also wait until the burners have cooled completely.
- When removing the hob and disconnecting the wires, be sure to write down their location on the terminals so as not to confuse them when reconnecting them after the repair is completed.
Diagnostics and testing of a glass-ceramic hob.
In order to determine whether the burner is working or not, the following steps should be taken.
1. Important! Before any diagnostics or repair of hobs, which involves partial disassembly of the stove, you should disconnect it from the electricity to avoid accidental electric shock. You can do this using automatic machines or simply pull the plug and pull it out of the socket. Make sure the stove is off before proceeding. Remember! A discharge from 220 volts can be fatal, be careful!
2. Remove the broken burner from the electric stove. To do this, we will need to partially disassemble the hob, since the broken burner is attached to it. After we have raised the hob, we should unscrew the screws of the broken burner, remove the clamps that secure it, the insulators, and carefully disconnect all the supply wires from the terminals. Be careful not to damage the heating coils inside the burner.