If you have ever used a portable burner with piezo ignition, then you have probably encountered the problem of such a device breaking down. Agree, it would be somewhat inappropriate to throw away an almost new burner due to a malfunction that you can fix yourself.
In order not to spend “extra” money on repairs, for which the technician will demand the cost of the device, you should figure out how to repair a gas burner with piezo ignition with your own hands, and not spend a penny from the family budget.
A gas burner can stop working for completely different reasons, ranging from water or dirt getting inside the mechanism, and ending with a breakdown of the piezo ignition itself. Further in the article, you will become familiar with the main causes of burner malfunction, and learn how to disassemble the mechanism yourself and repair it without the help of an experienced technician.
How to light it?
Special literature usually indicates a clear procedure for igniting the device. First of all, oxygen access is opened. Then the combustion gas is supplied. The resulting mixture must be ignited immediately. Extinguishing is carried out in the opposite order: first the gas valve is closed, then the tap responsible for the oxygen supply is closed.
The problem is that if you turn on the oxygen first and then the gas, the flame is likely to be blown out by the oxygen flow. Therefore, the feed should not be opened completely, but by ¼. Some solve the problem differently: they initially open the gas, ignite it and gradually open the access of oxygen. This method helps to adjust the torch, and the only drawback is a small amount of soot.
Goods for tourism and active recreation
- Fishing
- Tourism
- Accessories and fishing supplies
- Boat accessories.
- Weights, jig heads, hooks
- Hooks
- Jigs
- Zherlitsy, fishing mugs
- Soft baits
- Equipment
- Floats, gatehouses
- Lures
- Sleigh-drag
- Winter fishing rods
- Groundbait, baits, extracts
- Spoon
- Hooks
- fishing line
- Braided cords
- Accessories and fishing supplies
- Zherlitsy
- Reels
- Hooks
- Fishing line, cords
- Equipment
- Floats PRO
- Lures
- Bags, cases, tubes
- Rods
- Trout Trout-in-Action Program
- Winter fishing rods
- Boxes, cartons
- Balancers
- Wobblers
- Soft baits.
Jersey
- Racks for winter fishing rods
- Stands for jigs
- Nod stands
- Ice auger stands
- Float stands
- Reel stands
- Stands for landing nets
- Cargo stands
- Tube stands
- Rod stands
- Stands for glasses
- Motor racks
- Cabinets, stands
- Flower shop
Catalogs/certificatesAbout the companyWholesalersFranchiseContacts
Spray cans
These are convenient compact devices that provide fuel in nature, on hikes, etc.
How to clean a gas burner for a spray can? Here only a mechanical method is needed. An analogue of a cleaning rod is created from available devices. For the procedure to be effective, you need to understand the operating principle of such a device.
The burner is threaded onto a cylinder. Due to the pressure inside it, the fuel rapidly flies out of the hole, forming a mixture with oxygen along the way. Thanks to this, combustion occurs.
The cleansing procedure is performed in a place away from open flames and hot appliances. You need to disconnect the burner from the container.
The created cleaning rod systematically cleans the internal cavity of the gas supply tube.
At home, cleaning can be done with a long knitting needle or similar object.
General classification of gas burners by fuel type
Country houses cannot always be supplied with natural gas supplied from a public main. Therefore, the burners are varied in terms of using different types of fuel. If the fuel comes from the gas main, propane-butane gas burners are most likely used for heating boilers.
Trunk methane gas is the most affordable natural fuel for boilers. However, now there is no big benefit in the price of liquefied blue fuel (propane-butane mixture). General heating provided by the main pipeline is also expensive.
Gas boilers operating on different types of fuel mixtures have approximately the same design. There is a slight difference in cost, but it is also insignificant (equipment for liquefied fuel will cost more). The burners themselves are slightly different, having different nozzles for liquid fuel and blue gas.
If natural gas is not supplied to the house, propane-butane gas burners are used
Propane burners require adjustment to this type of fuel with the installation of a nozzle. When burning, the flames give off a yellowish color, and more soot accumulates in the chimney. The jet is responsible for normalizing pressure.
Modern burners operate in a wide temperature range – from -50 to +50 °C. Some equipment can be adapted for other types of energy carriers:
- used oil;
- diesel fuel;
- fuel oil;
- kerosene;
- propane butane base;
- Arctic diesel fuel.
Modern devices often include both types of injectors or universal equipment for fuel types, making them easy to reconfigure.
Homemade gas burners are most often used in solid fuel boilers
It is safer to purchase simple gas equipment adapted for bottled gas. Homemade equipment, although more affordable, is unsafe! Usually, “reworks” are carried out on the basis of old units.
Turbocharged types of gas burners and their design differences
Among modern gas equipment, many experts prefer closed-type burners for turbocharged boilers. They are self-sufficient in design and require a compact chimney, which can even be diverted into general ventilation during autonomous heating.
A heating unit with a special closed-type combustion chamber receives oxygen from the outside - through a special supply pipe (coaxial chimney). Combustion products are removed approximately in the same way. The heating equipment is controlled by a fairly powerful automatic fan.
Fan gas burners also have a drawback - the price, due to the complex design of the product
Such a device is much more expensive than atmospheric heating equipment. However, for an additional fee, the buyer receives a number of advantages, including autonomous operation in a residential area. This device, thanks to automatic control, has a high level of safety.
Turbocharged equipment has the highest efficiency and flexible temperature scheme
The fuel burns almost completely, which is important for environmental performance. There are also disadvantages, including design complexity, which causes difficulties during installation and repair
Gas burners for combined equipment are most often used in solid fuel boilers. This is a rather complex unit, so all components must meet certain efficiency and safety requirements. The automatic device is capable of switching from one type of fuel to another for uninterrupted heat supply. Pellet and pyrolysis boilers are designed according to this principle, equipped with gas for burners that drives the ignition process.
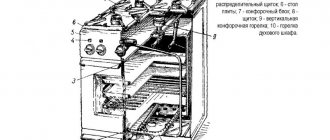
How to remove control knobs?
If you need to either adjust the flame in the burners of a Gorenje gas stove, or simply clean the buttons from accumulated grease, you can remove the handles from the control panel yourself, without using additional tools. Depending on the age of the model, the handles may have slight differences in structure.
The first thing you need to do is turn off the gas valve, and then make sure that all regulators are turned off. Next, you can slightly pry the handle with a knife to simplify the process of removing the handles.
So, if you have an inexpensive model, the handles can be removed by pulling, since each of them is based on a spring. To do this, just pull the handle towards you, slowly turning it along the axis.
On expensive models of Gorenje stoves, the handles may be equipped with special fasteners that must be unscrewed before pulling the handleTo prevent the handle from slipping in your hands, you can wrap it with a small piece of fabric, and only then pry it off with a knife.
Heavy contamination of the control panel can slow down the process of removing the handles, so in this case it makes sense to use a special soap solution. Having previously moistened each part with this solution, you can safely begin removing the handles.
If you are not sure that you can fix the breakdown on your own, it is better to contact the company with which you have an agreement for the maintenance of gas equipment.
Troubleshooting other problems
Problems with the piezoelectric element are the most common “disease” of gas burners, but they are far from the only one, since other parts can also fail. This is especially true for devices that are used for a long time and “mercilessly”. In any case, the structure will have to be completely disassembled and then carefully inspected.
Do-it-yourself gas burner repair may be required if a malfunction is detected in the operation of the nozzle. There are two options here.
- Heavy pollution. This trouble occurs if gas was used to refuel the burner, the quality of which is far from ideal. The best option is to use lighter gas. Due to the accumulated dirt, fuel will not be able to enter the burner, which means there will be nothing for the device to work on. Cleaning the nozzle is a method that is quite accessible at home.
- The second problem inside the nozzle is the ring falling out. A common reason is the appearance of cracks in it due to strong heating. The consequence is the impossibility of igniting the burner, since the spark will fly in different directions. In this case, repairing a gas burner will consist of making a homemade element. For example, a similar ring can be made from copper wire.
How do you repair a gas burner yourself if the source of the problem is the nozzle? In both cases, the technician has the opportunity to fix the problem himself.
Cleaning the nozzle yourself
Checking the nozzle for blockage is quite simple. You need to remove this element, then look through the hole into the light. If the white “spot” is not visible, then the “diagnosis” can be considered confirmed, so cleaning is necessary. However, there is one big obstacle to this operation. This is a small hole for which it is very difficult, almost impossible, to pick up a needle or thin wire.
Therefore, it is not always possible to mechanically clean the nozzle. Another disadvantage of “violent” actions is the risk of widening the hole. Such a defect will inevitably affect the operation of the burner - the flame will burn incorrectly: its height cannot be predicted. For this reason, experts recommend using two other methods.
- Blowing out dirt. This method is suitable if the contamination is not yet too serious. The nozzle is removed, then pressed against the gas cartridge with the side with the hole, and begin to blow through. There is a chance to get rid of the interference in such a simple way. Instead of compressed gas, you can try using a powerful jet of water.
- The nozzle gets very hot. It should be noted that this option refers to cardinal, even brutal decisions. Craftsmen use it at their own peril and risk, since a possible outcome is destruction (burning) of the part. A wire is attached to the removed nozzle and then heated red-hot using a second burner. After this, the part is dipped in cold water.
If you choose the best option, then it can be called the first, more gentle one. But it is also not always effective. Therefore, many consider it optimal to search for a thin wire and then sharpen its tip. One of the places where you can “get” a super-thin needle is a tattoo parlor (art tattoo studio). In this case, there is a chance to guarantee both the result and the safety of the part.
However, there are times when even these methods are powerless. Then, instead of cleaning or heating, they use a solvent wash, which is distributed with a soft brush. Some owners, after treating with gasoline, blow out the part using a pump. They say that this “tandem” always helps to get rid of blockages. Another rescue option is a product designed for cleaning carburetors.
Replacing the nozzle ring
When a gas burner is used intensively, the ring operating at high temperatures falls out after a certain period of time and is then completely lost. Due to damage or loss of such a part, it is unlikely that anyone will decide to buy a new gas burner. Finding a suitable replacement is also not the best solution, so the owner is left with the only option. This is making a ring with your own hands.
The material of the original element is brass, but purchasing it is not advisable, since such a ring will be equal in cost to the price of a new gas burner. Copper, or rather ordinary copper wire, can become a full-fledged replacement for this expensive alloy. Its cross section is 2.5 mm. To create a new part, first cut a piece to the required length. Then the wire is bent, focusing on the diameter of this nozzle element.
Repairing a gas burner with your own hands will be a quick process only if the diagnosis is carried out correctly. How to distinguish between a ring falling out and a clogged nozzle? You need to try lighting the burner with matches. If the operation is successful, then you can exclude the “plug” from the dirt and come to the conclusion that the ring is to blame.
Ignition produces a spark, but the burner does not ignite
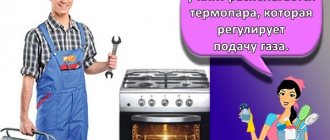
In cases where the electric ignition produces a spark, but the burner does not ignite, you should try replacing the thermocouple. Sometimes the problem is related to the solenoid valve, and after updating it, the equipment operates normally. You should check the ignition unit, because if everything is fine with it, but ignition does not occur, you need to look for a problem in the power wire or burner spark plug.
If a spark is supplied, the flame lights up, but immediately goes out, try holding the gas button longer. It is likely that the sensors responsible for the formation of the flame simply do not have time to warm up.
The gas stove burner does not light for several reasons:
.
Nozzle clogged with food; . Crack on ceramic spark plug; . The insulation of the spark plug wire is broken; . Poor ground between the ignition electrode and the burner; . Faulty electric ignition unit of the stove; . Worn or oxidized power button; . The thermocouple or solenoid valve has burnt out. To eliminate the causes in the electronic ignition system of gas stove burners and hobs, it is important to know the theoretical foundations and operating principles. When you press a knob or button, an electric spark appears at the spark plug, which ignites the gas. The electric spark is generated by the ignition unit. After the gas has ignited, you continue to hold the knob pressed for a few more seconds to magnetize the gas control system. When you turn on the burner, we hear characteristic clicks, which stop when the handle is released. If the burner does not turn on, does not light up, or goes out completely, this is considered a technical failure of the stove, which should be repaired.
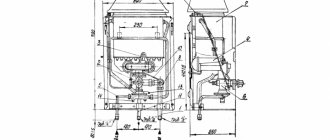
Reasons for the lack of spark and flame in boilers with semi-automatic ignition - methods for eliminating them
Most of these models are equipped with Eurosit 630 automatic transmission.
Photo of the Eurosit 630 automation.
One of the reasons why a gas boiler with automatic “Eurosit 630” does not light up or goes out may be:
The piezo element is faulty
The piezoelectric element is a reliable part of the gas boiler automation system and breaks down in rare cases. It is installed next to the coolant temperature control knob, but can be mounted separately. To check the functionality, it is enough to disconnect the wire along which the generated voltage moves from the electrode and bring it to the valve body at a distance of 4-8 mm.
Piezoelectric element wire disconnected from the electrode.
Press the piezoelectric element's trigger button several times
If a spark appears between the wire and the housing, it means that the generator is working and you should pay attention to the electrode itself, the ceramic housing of which must be dry and intact. The electrode mounting nut must only be tightened by hand.
The emergency electrical circuit is broken
The emergency protection system for a gas boiler consists of:
- connecting wires;
- bimetallic sensors installed in the chimney and heating supply line, triggered at a temperature of 75-85 degrees Celsius;
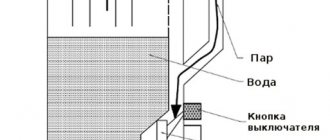
Problem: the heat exchanger is clogged with scale
The most common malfunction of geysers lies in the heat exchanger (radiator) being clogged with scale. Hard water is to blame for scale build-up on pipes. Scale deposition occurs at water temperatures above 80 degrees, and at 82 degrees this process begins to occur more intensely.
To prevent scale formation, you should not use too hot water. For swimming, a water temperature of about 42 degrees is enough, for removing grease when washing dishes - about 45 degrees, since grease removers can cope with it in cold water, and for washing in an automatic machine - no more than 60 degrees.
Many people leave the gas water heater running on the igniter because it is convenient and there is no need to light and adjust the water heater every time. However, even an hour is enough for the temperature in the heat exchanger to rise to 90 degrees - hence the scale. Therefore, do not be lazy to turn off and turn on the column as necessary, and also do not alter the heater’s automation; if you have low pressure, it is better to install an intensifying pump in this case.
Well, if you have a problem, you need to repair the Chinese gas water heater by flushing the heat exchanger. To do this, you need to understand that the heat exchanger of the column is really clogged, paying attention to the following symptoms: low pressure in the heated water tap, when the pressure in the cold water tap is good; the column does not turn on at all; or turns off immediately after turning on. Of course, the tap at the entrance to the gas column may have broken, but if it is working properly, proceed to disassembling the column.
To flush the column, you will need: a Phillips and flat-head screwdriver, a set of open-end wrenches, a set of paranit gaskets and a rubber hose. In addition, you must purchase anti-scale agent in advance from a hardware store, which is sold in a plastic bottle and in the form of a dry powder. You can also use vinegar essence because it is the most accessible.
First, remove the accessories from the speaker, and then the casing. After this, it is necessary to shut off the water supply at the inlet and open any of the heated water taps closer to the column. Next, unscrew the supply tube from the heat exchanger and move it to the side. After you unscrew the nut from the heat exchanger, water will begin to flow out of the heat exchanger. It needs to be drained about a liter.
Next, put a hose on the inlet of the heat exchanger, lift it higher than the column, insert a funnel into the hose and pour the prepared solution into it in a thin stream. Pour slowly, otherwise a reaction will begin and the anti-scale will be pushed back. The solution should remain in the heat exchanger for a couple of hours. The substance can also be heated on a burning igniter so that the reaction occurs faster and takes less time.
Place a basin or plastic bucket under the tap and slowly open the water supply to the gas water heater. See what comes out of the hose. If there is a lot of sludge and after washing the pressure becomes good, then everything worked out, if not, then the procedure will have to be repeated again. But when using anti-scale, this will not be necessary.
Lights up and goes out immediately
The reasons for this problem are:
- Weak traction. The chimney needs cleaning. If there is poor ventilation in the kitchen, then you need to open the windows or install a ventilation valve on the window frame.
- The ignition button is pressed poorly. It needs to be held for 20 to 30 seconds.
- The sensor that removes combustion products does not work. This can be found out using a multimeter. If the sensor is working, there will be a sign on the screen indicating infinity.
- Mixing streams. You need to set the regulator to a constant normal temperature.
- High pressure in models with low power. Set water parameters as indicated in the instructions.
- Systematic switching off of the overheating sensor. Solution: replacing it.
- Adjust the igniter. Disconnect the electrode from the igniter so that the spark is in the central part of the burner. Inspect and test the tube connections for leaks.
If ignition is delayed, clean the burner. There is a high probability that soot and soot have accumulated in it. The problem may also lie in the microswitch.
Methods for troubleshooting geysers
Geyser "Vector" is one of the most popular in Russia. This is evidenced by sales statistics.
When the piezoelectric element does not work in the Vector gas water heater, a spark does not appear and the burner does not ignite. The reasons for the problems are:
- Lack of draft in the chimney. It could simply be clogged and need to be cleaned. There is a special sensor in the column that monitors the presence of traction. If it is not there, it will not start working. If you cannot do this yourself, it is better to call a special service.
- No water pressure. If the water pressure is very good, then it affects the membrane, which presses on the valve. Very low pressure may indicate problems with the membrane or that the filter is clogged.
- The nutrient element is not working. Ignition is done using batteries, without which there will be no current to create a spark. You need to remove the panel, then take out the battery pack, pull them out and insert new ones.
How to avoid burner failure?
Since the most common reason for a gas burner with piezo ignition to stop working is the breakdown of its most important element - the piezo, it is important to take care of its safety. Do not damage the device or allow water to get inside the burner, especially if you are going camping.
At best, you will have to light the gas burner with matches, unless you remember to take them with you
Do not damage the device or allow water to get inside the burner, especially if you are going camping. At best, you will have to light the gas burner with matches, unless you remember to take them with you.
The duration of use of the gas burner should not exceed 10-15 minutes, after which it is necessary to give the device a little time to cool down
Even if the piezoelectric element is damaged in some way, you should not be upset, because today there are many autonomous piezoelectric ignition devices on sale. That is, it is the same piece, only portable.
So, you don’t have to unscrew the gas burner every time to put on a new piezo ignition, and such a portable piezo ignition will definitely come in handy not only outdoors, but also at home.
Do not forget that the cause of the malfunction may be simple contamination of the nozzle or a slipped ring, therefore, to identify the cause of the breakdown, it is important to conduct a thorough diagnosis of the device. If the piezo is working properly, you just need to try to light the burner to understand which part caused the burner to malfunction
Canister burner: selection, operation, safety
There are quite a lot of technologies for construction, installation and repair work associated with the use of a directed torch.
A popular household spray burner is a small device filled with propane-butane or other gas that regulates the direction, power and temperature of an open fire.
With their help, they can quickly light a barbecue, connect functional units, melt plastic parts, and perform heat-shrinking work.
Design features and operating principle
Burners of this class have different designs - from the simplest nozzle devices to more complex ones with organized air supply and piezo ignition. There are devices with an injector; this design helps to increase work productivity, and the presence of a check valve reduces gas consumption for work.
Most portable appliances used in everyday life belong to injection burners, in which the air from the combustion process is naturally captured inside the torch due to the vacuum at its base. The formation of the air-fuel mixture occurs in a special chamber, and the resulting gas-air mixture is ignited by a spark.
Gas burner for a can
The operation of a gas burner on a can is divided into three stages:
- Preparatory part. At this stage, air and fuel are given operating characteristics: direction of movement, speed and temperature conditions.
- Mixing. Formation of a flammable gas-air environment in the required ratio.
- Combustion. After a spark hits, the oxidation reaction of chemical elements under the influence of oxygen begins, forming a torch at the end point of the nozzle.
Modern canister burners with piezo ignition have additions that provide automation and safety when the device turns off when a malfunction is detected.
Despite the simple design of mini-burners, in case of any malfunctions, users are prohibited from carrying out independent repair work; the devices must be disposed of or transferred to specialized organizations for repair.
Types of portable equipment
An open flame source can be in demand not only during construction and installation, but also for everyday household needs and on vacation.
On a hike, this device has become simply indispensable; it is used to light a fire and prepare food. The main working element of mini-burners is a cartridge with consumables.
As soon as the gas in the device runs out, the old cylinder is disconnected and a new one is installed.
There are several types of installation of a spare element:
- Threaded, when the cartridge is screwed onto the structure in the usual way;
- collet connection, in which the cylinder is first put on and then scrolled to one side;
- valve, when the connection is secured with a clamp;
- pierced, connection to the cylinder, begins after pressing.
Threaded options are the most common and reliable, since they form a strong connection between two working units, which are subsequently easily separated. The structures to be pierced must not be separated until the gas in the cartridge is completely consumed.
Devices with collet fixation are characterized by quick installation. To secure them to the cylinder, they are put on and turned 25-30 degrees to the side. The disadvantage of the design is that the clamp becomes loose, which can result in unauthorized gas escape.
By fuel type
There are 3 categories of fuel classification:
- Gas, simple and reliable to use, do not require complex maintenance and operate on 2 types of fuel: propane and isobutane.
- Liquid fuel with reusable gas containers. Most run on pure gasoline, but can use diesel fuel or kerosene. They are preferred for areas where there is no centralized fuel supply, and are also ideal for high-altitude areas with low oxygen levels and are ideal for mountain travel.
- Multi-fuel tanks are filled with both gas and gasoline. Despite the fact that their price is much higher than other types, they are universal for any application. Solid fuel special devices using pelletized fuel.
GENERAL OCCUPATIONAL SAFETY REQUIREMENTS
1.1. An employee who is at least 18 years old, who has undergone a medical examination and has no contraindications for health reasons, who has the necessary theoretical and practical training, who has completed introductory and initial workplace safety briefings and training according to a special program, and who is certified, is allowed to perform work using a gas burner. qualification commission and received permission to work independently. 1.2. An employee who performs work using a gas burner (hereinafter referred to as the employee) must periodically, at least once a year, undergo training and testing of knowledge of labor protection requirements and receive permission to perform high-risk work. 1.3. An employee, regardless of qualifications and work experience, must undergo repeated training on labor protection at least once every three months; If an employee violates labor safety requirements, as well as during a break in work for more than 30 calendar days, he must undergo an unscheduled briefing. 1.4. An employee who has not undergone timely instructions and testing of knowledge of labor protection requirements is not allowed to work independently. 1.5. An employee performing work using a gas burner, who is allowed to work independently, must know: safety measures when using gas cylinders and burners. Rules, regulations and instructions for labor protection and fire safety. Rules for the use of primary fire extinguishing agents. Methods of providing first aid in case of accidents. Internal labor regulations of the organization. 1.6. An employee sent to participate in work unusual for his profession must undergo targeted training on the safe performance of the upcoming work. 1.7. An employee is prohibited from using tools, devices and equipment that he has not been trained in the safe handling of. 1.8. When performing work using a gas burner, an employee may be exposed mainly to the following dangerous and harmful production factors: - the possibility of a fire when using a gas burner; — the possibility of a gas cylinder explosion; — gas burner surfaces heated to high temperatures; - uncomfortable working position. 1.9. An employee performing work using a gas burner must be aware that during work, the most likely cause of injury may be burns from the open flame of a gas burner. 1.10. To protect against the effects of dangerous and harmful production factors, the employee must use special clothing, safety shoes and other personal protective equipment. 1.11. To prevent the possibility of a fire, the employee must comply with fire safety requirements himself and prevent other employees from violating these requirements; Smoking is permitted only in designated areas. 1.12. The employee is obliged to comply with labor and production discipline, internal labor regulations; It should be remembered that drinking alcohol usually leads to accidents. 1.13. If an accident occurs with one of the employees, the victim must be given first aid, report the incident to the manager and maintain the situation of the incident, if this does not create a danger to others. 1.14. The employee, if necessary, must be able to provide first aid and use a first aid kit. 1.15. To prevent the possibility of illness, employees should observe personal hygiene rules, including thoroughly washing their hands with soap before eating. 1.16. It is not allowed to perform work while intoxicated or in a state caused by the consumption of narcotic drugs, psychotropic, toxic or other intoxicating substances, as well as drink alcoholic beverages, use narcotic drugs, psychotropic, toxic or other intoxicating substances at the workplace or during work. time. 1.17. An employee who violates or fails to comply with the requirements of labor safety instructions is considered a violator of industrial discipline and may be subject to disciplinary liability, and, depending on the consequences, to criminal liability; if the violation is associated with causing material damage, then the perpetrator may be held financially liable in the prescribed manner.
Homemade gas soldering iron. DIY gas soldering iron
Soldering iron - How to make a gas soldering iron with your own hands?
A soldering iron is a simple tool that almost every owner has. Repair of TV, cell phones, radio equipment, connection of wires, antennas, cables is carried out using soldering. You can use welding, but it is not easy to use at home.
If you don’t have the necessary tool at home, you can make a soldering iron with your own hands.
Structural parts and gas used
A gas soldering iron consists of a gas reservoir and a burner on which a soldering nozzle or tip can be installed. Gas soldering can be carried out either using heated air, when only a torch is used, or when using a nozzle.
- The gas reservoir can be replaceable and connected to the burner using a hose, or it can be portable, made in the same design as the burner and refilled from a cylinder, which are often used for refilling lighters.
- The latter design is more common and preferable for domestic use because of its compactness and high mobility.
- But in production shops, and especially in car repair shops, you can also see large gas soldering irons running on propane coming from 50-liter cylinders.
Various gases are used for operation: propane, butane or a mixture of gases - mapp gas. The latter contains methyl acetylene, propadiene and propane in a certain proportion.
Mapp gas is very effective due to its combustion temperature reaching almost 3000℃. But the main advantage is that with the same performance of a gas soldering iron, it will be required eight to ten times less in volume than acetylene.
Required physical characteristics for a homemade soldering iron
The wide selection of soldering irons on the market today makes it easy to choose a device to solve specific problems. However, many people try to have a homemade soldering iron. To do this, you should consider the required physical characteristics of a homemade soldering iron.
These characteristics are divided into the following quantities:
- voltage supplied to the heating element (for electric soldering irons);
- heating element power;
- the presence of a power regulator;
- the size and shape of the sting;
- solder heating method;
- handle configurations;
- cost.
According to the first parameter, either a standard alternating voltage of 220V, or a constant voltage of 12V, 24V is supplied to the electric soldering iron. The voltage value determines the power of such soldering irons. It has discrete values at 20 W intervals. That is, 40 W, 60 W, 80 W and so on. More advanced devices have a special power regulator for the soldering iron.
Homemade battery-powered soldering iron
The size and shape of the soldering iron tip has a fairly wide range of design solutions. Often, special attachments are used to work with complex radio-electronic devices (for example, for soldering microcircuits, depending on its design).
Modern soldering irons use the following methods for heating solder:
- Using an electric current applied to a heating element. In this case, the following are used: nichrome wire, ceramic rod, induction coil, pulse converter.
- Gas apparatus. The solder is heated due to the combustion of the gas jet. You can call it a mini welding machine. Such devices belong to professional equipment.
- Infrared stations. The solder is heated using infrared radiation. It creates a heating zone from 10 millimeters to 60 millimeters. The size and shape of the heating zone may vary depending on the design of the infrared window.
Gas soldering iron design
The most commonly used devices are those that heat the tip using electric current. The small number of elements and the simplicity of the design allow us to say that you can make a soldering iron with your own hands.
Choosing the right tool
An attachment for a soldering iron for soldering small parts.
The choice depends on your priorities in work, because you can solder various parts, but at home they often deal with problems such as extending wires, soldering connectors, antennas, and electrical equipment.
For work in the country or at home, an electric soldering iron, which has a reasonable price, is well suited. It’s convenient that you can work with it for a long time. Its disadvantages:
- temperature is not regulated;
- the tip overheats;
- the presence of static electricity, which can damage soldering elements;
- short service life;
- poor insulation of the soldering iron tip.
A convenient and functional device is a gas soldering iron, the main advantage of which is that you can work anywhere, regardless of the presence of an outlet. Such a tool has a fairly high price, but it can solder everything you need.
A gas soldering iron is convenient to carry with you or carry in a car.
You can repair electrical equipment on the road when your car breaks down or fix an antenna on the roof of your house.
Gas tools are mobile; they operate from a canister filled with gas. You can use them as a gas burner. The price of the tool may vary. It depends on the manufacturer, type of flame, degree of protection, heating temperature.
Electric ignition does not work on two burners
In some cases, a gas stove on two burners does not light. Sometimes lighting it with a match helps - everything works normally, without interruption. The cause of this malfunction is damage to the spark plug responsible for ignition. We repair electric ignition as follows: clean the spark plug and look at its condition; perhaps it’s enough just to clean the spark plug’s power wire.
If there is a crack on the element, we buy a new part and put it in place of the old one. The electric ignition may also break down due to a faulty ignition button. Moisture or small debris could have gotten into it, or it could have been damaged mechanically. To fix this, you need to clean the oxidized buttons or replace them if they are mechanically damaged.
Why does the gas stove burner not light up?
A weak and intermittent spark with a predominantly yellow color indicates the need to replace the electric ignition unit, which is located inside the gas stove. Replacing the electric ignition unit involves disassembling the top part of the stove, so this work should be entrusted to us - gas stove repair specialists. It is easy to determine the wear of the unit: in the dark, turn off the lights in the kitchen and turn on the electric ignition. A yellow or orange spark is a characteristic sign of wear on the block, which will most likely need to be replaced. A bright blue spark clearly indicates serviceability.
When not all burners spark, you will most likely need to completely replace the spark plugs. For a good result, all four spark plugs should be changed. To replace ceramic spark plugs, you should completely disassemble the hob, but keep in mind that in order not to aggravate the problem, repairing the hob should be entrusted to professional hands. After removing the upper hob, disconnect the spark plugs from the impulse unit. On the burner side, the spark gaps (candles) will be secured with retaining rings; be careful not to lose them. Install new arresters to replace the old ones and connect to the ignition unit.
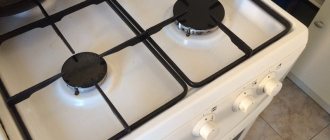
If the gas stove burner is clogged with food, debris from gas combustion, or cleaning powder, it will be difficult for the igniter to ignite the gas on the burner. To eliminate this problem, clean the burner and nozzle with a wooden toothpick. Do not use a paper clip or sewing needle; they can easily break off during cleaning and clog the channel.
Also, poor activation of the burner can occur due to high humidity around the appliance and, in particular, the gas burner. Water is a good conductor of electricity, so the spark can “strike” in a completely different direction. Unplug the gas stove and wipe the burner dry. You can use a hairdryer, but only use cold air when drying to avoid condensation.
Advice:
If the electric ignition constantly clicks after wet cleaning, turn off the power to the stove for three days. The stove will dry naturally and the ignition function will be restored.
Ignition operating principle
Electric ignitions, which are equipped with most modern models of gas boilers, include the following elements: diode, resistor, capacitor, transformer, spark plug, switch. This convenient and practical invention facilitates the operation of the unit, speeding up its activation and configuration. With the help of a compact device, you can ignite a flame in a burner not only quickly, but also safely, without the use of matches and lighters, which tend to run out and deteriorate. The flame appears immediately after pressing a button or turning a lever. It is customary to distinguish between several types of electric ignitions for gas boilers - mechanical, automatic and semi-automatic. If the unit is equipped with mechanical ignition, to turn it on you need not only to activate the burner by turning the switch, but also to press a special button. The device will generate a spark and ignite the flame. If the electric ignition is automatic, then the equipment turns on when you turn the handle - there is no need to use additional devices. To be able to use automatic ignition, the heat-generating device must be connected to the network (a grounded socket must be nearby). If the electric ignition of a gas boiler fails, you should call a heating equipment repairman at home; this can be done on the website https://24master.com.ua/.
The burner does not turn on
Unfortunately, errors are periodically found in articles; they are corrected, articles are supplemented, developed, and new ones are prepared. Subscribe to the news to stay informed.
We build the greenhouse ourselves, with our own hands. Self-assembly, installation... Do-it-yourself greenhouse, greenhouse. Drawing, diagram, description of the assembly. The greenhouse has a gray…
Homemade extension ladder. With my own hands. Prefabricated, collapsible, sc… How to make a reliable folding ladder yourself….
How to reinforce concrete, install and tie reinforcement.... Reinforcement of concrete, how and why. How to install and knit reinforcement. Secrets, owl...
How to cover walls and ceilings with clapboard?... How to cover them with clapboard to make it look beautiful and professional. Practical experience...
The geyser is a fairly reliable device and, with proper operation and proper care, will last a long time. However, sooner or later everything breaks down and requires repair. Gas appliance malfunctions must be left in the capable hands of professionals. However, today we will look at typical examples of speaker breakdowns that are not related to a defect in the device, and we will learn how to identify this or that breakdown even before the arrival of specialists.
Setting the gas burner flame
In order to properly configure the burner of a gas boiler, you must first follow the operating instructions for the gas appliance. Next, we’ll talk about how to properly start and set up a gas burner, and in what cases flame adjustment is necessary. But first things first.
Features of boiler burner settings
It is recommended to adjust the burner flame using a gas analyzer. It shows information about the amount of air that is mixed with the gas, namely the level of oxygen involved in the process and the amount of CO.
Typically, CO should be no more than 50 ppm, oxygen concentration should be approximately 3 to 5%. If it is less, then most likely the gas will not have time to burn, as a result of which a lot of soot will accumulate, the CO2 level will be higher than normal, and the efficiency of the equipment will decrease.
If the air is more than normal, then the temperature of the household burner of the gas boiler will be too high, and this can lead to tragic consequences, including an explosion of the equipment.
To ensure maximum efficiency of the equipment, make sure that the gas burner flame is blue. If it is yellow or blue-orange, then an adjustment needs to be made, otherwise the gas will not burn completely and leave a lot of soot. This in turn will lead to damage to the device.
The flame in the gas burner should be blue. If you find that the color has an orange tint, then try reducing the amount of gas. Reduce until the color turns blue (blue). This color is a sign of optimal operation of the gas appliance. The main thing is not to reduce the fuel supply to the point where the flame becomes almost colorless. In this case, it will go out very quickly.
Setting the starting gas supply is only necessary during ignition and does not affect the performance of the device. But if necessary, it is possible to adjust it too. To begin with, you should reduce the starting fuel supply. Reduce until the burner stops turning on. After this, you can turn the regulator until ignition resumes. You can watch the video at the end of this article for more details on setting the flame of a household gas burner.
We also recommend that you familiarize yourself with the intricacies of adjusting a gas boiler.
When is flame adjustment necessary?
An atmospheric gas burner, which operates without a built-in fan, very often fails; a turbocharged one breaks down much less often. During prolonged use of the device, its components may break or stop working at full capacity.
A floor-standing gas boiler occupies the usable area of your premises, so such heating systems are suitable for private homes. Most often, a special room is allocated for such devices - a boiler room in which the boiler is installed. Wall-mounted boilers save space, so they are preferably installed in apartments or houses with a small area
For example, a gas boiler may experience reduced efficiency or a decrease in flame.
And this can happen for the following reasons:
- High burner power installed for equipment that is designed for less powerful burners. In this case, there is not enough space for proper combustion of fuel, the fuel burns unevenly, which leads to soot quickly accumulating on equipment parts.
- A lot of soot in the chimney can have a bad effect on the draft of a gas boiler. Because of this, the subsequent removal of combustion products is very weak, little air enters, and the flame becomes yellow.
- The presence of burner defects is one of the reasons for reduced boiler efficiency, but in this case, adjusting the flame will not help correct the problem.
- Pressure drops when supplying gas can also contribute to the formation of soot and carbon deposits, and this will significantly reduce the productivity of the equipment.
All these reasons can affect the flame temperature in the gas burner, in which case repairs will be required.
Wall-mounted heating boilers and gas water heaters are installed, most often, in apartment buildings. But they may also need to adjust the burner flame
Repair of gas stoves with electric ignition
Cheap printed circuit boards that make up the electronic components of household equipment cost $10 rubles. Consumers avoid repairing budget gas stoves with electric ignition with their own hands. A price exceeding $30 involuntarily provokes the idea of saving money. You visit the amateur radio forum: you see... Ready-made electrical circuits for ignition devices. Wind step-up transformers, look for capacitors, solder, smoke equipment at your own peril and risk.
Operating principle of electric ignition
Unlike most household appliances, repairing gas stoves with electric ignition requires you to master the technique of replacing resistors. Frequent, ongoing process. Newcomers challenging the appropriateness of the event cause general indignation among forum members. They call the amateur with offensive phrases, and condescendingly explain, inside the high-voltage unit:
- High voltage transformer.
- Capacitor.
- Diode.
- Resistor.
The electrical circuit is specially filled with compound, so the burdock will not get inside. You pick it apart, saving your hard-earned $30. The self-taught person ignores the manufacturer’s thoughts about protecting products against unauthorized access.
The electric ignition unit for a gas stove optionally contains control elements - thyristors, triacs. It would take a long time to explain the exact operating principle of the components of electric ignition. It is worth noting: the behavior of semiconductor products resembles a key (a faucet - plumbers are more accustomed to thinking about it). Semiconductor electronic elements are used to control a power line using a voltage with an amplitude of 5-12 volts.
The analogy of a water valve is complete. A person makes a symbolic effort when opening the tap, releasing the incredible power of the pump. The tiny voltage of the control electrode reaches the operating point, the thyristor opens, starting the electrical ignition circuit. There are two positions: open, closed. Digital microelectronics of pure water. Any processor is formed by semiconductor keys - miniature, indistinguishable to the human eye. PCs are considered a logical evolutionary continuation of electronic circuits.
A high-voltage transformer increases the voltage (units of kilovolts) of the output winding, and the slot of the burner arresters is illuminated by an electric arc. Gas is supplied by the handle of the same name, starting the electric ignition circuit. There are other models of devices. Thanks to the spark, the gas ignites:
- By pressing the button, the cook charges the capacitor with rectified voltage;
- the capacitance begins to accumulate electrons;
- the voltage level of the control thyristor increases, when it reaches a threshold value, the capacitor is discharged, warming up the primary winding of the transformer;
- the output of the electric ignition circuit generates a voltage that triggers the spark gap;
- a spark ignites the gas.
The operating principle of electric ignition is based on charging the capacitor through a rectifying diode to a certain level. Specific implementations of the scheme vary. Be ashamed to study an electrical engineering textbook: repairing the electric ignition of a gas stove with your own hands is easier than a steamed turnip. Know a couple of rules, know how to solder.
Damn resistor
The mentioned resistor of the electrical ignition circuit is often rated at 3.9 kOhm. The dissipation power is 0.5, less often 1 W. The size of the capacitance has long been known (according to forum members) - a couple of fractions above 2 microfarads (the numbers go in jumps according to the series given by GOST, it will not be possible to find exactly 2 microfarads, except from the E24 series) with an operating voltage of 250 volts. A radio amateur will not notice any difficulties. There were times when fuel assemblies were rewound manually!
The average person wants to know the sequence of actions. First, you need to turn off the electric ignition of the gas stove from the voltage source. The second step is to remove the electronic, high-voltage units. The design consists of separate printed circuit boards, a single substrate. There are other options.
Begin your inspection by assessing the quality of the tracks and solder joints. The conductor layer, which looks like a silver stripe, is covered with a layer of varnish. Made to protect the electrical ignition circuit from external factors, primarily moisture. The varnish reliably covers the conductive layer. Do you have nail polish at home? It will fit one hundred percent.
The deposits are cleaned off with zero sandpaper, degreased with alcohol, and varnished on top. The peeled, torn tracks of the electrical ignition circuit are restored.
Example. The conductive layer is torn. Both edges are lightly sanded, tinned, and joined with solder. Varnish is applied over the cooled solder, alcohol is used as needed. For wiping the printed circuit board, of course.
The burnt resistor is black. The denomination is indicated above. It is not forbidden to install a more powerful element. Eyewitnesses unanimously say: the further process of operation is going excellently. Let's give the stove circuit a resistor with a nominal value of 9 kOhm. It is better to take the dissipation power equal to greater than the similar parameter of the original element. 1 W is fine.
A capacitor failure can be seen from afar. Some (electrolytic) swell; the swollen barrel cannot be missed by an attentive master. Regarding the denominations, it is recommended to ask members of the forum. Modern marking of resistors with multi-colored rings is more complex than the traditional alphanumeric inscription. Tolerance was expressed as a percentage.
Repairing an electric ignition gas stove can be a simple matter. If the windings of the transformer are burnt out, you will have to buy a new one. Do you want to check the location of the fault? At each output we find a pair that rings.
The resistance (use a multimeter) is hundreds of ohms. There were “legs” hanging in the air: most likely a problem with the installation of the transformer. Rewinding the activity is not easy. The Internet will provide you with valuable information. A core shaped like the letter W is used.
There are a dozen primary turns; the secondary winding will have to be taken seriously.
Beyond electronics
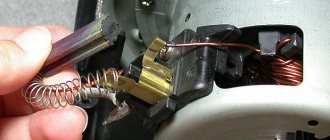
After examining the printed circuit boards of the gas stove, pay close attention to the condition of the button. A control panel element that starts the spark gap ionization process. The contacts of the electric ignition button are powered by a centralized voltage of 230 V. Brass contacts are easily melted by a welding arc in the event of a short circuit. It is recommended to clean the pads and check the functionality of the switch with a multimeter (ringing).
A product that can withstand operating voltage is suitable. Electric ignition will not work any worse. At times, installation is accompanied by technical difficulties. The button does not fit the installation dimensions of the case. Finish with a file.
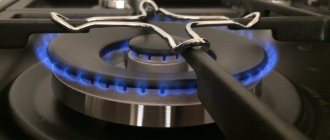
The main thing is to wire the cross-connect correctly; the necessary spare parts are often sold separately.
Each burner is equipped with a candle and a combustion control device (thermocouple). The electrical ignition of a gas stove differs little in circuitry from that of an ordinary car. Do you want to check the serviceability of the electric ignition spark plug on your gas stove? Turn off the gas. Remove the reflectors, dividers of each burner (round things that form tongues of fire), look... When you press the ignition, the products give a good spark. 1 candle broken? The cause of the breakdown of the electric ignition of the gas stove has been found.
The combustion control circuit is composed of a thermocouple (temperature sensor of any type). It happens that the electric ignition works 100%, but the gas refuses to burn. It's more about this node. The command closes the blue fuel supply path. A regularly beating spark from a gas stove is powerless to ignite air devoid of a combustible mixture.
The electric ignition unit is equipped with 4 or 6 outputs; the literature is silent about the reason for the need for the specified number of contacts. We assume that 1 pair is used for the oven and grill. Current trends oblige the manufacturer to produce models a la Two in One. A gas stove with electric ignition of the oven is convenient: you will find models where the option is not implemented, and those where you will have to modify the circuit with a copper wire. I'll need my husband's help.
Own schemes
We are ashamed to call the electrical circuits for igniting a gas stove complex. Radio amateurs make it easier. The getinax board is etched and the necessary elements are soldered in. The initial composition of the electric ignition of a gas stove is provided by a ready-made transformer and a button discussed above.
An experienced engineer can usually improve upon this from the manufacturer. The Internet provides an interesting circuit for electric ignition of a gas stove, formed by a triac, strikingly simple.
How to make a gas burner for a tandoor with your own hands
A do-it-yourself tandoor burner is an interesting and uncomplicated undertaking if you have the necessary tools. Making it yourself will allow you to more accurately select the desired parameters and geometric characteristics. To make your own, you must be able to handle a welding machine and drill. Have knowledge of connecting coupling fittings and conducting hydraulic tests.
Manufacturing will not take you much time if you set yourself a clear task beforehand, decide on the dimensions and characteristics of the burner to be manufactured. You need to look at existing analogues of products to understand the result you want to get.
The manufacture of the simplest and most reliable gas burner design will be described below.
Required materials and tools
To manufacture the most unpretentious burner device, the materials you will need are:
- Half-inch gas supply pipe;
- A pipe bender, or other device with which you can bend a pipe of the required diameter. If this is not the case, then you can use ½-inch half-bends at 45 degrees;
- 90 degree bends;
Important! It is necessary that all these parts are the same size in terms of internal and external diameters. You will also need:
You will also need:
- Piezo ignition button;
- Ceramic electrode for igniting boilers;
- Couplings, ½ inch bends – 1 set;
- ½ inch gas valve – 1 piece;
- Welding machine;
- Cutting machine;
- Drill;
- Drill;
Manufacturing instructions
Evenly mark the locations of the holes (the number of holes and their size should be such that the sum of the areas of these holes is equal to the cross-sectional area of the pipe itself);
Drill holes; We bend the pipes;
We mark pipes and bends according to the required size of the tandoor. In this case, it is necessary to take into account that the distance between the welds is at least 50 mm. This way you will get an outer ring and, if the diameter is sufficient, then an inner ring with rays. Then weld all the parts included in this structure. Perform hydrotests of the structure to control welds. Just make sure there are no leaks
And pay special attention to the places where the structure exits the tandoor. Connect the piezo ignition so that the ceramic electrode is located at the nearest hole in the pipe (this is necessary in order to avoid the accumulation of natural gas in the furnace).
Install a coupling and mount a valve on the section of pipe entering the furnace. The structure is ready. Homemade tandoor burner Another option
Installation and connection
- The burner is installed after testing in fresh air to determine the uniformity of gas supply and combustion. It is mandatory to check the piezo ignition multiple times under different operating conditions. Also be sure to test the adjustment range
- Installation is carried out in the lower part of the furnace using spacer metal fittings. Installation on bricks with subsequent fixation of pipes is possible.
- After installation, it is necessary to reliably seal the places where the pipes pass through the furnace wall. To do this, use either cement or mineral filler used in the manufacture of the tandoor itself.
- Connection is made with a flexible hose to the connection pipe with the valve.
- Tests of the installed combustion device can be carried out.
How to choose the right gas burner for a stove or boiler
Gas equipment is associated with a certain risk if used incorrectly. It is necessary to correctly select the stove gas burner (component parts), and for this you need to have a general understanding of the design differences between the devices
When purchasing, it is important to know what types the product is divided into according to the method of burning fuel in the boiler:
Gas burners can also be used in solid fuel stoves.
- atmospheric burner;
- inflatable.
Not every manufacturer should be trusted; it is better to purchase from official dealers who provide certificates and all technical documentation. If you purchase low-quality components or components, you will have someone to file a claim with.
Gas heating equipment has different features, including the method of ignition and flame adjustment
When purchasing, experts recommend paying attention to the following indicators:
- heat generator power;
- demands on the quality of the gas mixture;
- possibility of automatic regulation;
- the authority of the company and the country of origin;
- price-quality ratio".
Burners for floor-standing boilers are offered in the following versions:
- atmospheric;
- supercharged,
- piezo;
- electronic.
To properly configure the gas burner, it is better to contact specialists.
You can select a burner based on power settings:
- 1-stage;
- 2-speed;
- with a smooth transition;
- with automatic adjustment.
The flow of the gas mixture in different boilers is:
- straight-through;
- twisted (more powerful).
The most popular are gas burners for boilers made in Germany (Buderus, Vaillant), Slovak (Protherm) and Italian (Lamborghini). Among the products produced by domestic companies, Lemarx, Vakula and Conord equipment have proven themselves well. Among the industrial devices are burners of the “Impulse” series.
The duration and productivity of any unit depends on the correct choice and proper operation. Gas equipment is purchased not according to the principle of “cheaper” or “more powerful”, but according to the type of boiler available.