Spotter translates as spotter, but garage craftsmen know that this is a specific resistance welding device for body work. It differs from ordinary spot welding in that the pulse is formed in a very short time, and the metal does not have time to heat up. Many craftsmen have mastered the production of such an original device in order to use it to level out dents on car bodies. We will tell you in detail how you can construct a spotter from a microwave that has been in use for a long time in the kitchen.
Electrical part
A microwave oven emits magnetic waves of millimeter and centimeter lengths. They warm up the objects they pass through well, but are completely unsuitable for welding, since it is impossible to create an electric arc on the electrode. Replacing the winding allows you to supply a large direct current to the spotter electrode . It is enough to install equipment with household power in the straightening garage.
The operating principle of a microwave spotter is based on resistance spot welding technology. The transformer produces a large current with a voltage of 12V. The impulse lasts for a short period of time. The spotter electrode should only stick to the body steel without burning through the thin sheet. This is a rare case when sticking of the electrode does not interfere with the welding process, but is specially created.
The current is changed by creating windings. The step-by-step plan for the main alterations is simple.
- Disassemble the microwave oven. Remove the microwave unit with coils from it.
- Remove the windings. The easiest way is to cut off the wires on both sides of the case and remove the bundles inside.
- Wind the primary winding with wire 2.5 mm2 in cross section, 200 - 210 turns.
- The secondary winding of the spotter is only 7 turns, the wire has a cross-section of 55 mm2. You can use a single-core cable of this diameter.
The second circuit of the spotter should produce a voltage of 12 V. The output current to the electrode is 5000 - 7000 A. The pulse duration is up to 0.5 seconds.
Head of the site for the production of welding equipment KZESO Podgorbunsky D.S.: “The wire is wound smoothly, with the turns adjacent to each other. To secure the winding in working condition and extend its service life, the finished spotter coil is impregnated with varnish. The best option is Varnish FL-98. It is manufactured by domestic manufacturers in accordance with GOST 12294-66. Produced in containers for industrial enterprises of 50 and 70 kg. For consumers, 5 liters in a canister. It can be replaced with varnishes of the ML, GF and PF series. The varnish is heated in a container to 120⁰C, and a clean, grease-free winding is carefully lowered into it. Cardboard, used as insulators between the coils and the walls of the case, is impregnated with the same varnish and dried. Impregnation with varnish significantly increases the service life of the spotter.”
Transformer
The main component of any welding machine that uses electric current for the process of thermal joining of various metals is a power transformer, if you do not take into account modern electronic inverter welding equipment.
Moreover, the future welding transformer must have a high transformation ratio in order to be able to generate large welding currents.
The process of resistance spot welding is based on the Lenz-Joule law, which states that an electric current flowing through a conductor releases an amount of heat equal to the square of the electric current multiplied by the resistance of a section of this conductor per unit time:
Q = I**2 x R x t.
That is, with a current strength of, for example, 1000 amperes, a large amount of thermal energy will be released in a small area of contact. Depending on the length of time the electric current passes, at first the thermal energy will be enough to melt the contact area of low-melting aluminum sheets, and with prolonged contact, it will point-melt the steel sheet.
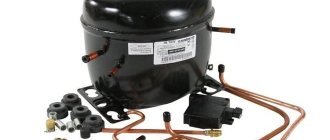
Hence, one of the best candidates for making a spot welding machine with your own hands will be a power transformer taken from an old broken microwave. As a rule, the power of such step-up transformers from a microwave oven ranges from 700 watts to 1.5 kilowatts, which is quite enough.
Keep in mind: that as a welding transformer you can take any suitable power transformer with a power of about 1 kW, but the most convenient, in our opinion, is a voltage converter from a microwave oven; it is easier to convert it.
Ensuring convenience and safety of work
A homemade spotter, created with your own hands from a microwave oven, requires a body and handles for turning on and adjusting. If desired, you can make it from sheet metal. Experts recommend cleaning the microwave from the remaining parts and placing the assembled spotter structure in it . The holes on the front panel are used for the regulator. The wires exit from the rear. The nodes are attached to the walls.
The wiring diagram is used from the furnace. Microwave plug with grounding. The wire will withstand short loads, but it is short and will not allow you to move around the car with the spotter. It is replaced with a long wire. The cable from the secondary winding is brought out, reliably insulated and brought to the holder.
Home workshops have a small area, but the created spotter must be moved during the work process. To do this, handles are attached to the top of the device, and wheels from a broken chair are attached to the bottom.
Before checking the operation of the equipment, it should be carefully inspected and all connections should be insulated . Cardboard is placed between the units and the walls of the housing.
A simple electrical circuit for a homemade spotter.
Step-by-step instruction
First of all, for this we will need a minimum of tools and devices that, perhaps, any household has at their disposal, namely:
- a small angle grinder with a cutting wheel for metal;
- electric drill or screwdriver with drills;
- hammer and chisel;
- a set of plumbing tools in the form of pliers, various screwdrivers, etc.
So let's get started:
- Let's take it
power transformer from a microwave oven and dismantle the secondary winding, it will be larger in volume, the main thing is not to mix it up. To do this, it is best to cut the steel core along the edges at the welding site and knock out the unnecessary winding with a hammer and chisel. But you can also try to carefully cut off the protruding edges of this winding with a grinder or a hacksaw, and simply knock out the remaining parts of it in the steel core with a chisel.
Important! Under no circumstances damage the primary winding; it is the main element of the future welding transformer. It can not be removed from the core.
- We are making the secondary winding of our future welding transformer. To do this, we need a piece of insulated copper wire with a cross-section of approximately 50 mm2 or about 8-10 mm in diameter (visually a finger thick) and a length of 70-100 centimeters. The main condition when choosing such a wire is that it must be new and undamaged.
We wind this copper conductor onto the central magnetic core of the steel core of our transformer so that we get two or three full turns. Moreover, this must be done in such a way that the turns on the magnetic core are the middle of the copper conductor, and the remaining ends are approximately equal in length.
- We assemble a welding transformer. To do this, we install the disassembled parts of the steel magnetic circuit in place exactly as they stood, having previously lubricated the contact points with epoxy resin or other glue suitable for these purposes. We clamp the entire structure in a vice and wait for the glue to completely harden.
Of course, if possible, these parts of the magnetic circuit can be welded, but it is necessary to reliably protect the transformer windings from possible damage from molten metal or sparks.
- We fix the manufactured welding transformer on the platform; it is best to take some insulated base in the form of a durable plastic plate, wooden board or thick plywood. Dimensions are approximately 150 mm in width and from 300 to 700 mm in length, which will further determine the depth of the workpiece to be welded.
The transformer itself should be covered with a protective box, in which it is necessary to make ventilation holes for natural cooling.
- Next, we make welding contacts. Moreover, one of them must be stationary and withstand heavy loads, so we make it from a durable bracket, which is rigidly fixed to the base of the transformer. Using a copper tip, we connect one of the ends of the secondary winding wire to this bracket.
Another
The contact must be made movable so that it can evenly close with the stationary one, but in a non-working state be normally open. To do this, we make the design of the second contact in the form of a lever, which we fix to the base and spring it with an elastic rubber band or a steel spring. We attach the welding contact bracket to the lever, to which we connect the second, remaining wire of the secondary winding of the welding transformer.
The easiest way to make welding contacts is from a copper rod 10-20 mm in diameter, making cone-shaped points at the ends. You can, of course, use rods specially designed for contact welding made of tungsten or based on beryllium bronze alloys with zirconium.
- Finally, we make the electrical part, that is, we connect the primary winding to a 220 V network. To do this, you can also use the power cord with a plug from our disassembled microwave oven, especially since it is no longer needed there.
To automate the welding process, it is necessary to make a switch.
The best option for these purposes is the so-called mic or push-type switch; it can also be taken from the microwave; it will be located in the door opening locking circuit. We place the microswitch on the break in the primary winding, that is, the 220 V network, and it is most convenient to position it by securing it to the movable contact lever.
Attention! All contacts and exposed parts of the 220 V electrical circuit of the welding machine manufactured by us must be carefully insulated using PVC electrical tape.
- That's it, spot welding from the microwave is ready. All you have to do first is practice to understand how the basic welding processes proceed for various metals, depending on the shape and thickness of the products. But after this, you can begin the practical use of your resistance welding machine for its intended purpose.
Manufacturing method
Before starting to make a spotter, you need to make a drawing and prepare all the details. In addition to the transformer you converted yourself, you will need:
- diode bridges D32A and D226B;
- thyristor PTL50;
- 1000uF capacitor;
- 100 Ohm resistor;
- fuse;
- power button.
All components and parts must be conveniently placed in the housing and isolated from each other.
Homemade products begin to be made from transformer windings . After this, the remaining parts are connected to the circuit one by one.
Frame
It is optimally convenient to use the body of a disassembled microwave oven. After removing the disk and rotation mechanism, you should strengthen the bottom with plywood or a sheet of dielectric.
At the back, where the wires exit, bolts are inserted into the holes and tightened with nuts. The plus and minus wires are attached to them. The mount is fixed on the inside. From the outside, the cable terminals must be freely removable and secured with nuts.
The holes in the microwave body are used to control the current and voltage of the spotter.
Holes are drilled in the upper part of the case, and a handle is installed for convenient movement of the device. If the spotter turns out to be very heavy, wheels are attached to it or mounted on a crosspiece from a computer chair.
Spotter control circuit.
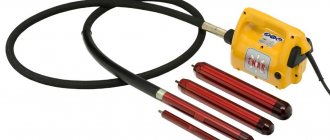
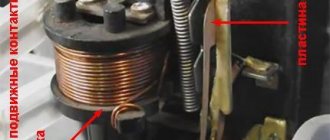
Holder, electrodes
Mechanics who straighten car bodies with a spotter recommend making a holder from an old glue gun . The cable is routed from the back. At the front, the spout is removed and a sleeve is installed, firmly connected to the body and a long tube. The button is replaced by a switch.
In the absence of suitable broken equipment, the body of the handle is cut out of plywood. The inner surface is covered with insulation. A hole is made on the handle for the starter so that the button can be pressed without removing your hand.
An electrode in the form of a plate with a sharp end is made of copper . It is short in length and is attached to the rod with a nut and bolt with washers.
You can make an electrode from a copper tube. It is connected to the cable with a union nut or soldered. The working end is flattened. The point of contact with the metal of the housing should be minimal.
Inoppuller
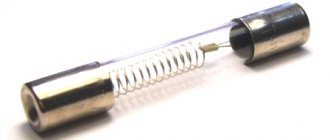
A reverse hammer, with the help of which the dent is gradually leveled - inoppuller . It is a long hollow rod with a handle. A device for holding the electrode is attached to its end. The other end of the inoppuller is attached to a pistol holder. There is a wire running inside that supplies current.
It is necessary to ensure a good connection between the cable and the electrode and reduce current losses to a minimum. The handle should be comfortable, well insulated from all conductive parts.
Using Dual Row Transducers
You can make a spotter with your own hands with a two-row converter only if you first find a generator for it. As a rule, a single-phase model is selected, in which the output voltage parameter is at the level of 4 V. Due to this, fairly good conductivity will be ensured. Next, you need to solve the problem with the transformer. In this situation, it is best to set the analog type.
Due to this, the nominal voltage in the system can be reduced to 5 V. To make a spotter with your own hands, it is recommended to select capacitors with a capacitance of 12 pF. They will provide good current conductivity. There should be three resistors on the board. In this case, only stricture filters are used. They are able to stabilize the operating frequency parameter at 45 Hz. Some specialists additionally install two-wire modulators at transformers. All this is necessary to ensure that welding is not interrupted during sudden voltage surges. The last thing you should do when assembling the spotter is installing the power supply.
Application
During the straightening process, the electrode is welded pointwise to the dent and, with the help of an inoppuller used as a return striker, is pulled out. In this case, the tack breaks, the electrode is displaced and the straightening process is repeated again. Gradually, point by point, the dent is leveled out.
The spotter is used for straightening metal bodies . The dent should be cleaned from paint to bare metal. The clamp of the second pole is attached to the area of the body being leveled next to the area being treated. The main condition is the occurrence of a short arc between the part and the electrode.
Features of a homemade device
A homemade device is less productive than professional equipment from car dealerships. For repairing your car, it has the following advantages:
- cheapness;
- DIY repair ability;
- small size.
In terms of power - welding force, a homemade spotter is inferior to a ready-made spotter from a store . This is a plus of the equipment. Body straightening requires skill. Low effort allows you to gradually, little by little, level out the dent, without fear of making a mistake.
Anyone who knows how to do mechanics and understands electrical circuits can make a spotter with their own hands. The equipment is necessary in every garage, although it is not constantly used.
Advantages of a battery spotter
By creating a spotter with your own hands, you can get a number of benefits, namely:
- significant cost savings compared to purchasing store-bought equipment or making a version from a transformer;
- speed of assembly, which can be about 30 minutes, if all components are available;
- no electrical engineering skills are required, and all work is done at home;
- the battery spotter will be able to work in places where there is no electricity (in a forest house, on the side of the road, in a common yard);
- with such a device you can perform the same work as a classic spotter;
- Quiet operation due to the absence of a transformer;
- easy transportation to another place.