During long-term operation, the main components of the refrigerator become faulty, and it becomes necessary to replace some parts. The cost of work is often comparable to the price of the refrigeration unit itself. If you have the appropriate skills, you can replace the compressor in the refrigerator yourself.
Let's remember physics
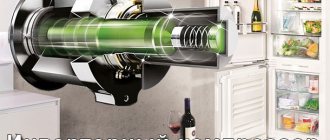
From a school physics course we know about the structure of an internal combustion engine. The compressor functions in a similar way. The scheme of its work for Indesit or Atlant is the same. A piston and valve system compresses the freon, sending the heated refrigerant to the condenser. There it turns into a liquid state and enters the capillary expander. The compressor compresses the freon, then cools the gas in the condenser, allowing it to circulate throughout the refrigeration system. The process has a continuous cyclical nature. The compressor is turned off, turning on from time to time to perform the function of compressing the refrigerant.
Internal combustion engine structure
Which refrigerator do you have - the Belarusian Atlant or the Indesit assembled under the Italian patent? They all have the same motor and similar internal circuit design. In Atlanta and Indesit, piston-type compressors are used. The piston compressor is equipped with an electric motor with a vertical shaft. The structure is insulated with a sealed casing. When the engine is turned on, it starts the crankshaft, which rotates and moves the piston. The piston pumps the refrigerant out of the evaporator and pumps it into the condenser.
Piston compressor
Types of compressors, their pros and cons
Their division into two types (linear and inverter) is conditional. In fact, these are units of similar design, operating according to the same principle described above. The classification is based only on the rotational speed of the engine shaft and the possibility of temporarily stopping it.
Linear
The models of these compressors are not so noisy
They work cyclically, that is, they turn on and off periodically. The launch is carried out only if the sensor, having compared the temperature in the refrigeration chambers with the set one, determines that it is increased. Since the unit quickly picks up speed, cooling occurs in the shortest possible time. As soon as the temperature equalizes, the system turns off for a while.
The advantage of this type of compressor is the fastest possible temperature reduction.
The disadvantage of a linear unit is increased noise, overvoltage in the network due to constant switching on and off, as well as significant energy consumption. In the latest models, these shortcomings are leveled out. Refrigerators that have less powerful compressors start up gradually, over several hours, but are less “gluttonous” and consume less electricity. Models equipped with “quiet start” systems are not as noisy.
Inverter
The compressor operates smoothly and measuredly
The compressor operates continuously, smoothly and steadily. That is, there is no on/off switching. If necessary, it simply reduces the speed.
Significant advantages of inverter units are noiselessness and minimal electricity consumption. The temperature in refrigerators equipped with such systems is always stable. However, such devices are too sensitive to voltage changes. And their cost is much higher than the price of devices with linear compressors.
Where to start replacing a refrigerator compressor with your own hands
You can repair refrigerators and replace the compressor yourself by identifying the cause of the malfunction. If the compressor heats up after being plugged in, the thermostat relay has most likely failed. Replacing the refrigerator compressor relay can be done even by an amateur. When starting the refrigerator does the motor suddenly turn off for no reason? Replacing a refrigerator compressor motor is best left to the professionals.
Refrigerator compressor repair
But you can try to replace the entire compressor.
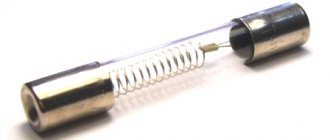
What you will need
Check out the video and photos of the step-by-step process of replacing a refrigerator compressor with your own hands.
Then prepare the necessary tools:
- oxygen-propane burner;
- two valves: for piercing and removing refrigerant;
- leak detector;
- electronic thermometer;
- small pipe cutter;
- filter drier:
- copper tube 6 mm;
- solder;
- flux;
- pinch pliers;
- Hansen coupling;
- charging cylinder;
- storage container for freon;
- new compressor.
Follow safety precautions. Do not start work while the device is turned on. Repair equipment must be grounded. The work is carried out with gas - the room must be well ventilated. Clear the refrigerator so you can lift and turn it easily.
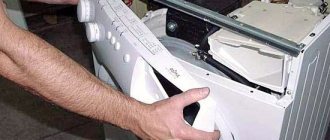
Disassembling the refrigerator
We repair it ourselves
Where to start repairing a refrigerator compressor with your own hands if your Minsk, Atlant, Indesit or Samsung has stopped performing its function?
First you need to make a correct diagnosis. Check out the photo for the diagram of your refrigerator. A photo of your Minsk or Atlanta will tell you what the thermostat looks like, in what position its indicator is: minimum, maximum (mark 7) or “•” is turned off. It is quite possible that the fault lies in the temperature regulator relay. Replacing the relay is the simplest operation.
Diagnosis of failure
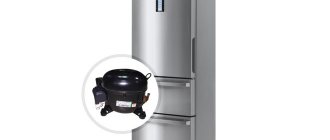
Each refrigerator, regardless of the model, be it Indesit, Minsk, Atlant or Samsung, has a freezer consisting of three important blocks: an evaporator, a condenser and a compressor. The failure of one of them can lead to a stop in the operation of the entire unit as a whole. The compressor consists of a relay and a motor.
It pumps out the refrigerant and supplies it under pressure to the condenser. This mechanism has a continuous cycle, but the compressor itself turns on periodically, triggered by a sensor signal, due to an increase in the temperature of the refrigeration chamber. The relay starts the motor, which in turn gives a signal to the compressor.
Disassembled compressor
Work process
When replacing the compressor of an Atlant refrigerator or any other refrigeration device, it is necessary to slightly extend the compressor. Lifting it, break off the freon filling tube, after cutting it with a file.
Compressor
Then you need to release the gas. Turn on the refrigerator for no more than 5 minutes. The refrigerant will move to the condenser. Attach the piercing valve with the hose from the cylinder connected to it, unscrew it for 30 seconds. The gas will collect in the container.
Solder a copper one in place of the broken tube. A gas burner is used here; in the absence of a burner, a soldering iron will do. A cut of several centimeters is made on the capillary expander to break off the tube and unsolder the filter from the condenser. The compressor is connected to the refrigeration unit by two tubes (one to build up pressure, the other to remove excess gas).
It needs to be unsoldered from these tubes or cut off with a pipe cutter. The filter drier is cut off at a distance of 15 mm from the condenser. Remove the start-up relay. Dismantle the compressor and remove it from the refrigerator. Before starting soldering on a new compressor, clean the pipeline.
When installing a new compressor, all steps are repeated in reverse order:
- place the compressor in the refrigeration cabinet, securing it to the traverse;
- the plugs on the pipes must be removed;
- it is important to depressurize the unit 5 minutes before starting soldering;
- when removing the plugs, check whether there is excess air pressure in the compressor (this will be indicated by the noise of the escaping air;
- gradually connect the discharge, suction and filling tubes to the compressor pipes, the filling tube should have a diameter of 6 mm and a length of 60 mm;
- start soldering the seams on the tubes, adhering to the following sequence: filling, suction, discharge, make sure that the burner flame is not directed into the compressor nozzle;
- Having removed the plugs from the filter drier, attach it to the condenser, connect the capillary tube to it;
- solder the filter along the seams;
- and put the filling tube on the valve coupling half;
- check the quality of soldering of all seams, they should be smooth, without unsoldered spaces;
- Refill with freon by connecting a vacuum filling station to the coupling and removing moisture from the system;
- attach the start-protection relay to the compressor by connecting the electrical wires;
- turn on the refrigerator, fill the system with freon, leave for 5 minutes;
- Use a leak detector to check whether the tightness of the seams is broken;
- perform a secondary evacuation of the refrigerator, leave it to work for 20 minutes;
- pinch the filling tube, remove the coupling, and solder the tube.
Diagnostics
The diagnostic process includes the following stages:
Which manufacturer’s equipment do you use at home?
- Bosch 16%, 1446 votes
1446 votes 16%1446 votes – 16% of all votes
- Samsung 15%, 1351 votes
1351 votes 15%
1351 votes – 15% of all votes
- LG 13%, 1205 votes
1205 votes 13%
1205 votes – 13% of all votes
- Indesit 6%, 578 votes
578 votes 6%
578 votes – 6% of all votes
- Atlant 6%, 550 votes
550 votes 6%
550 votes – 6% of all votes
- Electrolux 6%, 525 votes
525 votes 6%
525 votes – 6% of all votes
- Beko 3%, 315 votes
315 votes 3%
315 votes – 3% of all votes
- Philips 3%, 313 votes
313 votes 3%
313 votes – 3% of all votes
- Ariston 3%, 310 votes
310 votes 3%
310 votes – 3% of all votes
- Xiaomi 3%, 243 votes
243 votes 3%
243 votes – 3% of all votes
- Haier 2%, 228 votes
228 votes 2%
228 votes – 2% of all votes
- Redmond 2%, 189 votes
189 votes 2%
189 votes – 2% of all votes
- Gorenje 2%, 146 votes
146 votes 2%
146 votes – 2% of all votes
- Siemens 2%, 146 votes
146 votes 2%
146 votes – 2% of all votes
- Karcher 2%, 144 votes
144 votes 2%
144 votes – 2% of all votes
- Midea 2%, 140 votes
140 votes 2%
140 votes – 2% of all votes
- Liebherr 1%, 136 votes
136 votes 1%
136 votes – 1% of all votes
- Hansa 1%, 135 votes
135 votes 1%
135 votes – 1% of all votes
- Candy 1%, 132 votes
132 votes 1%
132 votes – 1% of all votes
- Whirlpool 1%, 128 votes
128 votes 1%
128 votes – 1% of all votes
- Zanussi 1%, 120 votes
120 votes 1%
120 votes – 1% of all votes
- Vitek 1%, 101 votes
101 votes 1%
101 votes – 1% of all votes
- AEG 1%, 83 votes
83 votes 1%
83 votes – 1% of all votes
- Dyson 1%, 68 votes
68 votes 1%
68 votes – 1% of all votes
- Thomas 1%, 57 votes
57 votes 1%
57 votes – 1% of all votes
- Scarlett 1%, 56 votes
56 votes 1%
56 votes – 1% of all votes
- Nord 1%, 55 votes
55 votes 1%
55 votes – 1% of all votes
- Miele 1%, 48 votes
48 votes 1%
48 votes – 1% of all votes
- iRobot 1%, 47 votes
47 votes 1%
47 votes – 1% of all votes
- Zelmer 0%, 45 votes
45 votes
45 votes – 0% of all votes
- BBK 0%, 42 votes
42 votes
42 votes – 0% of all votes
- DeLonghi 0%, 39 votes
39 votes
39 votes – 0% of all votes
- Kuppersberg 0%, 35 votes
35 votes
35 votes – 0% of all votes
- Smeg 0%, 17 votes
17 votes
17 votes – 0% of all votes
- iLife 0%, 10 votes
10 votes
10 votes – 0% of all votes
Total votes: 9183
Votes: 5378
22.01.2020
×
You or from your IP have already voted.
- Study of external signs. It is necessary to measure the temperature in the chambers. When the compressor is completely turned off, the freezer defrosts.
- Compressor inspection. Getting to this node is not easy. It is located in a protective casing filled with oil. Most units have the same structure. The main elements are the start relay and the motor. Most often the engine fails. A visual sign of a breakdown is a winding break. You can check the relay terminals by removing the part from the seat.
- Cable inspection. The engine often stops working due to a violation of the integrity of the supply wire. Replacing this element is the simplest repair option.
- Checking resistance. A place is found on the body that is devoid of the enamel layer. You can scrape off the paint yourself using a sharp tool. The multimeter is applied to the contact and body. The device screen should remain blank. Otherwise, you cannot replace the compressor with your own hands; there is a risk of electric shock.
- Checking the current. To do this, you will need a working relay; before starting the experiment, make sure it is working. The current is checked with a multimeter, the contact of which is a clamp. A 140 W motor produces a current of 1.3 A. At other power values, the ratio of parameters remains the same.