If you want to print an article you are interested in from the Internet, it is not at all necessary to scour the web page in search of a printable version, much less copy it into Word (but we will still consider this option, since many users are accustomed to using this program for working with text). Both of these methods are routine and irrational. It should be noted that if you copy text from an Internet page and paste it into any text editor, you will then need to edit the pictures and text (pictures may crawl onto the edges of the page in Word and the text may not display correctly), but this is not Very good. After all, there are other simpler ways to print a page from the Internet on a printer.
Note: At the end of the page there will be a conclusion that will help you choose the desired printing method.
In this publication we will discuss the most popular browsers that will help solve this issue:
- Google Chrome
- Mozilla Firefox
- Opera
- Internet Explorer
- Yandex browser
- Microsoft Edge
How to select the text to print
First of all, you must select the text you want to print on your printer. But on this page, in addition to the article itself, there may be other extraneous materials that you may not need: links to similar pages, comments, site table of contents, advertising, etc. You can leave, for example, comments as additional information, or you can remove it - it's up to you.
To select text to be printed on the printer, you need to select the text with the left mouse button. Left-click at the beginning of the text and, without releasing it, move the mouse to the last word in this document. This way, the text you want to print should be highlighted.
Note: you don't have to select the text, but make the settings in your browser. We'll talk about them further.
Without removing the selection, simultaneously press two keys on the keyboard “Ctrl” + “P” - the key combination is suitable for all browsers. After this, a window will open where you need to select the necessary parameters and click on the “Print” button. Now let's talk about what you need to click in the browser at this stage. Below you can find your browser to start the printing procedure.
Own book
Speaking about double-sided printing, it turns out that it is quite possible to print your own book without resorting to the services of printing workshops. Moreover, this can be done both through the printer settings and in the Word document itself.
The only warning is that it is not recommended to make such a brochure more than 80 pages, otherwise it will be inconvenient to staple it together.
Printing in the form of a book through the settings on a laser printer occurs as follows.
- After selecting the commands “File” - “Print”, you should go to the printer settings. All modern devices have a function that helps you print multiple pages per sheet. Here you will need to select sequentially “Mode” - “Left to Right”. So the device will print pages 1 and 2 sequentially on one sheet.
- To correctly set the printing of the entire book, it is important that the total number of pages of the reproduced document is a multiple of four. Otherwise, you will need to determine which spreads can be left empty or where breaks can be made.
- We determine and enter the sequence of pages for both pages of the sheet - we do this separated by commas. After this you can send it to print.
- We lift the pages that have come out of the device and, without changing their position, put them back into the tray on the printer. Sheets must not be turned over! After this, all that remains is to print the second range of pages, that is, repeat all the same steps described earlier.
- Regarding the set range of pages, you should do this: on one side there will be numbers: 1.4, and on the second - 2.3. This is repeated with all pages of the document.
You can configure the file to be printed as a book directly in the print settings from your computer. However, in this case there is a danger of skewing fonts and other settings. For those who are determined to try, this algorithm is proposed.
- Through “File” - “Print”, select 2 in the “Number of pages per sheet” parameter.
- Set numbers 1 and 4.
- Print the page on the printer, turn it over and repeat this entire procedure again for numbers 2 and 3.
For versions of MS Office 2007 and newer, you need to act in a slightly different sequence: “Page Layout” - “Options” - “Margins” - “Multiple Pages” - “Brochure”.
You can also assemble the text into a “book” in Word itself. For design you will need so many editor tools.
- The first step is to determine the correct page orientation. This can be done in the “Page Layout” tab. Now in “Page Setup” in the orientation, select “Portrait” (with the height of the sheet greater than its width).
- Next is “Setting up fields”. Without leaving the “Page Setup”, you need to click the “Margins” button, then “Mirror Margins”. This will help make sure that in odd-numbered documents the left margin is wider, and in even-numbered documents the opposite is true.
- Through “Margins” - “Custom margins” you can leave space for binding. In the dialog box that opens, select “Margins” - “Binding” and enter the required value. Don't forget to save.
- To select your own book format, you need to go through “Page Options” - “Size”. Select the required value from the drop-down list.
- For your own style, select “Home” - “Style”. In the appropriate tabs you can experiment with font and paragraph.
- Before sending text for printing, you should familiarize yourself with the text printing parameters in the dialog box of the printer itself. Pages can be displayed either automatically or after manual user configuration.
Google Chrome
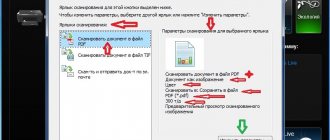
After pressing the keys, the print menu will appear. In the window you will see a preview area (located on the right), with which you can understand what is about to be printed. On the left there are very useful settings that will help remove unnecessary information from the document, and also at the top left you can see the number of how many sheets it will take to print this text.
Here you can specify: how many copies you want to make, select a layout and mark which printing option you want to make - color or black and white. When you set up printing, be sure to check the “Simplify Page” checkbox. This way, you will remove unnecessary elements from the future document and reduce the number of pages. Here's an example:
The number of pages became 10, but was 12. Also, elements that do not relate to the text were removed from the document. As you can see from practice, this function is useful, and we recommend using it. Now all you have to do is click “Print” to print these pages.
If you need a document in good quality, we recommend clicking “Advanced settings” and in the quality section specify “600 dpi”.
Selecting print quality:
Preparing a photograph for printing: basic parameters
You can pre-prepare an image for transfer to the printer using either special software from the device manufacturer or standard free image editing programs - XnView, Picasa, etc. First, the image itself is adjusted: changing brightness, contrast, adding effects. The second stage is to set the format of the final version: height, width, paper size and orientation, number of copies.
On our website there are separate instructions for printing photos 3 by 4 and 10*15. And if you want to make a printout of a finished photograph, then you first need to scan the photo on a scanner and work with it as with a regular image.
Internet Explorer
This browser has the same functionality as Mozilla Firefox. When you press “Ctrl” + “P”, you need to specify the page range and then click “Print”. If you made a selection of text, then click on “Selection”. If you want to print the entire web page, then click on “All” and after that you can print this page.
Please note that Internet Explorer may have a quick print button (see image below). You should absolutely not use it, because it immediately starts printing the entire page, bypassing the settings window and ignoring the selection. Internet Explorer also has a feature that prints text along with advertisements, even if they were not highlighted. We do not recommend using this browser to print web pages.
Opera
This browser is visually similar to Google Chrome. Therefore, we will not analyze it in detail, since we have already done this above. If you are going to print pages from this browser, we recommend that you go above, where we talked about how to print in the Google Chrome browser. We have made a complete review of this procedure for this browser and the information that is there will be very useful for you.
By pressing the “Ctrl” + “P” keys, a window for printing settings will appear. Here you need to check the “Simplified page” box (to remove unnecessary elements before printing) and select the quality “600 600”. After this, you can safely click on “Print”.
Rules for printing photos from a computer
There are some rules that will allow you to print high-quality images via a computer:
- Make sure the device is connected correctly. It is best to use the instructions to check. After turning on, check that the printer is ready for use.
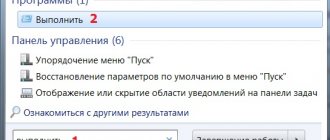
- Clear the queue. To do this, go to “Start”, “Control Panel”. There we look for the “Devices and Printers” sections. After opening it, categories will appear, select “Printers”. We display a list of printers connected to the computer. This also applies to virtual models (some applications create them to increase the functionality of the device). We find our printer. Left-click and the “View Print Queue” button should appear at the top. It will allow you to open all documents that are in the queue. If the list is empty, you do not need to do anything, but if there are documents left in it, they should be deleted.
Yandex browser
The printing procedure is very similar to the Google Chrome and Opera browsers (read more about the settings above, where we talked about these browsers). When you go to the desired page and press “Ctrl” + “P”, you will see the following window:
Be sure to check the “Simplify layout” checkbox, specify the parameters you need and click “Print”.
Microsoft Edge
In this browser, the printing procedure is the same as in other browsers. You need to indicate your printer on the left - if you have several of them, select the print orientation, how many copies to print, and we also recommend turning off the header and footer (as in the screenshot below).
When all the parameters are set according to your conditions, click “Print”.
Microsoft Word
Many users are already accustomed to the Microsoft Word program, and it seems to them that all procedures related to text should be done in it. Therefore, we decided to tell you how to do it correctly in this application. Below are the basic guidelines that you should use to make the text readable and correct for printing on paper:
- To paste text into Word, you first need to copy it, and our first recommendation is to copy the text in parts. If you select all the text at once, you will thus highlight the advertising that is on the site, as well as unnecessary elements of the site (for example, a menu).
- To save a picture, right-click on it and select: “Save Image” (in Opera) or “Save Image As...” (in Google Chrome) or “Save Image As...” (Internet Explorer). When the window opens, specify the path where you want to save the image. After this, you can insert the image into your prepared text (see the first point).
- When the document is completely ready, you can print it.
Recommendations
To get high-quality images, we suggest you learn a few useful tips:
- The choice between glossy and matte paper depends on whether you plan to frame your photo or not. If yes, then we recommend a matte finish.
- When the image seems insufficiently bright, contrasty, or with defects, this must be corrected.
- The brightness and saturation of a photo in electronic form and on paper may often not match. It is better to make a test copy of the print to understand the “character” of the image.
- After processing the file, save it not as jpeg, but as tiff. This format will give better quality when printed.
- The picture resolution should be good - preferably from 600 dpi.
- To print directly from your smartphone, use the Dropbox or similar app.
- MFPs with the Cloud Print Ready label can print images from cloud services from any device.
- You shouldn’t immediately put the finished photo under a frame or in an album. Allow at least half an hour for the paint to dry completely.
Service PrintWhatYouLike.com
There is a service on the Internet that will help you print any Internet page. Here it is https://www.printwhatyoulike.com/. Go to this site and enter the page address in the empty field. Next, check the box “I’m not a robot” and click “Start”.
At the top left you will see a window in which you can set printing settings:
To start printing, click "Print".
How to print without advertising
To print a page without advertising in browsers you need to install AdBlock or AdBlock Plus. This extension allows you to remove advertising from your browser not only while printing, but in the future you will no longer see advertising.
This plugin can be installed with one click in any modern browser, after which it will work in the background and block all advertising on sites (the plugin can be disabled for some sites). Thanks to this plugin, you can clean up an article for printing directly in your browser. But, it is better to use Google Chrome or Opera. And you won't need to install additional applications in your browser.
Programs for printing posters on A4
Placard
- Download the software, install and launch.
- Open the desired image.
- In the “New Size” panel, set the required size of the future poster.
- Print fragments or save them on your hard drive for later printing.
Easy Poster Printer
Select a picture using the “Poster Image” function. Settings are made using the following options:
- Dimensions – allows you to change the dimensions of the poster;
- Paper scaling – increases (Scale Up) or decreases (Scale Down) the divided image to save paper;
- Paper orientation – changes the page orientation;
- Quality – adjusts the quality of picture playback;
- Cut-lines – responsible for the width of the marking line.
To start printing, click on Print Poster.
Posteriza
You can install it on your computer for free or use the portable version without installation.
- Launch the program.
- In the language menu, click on “Russian (RU)”.
- Click on “Open Photo” and find the picture.
- To remove an unnecessary text block, open the “Texts” tab, delete the excess and click on “Apply”.
- In the “Size” tab, change the dimensions of the poster, indicate the required number of fragments.
- Print the picture.
Let's take stock
To print a web page, we recommend using Google Chrome, Opera or any other browser based on the Chromium engine. In these browsers, printing the page you are interested in is much more convenient and practical. After opening the print menu by pressing the key combination “Ctrl” + “P”, we will see a document preview window, in which the volume of text and its location on the sheet of paper will be clearly visible. If you use these browsers, then you get a huge advantage, since in them you can remove all unnecessary elements of the site and leave only the text.