A clogged Epson inkjet printer can lead to either minor loss of image quality or complete inability to print further. A blockage usually means that the ink has dried out in a certain area of the ink path, causing the printer to streak for a while and then begin to produce clean white sheets. Such situations result from device downtime. The longer they are, the more difficult it will be to fix the problem.
Localization of printer blockage
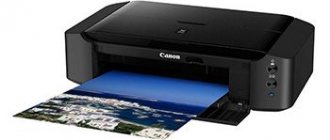
Epson printing devices can be divided into several main types:
- Household printer with replaceable cartridges. In such devices, ink cartridges are installed in the print head and drying out (contamination) can only occur in the latter.
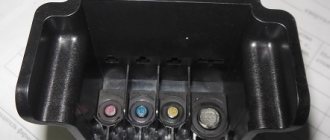
- Household or office printer with built-in CISS. In such devices, the cartridges in the print head are replaced by dampers, and the ink goes to the PG through loops from donor containers. Added to the list of possible problems is ink drying out in the cable or air getting into the cable.
- Professional office printer or plotter. Most Epson business devices use a system similar to CISS: dampers enter the print head, which are connected through cables to cartridges that act as donor containers. The problems that arise on such devices are similar to those mentioned in the previous paragraph, adjusted for the size of the device.
Air getting into the loop is corrected according to approximately the same principle, regardless of the type of device:
- Removing air from the Epson CISS ink plume
Systemic cleaning of nozzles
By system means of cleaning the printing system we mean running ink through the print head. Typically, a printer’s functionality includes several levels of device cleaning, which differ in the volume of ink passed through the PG. For minor ink stagnation, several such cleanings should be sufficient.
To start system cleaning:
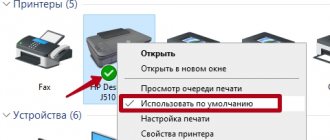
- Go to the operating system settings and select “Devices”.
- In the “Printers and Scanners” tab, select the desired model and click on “Manage”.
- Select "Print Settings" and go to the "Maintenance" tab.
- Run “Nozzle Check” and evaluate the result. If the test result is bad, run Printhead Cleaning.
- Repeat “Checking” and “Cleaning” 2-3 more times. If there is no improvement in the test print, move on to deeper cleaning tools.
System cleaning with service fluid
This method is not suitable for original and disposable compatible cartridges. The flushing service fluid is poured into the PZK or CISS (factory or compatible, it doesn’t matter) instead of ink. This approach is only slightly better for clearing blockages than conventional system cleaning (more often this method is used to flush the system when switching the printer to a different brand of ink). Its main advantage can be considered the low cost of service fluid compared to ink.
- Pour service fluid into the slam-shut valve or CISS (do not pour too much). Drop some ink into the liquid so that the result can be seen on the nozzle test. Liquid can only be refilled into a cartridge of a problematic color.
- Run a print head cleaning, print a few images with a large fill, then let the printer sit for 10-15 minutes.
- Do a nozzle test. If the printer prints the template as expected, proceed to the next step. Otherwise, repeat cleaning the PG after 30-60 minutes and return to this point again. But if after 3-5 cleanings there is no improvement, move on to more complex cleaning methods.
- Pour the cleaning liquid out of the cartridge, and immediately, without allowing it to dry out, refill with ink. If you want to wash the cartridges (this is not necessary, the cleaning liquid from the walls will simply dilute the ink a little), then you can rinse with distilled water, then blow everything with air and dry. Do not leave the printer without cartridges for more than 15 minutes - the fittings in the device carriage (and therefore the print head) dry in the air.
Cleaning the print head nozzles and restoring the print heads
Let's start with the theory of inkjet printing. Epson applied the principle of squeezing out a drop of ink; The property of a piezoelectric element to change its shape when voltage is applied to it is used as a piston. The advantage of this type of printing is the ability to place nozzles very close to each other and obtain high print resolution. Disadvantages - very high requirements for the ink used (in terms of fluidity, dye dispersion, drying time); as a result, the cost of this ink is quite high. Therefore, users try to use ink from other manufacturers. To reduce ink costs, Epson's competitors are making the technology cheaper; Perhaps the parameters cannot be reproduced (“know-how”, however!). And the result is obvious, or rather, in the head (the printer): the nozzles become clogged, the ink itself dries out.
Now let's move on to an overview of the tips and tricks picked up on StartCopy.
The first tip is to use an ultrasonic bath to rinse your hair. I haven’t used it myself, but here are the conclusions I drew from the tips on use: first, you need to find or buy a bath somewhere, then experiment with the printer head (immersion depth, soaking time, liquid composition), and if you have one printer (say, a home printer) ), then any unsuccessful experiment leads to permanent failure of the head (and printer). Is it worth the bother?!
Tip two is pressure rinsing your hair. The technique is this: fill a syringe with liquid to clear the head and, gently pressing on the piston, try to break through the nozzles. If the nozzles are not very dry, then this method will help; and if not, the piezoelements will burst, and - goodbye, head!
Method three, personally tested. based on the use of the technique recommended by the manufacturer itself: the use of a pump, which is available on all Epson printers. To begin with, let’s stock up on a sufficient amount of liquid for washing the heads (0.5-1 l), since the larger the packaging, the cheaper the unit volume of liquid is. Then we partially disassemble the printer so that we can get to the parking unit. We force the head to move to the side and drip liquid onto the foam rubber in the parking area, return everything to its place and leave it to soak for several hours. It is better to return the head when the printer is turned off, so that the pump does not pump out the flushing liquid - it is too early.
Then turn on the printer and let it carry out a cleaning cycle. Printing a check sheet. If the result is unsatisfactory, prepare several syringes (preferably smaller in volume - 2 ml) and saw off the upper part of one syringe. We fill the syringe with foam rubber, remove the cartridge and put this syringe on the ink intake instead of the cartridge. We pour liquid into the syringe and give the printer several commands to pump; you can even print it; then we return the cartridges to their place. Sometimes I pour liquid into the cartridge itself (2-3 ml, closer to the intake) - the ink in the cartridge also dries out. Then I give the command to pump with this ink - and that’s it, in 90% of cases this technology helps.
If the measures described still do not help, then we remove the head and try to rinse it with a syringe, but the main emphasis is not on squeezing out the dried ink (what the pump did), but on sucking the ink from the head. If the result appears - say, 70% of the nozzles print - we buy original ink: they should finally clean up what we were unable to do. And only then install compatible ink - and save, save, save (until the problems appear again). Unfortunately, original ink is not a panacea for all ills: they dry in the nozzles just as well as compatible ones - for example, you went on vacation, and hello to your head; the problem is guaranteed for you.
And now about the sad thing: the developers at Epson are not asleep, they have launched polymer ink, which does not seem to wash off or fade. But if they are dried up in your head, how do you order them to be pulled out of there?
Separately, about resetting the sump tank overflow counter (in common parlance, “diaper”). I recommend starting and finishing all work with this procedure; and if there is a need, then change the filler itself in the sump. What to use as a filler? The scope for imagination is the greatest: from the original to medical cotton wool.
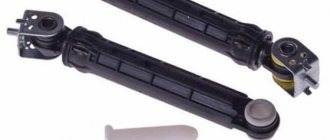
Well, if we touched on diapers, then it makes sense to talk about printer prevention in general. Prevention of the mechanics of an inkjet printer is not much different from the prevention of a matrix printer; only here, perhaps, there is more dirt - this is spilled or splattered ink, and paper dust. All together gives a “great” result: the dirt cokes in the mechanics until the printer completely fails. Regarding the selection of lubricant for the guide, I will say the following: ideally you need a lubricant for precision mechanics (watch oil); Previously, hardware stores sold oil for sewing machines - this will also work. Nowadays it’s actually possible to buy gun oil.
The felt rings or gaskets in the guides need to be replaced or washed (depending on the model).
Separately, I will say about the parking space of the head. I already talked about foam rubber in the parking lot above, but be sure to pay attention to the rubber band that is pressed against your head: it should not be dirty, so that the pressure is as tight as possible - then during long-term storage, the ink will dry out later. Pay special attention to the knife that cleans the head: there should also be no dried ink there.
And one last thing. This article is not a panacea for all problems that may arise when using Epson inkjet printers. I hope it will only allow you to objectively assess your strengths and capabilities when repairing the printer.
Addition. I observed the following: after pouring a little soaking liquid into the cartridge, I decided to try filling the entire cartridge with this liquid. After restoration and washing, I filled the cartridge (T013, original) with a special liquid and started printing - the quality and color are very good. And if you take into account that there is not so much ink in the cartridge, then as an alternative to left-hand refills and ink it will work quite well - we get original ink at half the price. Now about the nuances: you need to refuel very carefully; I tried it on low-capacity cartridges (i.e. a cartridge without sensors, chips and other bells and whistles - they have their own specifics). Checked the saturation for the text; Perhaps black will not work for a photo.
Manually cleaning the print head
The easiest way to wash the print head is to soak it. It is relevant only if the PG is easily removed.
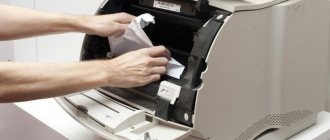
- Remove the print head from the printer.
- Pour a small amount of service fluid into a saucer.
- Immerse the PG with nozzles into the service liquid approximately 2 mm.
- Keep the PG in the liquid for 7-10 minutes (do not allow the PG to be completely immersed in the liquid or any electronic parts except the bottom platform with the nozzles to get wet).
- Wipe the PG, reinstall it and run a nozzle test.
- If the test is unsatisfactory, try 2-3 additional cleanings and, if there is no positive dynamics, move on to more complex methods.
If the print head is not removable, cleaning may require a technique using a syringe and a large number of wipes.
- Detailed instructions for cleaning an Epson printer
Epson cx4300 - head washing after a long break
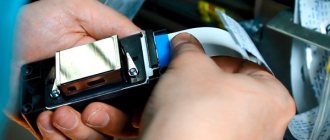
Use the usual software method to clean the device. If it turns out to be unsuccessful due to the head being heavily clogged with debris and dried ink, Epson can use the physical nozzle cleaning method. Stock up on a syringe, IV tube, flushing fluid, scissors, tissue and gloves. After cutting the IV tube to a length of 5 to 10 cm, it is placed on the syringe. Flushing liquid is drawn into the tube. You need to turn on the printer and open the lid, wait for the carriage with cartridges to move out until the replacement position.
Next, the device turns off. The print head is manually moved to the right, a napkin is applied and the head is pressed onto it. The cartridges are removed, and a tube with a syringe is inserted into their connectors one by one to supply 2-3 cubes of the flushing composition.
After the procedure is completed, the system is put back together and 2 cleanings are performed using the printer driver. If in the future you do not want to frequently repeat cleaning the device, it is advisable to print one color sheet at least once every 7 days so that the ink does not dry out and clog the printer head.
By learning how to clean your device at home, you will save yourself from going to service centers and paying for their services.
We also carry out: refilling and repair How to clean the Epson printer head?