Modern printers and multifunctional devices have a system that allows self-diagnosis of all components of the device. If any malfunction occurs in the equipment, the microprocessor sends a code signal to the user that a malfunction has been detected. Fault codes can be displayed on the device display (if it is provided for by the design), or by alternate blinking of LEDs on the device control panel. An error message with a code may also appear on the PC screen. Despite their high reliability, printers and MFPs from the manufacturer HP (Hewlett-Packard) are also subject to operational failures. The most common errors when operating HP devices, according to user reviews, are the following: printing error and errors with codes E8, E3 and 79.
Printing failure on HP printers
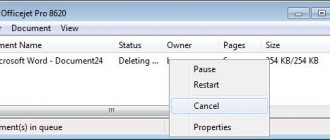
Often, when trying to print a document, the user discovers that the process is blocked for an unknown reason. However, all attempts to delete or cancel a job in the print queue fail.
This failure can appear for a number of reasons, for example, from a sudden power surge, but, in any case, you will have to fix the problem in the Print Manager program. This fact is explained by the fact that when a document is sent for printing, a special file is created in the Windows system. For a number of reasons, this file may become corrupted and cause a failure in which the printer does not print. Therefore, this file must be deleted in the following way.
- Turn off the printing device with the button and disconnect the electrical cable from the outlet.
- Save all your work so that it is not lost.
- Next, you should open “windows services” by pressing the windows + r keys simultaneously.
- A window will open with an empty line in which you need to enter “services.msc” (without quotes) and click OK.
- In the window that appears, find the line “print spooler”.
- Right-click on this line and select “Stop” in the menu that appears.
- After stopping the service, the window can be closed.
- Next, go to: C:\Windows\System32\Spool\PRINTERS. You can do this by pasting it into the address bar of Windows Explorer and then pressing Enter on your keyboard.
- In the folder that opens, you need to delete all the files that are in it.
- Turn off your computer.
- Before connecting the MFP (printer) to the electrical network, make sure that it has been turned off for at least 60 seconds.
- Turn on the MFP (printer) using the power key.
- Turn on your computer and wait for the operating system to load.
- Send the document for printing.
If the printing process went well, then the setup is considered complete. If you still cannot print the document, you can solve the problem using free software from HP. The program is called “HP Print and Scan Doctor” and is used to solve problems that arise during printing, as well as to diagnose equipment. You can download it from the official website using this link. After opening the program window, select automatic search for problems and fix them. After the program exits, try to print the document again.
In some cases, the following measures help solve this problem.
- Reinstalling the printer driver. But first you need to remove it: in “Control Panel” find “Devices and Printers” and open the window. Right-click on the HP printer icon and select “Delete”. These steps will remove the driver that was installed on the system. After removal, you must restart your PC. If for some reason you do not have drivers for a given MFP (printer) model, you can download them from the HP website by following this link.
- Disable the firewall temporarily and try printing the document.
- Log in to the system under a different account (relevant if the equipment was configured from a different account).
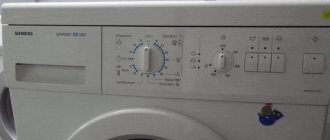
How to drain water from a washing machine manually
There are several ways to drain the water if the washing machine door is locked and will not open.
Method 1 - through the emergency drain hose
Some models of Bosch washing machines are equipped with a special hose for emergency drainage. It is located at the bottom next to the drain filter in the right or left corner of the washing machine. Pull it out, open the plug and lower the hose into a basin or bucket.
Method 2 - through the drain hose
Remove the drain hose from the washing machine body. Pull the end out of the drain, bathtub or toilet and place it in a basin or bucket so that the hose is completely below the water level in the tank. Water will leave the washing machine through the hose by gravity.
Method 3 - through the drain filter
Tilt the Bosch washing machine backwards and lean it against the wall so that you can slide a basin underneath the filter. Place a rag under the filter and place a basin. Unscrew the drain filter a little. Water will flow out of it. If all the water does not fit into the basin, screw the filter back on, drain the water from the basin and repeat all over again.
How to fix error e8
A service message with code e8 is often found on the laserjet 1132 MFP. It means that there is a problem with the scanner. The instructions for the device indicate that a malfunction with code e8 is fatal, that is, cannot be eliminated. But craftsmen have found several ways to eliminate this problem, which, in some cases, can return the scanner to work.
The most common case is when the scanner ruler has stopped in the extreme right position and does not move . In this case, error E8 appears on the MFP display.
In this case, the carriage was simply jammed. To fix this problem, you will have to remove the scanner glass and move the ruler to the center of the device or closer to the left edge. To remove the glass, you need to unscrew 6 bolts located around the perimeter.
To unscrew the screws you will need an asterisk hexagon.
Once the glass cover is removed, take the carriage, move it closer to the center and return the glass to its place. Turn on the device and wait until the ruler is positioned (it should move to the far left position). If everything happened exactly like this, then you are in luck, since the E8 code can appear for other reasons.
If, after turning on the MFP, the scanner carriage moves jerkily and stops, and code E8 appears on the display, then you will have to thoroughly check all the components of this unit. To check the scanner block, you need to remove the glass cover, as mentioned above, after which you need to take out the block itself and turn it over. On the bottom side of the block you will see 2 gears and an electric motor pressed against a plate. Next, do the following.
- First, it is recommended to unscrew the 2 screws on the plate and check the gears: are there any dirt or damage to the teeth, is there any play or not, is the axle on which the gear is held broken, etc.
- Remove dirt (if any) from the optocoupler.
- Check the connection quality of the cable.
- After checking and replacing failed parts, apply a little lubricant (you can use thermal film lubricant) on the gear bushings and on the guides along which the scanner unit moves.
The above steps usually fix the scanner problem in the hp m1132 MFP. But in some cases, this problem can be caused by pressing the gears or optocoupler too tightly. Sometimes the problem is resolved by loosening the pressure on the gears or removing the small gear altogether. After this, turn on the device (with the scanner unit removed and inverted) and observe the rotation of the gear. If it continues to move jerkily, then the problem may be hidden in the optocoupler.
If you look closely at the optocoupler, you will see that there is a notched disk between the two sensors. This disk should be located in the center of the optocoupler. Sometimes it moves to one side, which causes the E8 code to appear. Try installing the engine so that the disk is centrally located between the sensors.
If, after all the manipulations described above, the E8 code appears again, then the fault may lie in the engine itself or the control board. If you can replace the motor yourself, you will have to contact a service center regarding the control board.
What to do in case of error E01?
First of all, bring it to the service; you won’t solve this problem yourself. The service should:
- clean the head of ink and dry it;
- a cartridge that has leaked needs to be replaced or repaired;
- repair or replace the damaged cable;
- disassemble the MFP and remove the control board, re-solder the fuse, and put it back together.
The cost of such Epson XP repair work at Complace is about 3,000 rubles.
Troubleshooting E3 code
Often, users of HP MFPs observe the appearance of the E3 code on the device’s display. If you look at the instructions for the device, this code is deciphered as “The cartridge is missing or installed incorrectly.” Undoubtedly, the cartridge may be installed incorrectly, foreign objects may get under it, or it may simply be broken. But sometimes a situation arises when the device does not see the cartridge due to the fact that the lever, which has a shutter, simply does not reach the optocoupler. To get to it, you need to remove the back (metal) cover of the MFP. How to unlock the lever, after which the E3 error will be reset, is clearly shown in this video from a foreign resource (knowledge of the language is not necessary).
Filled the head contacts with ink
Error E01 is most often associated with the head cable being flooded with ink. Part of the cable burns out.
Next, the SMD fuse F1 on the control board usually burns out, which is what the printer detects.
In the photo, a burnt fuse F1 with a nominal value of 1.5A is marked in a circle.
This malfunction occurs in Epson XP series printers, for example, XP-33, 103, 203, 206, 303, 306, 313, 323, 332, 340, 342, 403, 406, 413, 430, etc. Usually, the head cable is flooded with ink due to a faulty cartridge or CISS.
Option 2 error E-01
In the SX-430, error E01 was caused by a faulty print head. The actual error code was 0x43, which means Head Hot Error. Those. the sensor detects its overheating. But with such a malfunction, the device will not work. And no amount of cleaning will help. Only head replacement.
Troubleshooting Error 79
Error 79 in HP printers usually means that there is a problem with the machine's software. To fix it, do the following:
- turn off the power to the device using the power key;
- pause for at least 30 seconds;
- turn on the unit again and wait until it initializes;
- in the case where the device was connected through a surge protector, try plugging it in directly into a power outlet this time;
- If the code message continues to appear, then sometimes clearing the print queue or reinstalling the driver helps get rid of the problem.
Error E-01 000041
Error E01 000041 occurred in the XP-342 only when attempting to pick up paper.
This error is caused by a paper feed problem. Paper feed encoder with sensor, motor, belt, tensioner, as well as the gripper assembly itself.
For example, in one case, cleaning a dirty encoder and sensor did not help. Because the problem was in the separation roller.
It's jammed.
Resetting errors on HP printers
To reset an error or so-called service message on HP printers, there are many methods that are only suitable for specific models. Since this manufacturer has a large number of models of printing equipment, you can use the tables below to reset service messages about a problem.
In cases where cartridges (LaserJet 1300, 1320, 4250/4350) containing a chip are being refilled, it must be sealed before installing them in the device. The device, of course, will display a message that the “left” cartridge is inserted, but it will work. You can also use the recommendations from the following table to reset the chips.
Almost any service codes that indicate errors for HP Photosmart series printing devices can be reset using the following method.
- Hold the left arrow and, without releasing it, press the “Setup” key, then remove your fingers from the keys. As a result of this action, the “Enter Special Key Combo” menu will appear. Press and hold the “Print Photos” and “Red Eye Removal” keys at the same time and release them. Next, press one key at a time and release: “Photo correction (Red Eye Removal)”, “Print Photos”, “Photo correction (Red Eye Removal)”.
- Click the right arrow and go to the “System Configuration” line. Click OK.
- Press the right arrow again until you reach the line “Hardware failure status: Clear. Press OK to clear" (if the device worked without failures before, then you will not find this line). Remember, you cannot start printing at this time.
- Turn off the device, then turn it on.
Thus, the error code has been reset and the device can be used as usual.
Problems with error E01 in Epson printers
If error E01 does not appear immediately when turned on, then this is not a problem. Repairs will not be very expensive.
But when the error pops up immediately, without moving the carriage, then the situation is worse. However, even if the head was flooded, recovery from error E-01 is possible. But there are also nuances.
For example, the head may fail. The cost of a new one is about 5,000 rubles, installation is 1,000 rubles. In this case, it needs to be replaced, and the control board and cable must be repaired. It's all expensive.
Where is the stop/reset button?
The service stop/reset button on the Canon MG2440, MP250 and other MFP printers is located on the front panel next to the device power button. It is indicated by a triangle in a circle and is highlighted in orange. The button provides access to the error reading menu on multifunction devices such as the MG2440 that are not equipped with a display. When you press and hold the key for 5 seconds, the lightning light will begin to flash in a certain mode. This key is often used to disable the print counter program.
Stop/reset button on the printer
For “budget” MFPs focused on printing photos (MP280, MP230 and MP250), pressing and holding the “stop/reset” button until a certain number of indicator flashes enables the following operations:
- nozzle test (1 blink);
- quick cleaning of print heads (2 blinks);
- deep cleaning of print heads (3 blinks);
- Printing the printhead auto-calibration page (4 blinks);
- forced scanning of the head auto-calibration page (5 blinks);
- Printing manual head calibration page (6 blinks);
- testing the paper feed mechanism (7 flashes);
- forced cleaning of the feed rollers (8 flashes).
Detailed description of code meanings
You should not be immediately alarmed by the display of notifications, because they are designed to help the user quickly and correctly troubleshoot equipment problems.
Printing equipment uses its internal memory for memorization, but when it becomes full, it is an error. In such situations, turning off the power for a while helps. There are models that are equipped with a built-in battery, so disconnecting the cable will not help. You must follow the individual instructions for the device.
If errors e4 or 5 occur, you should pay attention to the toner level in the cartridge.
Instructions for cleaning printer rollers. Procedure for self-repair. Other reasons for the lack of sheet picking and their solution.