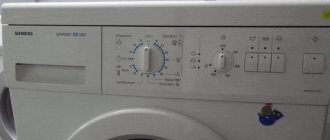
Modern printers and multifunctional devices have a system that allows self-diagnosis of all components of the device. If any malfunction occurs in the equipment, the microprocessor sends a code signal to the user that a malfunction has been detected. Fault codes can be displayed on the device display (if it is provided for by the design), or by alternate blinking of LEDs on the device control panel. An error message with a code may also appear on the PC screen. Despite their high reliability, printers and MFPs from the manufacturer HP (Hewlett-Packard) are also subject to operational failures. The most common errors when operating HP devices, according to user reviews, are the following: printing error and errors with codes E8, E3 and 79.
Printing failure on HP printers
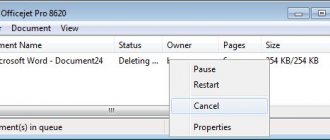
Often, when trying to print a document, the user discovers that the process is blocked for an unknown reason. However, all attempts to delete or cancel a job in the print queue fail.
This failure can appear for a number of reasons, for example, from a sudden power surge, but, in any case, you will have to fix the problem in the Print Manager program. This fact is explained by the fact that when a document is sent for printing, a special file is created in the Windows system. For a number of reasons, this file may become corrupted and cause a failure in which the printer does not print. Therefore, this file must be deleted in the following way.
- Turn off the printing device with the button and disconnect the electrical cable from the outlet.
- Save all your work so that it is not lost.
- Next, you should open “windows services” by pressing the windows + r keys simultaneously.
- A window will open with an empty line in which you need to enter “services.msc” (without quotes) and click OK.
- In the window that appears, find the line “print spooler”.
- Right-click on this line and select “Stop” in the menu that appears.
- After stopping the service, the window can be closed.
- Next, go to: C:WindowsSystem32SpoolPRINTERS. You can do this by pasting it into the address bar of Windows Explorer and then pressing Enter on your keyboard.
- In the folder that opens, you need to delete all the files that are in it.
- Turn off your computer.
- Before connecting the MFP (printer) to the electrical network, make sure that it has been turned off for at least 60 seconds.
- Turn on the MFP (printer) using the power key.
- Turn on your computer and wait for the operating system to load.
- Send the document for printing.
If the printing process went well, then the setup is considered complete. If you still cannot print the document, you can solve the problem using free software from HP. The program is called “HP Print and Scan Doctor” and is used to solve problems that arise during printing, as well as to diagnose equipment. You can download it from the official website using this link. After opening the program window, select automatic search for problems and fix them. After the program exits, try to print the document again.
In some cases, the following measures help solve this problem.
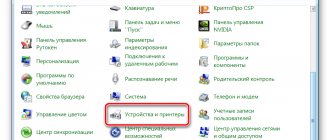
- Reinstalling the printer driver. But first you need to remove it: in “Control Panel” find “Devices and Printers” and open the window. Right-click on the HP printer icon and select “Delete”. These steps will remove the driver that was installed on the system. After removal, you must restart your PC. If for some reason you do not have drivers for a given MFP (printer) model, you can download them from the HP website by following this link.
- Disable the firewall temporarily and try printing the document.
- Log in to the system under a different account (relevant if the equipment was configured from a different account).
We eliminate hp printer error codes: e8, e3, 79, as well as printing errors
Basic error codes, malfunctions of hp printers and troubleshooting solutions.
13.xx where ( X ) is: 1. Check the paper path, remove jammed paper or objects that cause paper jams. 2. Check the paper registration flags along the entire path of its movement. 3. Check and, if necessary, replace the paper feed rollers 5. Paper jam in the fuser 1. Check the paper path, remove the jammed paper or objects that cause the paper jam. 2. Check the paper registration flags along the entire path of its movement. 3. Check the thermoblock and replace it if necessary.
13.6.xx Paper jam at the exit of the fuser
1. Check the paper path, remove jammed paper or objects that cause paper jams. 2. Check the paper registration flags along the entire path of its movement. 3. Check the fuser cover and the paper output path. 4. Check the thermoblock and replace it if necessary.
13.9.xx Paper jam on the left side of the printer
1. Check the paper path, remove jammed paper or objects that cause paper jams. 2. Check the paper registration flags along the entire path of its movement. 3. Check and, if necessary, replace the paper feed rollers. 4. Check the fuser cover and the paper output path. 5. Check the thermoblock and replace it if necessary.
13.20.xx General paper jam error It is required to carry out a detailed inspection of the entire paper supply system, registration, motion path, contacts of solenoids and drives of the paper path, motion conveyors to the fuser, fuser and print output system. In rare cases, such a code is a harbinger of a malfunction of the registration sensors and sheet movement sensors, as well as a malfunction of the DC-Controller. 13.A General paper jam error Another type of error 13.20.xx
20 ERROR Memory error. Clear the print queue. Please try again. If the problem occurs again, you should add RAM memory (DIMM) to the printer.
21 ERROR Memory error. Clear the print queue. Please try again. If the malfunction reoccurs, set the PAGE PROTECT menu from the “ON” position to the “AUTO” position. If the problem persists, you should add RAM (DIMM) to the printer. 22 EIO EIO protocol error The current (used) MIO protocol may be busy (used by another device). Change your network settings. 22 PARALLEL I/O Parallel port error Usually occurs when using drivers that are not compatible with this printer (the driver does not use IEEE-1284), a malfunction of the Cenronix-Bitronix cable, and I/O errors. Reinstall the driver, replace the cable. 22 SERIAL I/O Data cannot be sent to the printer port. Check the settings in the printer's I/O Menu. Compare them with the computer port settings. Using the printer's I/O Menu, match the computer port settings with the printer settings (in the printer).
40 BAD SERIAL TRANSSMISION Printer network card error
1. Check the settings in the printer's I/O Menu. Compare them with the computer port settings. 2. Using the printer’s I/O Menu, match the computer port settings with the printer settings (in the printer). 3. Click “continue printing” 4. If the problem persists, replace the network card.
40 EIO x BAD TRANSSMISION Printer network card error
1. Turn off and then on the printer. 2. If the problem persists, replace the network card.
41.x Cumulative laser scanner error (except 41.3)
1. Check the contacts of the laser scanner. 2. Check the polygon motor of the laser scanner. 3. Check the laser diode. 4. Replace the laser scanner
41.3 Paper size error
1. Set the correct paper size from the printer menu or from the host computer driver. 2. Check the paper tray settings. 3. Check the serviceability of the paper size control board (often in 4xxx series models).
49.x (Error 49.x formatter malfunction) - replace the format board
50.x Fuser error, where x is:
1. Thermoblock temperature is too low 2. Thermoblock thermistor error 3. Thermoblock temperature is too high 4. Thermoblock is not defined 5. Thermoblock circuit is not complete
1. Check the fuser connectors. 2. Replace the fuser.
51.x Laser scanner error where x is:
1. laser diode beam detection error 2. laser unit error
1. Check the laser scanner connectors 2. Check the laser diode for serviceability 3. Replace the laser scanner
52.x Laser scanner error where x is:
1. laser unit error 2. laser scanner polygon motor does not reach the required speed. 3. Polygon motor does not start
1. Check the connectors of the laser scanner 2. Check the serviceability of the laser scanner motor 3. Replace the laser scanner
53.хх.хх Error in the standard/additionally installed printer memory
1. Turn on the printer. 2. Swap DIMMs 3. Replace the faulty DIMM
55.x Power Error Summary system failure. Turn off/on the printer. Check the 220V network.
56.x I/O Error The driver currently in use was unable to automatically configure the printer.
57.x FAN FAILURE Printer fan error, where x is: 2-formator fan (FAN3) 3-laser scanner fan (FAN2) 5-main fan, low resistance or no resistance detected 6-top top fan (FAN4) 9 -fan of tray No. 1 1. Check the fan cables according to the table of “X” values. 2. Replace the failed fan.
58.x Tray lifting error, where x is the tray number.
1. Check the tray lifting mechanism. 2. Repair the mechanism (if necessary)
59.x Main motor error, where x is:
0. motor not found 1. motor found, but does not start 2. Motor found, starts, but rotation speed differs from nominal
1. Turn the printer on - off 2. Check the motor cables 3. Replace the motor cables 4. Replace the main motor.
62.x DIMM module error. Where x is:
0. No DIMMs found 1. Bad DIMM in slot #1 2. Bad DIMM in slot #2 3. Bad DIMM in slot #3
Replace the faulty DIMM
64 Formatter processor error Replace formatter 68 NVRAM ERROR/ NVRAM FULL Printer temporary memory error
1. Turn off the printer. 2. Remove the network card. 3. While holding the “CANCEL JOB” button, turn on the printer. Wait for the test to finish. 4. If the problem persists, replace the formatter.
69.x Duplex error, where x is:
0. duplex mechanism is faulty or not working properly 1. other duplex systems are not responding or not working correctly
1. Turn the printer on and off. 2. Perform duplex maintenance 3. Replace duplex
How to fix error e8
A service message with code e8 is often found on the laserjet 1132 MFP. It means that there is a problem with the scanner. The instructions for the device indicate that a malfunction with code e8 is fatal, that is, cannot be eliminated. But craftsmen have found several ways to eliminate this problem, which, in some cases, can return the scanner to work.
The most common case is when the scanner ruler has stopped in the extreme right position and does not move . In this case, error E8 appears on the MFP display.
In this case, the carriage was simply jammed. To fix this problem, you will have to remove the scanner glass and move the ruler to the center of the device or closer to the left edge. To remove the glass, you need to unscrew 6 bolts located around the perimeter.
To unscrew the screws you will need an asterisk hexagon.
Once the glass cover is removed, take the carriage, move it closer to the center and return the glass to its place. Turn on the device and wait until the ruler is positioned (it should move to the far left position). If everything happened exactly like this, then you are in luck, since the E8 code can appear for other reasons.
If, after turning on the MFP, the scanner carriage moves jerkily and stops, and code E8 appears on the display, then you will have to thoroughly check all the components of this unit. To check the scanner block, you need to remove the glass cover, as mentioned above, after which you need to take out the block itself and turn it over. On the bottom side of the block you will see 2 gears and an electric motor pressed against a plate. Next, do the following.
- First, it is recommended to unscrew the 2 screws on the plate and check the gears: are there any dirt or damage to the teeth, is there any play or not, is the axle on which the gear is held broken, etc.
- Remove dirt (if any) from the optocoupler.
- Check the connection quality of the cable.
- After checking and replacing failed parts, apply a little lubricant (you can use thermal film lubricant) on the gear bushings and on the guides along which the scanner unit moves.
Troubleshooting E3 code
Often, users of HP MFPs observe the appearance of the E3 code on the device’s display. If you look at the instructions for the device, this code is deciphered as “The cartridge is missing or installed incorrectly.” Undoubtedly, the cartridge may be installed incorrectly, foreign objects may get under it, or it may simply be broken. But sometimes a situation arises when the device does not see the cartridge due to the fact that the lever, which has a shutter, simply does not reach the optocoupler. To get to it, you need to remove the back (metal) cover of the MFP. How to unlock the lever, after which the E3 error will be reset, is clearly shown in this video from a foreign resource (knowledge of the language is not necessary).
Installing the appropriate driver on your computer
It is worth noting that the operation of the printer depends on the settings and driver. Therefore, you need to install only suitable drivers for your PC. If you encounter problems installing the driver, you need to find out the error code and try to fix it yourself. If this fails, then it is best to contact a specialist.
It is easy to guess that all possible errors appear as a result of various factors. This suggests that the solution to the problem will directly depend on the cause of its occurrence. Therefore, it is worth analyzing the most common mistakes and ways to solve them separately.
Troubleshooting Error 79
Error 79 in HP printers usually means that there is a problem with the machine's software. To fix it, do the following:
- turn off the power to the device using the power key;
- pause for at least 30 seconds;
- turn on the unit again and wait until it initializes;
- in the case where the device was connected through a surge protector, try plugging it in directly into a power outlet this time;
- If the code message continues to appear, then sometimes clearing the print queue or reinstalling the driver helps get rid of the problem.
Hp 125 error e3
Modern printers and multifunctional devices have a system that allows self-diagnosis of all components of the device. If any malfunction occurs in the equipment, the microprocessor sends a code signal to the user that a malfunction has been detected. Fault codes can be displayed on the device display (if it is provided for by the design), or by alternate blinking of LEDs on the device control panel. An error message with a code may also appear on the PC screen. Despite their high reliability, printers and MFPs from the manufacturer HP (Hewlett-Packard) are also subject to operational failures. The most common errors when operating HP devices, according to user reviews, are the following: printing error and errors with codes E8, E3 and 79.
Resetting errors on HP printers
To reset an error or so-called service message on HP printers, there are many methods that are only suitable for specific models. Since this manufacturer has a large number of models of printing equipment, you can use the tables below to reset service messages about a problem.
In cases where cartridges (LaserJet 1300, 1320, 4250/4350) containing a chip are being refilled, it must be sealed before installing them in the device. The device, of course, will display a message that the “left” cartridge is inserted, but it will work. You can also use the recommendations from the following table to reset the chips.
Almost any service codes that indicate errors for HP Photosmart series printing devices can be reset using the following method.
- Hold the left arrow and, without releasing it, press the “Setup” key, then remove your fingers from the keys. As a result of this action, the “Enter Special Key Combo” menu will appear. Press and hold the “Print Photos” and “Red Eye Removal” keys at the same time and release them. Next, press one key at a time and release: “Photo correction (Red Eye Removal)”, “Print Photos”, “Photo correction (Red Eye Removal)”.
- Click the right arrow and go to the “System Configuration” line. Click OK.
- Press the right arrow again until you reach the line “Hardware failure status: Clear. Press OK to clear" (if the device worked without failures before, then you will not find this line). Remember, you cannot start printing at this time.
- Turn off the device, then turn it on.
Thus, the error code has been reset and the device can be used as usual.
Modern printers and multifunctional devices have a system that allows self-diagnosis of all components of the device. If any malfunction occurs in the equipment, the microprocessor sends a code signal to the user that a malfunction has been detected. Fault codes can be displayed on the device display (if it is provided for by the design), or by alternate blinking of LEDs on the device control panel. An error message with a code may also appear on the PC screen. Despite their high reliability, printers and MFPs from the manufacturer HP (Hewlett-Packard) are also subject to operational failures. The most common errors when operating HP devices, according to user reviews, are the following: printing error and errors with codes E8, E3 and 79.
HP M1132 General Alerts
Please note that error codes may vary between models. The latest versions have the same codes.
The main ones include the following list:
E0 – paper is jammed by the mechanism;
E2 – body open;
E1 – no paper;
E3 – problems with installing the cartridge (incorrect position);
E4 – memory full (can also mean toner is low, in addition to E3);
E5 – no paper pickup (can also mean low toner);
E6, E7, E8, E9 – critical warning.
The printer does not pick up paper
Users often have a question: what to do when the device issues a critical warning? This is most likely a hardware malfunction that requires repair at a service center or replacement of components. In some cases, code E1 is issued when paper is available. This may occur if the transport mechanism is damaged or the HP M1132 paper sensor fails, which may require additional installation.
When an E2 error appears on the HP m1132 printer, it is enough to check or close the device case; printing is carried out only when the device is closed and ready for use (E2 signals that the device is not ready for use). The following faults and codes typically refer to a cartridge position issue.
Error E3 on the HP M1132 MFP printer appears when the cartridge is reinstalled or is missing. E4 - usually occurs during work when memory is overloaded - this is a logical failure that sometimes occurs as a result of incorrect operation of a computer program and is eliminated by rebooting. E5 signals that the paper sensor reacts that there are sheets in the tray, but are not picked up. We are more likely talking about the failure of the broaching mechanism. Sometimes it can be eliminated by regular cleaning.
Cleaning the Printer Head
The problem is with critical warnings, starting with code E6 through E9. Typically, after a reboot, the device continues to indicate a breakdown, and the code is the starting point for the service technician to determine the nature of the problem.
Printing failure on HP printers
Often, when trying to print a document, the user discovers that the process is blocked for an unknown reason. However, all attempts to delete or cancel a job in the print queue fail.
This failure can appear for a number of reasons, for example, from a sudden power surge, but, in any case, you will have to fix the problem in the Print Manager program. This fact is explained by the fact that when a document is sent for printing, a special file is created in the Windows system. For a number of reasons, this file may become corrupted and cause a failure in which the printer does not print. Therefore, this file must be deleted in the following way.
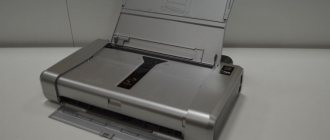
HP LaserJet M1132 MFP won't print? Printer error codes, as well as recommendations for eliminating them!
HP LaserJet M1132 MFP is one of the most popular laser MFPs on the market, compatible with the equally popular 85A (CE285A) cartridges.
HP M1132 MFP does not print due to an error? Do not rush to take the printer to a service center. Most problems can be solved with your own hands, even for those users who do not have experience in servicing office equipment. Just follow the recommendations from the article!
To begin with, we strongly recommend updating the drivers on your personal computer. If the bundled software disc was lost, download the necessary software from the official HP support website.
HP M1132 MF errors and how to resolve them
| Error number | Reason for error | Troubleshooting |
| Error E0 | Paper jam | Open the printer cover and clear any remaining paper from the jam. Don't leave a single fragment. |
| Error E1 | There is no paper in the feed tray | Load the required amount of paper of compatible sizes. |
| Error E2 | Lid open | The error may appear even when all the covers are closed due to failed sensors. Try opening/closing the printer covers again, and don't forget to restart the device. |
| Error E3 | Missing cartridge / incorrect installation | If the printer makes strange noises during operation, including crackling sounds. Then, most likely, the cartridge has failed or worn out due to frequent toner refills. These problems occur with the gear or with a jammed photodrum. To eliminate the error, you will have to disassemble the cartridge and turn all the movable mechanisms. And the photodrum still needs to be lubricated with toner or talcum powder. In some cases, error E3 appears due to a paper jam that falls under the cartridge fixation flag. The solution is to remove the paper completely. |
| Error E4 | The printer's internal memory is full | Reset the seal and start the process again. If the error occurs again, divide the document into parts to print the entire file in fragments. |
| Error E5 | The paper pick-up mechanism has failed | If restarting the printer did not help, and superficial cleaning of the capture mechanism turned out to be useless, then a visit to the service center cannot be avoided. |
| Error E6, E7, E8, E9 | Critical hardware failure | You need to contact a service center for help. With the exception of error E8, which we will talk about in more detail. |
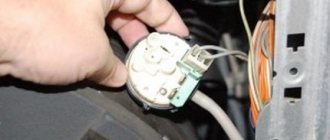
Error E8 on HP M1132 MFP printers
Error E8 on HP M1132 MFP printers is the only critical fault that can be fixed by a user with a minimum set of skills in servicing office equipment.
Essentially, this is a breakdown of the scanner caused by a jammed lamp movement mechanism, contamination of the cable, and so on. You can’t do without a screwdriver, but the process of disassembling the device’s body is extremely simple.
Attention! If your HP M1132 MFP printer is under warranty, under no circumstances do any manipulations yourself. Otherwise, you will lose free service provided by the manufacturer
HP M1132 MFP prints faintly
Faded printing on the HP M1132 MFP printer may be caused by a simple lack of toner in the supplied 85A (CE285A) cartridge.
On a note! Are you using a new cartridge, knowing for sure that its life is far from complete? Feel free to submit your consumable for diagnostics under warranty.
Old cartridges that have been refilled with toner many times produce faint prints for a variety of reasons, some of them:
- wear of the photodrum or magnetic shaft;
- lack of conductive lubricant on the contacts, etc.
An experienced technician warns you of these problems at the cartridge maintenance stage.
Therefore, it is important to follow all the recommendations of specialists in order to maximize the performance capabilities of printing devices and components.
Having problems with the performance of your HP M1132 MFP? MosToner service center - free visit of a technician within the Moscow Ring Road!
How to fix error e8
A service message with code e8 is often found on the laserjet 1132 MFP. It means that there is a problem with the scanner. The instructions for the device indicate that a malfunction with code e8 is fatal, that is, cannot be eliminated. But craftsmen have found several ways to eliminate this problem, which, in some cases, can return the scanner to work.
The most common case is when the scanner ruler has stopped in the extreme right position and does not move . In this case, error E8 appears on the MFP display.
In this case, the carriage was simply jammed. To fix this problem, you will have to remove the scanner glass and move the ruler to the center of the device or closer to the left edge. To remove the glass, you need to unscrew 6 bolts located around the perimeter.
To unscrew the screws you will need an asterisk hexagon.
Once the glass cover is removed, take the carriage, move it closer to the center and return the glass to its place. Turn on the device and wait until the ruler is positioned (it should move to the far left position). If everything happened exactly like this, then you are in luck, since the E8 code can appear for other reasons.
If, after turning on the MFP, the scanner carriage moves jerkily and stops, and code E8 appears on the display, then you will have to thoroughly check all the components of this unit. To check the scanner block, you need to remove the glass cover, as mentioned above, after which you need to take out the block itself and turn it over. On the bottom side of the block you will see 2 gears and an electric motor pressed against a plate. Next, do the following.
- First, it is recommended to unscrew the 2 screws on the plate and check the gears: are there any dirt or damage to the teeth, is there any play or not, is the axle on which the gear is held broken, etc.
- Remove dirt (if any) from the optocoupler.
- Check the connection quality of the cable.
- After checking and replacing failed parts, apply a little lubricant (you can use thermal film lubricant) on the gear bushings and on the guides along which the scanner unit moves.
The above steps usually fix the scanner problem in the hp m1132 MFP. But in some cases, this problem can be caused by pressing the gears or optocoupler too tightly. Sometimes the problem is resolved by loosening the pressure on the gears or removing the small gear altogether. After this, turn on the device (with the scanner unit removed and inverted) and observe the rotation of the gear. If it continues to move jerkily, then the problem may be hidden in the optocoupler.
If you look closely at the optocoupler, you will see that there is a notched disk between the two sensors. This disk should be located in the center of the optocoupler. Sometimes it moves to one side, which causes the E8 code to appear. Try installing the engine so that the disk is centrally located between the sensors.
If, after all the manipulations described above, the E8 code appears again, then the fault may lie in the engine itself or the control board. If you can replace the motor yourself, you will have to contact a service center regarding the control board.
Critical failures and codes for HP Laserjet and HP M1132 models
If error E8 appears on the screen of the HP M1132 MFP printer, firstly, it is typical only for MFPs - this is a scanner failure. In some cases, it will be necessary to unscrew and reinstall the structural elements of the scanner, which may acquire play during operation. Sometimes E8 is issued when a lamp fails. This has a negative impact on operation, and a warning code is issued. Experienced users can fix the problem themselves; inexperienced users need to contact the service and get professional advice.
Work of a master in a service center
Codes E6, E7 and E9 also refer to hardware problems that cannot be fixed on your own. Their appearance on the screen should be a signal for a visit to the specialist. Error E8 of the HP Laserjet M1132 MFP printer is the only critical one that can be resolved independently by an experienced MFP owner with hardware repair skills. The remaining fault codes are not even decipherable by the manufacturer and are considered fatal, requiring serious repair of the device. We strongly advise against removing the scanner glass and installing the carriage yourself without experience in device repair.
Troubleshooting E3 code
Often, users of HP MFPs observe the appearance of the E3 code on the device’s display. If you look at the instructions for the device, this code is deciphered as “The cartridge is missing or installed incorrectly.” Undoubtedly, the cartridge may be installed incorrectly, foreign objects may get under it, or it may simply be broken. But sometimes a situation arises when the device does not see the cartridge due to the fact that the lever, which has a shutter, simply does not reach the optocoupler. To get to it, you need to remove the back (metal) cover of the MFP. How to unlock the lever, after which the E3 error will be reset, is clearly shown in this video from a foreign resource (knowledge of the language is not necessary).
Troubleshooting Error 79
Error 79 in HP printers usually means that there is a problem with the machine's software. To fix it, do the following:
- turn off the power to the device using the power key;
- pause for at least 30 seconds;
- turn on the unit again and wait until it initializes;
- in the case where the device was connected through a surge protector, try plugging it in directly into a power outlet this time;
- If the code message continues to appear, then sometimes clearing the print queue or reinstalling the driver helps get rid of the problem.
Resetting errors on HP printers
To reset an error or so-called service message on HP printers, there are many methods that are only suitable for specific models. Since this manufacturer has a large number of models of printing equipment, you can use the tables below to reset service messages about a problem.
In cases where cartridges (LaserJet 1300, 1320, 4250/4350) containing a chip are being refilled, it must be sealed before installing them in the device. The device, of course, will display a message that the “left” cartridge is inserted, but it will work. You can also use the recommendations from the following table to reset the chips.
Almost any service codes that indicate errors for HP Photosmart series printing devices can be reset using the following method.
- Hold the left arrow and, without releasing it, press the “Setup” key, then remove your fingers from the keys. As a result of this action, the “Enter Special Key Combo” menu will appear. Press and hold the “Print Photos” and “Red Eye Removal” keys at the same time and release them. Next, press one key at a time and release: “Photo correction (Red Eye Removal)”, “Print Photos”, “Photo correction (Red Eye Removal)”.
- Click the right arrow and go to the “System Configuration” line. Click OK.
- Press the right arrow again until you reach the line “Hardware failure status: Clear. Press OK to clear" (if the device worked without failures before, then you will not find this line). Remember, you cannot start printing at this time.
- Turn off the device, then turn it on.
Thus, the error code has been reset and the device can be used as usual.
Problems with the printing device arise often and not at the most opportune moment. HP technology is no exception, although it is quite reliable. Another value is its high maintainability. These instructions will help solve errors on the HP M1132 printer with codes e8, e3, e2 and others in this series. Here you will find information about the causes of their occurrence and prevention of their occurrence. Separately, we offer a description of actions to take when troubleshooting code E8 in HP printers.
Printer supplies memory error - how to fix
The printer is a multifunctional printing peripheral device that provides self-diagnosis and user notification functions in the form of codes. Warning codes in modern models are displayed on the LCD screen. If your HP M1132 printer produces a code marked E and a number, this means that the device is alerting you to a local fault. Depending on the nature, it may be removable or not.
HP Laserjet M1132 MFP Printer
There is no need to panic, the HP Laserjet M1132 MFP printer error is a natural part of the manifestation of the versatility of this device. It is implemented according to a principle well known to car owners, when the on-board computer records only operational monitoring error codes. In this regard, the HP Laserjet M1132 and other versions are simply high-tech equipment, the additional functions of which greatly facilitate the user's operation.
Detailed description of code meanings
You should not be immediately alarmed by the display of notifications, because they are designed to help the user quickly and correctly troubleshoot equipment problems.
- E0 - this is how the equipment reports a possible paper jam. This is easy to check and fix. Unplug the printer and inspect it inside and out. Find the jammed sheet and pull it out. Resume operation by plugging the plug back into the device. Please refer to the separate instructions for removing paper if it is jammed in the printer.
If errors e4 or 5 occur, you should pay attention to the toner level in the cartridge.
Paper Jam Errors
The following errors occur when paper jams and/or foreign objects are stuck inside the printer.
13.3.xx or CHECK INPUT/OUTPUT DEVICE
Here and below, the symbols “xx” in the error code should mean any set of letters or numbers. Regarding the errors themselves, they mean that paper is stuck in the printer, i.e. it has become jammed. The printer will report the same thing in case of mechanical failure of the paper feed roller. If everything is fine with the latter, then to solve the problem it is enough to remove the jammed paper from the printer. Troubleshooting platen problems may require disassembling the printer, repairing it, or completely replacing the part.
13.5.xx
This error also indicates a paper jam, specifically in the printer’s thermal block. This is one of the most important parts of laser devices and MFPs, without which the operation of the machine is not possible. There are also two ways to solve the problem - removing the jammed paper or repairing/replacing the thermal block.
13.6.xx
The error occurs for the same reason as in the previous case. The only difference is that the error indicates a paper jam not inside, but at the exit of the thermal block. The solution to the problem is the same as in the previous case.
13.9.xx
A more serious error, also associated with a paper jam. It indicates a malfunction in the functioning of the paper feed roller and/or fuser. In this case, you will have to check the operation of both parts. If the cause is a paper jam, simply remove it from the printer. Any hardware/mechanical problems are resolved by disassembling, diagnosing and repairing/replacing the feed roller and/or fuser.
13.20.xx (can also be displayed as 13.A)
This is a common error that occurs when one or more of the printer's electronic-mechanical components responsible for feeding paper fails. In addition to the feed roller and fuser block, the error may be caused by improper functioning of sensors, solenoids, motion conveyors and other parts. In most cases, the occurrence of this error indicates the need to diagnose and repair the printer as a whole.
Eliminating error e8
The only system error that can be solved at home, code E8, deserves attention. It occurs on devices that are equipped with a scanner. The problem is more often observed in MFPs. Before proceeding with a more complex solution, it is worth trying to “reset” the error in a simpler way. Press and hold the “Cancel” button for 20-30 seconds. It will have a red circle, diamond or square and is located on the body of the equipment.
If this does not help, then you will have to try more complex repairs. Follow these instructions:
- Open the top cover to reveal the scanner glass.
- Unscrew the perimeter screws with a hex screwdriver.
- Now you can remove the glass. Carefully set it aside to avoid damaging it.
- This is how we got to the scanner “carriage”. Now we need to remove its motor. Unscrew the bolts that hold it in place.
If the steps above did not help, then you can check and correct the following points:
- Replace the printer firmware with a newer one or update to the same version. You can download it without any problems on the company’s website.
A few more tips
- Prevention - clean the paper feed rollers after a certain period of use of the equipment to avoid serious contamination and rapid wear of their surface. It would also be a good idea to clean the entire printer. Feel free to use these instructions for holding events at home.
- Resetting to factory settings can be considered as another effective way to eliminate errors marked “E”, but not only them. This is not difficult to do. Turn off the printer, simultaneously hold down the “Cancel” and “Start Copy” buttons without releasing them, turn on the device, wait for the “Permanent storage init” message, and then release all keys.