A clogged PG is far from the only reason why printers stop printing. However, there is a high probability that this is the problem if on your device:
- white stripes appear across the movement of the paper;
- one or more colors are missing;
- nothing is printed, although the printer does not issue any warnings, and the carriage moves properly.
Causes of blockages
Most often, the print head does not want to work properly:
After a long period of inactivity
When the ink has simply dried out. In this case, several sessions of cleaning the nozzles through the printer utility program can help. If cleaning twice does not help, use the “Deep cleaning” function; you can repeat it after a day. Didn't help again? This means the problem is much more serious and may require flushing.
Due to mixing of incompatible paints
Burnt out nozzles
Water-based and pigment inks categorically do not want to cooperate, they curl up, give sediment, and quickly clog the nozzles. It’s good if you noticed the problem in time and the nozzles did not have time to burn out. Also, paint of the same type from different manufacturers may be incompatible. Ideally, ink tanks should be refilled with the same consumables. Some experts even advise not to print with new original cartridges if you are going to refill them later, but to immediately rinse and refill with the exact ink that will always be used.
As a result of printing with an empty cartridge
Carefully monitor the condition of the ink tanks, refill them on time, as printing with leftover ink quickly damages the ink tank. First, the nozzles become clogged, and then, if you do not pay attention to the print quality in a timely manner, the nozzles burn out. Here, washing will not help; such a head cannot be restored.
Regularity of cleaning
Cleaning is necessary if your printer:
- I worked long and hard - after large volumes of printing;
- “Attened” low-quality ink;
- Experienced difficulties in work (paper got stuck and dirty, for example);
- Needs prevention or restoration after a long period of inactivity.
And finally, we will give one piece of advice. It is worth remembering about the flushing fluid before sending the printer for repair. In 90% of cases, the device is restored after clearing the blockages, which are the cause of the breakdown.
Flushing fluids
Flushing fluid OPC RSL100
Specialized ink stores also sell washing liquids. For example, OCP RSL100 or more concentrated Bursten PDK . But they are quite expensive, and washing a very dry head may require a large amount of product.
You can make your own alkaline solution using the following recipe. For 7 parts distilled water, take one part:
- ammonia,
- isopropyl alcohol,
- glycerin.
Flushing fluid Mister Muscle
Mix the resulting mixture thoroughly and strain. It makes no sense to use distilled water separately, since it is ineffective for water-based ink and does not dissolve pigment paint at all.
Important : Do not wash clogs with alcohol and vodka. Dried or curdled paint releases remaining liquid into ethyl alcohol, making further soaking difficult or impossible.
Mister Muscle glass cleaner in blue or green color has proven itself to be the best. Its effect is comparable in results to specialized flushing fluids, but the price is significantly lower. You can use other window cleaners whose composition is similar to Mister Muscle and contains ammonia.
How to do it yourself?
If you do not want to purchase professional cleaning fluids from a specialty store, then you can prepare them yourself at home. There are several ways to make such substances.
The finished washing liquid can be replaced with ordinary distilled water. But before washing it must be heated to a temperature of 50 or 60°. Most often, this option is used to clean inkjet printing equipment. Cleaning with distilled water will be effective if the printer has not been used for more than 2–3 months before. Otherwise, the procedure simply will not bring the desired result.
You can also prepare standard custom formulations at home, which are sold in stores, but you should carefully select the proportions of the components. So, when creating a neutral sample, you need to mix:
- 80% distilled water;
- 10% glycerin;
- 10% medical alcohol.
If you decide to make an alkaline liquid, then it is better to take:
- 70% water;
- 10% glycerin and medical alcohol each;
- 10% aqueous solution with ammonia.
For the acid mixture you will need 80% water and 10% each of medical alcohol and acetic acid.
It must include elements such as isopropyl alcohol and sodium sulfoethoxylate. These important components help quickly soften dried color pigments.
Pour 9 parts distilled water to 1 part cleaning product into a separate clean container. To avoid mistakes, you can use a syringe with markings. Then the contents of the container are lightly stirred and try to clean individual parts of the printing device with it. If the desired result is not achieved, then you can add a little more product. But in any case, its total share should not be more than 50% of the total solution.
If before the procedure you want to test a homemade flushing composition, you need to mix a few drops of ink from the printer with the resulting liquid in a separate container and leave for 2-3 hours. If the pigment then becomes too viscous, then this cleaning agent should not be used, it may harm the equipment.
How to remove the print head
Canon iP3600 Print Head Lock
Open the cover while the printer is turned on to allow the carriage to move out of the parking space. Turn off the printer. Remove the cartridges. The print head is clearly visible, but it is too early to remove it.
In different printer models, the latch holding the PG looks different, although the principle of operation is the same in almost all models. On the right side there is a lever, or the frame has a certain shape. You need to lift it up.
The MG5440 model has a slightly different principle. The latch here is a bar with the image of ink colors, which does not rise up: you need to pull it towards you until it clicks. Now the PG is free, tilt it forward and carefully remove it from the printer.
Cleaning algorithm
If the ink does dry out, it is important to clearly understand what to do and how to clean the inkjet printer cartridge without resorting to the services of expensive specialists and without spending a lot of time buying a new one.
To do this, you should strictly follow the algorithm below:
- Turn off the device, including from the network;
- Lift the cover and remove the cartridge from the printer;
- Clean it with a cotton swab soaked in water;
- Dry the cleaned cartridge under natural conditions;
- Use the same method to clean the photo drum of the laser printer;
- Return to printer;
- Run a test print.
It is important to understand that cartridges of any brand, be it HP or Canon, can be cleaned in this way, but only if the degree of contamination is low. If this method does not help, or the problem is not the contamination of the cartridge or heads, then most likely you will need to soak it, and there are several methods for this.
Flushing
Burnouts in the nozzle area (Click to enlarge)
Make sure that the PG of your printer has no burns near the nozzles, the nozzles are intact, and washing makes sense. If so, prepare:
- washing liquid;
- gauze, napkins or bandage;
- syringe;
- a low plastic container where the GHG will fit;
- tube from a medical drip.
Cover the table with newspapers and place a piece of bandage, folded several times, soaked in the washing liquid, under the PG. Using another piece of cloth, also soaked in the cleaner, gently blot the intake grates.
Remove the rubber seals, wash them, and thoroughly wipe the head body around the intake holes. Drying of ink in these places can lead to depressurization of the system. As a result, air may be sucked in and paint will flow intermittently. It is a good idea to periodically clean the O-rings for preventive purposes, even when there are no problems with the seal.
Digging
Instillation of PG (Click to enlarge)
A little liquid is instilled into each gateway with a syringe and needle. As soon as the drop is absorbed, add more. Change the bandage as it gets dirty and continue dripping until the liquid passing through the head is no longer the same color as the ink. If the liquid is not absorbed very well, heat it to 50–60 degrees. To enhance the effect, you can use a more aggressive agent, following the instructions for its use.
When each of the sluices begins to absorb well and allow flushing to pass through, let the head stand. After an hour, there should be no strong ink streaks on the fabric. This means that the washing was successful and the head can be returned to the printer. Before printing, be sure to clean the nozzles of cleaning agent using the printer utility program.
Soaking the nozzle plate
But washing is not always so simple. Perhaps one or two sluices do not allow liquid to pass through: the drop is not absorbed for a long time. For some time you need to remove it with a bandage and drip again, but if nothing has changed in an hour, it’s time to proceed to the next stage.
Pour 2-3 mm of washing liquid heated to 40° into a plastic container, lower the print head there with the nozzles down and place it in a warm place to soak, after covering the airlocks on top with a damp bandage to prevent them from drying out and covering the PG with a plastic bag. If no changes are observed the next day, heat the cleaning liquid again and leave for another day. In general, washing the print head is a long process; you can only save the part slowly.
Soaking intake holes
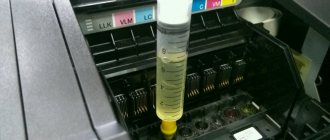
Flushing fluid filled
If the sluices still do not allow liquid to pass through, you can try to create some pressure from above. You need to put tubes about 5 cm long on each of the intake holes and fill them with cleaning liquid.
In this form, the structure can be left for a long time, periodically adding rinsing. If the liquid still leaves the tube through the problematic sluices, continue the procedure for two days.
Reaching out
When the liquid level in one of the tubes does not decrease, you can try the following technique. Pour a little product into the container, put a piece of cloth and press the PG nozzles against it. Insert a syringe without a needle into the tube and, carefully moving the piston towards you, draw the cleaning agent through the nozzles.
Do this several times, adding clean liquid to the pan. Pour out the used rinse from the syringe, then refill the tube and leave for another hour. The process can be repeated several times.
Important : the head must be pressed firmly against the wet fabric so as not to draw air into the nozzles.
If the liquid now leaves the tubes at approximately the same speed, the steam generator has been flushed.
Pumping
Pumping liquid through the steam generator (Click to enlarge)
If after two days of soaking the liquid still does not flow well, you can try pumping it with a syringe in both directions. Continue to press the nozzles against the wet bandage, drawing in the liquid in the same way. Squeezing in the opposite direction must be done when the tube is full.
Liquid is drawn into the syringe so that there is a layer of air between the piston and the flushing agent. This technique helps to avoid a sharp push that could damage the nozzle plate.
You need to press the piston very carefully, no more than 2-3 divisions at once, then even more slowly, depending on the fluid loss.
Extreme methods
So, in fact, we have run out of methods that still have a high chance of saving the print head. If the goal cannot be achieved, you can use several more much riskier methods:
- Press out the liquid with a full syringe without an air cushion. The pressure on the nozzles will increase significantly, as will the risk of damaging them. Do not press the head against the fabric, but lift it slightly. Press the piston carefully, as before, the pressure is much greater due to the lack of an air cushion.
- Hold the steam generator nozzles over the steam for several minutes and push through the flushing heated to 40–50 degrees.
- Place the head on the surface of hot water for a few minutes, without dipping more than a millimeter, and draw the liquid through the nozzles.
The print head is washed (picture taken from www.chernila.com) (Click to enlarge)
- Use a more aggressive product: mix 9% vinegar and distilled water in a ratio of 1:9. This composition cleans well, but has a destructive effect on internal parts, and after using it, it is necessary to rinse with an alkaline solution to neutralize the acidic environment. Do not use this method if you are not prepared for the fact that the print head will fail in two to three months.
If one of these extreme methods helped achieve the desired goal, do not rush to return the PG to the printer. After such extreme measures, be sure to dry it with a hairdryer. Do not overheat the head: take breaks for about twenty minutes. If you doubt that everything has dried well enough, leave it near the battery for two days, and before installation, drop a little flushing liquid into each gateway.
- Error codes for Canon MP240, MP250, MP260, MP270, MP280.
- Software for Canon printers and MFPs.
Have fun typing.