Why sterilize bottles?
Milk and infant formula are an excellent environment for the growth and reproduction of pathogenic organisms. Sterilization is an additional method of processing baby bottles, which allows you to completely destroy various microorganisms (bacteria, their spores, fungi and viruses).
Doctors' opinions on sterilizing bottles before each feeding vary. Some doctors believe that this type of treatment is necessary, others suggest simply rinsing the bottle well and rinsing with boiling water. Therefore, deciding whether to sterilize baby bottles before each feeding or not, as well as the entire responsibility for the baby’s health, lies with the parents.
Parents who choose not to sterilize their baby bottles before each feeding should consider a few reasons why sterilization is necessary.
- After the purchase. A new bottle needs one good treatment. We all visit modern stores and can imagine how many pathogenic microorganisms settle on goods.
- If it is not possible to rinse the bottle well. When the quality of water for washing is in serious doubt or the design of the bottle does not allow this.
- After the baby got sick.
- Premature babies and children with weakened immune systems.
Why is sterilization necessary?
Every mother knows that in the first months of life, her child’s immunity is especially weak. In order to prevent the occurrence of various infections and diseases, parents strive to protect everything their child comes into contact with. This is especially true for dishes and what the child can put in his mouth. So, why is sterilization necessary?
- The child’s body simply cannot cope with the infections that can enter his body through a pacifier or pacifier.
- Even a slight upset stomach at an early age can cause colic, which will cause a lot of trouble for both the baby and his mother.
It is important to understand that the problem of sterilizing dishes is due to the fact that this procedure must be performed before each meal. That is, without automating the process, you are doomed to spend more than one hour disinfecting dishes for feeding your baby.
Preparing baby bottles for sterilization at home
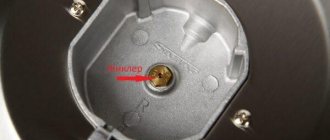
Before sterilizing a bottle, pacifier or other baby accessories, they should be washed thoroughly using a brush. To do this, the bottle is disassembled and all parts are washed separately. Particular attention should be paid to the nipple (it can be turned out and washed from the inside) and the ring that secures it.
If the bottle is poorly washed or there is residue left inside it from juice or tea, wash it with soda. After treatment with soda, rinse the bottle well in running water.
Important! For hot (boiling water or steam) types of sterilization, pay attention to what the bottle and nipple are made of. Bottles made of low-quality plastic and plastic containing besfinol A are especially dangerous when heated.
Preparation
Before disinfecting all containers after feeding, you must wash the utensils. Wash children's utensils immediately after using them. If it stinks, it cannot be sterilized. First you need to remove the smell.
After feeding, always wash all feeding products. We don’t leave it for later. Especially if the products are plastic, they quickly absorb unpleasant odors.
How to wash children's dishes? Most young mothers think about this question.
An inexperienced housewife washes with a regular detergent, but an experienced mother knows that Gala and Fairy are harmful to the body. For your baby, you need to buy a liquid specially designed to thoroughly wash baby's feeding products.
Detergents should be chosen carefully. If after using it the child shows any signs of an allergy, replace the soap product with another one.
How to wash baby bottles:
- Pigeon;
- Aqa Baby;
- Nuk;
- BioMio;
- "Umka."
Children's dishwashing detergents do not harm the gastrointestinal tract. They are made from safe plant materials. It is completely safe to wash baby bottles with these detergents.
They are completely washed off in any water. They have a good antibacterial effect and are gentle on the skin of mother’s hands.
How to wash bottles:
- Do not wash them when assembled. First of all, take it apart. This way all dried milk will be washed off better. Separate washing is also recommended because a lot of milk accumulates between the ring and the nipple, which promotes the rapid growth of bacteria.
- Prepare hot water and add a small amount of detergent.
- Place in a soapy solution, take a brush or a special brush, and clean thoroughly. Use a long brush to scrub the bottom thoroughly.
- To clean the nipples, turn them inside out.
- Rinse all parts well in clean water. If the product smells of soap, rinse again.
- After finishing the manipulation, you need to dry it.
Sometimes even after thorough washing it is not possible to remove the unpleasant smell of sour milk.
How to wash kitchen utensils?
Before you sterilize baby bottles, you need to remove the stench. Baking soda will help with this. It perfectly removes any unpleasant odors. Baking soda deodorizes children's dishes.
It can also remove plaque from bottles.
Just add 1 tsp. products, fill halfway with hot water. Close the lid and shake vigorously. Pour out the soda solution and rinse.
If the juice smell remains, use vinegar. Just fill the container to the brim with this product and leave it overnight. Rinse the feeding container in the morning.
Homemade cleaning products rinse well and do not enter the body of crumbs with food. They are safe for babies.
How to sterilize baby bottles at home in a saucepan
One of the oldest ways to sterilize bottles at home is by simply boiling them in water. It takes a lot of time and is not suitable for parents who sterilize children's items frequently.
Choose a pan that will fit the bottle when disassembled. Pour cold water into the pan so that the baby supplies are completely covered with water and cover it with a lid. Place the pan on the fire and wait until it boils. Boil the bottles for 5 minutes, turn off the water and, without opening the lid, leave for 10 minutes. After the time has passed, remove the bottle and place it upside down on a clean towel.
Steamer and multicooker
Sterilizing bottles in a slow cooker is often used. How many dishes can be placed in it at one time?
This technique is capable of processing a lot of dishes for a newborn at one time. More precisely, as much as will fit in it.
How to sterilize bottles in a slow cooker:
- Pour a liter of water into a clean bowl.
- Then place a grate for steaming.
- Place all the dishes with which you plan to feed the baby on the wire rack.
- Then the lid is closed and the container sterilization mode is turned on.
The process takes up to 15 minutes. At the end, take out the dishes and lay them out on a clean towel. It is dried upside down.
Is it possible to sterilize in a steamer? Can. Sterilizing in a double boiler is as easy as shelling pears. The process is similar to that in a slow cooker. Drying is also carried out on a clean towel.
There is enough room in the steamer to place them neck down or sideways. You can place several feeding containers, pacifiers, and pacifiers inside.
Now every mother knows how to properly sterilize baby bottles in a slow cooker and double boiler. This is very convenient, because most housewives have at least one of the devices.
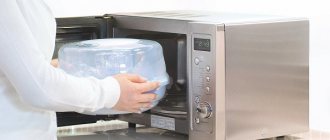
How to sterilize baby bottles at home in the microwave
Modern mothers and fathers adapt to everything so quickly that they easily add new functions to household appliances. And manufacturers, in turn, do not lag behind them and produce special sterilizers and bags for microwave ovens and steamers with a sterilization function. So you can sterilize baby bottles at home in the microwave.
Using any container
Pour 2 cm of water into a clean microwave bowl and place the bottles unassembled and close the bowl. Turn on the timer for 2 minutes. Then leave covered for 5 minutes.
Bottle sterilization bags
This is a great thing, especially for moms who don’t sit still, it’s convenient to take them with you! You can buy such bags in almost any children's goods store at a price from 400 to 1200 rubles for 5 pieces. One package can be used up to 20 times. Sterilization time will depend on the manufacturer's instructions, on average 2-3 minutes.
Pour the specified amount of water into the bag, zip it up, and put it in the microwave for the required time. Be careful, you can get burned when opening the package! Give it some time to cool.
Microwave Sterilizer
For parents who sterilize bottles frequently, but whose budget does not allow them to buy a full-fledged sterilizer, a microwave sterilizer is suitable. It is a container with a closing lid and special compartments for bottles and nipples. With this sterilizer you can sterilize several bottles at a time and take them out as needed. Each such device is equipped with detailed operating instructions.
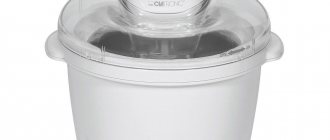
Sterilizer
The industry produces many types of special sterilizers:
- single;
- multiple;
- steam;
- electrical;
- microwave designs.
The washed children's dishes are placed in the sterilizer compartments and acted according to the instructions. The bottles may remain in the device until used.
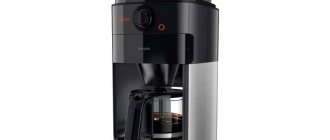
Most often, steam sterilizers powered by the Philips AVENT network are used for sterilization. It is designed to handle multiple bottles (6) and can also serve as a storage container for clean, sterile products for up to six hours. For sterilization you need:
- Prepare dishes and sterilizer;
- Pour water into the reservoir compartment;
- Place the bottles in the sterilizer;
- Turn on and set the mode.
Sterilization time is up to 12 minutes; utensils should be used as needed.
Sterilization of baby bottles in special devices
For parents who are on a budget and plan to sterilize bottles, a sterilizer is often ideal. In addition to sterilization, some devices provide the function of heating baby food and steaming. In such devices, sterilization occurs due to steam or UV. rays
The advantages of sterilizers also include a large volume of containers and individual use.
In addition to large children's sterilizers, you can also find compact ones - for one bottle, which you can take with you on a trip.
Which bottle is better?
A huge variety of accessories for babies allows parents to choose the right dishes based on shape, size and price. Inexperienced parents are primarily attracted by the appearance of the product or its interesting shape. A bottle is a utensil for a child; when buying it, you need to be guided only by issues of practicality. The best dishes for a child:
- should be easy to wash;
- do not lose appearance during sterilization;
- withstand a large number of treatments;
- be resistant to shocks and falls;
- have a shape that allows you to hold it in your hand.
Simple shaped bottles with a capacity of up to 200 grams are easy to clean. Cleaners should be separate and used only for this purpose.
Many mothers use liquid for washing children's dishes, but there is no practical need for it (this is not a pan with fat that cannot be washed in any other way).
Although the manufacturer assures that such household chemicals are easily washed off, in the first months of a child’s life you can wash bottles without much effort with regular baking soda, without loading the baby’s body with chemical residues that may not be entirely harmless.
Glass bottles are a little heavier than plastic ones, but they are easy to wash and sterilize in any way without changing their properties. They can break, but in the first months of life, parents monitor this, so the risk for the child is minimal.
Plastic bottles have many advantages:
- they are light;
- they are easy to wash;
- don't fight;
- Their cost is much less than glass ones.
But such dishes have many disadvantages:
- the use of containers from an unknown manufacturer can lead to the release of toxic substances into baby food;
- it is difficult to sterilize - plastic does not withstand high temperatures, receiving microcracks and losing its shape;
- Due to cracks and frequent washing, it loses its appearance.
It is necessary to have 2 bottles of different sizes made of different materials, even if the baby is breastfed, sometimes there is a need to express milk. If a child is on artificial nutrition, having several different bottles is a necessity.
Buy a sterilizer for baby bottles
Buy a sterilizer for bottles from a Russian manufacturer. The electronic steam sterilizer CS Medica KIDS CS-28s can be bought relatively inexpensively for 2000 - 2500 rubles. Sterilizes 6 items at a time, time 9 minutes.
Reviews on the market
More details about the product in the online store
Preparatory stage before sterilizing jars
In order for homemade preparations to last all winter and not deteriorate, it is necessary to take the issue of preparing jars very seriously.
- They must be free of chips, chips, and scratches, especially their upper edge.
- Experienced housewives recommend using previously used cans for preparations. From a physics point of view, this is quite justified; this glass has already been tempered.
- If you purchased a new container, then hold it under running hot water (gradually increasing the temperature). This is necessary so that the glass gets used to high temperatures and does not burst at a crucial moment.
- Selected jars must be thoroughly washed with hot water and soda or mustard powder. It is not recommended to use detergents for this purpose. Chemical particles accidentally left on the glass can ruin the taste of your preparations.
After washing, you can proceed directly to sterilization. There are many ways, choose the most convenient one for yourself and use it successfully.
Sterilization of caps
If we approach sterilization of jars so carefully, then, naturally, it is necessary to subject the lids to this operation.
Metal lids
If you are using a modern version of reusable Twist-off lids, then first inspect them for rust, scratches, chips, etc.
If the lids retain the smell from last year’s preparations, then after washing, keep them for 15-20 minutes in a citric acid solution (1 tsp per 1 liter of water) or vinegar solution (50 g of vinegar (9%) per 1 liter of water).
Disposable lids also need to be checked to ensure that the elastic fits tightly and there are no cracks or damage.
The lids are sterilized immediately before rolling up the canned food. The simplest and easiest way is in boiling water. Take a saucepan, boil water in it and put metal lids there for 5 minutes.
IMPORTANT: boiling for too long can ruin the rubber bands!
Be careful when removing the caps from the hot water; use wooden tongs for this purpose.
Never use a microwave oven to sterilize metal lids.
It is convenient to sterilize metal screw caps in the oven at the same time as jars. But it is not recommended to sterilize tin lids with rubber inserts in the oven.
Plastic lids
Plastic lids cannot be boiled; during prolonged heating they become deformed and lose their seal. Therefore, it is enough to immerse them in hot water (80˚C) for 1 minute, then dry them on a towel so that water does not get on the workpieces and close the jars.
You can not treat the lids with boiling water, but place them in a solution of furatsilin, manganese or alcohol. This method will help disinfect both metal and plastic lids.
As you can see, there are many ways to prepare jars and lids for the harvesting season. All you have to do is choose the most convenient methods for yourself and delight your family with delicious preparations for the winter.
How to properly sterilize jars with blanks
Some recipes for salads or homemade adjika require sterilizing jars along with the ingredients; to carry out such work, you will need a saucepan with a wide bottom. Place a waffle towel or four-inch cotton cloth on the bottom of the pan and place the jars, but not very tightly, so that when boiling they do not touch each other.
The water should reach approximately up to the hangers of the cans. We put the prepared lids on the jars with blanks. When the water boils, we note the time: sterilize 3-liter jars - 30 minutes, 2-liter jars - 20 minutes, and liter jars - 10 minutes.
Then carefully remove the jars from the pan and screw on the lids. We place the jars on their necks, and wrap them with a towel or blanket on top until they cool completely (for about a day). After which the workpieces can be transferred to the pantry or cellar.
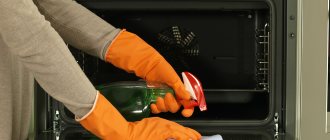
Sterilization of jars with preparations in the oven
This method is convenient because you can place many jars in the oven at once and sterilize them at the same time.
Place the pieces into jars and cover loosely with lids.
To begin, preheat the oven to 50 degrees and place the jars there, and then bring the temperature to 150 degrees.
We sterilize the jars in the same way as in the first case. Then, turning off the heat, let the jars cool slightly, take out the products and close the lids tightly.
IMPORTANT: when you place jars with preparations in the oven, make sure that there is not a big difference between the temperatures. To do this, hold the jar with the workpiece under running hot water.