Required Tools
Even the highest quality and reliable steam generator, produced under a well-known brand, can break down. Breakdowns come in different forms – small and large.
In all cases, a home mechanic who decides to repair equipment himself will need to stock up on a number of necessary tools, without which carrying out restoration work will be impossible.
Let's take a look at their list.
You will need:
- a set of flat and Phillips screwdrivers ;
- a wide knife or an unnecessary plastic card, or a special device for removing parts with latches (with a knife you can accidentally scratch the body of the steam generator, thereby ruining its appearance);
- a multimeter is a device that will be necessary to ensure the integrity of all important elements of the device being repaired;
- You may also need a soldering iron if you need to change certain parts.
In addition to tools, the following materials may be useful for repairing equipment :
- insulating tape;
- special heat-shrinkable tubes;
- pliers;
- a piece of sandpaper.
All tools for work must be of high quality, reliable and intact.
It will be very difficult to carry out good repairs on broken or heavily worn devices, but it is easy to damage a steam generator.
Basic malfunctions and their elimination
Philips steam generators can suffer from various types of breakdowns. You can solve most problems yourself without turning to specialists. Let's look at a few examples of common breakdowns and ways to repair such equipment yourself.
Doesn't produce steam
It happens that the steam generator does not produce the required steam during operation. Possible reasons may include the following circumstances.
- The device is clogged with scale. To remove scale, you will need to clean the equipment. The lion's share of models produced by the brand are equipped with an automatic descaling function - smart Calc-Clean (when the device needs to be descaled, the De-Calc button flashes and a red or orange light is usually on). To do this, pour water into the device, plug it in, and then press the appropriate button. After a couple of hours, the liquid must be drained by flushing the boiler again. In some models you will have to change cartridges.
- The key responsible for supplying steam was not pressed. To solve this problem, you need to press and press the button until the unit starts working.
- The device has not fully heated up. People often mistakenly believe that the unit has stopped producing steam. In fact, such equipment heats up within 2 minutes after starting, after which steam still comes out.
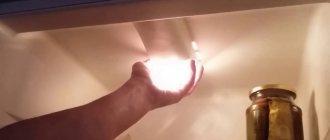
- There is not enough water in the boiler. If the device does not produce steam, there may not be enough liquid in its tank. This problem can be solved by adding water to the required level.
A similar problem may occur due to problems in the board or due to the fact that the voltage at the pump drops. It is better to take the equipment to specialists.
Doesn't turn on
The Philips branded steam generator may not turn on due to the following reasons.
- Damaged power cord. If there are no noticeable defects, it is difficult to find the broken area. You'll have to contact a specialist.
- There is no power in the network. To check that the outlet is working properly, you need to plug in any other device.
- The power-on indication does not work when the equipment is working properly. You will need to press the button that supplies steam to check its functionality.
- Electronics malfunction. In this case, you need to visit an experienced technician.
Water flows
If liquid is leaking from the steam generator, the reasons may be as follows.
- Condensation has accumulated in the steam supply hose. A problem that occurs after a long period of equipment downtime. You can solve the problem by pointing the sole of the iron to the side, while holding down the steam button until the water stops flowing. It is also recommended to check the condition of the hose for kinks or clamps.
- Water with aromatic additives or contaminants has been poured into the container. In this case, the boiler needs to be flushed. Then clean water is poured into it again and the device is started.
- Frequent activation of the steam boost function. You can continue to use the equipment, but wait a little before pressing the intense steam button again.
- After cleaning the equipment, there was still water left in it. This may leak from the sole. You just need to wipe it with a dry cloth.
- The shutter valve is broken. It needs to be replaced.
- The holes are clogged with scale. Will need cleaning.
Rusty water splashes
The following may be the cause of this problem:
- The device was filled with water containing impurities. In this case, flushing the tank is required.
- The equipment has not been used for a long time, but there is some liquid left inside. The boiler must also be thoroughly washed.
- The heating element has failed. It will need to be replaced.
Other problems
There may be other problems with your Philips steam generator.
- The device may flash blue and green lights alternately or simultaneously. Most often, with such a malfunction, the equipment is sent to a service center. This breakdown is associated with damage to the yellow wire in the design of the device.
- It happens that the steam generator beeps and at the same time the orange Anti-Calc indicator on it lights up. Perhaps the fact is that the descaling cartridge has become unusable. If after replacing it the signals continue, you should remove it again and insert a new cartridge again. Replacement should be made only after disconnecting the equipment from the network.
- The above signals can be shown every 2 weeks. Repairing the products in this case is simple - you just need to secure the cartridges inside the devices more tightly.
The device of a typical steamer
The master encounters the greatest difficulties when trying to disassemble the case. Manufacturers of household appliances protect their products from self-taught craftsmen. It is expected that when the internals are dismantled, the case will receive irreparable damage, which can be easily detected by technical services.
The similarity with a coffee maker is revealed by a characteristic detail - the presence of a pump. It is customary to brew coffee at a pressure of 15 atm - clothes are content with three. A typical indicator of mobile models that resemble vacuum cleaners in appearance. Regarding manual technology, the parameter is much lower. The volume of water is more modest. Inside a typical Shark Mop steam mop are:
- The power cord terminal is often devoid of a block.
- A pump that pushes a piston. The portal discussed the design of a steam iron, where the steam boost uses an equivalent circuit, the drive is predominantly mechanical, using the physical strength of the finger. The technique under discussion contains a servomotor that is activated by pressing the corresponding button. Irons with an electric auxiliary pump are rarely used.
- A separate branch of the electrical circuit serves the boiler. We can clearly distinguish the similarities with a coffee maker. We started talking about Shark Mop, but a hand-held steamer for clothes and furniture is similar in structure to a boiler. This is something, so let’s look at the design in more detail.
Clothes Steamer Boiler
Firstly, the housing contains a thermal fuse, traditional for most heating devices. Just find the element inside, pulled by a bracket to the metal body of the boiler. The water does not heat up - feel free to connect the wire on both sides (by removing the plug from the socket). The tester refuses to beep - the thermal fuse has burned out. Despite this protection of the integrity of the system, a thermostat is installed inside. If, in the absence of water, the thermal fuse burns every time, customers will quickly get tired of making a choice in favor of the product. The thermostat exploits the unique qualities of the bimetallic plate, forming a relay that cuts off the current supply when the temperature reaches a certain safe value.
What is the temperature inside? More than 100 degrees Celsius. Coffee makers use 135 degrees Celsius to froth milk (producing steam). We believe that the same thing happens in our case. Limescale has become a recognized problem with steamers. The heating element is cleaned periodically. With a slight difference versus a coffee maker. With drinks, the boiler design is made up of two halves, identical and equivalent, through a silicone gasket with twisted bolts. The heating tank of the steamer contains a base, heating elements forming a single whole, and a steel cap is placed on top. The assembly is secured with cross screws. There is a silicone gasket and body stiffening ribs. Read the section on steam irons, you will find a photo of the tank receiving steam. Surprisingly similar to a steamer.
The principle of operation of a clothing steamer is limited to producing steam under pressure. The boiler is regulated by a bypass or check valve. Those who remember Soviet bicycles will be surprised: the design of the device exactly repeats the nipple of the Salyut wheel. The rubber tube has been replaced with silicone. The polymer successfully withstands high temperatures. A threaded fitting cut by an axial channel that opens into a hole in the side of a steel probe surrounded by a silicone tube. The pump pumps tirelessly, water flows in when the pressure in the tank is below the limit. Makes it relatively easy to maintain specified conditions.
The boiler outlet pipe is devoid of any special differences. The tube is equipped with a spring that locks the movement against the flow of liquid drawn by the force of gravity. Most clothes steamers have a grounded tank. Without this, even a manual model can give you a serious electric shock, there are 230 volts inside (battery steamers are safe). The tubes and wires directly adjacent to the boiler of the clothes steamer are covered with thermal protection that protects against high temperatures. Now let's see how to make repairs!
How to disassemble and reassemble?
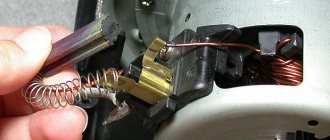
If the steam generator breaks down, the reason may lie in a broken electromagnetic coil.
Its serviceability is checked with a multimeter, for which you will need to get to the “insides” of the device.
This is how you can disassemble and reassemble damaged equipment.
- First, the unit is disconnected from the network.
- The protective rubber bands from the steam station, and the bolts above it are unscrewed.
- The top cover is removed. Under it there is an upper body part, fixed with 3 screws. They need to be unscrewed.
- By removing the housing, you can see the coil. It needs to be replaced. It is secured with just one nut.
- back together in exactly the same way , but in reverse order.
Of course, there is no guarantee that the Philips branded steam generator failed precisely because of the need to replace the electromagnetic coil. probably lies in other important parts of household appliances.
In this case, it is not recommended to check and repair the steam generator yourself - it is better to visit an experienced technician.
Recommendations
If you have a Philips steam generator at home, you need to be prepared for the fact that for some reason it may break (like any other equipment).
In this case, it will be better if you arm yourself with a few useful tips and tricks.
- Don’t be alarmed when the steam generator produces steam with a slight delay when you first use it. During these seconds, the equipment is working properly, but is simply preparing for further actions.
- To prevent hot splashes from the steam generator from getting on your skin while fixing leaks, you need to keep the device away from you until the problem is completely resolved.
- The proper operation of many parts can be checked in the store at the stage of purchasing the equipment. Typically, sales consultants do not refuse such a request from buyers.
- If the breakdown is too complex and serious, and you do not have the appropriate experience and knowledge, it is better not to waste time and not try to fix everything yourself, but to visit professional repairmen. Otherwise, you risk only making things worse and breaking the generator.
- When disassembling a branded steam generator, you should be as careful as possible. Be careful not to damage the case, as it can easily be chipped or scratched, especially if you open it with sharp tools.
- If the branded steam generator does not have a “smart cleaning system” mentioned above, then you can get rid of scale in the tank using citric acid. It also easily dissolves mineral deposits on the sole.
- If there are serious blockages in the steam generator chamber, due to which steam is not supplied, it is not recommended to repair it yourself. It would be better to visit a service center.
- You will never encounter many breakdowns and problems with branded equipment if you use it correctly and carefully. Operate the steam generator in accordance with the instructions and treat it with care.
To learn how to repair a Philips steam generator, watch the video.
All rights reserved, 14+
The use of any materials without our prior written consent is prohibited.
Fuse and spray system
In case the iron overheats, it has a fuse. It is located near the thermostat and in most models is covered with a white tube. If the iron reaches a dangerous temperature, the fuse will blow.
To check the fuse, test its contacts with a multimeter. If it is working properly, the multimeter makes a sound, if not, then it is silent. To replace the thermal fuse for an iron, you need to remove the blown element and install a new one in its place. The appliance should not be left unprotected, as it may cause a fire if it becomes overheated.
If there is water in the container, but no steam, then the cause of the malfunction may be clogged holes in the soleplate. To clean them, you need to prepare one of the following compositions:
- 1 liter of water is mixed with 200 grams of vinegar;
- Add 2 teaspoons of citric acid to 1 cup of boiling water.
The liquid is poured into the frying pan and the turned off iron is placed there. The composition should cover the sole. Place the frying pan on the fire, bring to a boil and turn off. Wait for the liquid to cool, and then put it back on the fire until it boils. This operation is performed 3-4 times. The salts should dissolve.
If water stops flowing from the sprinkler, the reason may be that the tube is disconnected. To fix the problem, you need to disassemble the panel with the intake buttons and replace the tubes there.
You can clear clogged holes in the sole by completely disassembling the device. Then its sole is sealed with tape. Hot water with the addition of vinegar or citric acid is poured into it several times, kept until it cools and drained.
An iron that has stopped working should not be immediately thrown into the trash . If the damage is not too serious, you can fix it yourself. If you are careful and consistent, this work will not take much effort and time.
Features of the Philips irons
The electrical design of the Philips iron is simple and is almost no different from the circuits of other electrical household appliances. The main difference is the heating device and other auxiliary components. The diagram contains the following elements:
- electric heater;
- thermostat;
- thesistor;
- lamp;
- mains plug;
- thermal protection.
It follows from this that if you delve a little, disassembling and repairing a Philips iron will not be difficult.
Iron temperature in degrees
In temperature-controlled devices, the “points” correspond to a certain temperature (data in the table)
| Thermal mode of the iron | Minimum t (˚С) | Nominal t (˚С) | Maximum t (˚С) |
| 75 | 95 | 115 | |
| 150 | 130 | 155 | |
| 145 | 175 | 205 |
The heating of a household iron within the soleplate can vary by 10 °C.
How many degrees does the iron heat up to?
For fabrics that are most difficult to iron, it is necessary to use a maximum iron heating temperature in degrees equal to 205˚C. In this case, the heating rate will depend on the type of material from which the sole of the iron is made, and the power of the electrical appliance.
Heating rate depending on sole material
The sole is made from:
- Aluminum. Heating occurs very quickly, and cooling also occurs, but the material is short-lived. Hard elements on clothing can leave scratches in which burnt-on fabric particles become embedded.
- Of stainless steel. It heats up quickly, glides well over the surface, and is durable. The disadvantage is the heavy weight of the device.
- Ceramics. This coating is applied to a metal base. It glides perfectly, allows you to iron fabric in hard-to-reach places, and does not catch clothes. Heating and cooling take longer. Ceramic retains heat, so even when turned off, the iron remains on for 8-10 minutes. stays hot. The disadvantage is the fragility of ceramics, susceptibility to chips and damage. To extend service life, manufacturers use cermets.
- Teflon - reliably protects clothes from burning, but does not last long. The Teflon surface does not glide well over fabric, making ironing difficult.
- Sapphire is a specially developed alloy that gives the sole extra strength. Conducts heat well.
- Titanium is rarely used in the production of household irons. The metal will heat up quickly and take a long time to cool down. The surface strength is not inferior to steel.
Maximum temperatures in different models may vary, so before choosing a mode, you should read the instructions.
If the iron has only one heating mode, there is no spray and steam function, the temperature of the iron sole will be 115˚C (±10).
Irons with a drip system are slightly hotter - about 155˚C.
Electrical appliances with the possibility of steam processing reach temperatures of 175-205 ˚C.
Disassembly stages
Lid
The most significant and difficult stage of iron repair is proper disassembly. To disassemble your Philips iron, you first need to remove the back cover. There are bolts on the cover that need to be unscrewed one by one. After successfully unlocking the cover, it must be slightly lifted so as not to damage it. If there are latches, they should be pressed out a little.
It is important to determine their location. A wide knife blade, which must be inserted under the lid, will help you cope with this. In Philips Ecocare irons there are also bolts under the cover. They also need to be unscrewed. When the back panel with all fasteners is removed, you need to remove the temperature regulator and the steam button by pulling them up in turn. In some cases, they are secured with additional latches, and to remove them, you need to pry them off with a flat-head screwdriver.
Frame
Then, applying a little force, you need to pull out the handle of the iron, which is inserted into the body using latches. Then you should remove the temperature regulator. There is a spring there (for the ratchet). In order to properly start putting the iron back together, you must not lose it. Then remove the control unit with the heating element connector. Now all that remains is to unscrew a couple of bolts and disconnect the housing from the bottom surface of the device.
The power cord is removed along with the indicator. The console with the indicator is attached to the body using two latches. In order to get the indicator, you should bend the latches one by one. Then you need to remove the terminals holding the electrical cord. Then you need to remove all the electrical contents of the iron. It's easy to do. With a little effort, pull it back.
After completing these manipulations, you can begin to remove the plug of the water sprayer. To do this, you need to unscrew the screw using a tool. In the final stage, we disconnect the two bolts with which the body is fixed, and thus the sole is removed. Now the question of how to remove the soleplate from a Philips iron is not difficult.
Remember! To properly assemble a Philips iron, you need to remember the sequence of its disassembly.
What's wrong with anyone
Tefal
The Tefal iron repair is unique. First, its body is removed along with the top cover. Second, the nose screw is hidden under the water dispenser cover (left and center in the picture); it is visible through translucent plastic. Third, to get to the pumps, you need to remove the top cover with the housing removed. Its screw is hidden under the buttons (on the right in the figure), and it must be unscrewed so that the cover can be removed.
Fastening the lid of the Tefal iron
Finally, Tefal is a leader in the production of cordless irons. They come in several types: with contacts on the platform, with a heat-accumulating sole, with a discardable (shooting) cord. The first two are unsuitable for amateur repairs, but the last one, which seems to be faulty, may turn out to be quite functional.
The cord from the iron is thrown away by a pusher operating from a separate trigger mechanism with its own bimetallic plate. That is, if you, for example, ironed the cuffs and want to heat up the iron further by inserting the cord, but it doesn’t work, then the iron has not cooled down enough. You need to let it cool further, insert the cord, turn the dial to higher heat and wait until the cord bounces off. It’s inconvenient, of course, which is why irons with a detachable cord are not in great demand.
Phillips
A special feature of Philips irons is their double body. For example, the popular Azur is first dealt with in the usual sequence, poses. And in the figure, but the back cover is secured with 2 screws from the bottom. Under the decorative casing with pumps there is an internal one with protection (pos. B), and already under it there is a massive sole (in fact, the third casing) with a thermostat and thermal pad, pos. IN.
Disassembling the Philips Azur iron
Bosch
Fastening the back cover of the Bosch iron
The design of Bosch irons can be considered typical, and disassembling Bosch irons is even easier than others: the back cover is on one screw and without tricky fasteners. To remove it, you need to unscrew the screw and pull back the input hose of the power cord (see the figure on the right), the cover will fold back together with the hinge, after which further disassembly has no special features.
Brown
Rusted iron steam generator
The congenital defect of inexpensive Brown irons is the thin-walled steam generator tank made of galvanized steel and the fastening of the thermostat casing with foldable legs made of the same. Both rust perfectly, see fig. on the right, after which repairing the iron loses its meaning.
How to make steam
Improper descaling of the iron
The same congenital defect of all steam irons without exception is scale. It is difficult to remove it from the non-removable tank of the steam generator, and in no case should you boil the iron in a frying pan with vinegar to do this, as in Fig. Acetic acid fumes will make the plastic brittle, corrode the nickel on the sole to the point of roughness, and if it is coated with Teflon, it will begin to peel off. Firstly, the iron must be disassembled down to the sole for cleaning, see for example. video on how to clean Philips 3240:
Video: example of disassembling and cleaning a Philips 3240 iron
Secondly, as already mentioned, it is better to use a solution of citric acid rather than vinegar. Thirdly, before cleaning, the heating element contacts together with ceramic bushings must be tightly wrapped with good soft electrical tape in 3-4 layers or, better, with heat-shrinkable tape. Fourthly, if the nozzles are clogged with scale, also pierce them with a toothpick before cleaning. And fifthly, after cleaning, thoroughly rinse the hydraulic system of the sole with clean water from top to bottom, pouring it into the steam generator tank. Then you can rest assured: the iron will serve as well after cleaning as before.
***
2012-2020 Question-Remont.ru
Display all materials with the tag:
Go to section:
Self-repair steam generator Philips gc9220
Self-repair of Philips gc9220 steam generator, the power button blinks and there is no steam supply.
A steam station has become an indispensable assistant in the everyday life of every housewife, but what to do if your station stops working properly? In this article I will try to tell you how to disassemble the Philips gc9220 steam station yourself and make repairs at home.
How to fix it yourself?
Repair recommendations for Philips steam generators:
- any repair work related to disassembling the device must be carried out with the device disconnected from the electrical network;
- In order for the steam generator to work properly, it must be descaled at least once a month (subject to regular use);
- When checking the functionality of the device, you need to be careful: if a burning smell appears, you must disconnect it from the network and contact a service center;
- complex repairs should be performed by a specialist.
Briefly about the design
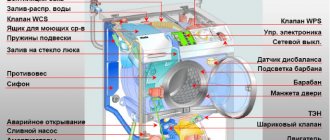
A steam generator from any manufacturer: Tefal, Bosch or Philips, consists of three main parts: an electronic control unit, a stand, also known as a station, and an iron. The delivery set also includes special attachments. The boiler heats the water, producing steam, which is supplied through a special hose to the iron, which has perforations at the base. Coming out of the holes, the steam processes the material, smoothing out any wrinkles.
The density and size of clothing do not affect the quality of its processing: you can simultaneously process bed linen, fabrics that require delicate handling - for example, silk, as well as jeans, suits made of wool blends or synthetics.
A household steam generator station, for example, Tefal, has a number of differences from a steam iron from the same manufacturer:
- firstly, the size - it is much larger and takes up a lot of space;
- secondly, water is poured into a separate boiler container and heated there until steam is formed;
- thirdly, the steam is not wet, but dry with a temperature of about 160 degrees;
- clothes and linen are processed without touching them with a device in the form of an iron, but only with steam, so you don’t have to worry about the integrity of things.
The figure below shows a standard Tefal steam generator station.
BUY AN ELECTRODE STEAM GENERATOR
Steam supply system Most modern models of irons are equipped with two buttons that are located in the front of the device: one of them is responsible for supplying steam, and the other makes it possible, if necessary, to moisten the fabric by spraying water through a special hole located on the nose of the iron. When the temperature of these metals changes, mechanical deformation of the element occurs, since the expansion coefficients of the metals are different.
Water is a good solvent, and this property greatly complicates water treatment plants, which must purify water not only from suspended or colloidal particles, but also from dissolved ones.
In this regard, nuclear power plant steam generators, heated by water under pressure, produce saturated steam of average pressure 3-7 MPa, having a high pressure of 10-17 MPa in the primary circuit.
The conditions are necessary for the water to be forced through a tablet of dense coffee, a cone squeezed into a cup, wrapped by a lover of strong, non-strong drinks. In most cases, ironing requirements are indicated by clothing manufacturers on a separate label, which is sewn into the folds of the product. Excellent for removing dirt from the sole. The body of this model does not slip when ironing with the entire sole; it comes into contact with the fabric at several points, thereby reducing the heating of the body from the sole. When heated, the metal is deformed, and differences in the properties of the component parts of the plate lead to slight deformation, as a result of which the plate moves upward and stops contacting the electrical circuit. In particular, the thermostat. The thermostat of the device will maintain the desired temperature automatically throughout the entire ironing process.
The required temperature is set on a scale using the thermostat lever. SteamGlide Sole A sole that combines a premium ceramic coating for superior glide on all fabrics and carefully designed vents for efficient crease removal.
If you are in a hurry when repairing your iron, you will be shouting an old grandmother’s hit: “Tyuk, tykh, tykh - my iron flared up. It removes dirt from the sole perfectly.
A true problem that can be eliminated in smart devices using different methods. Sole and heating system Not only the quality of ironing, but also the overall level of comfort when using the device largely depends on the sole, as the main component of the iron. How to connect a magnetic starter. Connection diagram.
troubleshooting
During operation, household appliances sometimes develop various malfunctions, which can be diagnosed based on characteristic signs and repaired steam generators with your own hands. If steam generators refuse to fulfill their assigned duties, the reason may be different.
- The station does not supply steam - the heating element or its contacts have burned out. There may also be incorrect operation of the boiler switch, or the steam supply button on the device may simply be broken.
- The pressure is not regulated - the switch is broken.
- The device supplies steam at the wrong temperature - the temperature fuse has blown, the thermostat has failed.
- No voltage - one of the wires in the power cord is broken.
- Poor water heating - a lot of deposits have accumulated on the walls of the container.
- The water level indicator is constantly on - the sensor is broken.
- Steam is constantly being released through the safety valve - there may be little water in the tank.
- Water has appeared under the station - there is a leak somewhere, turn off the steam generator and localize the fault.
In addition to the listed failures, many more reasons can be named that provoke the appearance of malfunctions in the operation of the steam generator.
To carry out a complete diagnosis of the product and repair various faults with your own hands, you need to have special equipment; with one multimeter and a soldering iron you can only find and fix simple faults.
Useful video
Philips steam generator does not supply steam, video repair instructions:
Sometimes, your Philips steam generator may not produce steam. Usually, this happens suddenly and despite the fact that all the indicators indicate operating mode, there is still no steam.
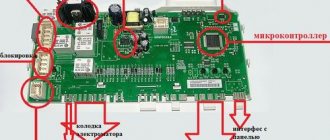
What can you say about this? The fact that a breakdown occurred is obvious. If your Philips steam generator has stopped producing steam at least once for no apparent reason, then you cannot do without technical intervention. Currently, the manufacturer equips its products with a rather complex control circuit. Only in the cheapest Philips steam generators can you find out the reason that no steam is coming out on your own. Modern models are equipped with a microprocessor unit with fragile temperature sensors that can be easily damaged and your iron will definitely no longer work.
To understand the reasons why your Philips steam generators do not produce steam, the technician will have to sequentially check all subsequent electrical circuits. Unfortunately, any of the reasons can be the basis for inoperability.
- Steam generator boiler heating does not work
- There is no heating signal from the microprocessor module
- The microprocessor module does not receive the steam signal from the iron
- Steam supply blocked by microprocessor module
- Philips steam generator electronic module is faulty
- The steam supply valve in the Philips steam generator is not working properly
All of the above reasons will require replacement of individual parts. The time when the cause of inoperability could be a simple lack of contact has passed. To eliminate the reason why there is no steam in your steam generator, it is most advisable to contact a workshop, which guarantees qualified and prompt repair of your Philips steam generator.
As always, if you have a sports interest and technical skills, you are willing to spend time and you have the opportunity to purchase spare parts, then you can try repairing the steam generator yourself.
>
DIY repair
You can repair simple faults yourself, even if you have a steam generator from Tefal, because we have already written that the design of all models is the same, with the exception of certain nuances. Below is a small list of common failures and methods for eliminating them.
- Steam has stopped flowing - check the heating element, fuse, solenoid valve, clean the steam outlet tube. Clean the boiler tank from scale, replace the thermostat or the hose through which steam flows to the iron.
- Incorrect operation of the pressure switch - check with a multimeter. If a breakdown occurs, install a working toggle switch or microswitch.
- There is no response to pressing a button on the control panel - check the integrity of the wiring, if everything is normal, then replace it.
- The low water level indicator in the container is constantly lit - check the level, if it is normal, then replace the liquid volume sensor in the container.
- The station reports that it is ready for operation, but when you press the steam button, it does not come out - the button is faulty and needs to be replaced.
- Weak steam pressure from the perforations on the soleplate of the iron - check the regulator, and if it breaks, replace it with a new one.
Of course, it is impossible to predict all the cases that may occur during operation - this list can be continued indefinitely, but here are presented only those malfunctions that the user can fix independently.
It should be taken into account that the home technician has skills in working with electrical household appliances - otherwise you should not even try to disassemble or try to independently repair steam generators, for example, from such well-known manufacturers of very reliable and high-quality equipment as Tefal or Philips.
Disassembling and repairing a steam iron
You can disassemble a modern steam iron yourself, but repairs to irons should only be performed by qualified specialists. Do not forget that the iron is an electrical device that works with water, which increases its danger
Attention! Improper disassembly and reassembly of the iron may result in electric shock or short circuit.
You don’t need to disassemble the iron yourself also because iron breakdowns are most often associated with the burnout of the heating element (the sole of the iron), which cannot be repaired, but only replaced with a new heating element. Therefore, it is usually cheaper and easier to buy a new iron than to have it repaired, because even if the fault is minor, the work and time of the technician are expensive. By the way, if you have to iron a lot, for example, in a studio, it is better to buy an ironing system or an iron with a steam generator.
The purpose of this article is precisely to help you understand what should be done when the iron stops working, when the light is on, but the soleplate of the iron does not heat. Help determine whether the iron needs repair or whether you should prepare to buy a new iron. These recommendations are suitable for any brands of household irons (Tefal, Philips, Vitek, Scarlet, Brown, Bosch, etc.)