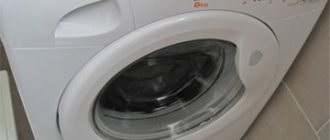
Today, in almost every apartment building you can find a Whirlpool brand washing machine, and more than one. Both assemblies are common in our country: Slovakia and Italy. The latter are bought less frequently and are more expensive, but machines assembled in Slovakia can be found in all household appliance stores.
Perhaps, it was the European assembly standards that helped Whirlpool machines establish themselves as machines of high quality and enviable durability. That is why repairs are rarely required, but if breakdowns do occur, you can often repair Whirlpool washing machines (Whirlpool) yourself.
Typical Whirlpool machine failures
If we thoroughly list all possible breakdowns of SMA, we would be forced to write a whole manual in 10 volumes. Therefore, we will focus only on malfunctions that are typical for this brand.
We've used data from reputable service centers to create valuable instructions for those planning to do their own Whirlpool washing machine repairs.
The most common failures:
- After washing, the water remains in the tank.
- Washing modes freeze, do not start at all, or programs run incorrectly.
- All washing modes are carried out in cold water.
- The SMA leaks in the manhole area.
Important! These seemingly harmless faults may hide serious damage. They need to be eliminated immediately so as not to completely break the SM.
The most vulnerable parts of Whirlpool machines
Based on the problems described above, we can identify the most vulnerable areas of Whirlpool washing machines. Many modern models have a self-diagnosis system that, using a fault code, will tell you which part has failed.
But what to do if the machine does not turn on at all, and there is nothing that could help you find out the cause of the breakdown? Listen to the advice of experienced repairmen, they are sure that the most vulnerable parts in a Whirlpool machine are:
- Thermoelectric heater – heating element.
- The engine and its moving elements.
- Hatch cuff, pipes.
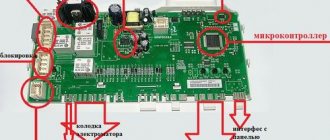
- Controller (control module).
Attention! Whirlpool machines, like any other machines, suffer from blockages. Both filters and hoses become clogged. If you carry out cleaning in a timely manner (3-4 times a year), you can avoid breakdowns of the water drain and fill system.
We dismantle the pressure switch and control panel
The further sequence of actions depends on the final goal. If it is necessary to remove the pressure switch or control panel, then the starting point will be the top of the machine body. The step-by-step instructions are as follows.
- Carefully insert the putty knife under the dashboard and lift to release the two spring clips.
- Slowly pull the part towards you.
- We inspect the opened selector switches and the water supply valve. When replacing the electronic board, you must remember the location of the connectors and lead wires.
- We disconnect the conductors and power cable (to conveniently unhook the terminals and brackets, it is better to use a flat-head screwdriver or pliers).
- Remove the water level sensor tube.
- Using a suitable socket or wrench, unscrew the two fastening screws.
- We take out the central control module.
Now all that remains is to straighten the groups of wires and finally remove the dashboard. To avoid confusion in the future when reassembling, it is recommended to photograph the connections and connectors or take care to mark them with a felt-tip pen or electrical tape. To penetrate even further into the interior of the Whirlpool washing machine, you will have to continue the manipulations you have begun.
Water does not leave the tank of the Whirlpool machine
You are probably familiar with the situation when you loaded the laundry into the tank, selected a convenient washing mode, went about your business in the kitchen, then came to get the laundry, and there was a disaster. The machine is malfunctioning: it is full of water and foam, the wash has not finished, the laundry is wet.
You restart the program, but everything is in a circle - the washing program is not executed because the water remains in the drum. This problem is caused by one of three factors:
- Debris has accumulated in the water drain pipe or drain filter.
- A clogged drain hose or a blockage in the sewer system.
- Failure of the electric drain pump (pump).
However, before you devote time to finding the causes of the failure, prepare your SMA for this:
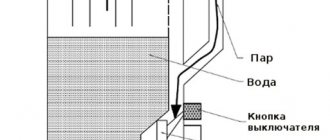
- Turn off the power.
- Manually drain any water remaining in the drum. This can be done quickly using the emergency drain hose - it is usually located near the water drain filter.
- Place a container or place a rag on the floor and waste water will flow out there.
Next, remove the waste water filter:
- Place a cloth or container under the hatch behind which the filter is located.
- Unscrew the plug counterclockwise.
- Clean and rinse the unit under the tap.
- Put everything back in place.
- Twist the drain hose, clean and rinse it, and install it in place.
It doesn't hurt to check the drain for blockages.
To carry out all the steps, you do not need to know how to disassemble a Whirlpool washing machine - this is an easy job that any user can do.
If your actions did not help get rid of the problem, the drainage system is clean, there is no blockage in the sewer, and the washing machine still does not drain water from the tank, it will still have to be disassembled. The real cause of the breakdown may be hidden in the pump and drain pipe.
Important! Almost all Whirlpool models are designed in such a way that the pump and pipe can only be reached from the bottom. You'll have to turn the car on its side.
How to find, check and clean the pump and pipe:
- Remove the detergent dispenser.
- Disconnect the machine from all systems: electricity, water supply, sewerage.
- Turn the SMA over, placing it on the side wall.
- Unscrew the bolts and remove the bottom.
- Arm yourself with a tester and measure the resistance of the pump.
- If you find a problem, change the pump.
- If the pump has nothing to do with it, then proceed further.
- Loosen the clamps of the water drain pipe.
- Remove the pipe.
- Clean and rinse it.
- Reinstall the pipe.
This breakdown is typical for machines with any type of loading. The design of the top-loading Whirlpool washing machine is somewhat different from that of conventional washing machines, but the problem with it must be solved according to the same scheme.
The main malfunctions of the Whirlpool washing machine with vertical loading and how to eliminate them
According to reviews from users and specialists, the following problems most often arise:
- Control unit malfunction. In this case, after turning on the machine, all indicators light up chaotically or during the “Wash” function its mode is disrupted. To eliminate this breakdown, it is necessary to determine the board that is causing the failure of the control unit. To correct this problem with a top-loading Whirlpool washing machine, you must contact a qualified technician.
- Failure to perform the “Drain water” option. This problem can only occur during the last cycle of operation of the washing machine. If water remains in the tank, disconnect the device from the power supply and drain the water using the emergency drain hose. The cause of the breakdown may be accumulated debris or pump failure. It is necessary to clean the filter from accumulated contaminants.
- Failure of the heating element. If within 10 minutes after starting the machine in the “Wash” mode the water temperature does not increase, then the “culprit” of the breakdown is the tubular electric heater. Such a malfunction of the Whirlpool washing machine, both front-loading and vertical, most often occurs due to hard water, poor-quality chemicals, or a power surge. If the heating element fails, it will need to be replaced.
- Spontaneous opening of the unit doors. If the shutters malfunction, you must stop using the washing machine, as the drum may jam. This problem may be caused by overloading, uneven distribution of items inside, or a faulty drum latch.
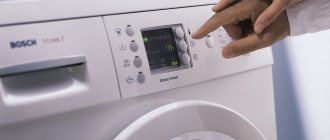
Whirlpool machine freezes, cold water when washing
Often, after starting the washing machine, the control panel begins to behave inappropriately: the display blinks, and all the LEDs blink along with it. The program you have chosen may also not work.
If this is your case, then immediately turn off the SM and wait 60 seconds. Then turn it on and, if the problem persists, you should call a technician, since the control module is damaged, and repairing it yourself is almost impossible. You will need not only a diagram of the control module of the Whirlpool washing machine, but also experience in such repairs.
If the washing machine does not want to heat the water and does not wash clothes well, then you can determine the breakdown without the help of special devices and carry out independent repairs.
The most likely reason for this behavior is a breakdown of the thermistor (temperature sensor) , but the heating element could also fail. Be that as it may, it is worth checking both elements together. Next, follow this simple procedure:
- Turn the machine so that the front wall is in front of you - this will make it more convenient to work.
- Unscrew the bolts and remove the back panel.
- Next, remove the bracket by unscrewing the bolts so that it does not interfere with working with the heater.
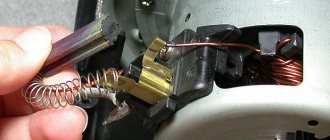
- You won’t see the entire heating element at once - only its tail is visible under the tank, to which four wires go, two of which are connected to the heater itself, and the rest to the temperature sensor.
- Remove all wires.
- Take a tester and measure the resistance of the temperature sensor contacts. Check the readings at room temperature, and then by heating the sensor in warm water, they should differ significantly if the sensor is working.
- Next, measure the resistance on the heating element itself. Its normal values are: 20-40 Ohms.
With such a problem, the breakdown will most likely be confirmed, so you will have to replace the sensor (which is easier) or the heating element.
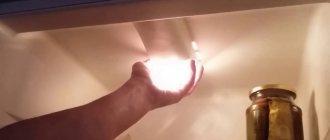
Important! If you do not have a tester at hand, immediately remove the heating element from the tank by unscrewing the fasteners. You will quickly determine the malfunction if the heating element is covered with a thick layer of scale, or dark spots appear on it. If there is just a little scale, then the heating element may not have burned out, but if the water stone is 1 cm thick or more, the breakdown is obvious.
You can easily change the heating element with your own hands as follows:
- The contacts and wires have already been removed, so next remove the plastic shield.
- Unscrew the fastener - it is located in the center of the shank.
- By carefully pulling the contacts, shaking the heater in different directions, remove the heating element. The rubber gasket will be an obstacle, so be patient - there is nothing you can do about it.
- Having taken out the heating element, remove the gasket.
Important! Mechanics recommend installing a new gasket along with the new heater, since leaks due to wear of the gasket are detrimental to this important unit.
- There is probably debris and scale in the hole where the heating element was, so carry out a general cleaning; Only after this can you install the gasket.
- Install a new heating element, tighten the fastener.
- Replace the plastic shield.
- Connect the contacts to the heater and sensor.
- Restore the location of the bracket, and finally mount the machine panel back.
Error codes
| Code | What does it mean | Reasons for the error | What to do |
| F01 (FH) | Problem with water getting inside the unit | The pressure in the water supply pipes is too low, which is why water does not flow at all or comes in less quantity than required. | Check the water pressure in the pipes. |
| There is a blockage in the filling valve screen or the water tap is not fully unscrewed. | Make sure the tap is turned off completely and the filter is not clogged. | ||
| The sensor that determines the water level has stopped functioning. | Check the operation of the pressure switch and solenoid valve, as well as the drain pump. | ||
| The contacts of the pressure switch, fill valve or drain pump are broken. | Clean the contacts of the pressure switch, fill valve or drain pump. | ||
| The controller is malfunctioning. | Evaluate the operation of the controller by checking its circuit and contacts. | ||
| F02 (FA) | Activating AquaStop | The electrovalve responsible for filling water into the device is blocked. | Repair or replace the solenoid valve with a new part. |
| The operation of the electrical controller is disrupted. | Correct the controller defect or replace it. | ||
| There is a water leak. | Check the machine components for leaks, eliminate leaks and replace damaged parts. | ||
| F03 (FP) | Problem with water drainage | Water does not drain from the machine due to a breakdown or debris in the drainage tract. | Inspect the drainage path, checking its permeability, then remove contamination or repair damaged elements. |
| The pump that pumps water out of the device has broken down. | Clean the pump filter and check its contacts, and if repair is not possible, replace it with a new pump. | ||
| Parts on the electrical controller board have burned out. | Once you have confirmed the problem with the controller, replace the controller itself or those parts that have burned out. | ||
| F04 | Water heating problem | The water does not heat up to the required temperature due to a breakdown of the heating element associated with the formation of scale on the surface of the heater. | Inspect the heater, descale it, or replace the heating element with a new part. |
| The temperature sensor control circuit is damaged. | Check the temperature sensor control circuit by replacing damaged parts or repairing the break. | ||
| There is a break in the temperature sensor or it is damaged due to a short circuit. | Assess the performance of the temperature sensor and replace it if damage is detected. | ||
| F05 | Water heating problem | The temperature sensor is malfunctioning. | Check the electrical circuit of the temperature sensor. If necessary, replace damaged wires and seal contacts. If the sensor itself is faulty, you will have to replace it with a new one. |
| F06 | No signal from the tachogenerator | The tachogenerator assembly in which the spring washer is located is faulty. | Reinstall the slipped washer in its place. |
| The connection between the control panel and the tacho is broken (the circuit is damaged). | Repair the electrical circuit between the engine control board and the tacho. | ||
| F07 | Problem with the motor control board | The electronic controller does not work. | Repair the controller or replace it completely. |
| A triac or thyristor has burned out on the control board. | Replace any burnt parts on the control board. | ||
| F08 | Problem with heating element | The heater burned out or there was a break in its wiring. | Replace the heating element with a new one or repair its wiring, and also check the contacts. |
| The protective pressure switch has broken. | Replace the damaged pressure switch. | ||
| The electrical controller is faulty. | Replace the damaged controller or repair the board by replacing burnt-out elements. | ||
| The thermistor is damaged. | Resolder the thermistor or seal the contacts in the electrical circuit of the temperature sensor. | ||
| F09 | Problem with water filling | There is a malfunction of the sensor that controls the water level. | Repair the sensor hydraulic system or replace the pressure switch. |
| The water inlet valve is broken or blocked. | Replace the fill valve with a working part. | ||
| The controller has malfunctioned. | Check the controller, resolder the burnt parts of its board, and if this is not possible, replace the controller with a new one. | ||
| F10 | Motor problem | The engine does not turn on due to a burnt-out triac on the control board. | Inspect the control board and replace parts that are burnt out. |
| The temperature sensor in the engine module has failed. | Replace the temperature sensor, and if it cannot be repaired, install a new control unit. If this does not help, you will have to replace the electric motor itself. | ||
| F11 | Communication problem | The supply voltage is below the required level. | Check the voltage and take measures to restore normal parameters of the apartment’s electrical network. |
| F12 | Water heating problem | The water no longer heats up due to the failure of the heating element or the breakdown of the pressure switch. | Replace the faulty heating element or pressure switch. |
| There is a break in the wires connecting the heating element and the controller. | After checking the wires of the circuit connecting the controller and the heating element, eliminate any identified defects, and also seal the clamps. | ||
| The water heating relay has malfunctioned (sticking has occurred). | If inspection confirms a problem with the heating relay, it should be replaced with a new one. | ||
| The temperature sensor has failed. | After confirming that the temperature sensor is damaged, repair the control board by replacing the thermistor on it. | ||
| F13 | Problem with water filling | Water is not poured into the tank due to insufficient pressure in the water supply. | Check the water pressure in the water supply. |
| The detergent container is clogged. | Clean the detergent reservoir. | ||
| Water fills up too slowly due to a clogged strainer in the filling device. | Clean the strainer in the fill valve. | ||
| F14 | Problem with the control system | The control board started working with errors. An error has occurred in the microprocessor. | Reflash the controller or completely replace the device control unit. |
| F15 | Motor problem | There is a fault in the triac on the controller board. | Check the operation of the triac and if it malfunctions, replace this part. |
| The motor brushes are worn out. | Replace the brushes or replace the entire motor. | ||
| The mechanical part of the tachogenerator is faulty. | Repair the tachogenerator by replacing the spring washer. Sometimes it is necessary to replace the tachogenerator with a new part. | ||
| There is a break in the wires connecting the electric motor to the controller. | Ring the wires and replace sections of the wiring where problems have been identified. | ||
| The electrical controller is faulty. | Repair the controller board or completely replace the controller with a new part. | ||
| F16 | Problem with the control system | Damage appeared in the wires. | Inspect the contacts and check the wires by stripping and replacing defective elements. |
| Parts on the control board are burnt out. | Repair the control unit or completely replace this module in the washing machine. | ||
| F18 or Fod | Wrong detergent | Detergent was loaded into the machine and caused excessive foam formation. | Change the detergent and restart the machine. |
| F19 | Power problem | The voltage in the power supply is inappropriate (too low or too high). | Normalize the network parameters and turn on the device again. |
| F20 | Problem with the controller | The control program cannot be executed due to a malfunction of the control unit. | Restart the machine, and if the washing does not turn on, check the operation of the control unit, try to repair the controller board, and if this is not possible, then completely replace the controller. |
| F21 | Problem with the controller | The transmission of commands from the controller to the control module was disrupted due to problems with wires and contacts. | Inspect the wiring and eliminate defective areas. Seal the contacts and tighten the wire clamps. If the problem persists, replace the controller. |
| F22 | Problem with water supply or heating | The heating element does not heat the water. | Inspect the heating element by sealing its terminals. If necessary, replace the heater with a new one. |
| The contacts between the heating element and the controller are broken. | Ring the wires and pay attention to the sealing of the clamps. | ||
| The voltage in the home electrical network is insufficient for the heating element to operate. | Turn off the device and fix problems in the power supply. | ||
| Water cannot pass through the detergent reservoir because it is clogged. | Check the condition of the tank and clear any blockage found. | ||
| F23 | Problem with water filling | The operation of the water level sensor is disrupted, resulting in simultaneous signals indicating that the tank is full and that there is no water in it. | Check the pressure switch and, if a fault is detected, replace it with a new part. |
| F24 | Malfunction of the system that controls the water level in the tank | The water level sensor is broken, causing it to give signals about overflow. | After confirming the malfunction, replace the pressure switch. |
| F26 | Motor problem | Due to a faulty triac in the control board, the motor stopped rotating. | Replace the triac and check the contact tracks on the board. |
| F27 | Motor problem | Due to a malfunction of the reverse relay located on the control module board, the engine rotates only in one direction. | Check the reverse relay, and if a breakdown is detected, replace it with a working part. |
| F28 | Motor problem | The winding switching relay is faulty, resulting in the engine rotation becoming too slow or the engine no longer starting during the cycle change process. | Check the relay and replace it. |
| F31 | Software update problem | The software is not updated via the Internet. | Contact your provider. |
| FDL | Sunroof problem | The hatch lock has failed. | Check the interlock contacts by cleaning them and tightening them. If repair is not possible, replace the blocker. |
| FDU | Sunroof problem | The door is not closed tightly. | Open the door and try to close it tightly. |
| The hatch lock is faulty. | Repair or replace the door lock. |
Related article: Calculation of cable length for electrical wiring