What can an engine from an old washing machine look like?
If you are planning to make homemade products from a used engine, you need to figure out what it is and what it is capable of. In washing machines you can find three types of motors: asynchronous, brushless and commutated. Let's take a closer look at them:
- Asynchronous - can be two-phase or three-phase. Two-phase engines are found in older Soviet-made models. More modern machines are equipped with three-phase. The design of such an engine is extremely simple; it can reach speeds of up to 2800 rpm. The working engine removed from the machine just needs to be lubricated - and it is ready for new exploits.
Such motors are characterized by quiet operation. Their only drawback is their impressive dimensions.
- Commutator – you will find this type of motor in the design of most household appliances. Such devices can operate from direct and alternating current, have compact dimensions and a controlled speed. The only drawback of such an engine is the brushes that wear out, but these parts can be replaced if necessary.
It must be admitted that, in comparison with an asynchronous motor, such a motor is noisier. In addition, it often overheats and even sparks
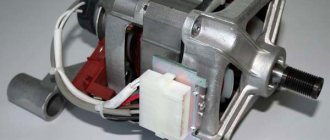
- Brushless direct drive is the most modern motor from the Korean manufacturer. You will find it in modern washing machines from LG and Samsung.
Such models are the most compact. They are characterized by wear resistance, simplicity of design and high efficiency.
Now that you can determine the type of motor, all that remains is to decide where you can use the motor from the washing machine.
How to connect an electric motor from a washing machine to a 220 volt network
Before planning to connect the motor to the washing machine, you need to determine its type. Then you need to determine which parts of the motor the wires come from. If the terminal block has been preserved, then it is easier to do this by testing the contacts with a multimeter.
How to simply connect the motor from an automatic washing machine. Without any instruments, at random
See how to connect a dishwasher to the sewer and water supply.
It is important to correctly develop a connection diagram to a 220 volt network in order to fully use the capabilities of the electric motor in a new device. If the engine is needed to drive a constant spindle speed, then a capacitor is not needed. Otherwise, it is necessary to maintain a complex connection to the electrical network in order for the speed controller to work. Below we will consider ways to connect asynchronous, commutator and inverter motors removed from washing machines.
Connecting an asynchronous motor
In old Soviet units, asynchronous electric motors were installed on the washing tank, and collector motors were rotated by centrifuges for spinning clothes. If you are sure that the power blocks have been removed from such a machine, then it becomes clear what type each of them belongs to.
An asynchronous motor has two windings, one of which carries out the start, and the other ensures the operating mode of rotation of the motor spindle. Their conclusions can be found on the dispensing block. To determine which pair of them belongs to which winding, use a tester (multimeter). To begin with, all the wires are ringing one by one.
As a result, two pairs of terminals of both windings are determined. The greater resistance of one of the pairs will indicate that it belongs to the starting winding; accordingly, the secondary working winding will have less resistance.
To operate the engine, it will be enough to connect the working winding. But immediately a problem arises with starting the engine. You will need to unscrew the spindle manually each time. However, this is far from safe, and even burdensome, especially with large loads on the motor shaft.
Connecting an asynchronous motor from a washing machine
Therefore, you will have to use a starting winding and a capacitor. For an idea of how an asynchronous electric motor should have been connected, below is a universal diagram, where OB is the excitation winding (working), PO is the starting winding and SB is the contactor (a non-polar capacitor of small capacity 2 - 4 μF can be installed instead).
You can use an old capacitor that was removed along with the engine. It is connected to one of the software pins. The photo below shows the preliminary connection of the motor to check its functionality.
When starting for the first time, you should try to turn on the motor without a starting winding. If the motor starts to rotate the spindle, and the workload is small, then you can do without a starting device. Otherwise, the software in the circuit will simply be necessary.
Since the engine inherited from an old washing machine is itself an old power unit, the motor may overheat when first started. This may occur due to worn bearings or a capacitor with an excessively large capacity.
It's easy to check. If working with a disconnected capacitor does not cause the motor to overheat, then the capacitor is replaced with another one with a smaller capacity. If the cause is a worn bearing, then the question will arise about its replacement or the feasibility of repair.
You can do without a capacitor. Instead, a contactor is connected to one of the software terminals without fixing. Most often, a simple doorbell button is used for this.
At the moment of startup, the button is clamped and fixed until the spindle spins. After this, the button is released, which disables the software. If you need to change the direction of rotation of the rotor, then to reverse, change the sides of the starting winding terminals. How to reverse an asynchronous motor can be seen in the diagram below.
If, for example, the starting winding is not used, then the direction of rotation of the rotor can be changed with a push of the hand.
How to connect a commutator motor
Such engines were installed in washing machines with vertical loading of the tank. Commutator motors do not require forced starting, so they do not have a starting winding.
Connecting a commutator motor from an automatic washing machine.
You can determine whether an electric motor belongs to a given type of engine by looking at the terminal box. As a rule, you can find from 5 to 8 pins in it. Most of them are designed to control washing modes and will not be needed later. Also, commutator engines are distinguished by the presence of brushes; their mounting sockets are visible on the engine body.
If you disassemble the engine, you can see an armature (rotor) with a winding with steel frames, the ends of which are brought together into a collector ring. The commutator, in contact with the graphite brushes under voltage, excites the winding. In the electromagnetic field of the stator, an electromotive force (EMF) arises in the armature, which causes the armature to rotate.
To understand the structure of a commutator electric motor, it is necessary to consider the standard layout of all parts of a commutator motor.
This type of motor is connected in this way:
- It is necessary to find one of the terminals of the stator winding and connect it directly to the phase wire of the electrical network;
- The second terminal of the stator winding will be connected to one of the rotor brushes;
- At the same time, another brush is connected to the neutral wire of the electrical network;
- To carry out correct on/off, a household light switch is soldered into the circuit of branches 1 or 2 (see diagram below).
To change the direction of rotation of the electric motor spindle, it is enough to change the connection points of the brushes.
To do this, you can assemble a simple circuit with one pass-through switch. Since the engine starts with a jerk, its body should be firmly secured to a tabletop, workbench or other base. To do this, use the mounting holes on the ebbs of the motor housing.
Home craftsmen often install motors with a spindle speed controller in their homemade products. To control the speed, a dimmer is soldered into the power circuit between the socket and one of the commutator brushes. This is an ordinary household light controller. A necessary condition is that the dimmer must be somewhat more powerful than the electric motor.
Before starting the commutator motor from an old washing machine, you need to disassemble it and check the condition of the two rotor support bearings, replace worn brushes, and clean the copper surface of the commutator with zero-grade sandpaper.
We properly disassemble and decide what can be made from parts of an old washing machine
Disassembling a washing machine is a leisurely task. After working with water, a salt build-up may remain on the parts; it must be carefully removed so as not to damage the parts during removal. What can be made from an old washing machine? A motor will be useful for homemade projects - it will become the basis for many devices. The drum will also come into play. It is usually made of stainless steel. All pipes must be disconnected from the drum. A loading hatch may also be useful. In addition to these parts, do not rush to throw away springs, counterweights and body parts.
For those who are versed in electronics, you may need a circuit board - it can easily be used to find spare parts for repair work if necessary.
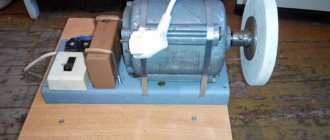
How to make a sharpener or grinding device from a washing machine engine
A sharpener is one of the most popular tools for the home. It can be used to sharpen garden tools, household knives and scissors. If you don’t already have one, buy it at any tool store or make a sharpening machine from a washing machine. The most difficult part is how to attach the sanding wheel to the motor. The easiest way is to buy a ready-made flange. It looks something like this.
Flange for motor
You can machine a flange from a metal pipe of a suitable diameter; most often, a tube with a cross-section of 32 mm is suitable. You need to cut a piece 15 centimeters long from it, this is quite enough to fix the emery. The flange is secured to the motor shaft by welding or a through bolt. The video describes in detail how a homemade washing machine sharpener works:
Second life of the motor
After purchasing a new washing machine, there is no need to throw away the old one. Serviceable elements can be used in everyday life. For example, the engine has interesting uses.
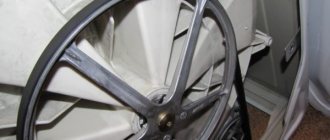
Grinder
Designed for sharpening knives and tools. In principle, anyone can do it. The main difficulty lies in attaching the abrasive disc. The washing machine motor shaft is not designed to accommodate additional parts. It only has grooves for the drive belt.
Sharpening machine from a washing machine
In this case, two options are possible:
- Weld an extension to the end of the shaft, onto which a sharpening disk is attached. Greater precision is needed here to ensure that alignment is maintained.
- Machine the shaft so that it becomes possible to install the disk and strengthen it, for example, with a washer.
If this can be done, then the rest is a matter of technology. You will need to find a suitable place and secure the device.
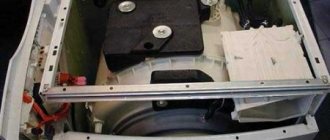
Vibrating table
A vibrating table may be needed by those who are engaged in the independent production of paving slabs or cinder blocks. There is also the issue of processing the shaft for fastening parts.
Are you using citric acid?
Oh yes! No
In addition, motors from washing machines are used to manufacture the following products:
- Concrete mixer. Quite often this is used because it is convenient to use a washing machine tank for these purposes. Of course, some modifications need to be made. The power will be small, but quite sufficient for personal purposes.
- Mill for grinding grass. A rare use, but very convenient for rural residents who keep poultry.
Other, more exotic options are also possible. A lot depends on personal needs and imagination.
Video on making a do-it-yourself engine speed controller
Making a wood lathe from a washing machine
What else can you do with the washing machine motor? One popular idea is a wood lathe. Let's look at the step-by-step process.
| Illustration | Description of action |
| To firmly fix the engine on the workbench, make fasteners from a metal angle. To do this, drill holes for fixing to the motor legs and table. | |
| To fasten a wooden part, you will need a flange fixed to the motor shaft, and these are the studs made from ordinary bolts with cut off heads. Screw these pins into the base. You will need 3 studs. | |
| The motor is fixed to the table with self-tapping screws and to the metal part with bolts. | |
| The opposite end of the wooden part is attached with such a device. It consists of a screw with a loop, two wooden stands perpendicularly fixed to the corners. | |
| This wooden part must be movable so that different workpieces can be used. For mobility, it is mounted on a threaded stud with bolts. | |
| To control the motor you will need a power supply. You can use one of the computer units. You will need to install switches to adjust the rotation speed. | |
| How to connect a motor to a power supply in animation. | |
| To guide your tools, make a tool rest. It consists of two wooden parts and a metal corner. All parts are movable due to fastening with one bolt. | |
| The lower part of the tool rest is rigidly fixed on the workbench using self-tapping screws and corners. | |
| The workpiece is fixed on the machine on both sides: on the left - on studs, on the right - on a bolt with a handle. To fix it in the workpiece, you need to drill the corresponding holes. | |
| To work, you will need sharpened tools - cutters. | |
| Final sanding of the workpiece is done using a strip of sandpaper. |
Self-connection methods
For an engine to work, it needs power. Connecting to electricity yourself involves connecting the wires correctly. Therefore, you will need a washing machine motor wiring diagram.
To work you need stator and rotor wires. But how to find them? A visual inspection reveals many wires. How to decide which one you need?
Let's look at how to connect an electric motor with 3, 4 and 6 wires.
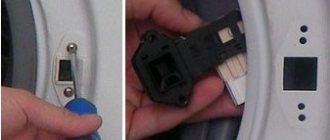
Look at the motor. There are two wires on the left side - they are not used. Often the manufacturer paints them white. For clarity, look at the photo below:
The orange arrows point to the red and brown wires. These are the stator terminals. The blue arrows point to the wires leading to the rotor brushes. These four wires are needed to connect the motor from the washing machine.
Wiring colors may vary from manufacturer to manufacturer. Therefore, use the tester for an accurate check.
Measure the resistance of each wire to find its pair. Clean the contacts and connect the tester probe to them. Record your readings. Next, ring all the wires in turn until everyone has a pair.
How to make a simple feather removal machine for home use from a washing machine with your own hands
The time of slaughtering a bird is a troublesome stage. This is usually done in the fall, when the ducks and broilers have reached the desired weight, and it is no longer profitable to keep them in the winter. You need to pluck several dozen or even hundreds of carcasses very quickly. You can get rid of hard labor with the help of a feather removal machine, and it’s easy to do everything from the same parts of the washing machine.
The only thing that can cause difficulties is the search for rubber fingers with threads - beaters. You will have to order them, so keep in mind that you need to think about making the machine long before slaughter
The device does not require disassembling the washing machine. It is especially convenient to use machines with vertical loading. You just need to fix the beats in the drum so that they point inward. Before plucking, the chicken carcass must be scalded with boiling water and then simply thrown into a rotating drum. Here's what happens:
Important! To prevent water from getting on the engine of the feather removal machine, you need to protect it with a plastic casing.
And the last point - the feather removal device must be firmly fixed, since the vibration when loading the carcass will be very strong.
Washing machine in the Soviet Union - emergence and evolution
Washing machines today are an everyday item, and now women, and men too, cannot imagine how they managed without this device before, when these home appliances did not exist.
The evolution of washing machines
Now it is almost impossible to imagine hand washing, and only very elderly people can remember how and where they washed sixty years ago. In the USSR, washing machines began to be produced almost half a century later than in America.
A short excursion into the past
A patent for the unit, called the “electric washerwoman,” was issued in 1910 to engineer A. Fisher from the USA. From that moment on, the replacement of hand washing with machine washing began. When did the first washing machines appear in the USSR?
Drawing of the first washing machine by A. Fisher
The country had not yet produced its own cars, nor did they arrive from abroad. And only a few nomenklatura ranks, while on official business trips abroad, brought from there this miracle of imperialist technology.
The first washing machines were imported into the USSR in 1925. Soviet and party bosses meticulously chose washing machines. The cost did not bother them; the technical characteristics were of secondary interest.
They were mainly interested in appearance. It was extremely important that the car looked like a piece of furniture, and not like some kind of unit, and that it fit organically into the existing interior, if not a living room, then at least a kitchen.
The leadership of the relevant ministries did not get around to starting domestic production in the country. That’s why ordinary Soviet women suffered with washboards and rubles while the nomenklatura washed their things in expensive imported machines. And only in the post-war period, in the fifties, domestic washing machines appeared in the country.
The first domestic washing machines
In 1950, the Riga Electromechanical Plant was the first to start producing washing units. The plant’s specialists developed and launched into production washing machines “EAYA-2” and “EAYA-3”. To attract buyers, these devices were sold for only 600 rubles, although each copy cost the plant one and a half thousand.
Lawnmower from a used motor
We continue to look for the answer to the question of where we can use the motor from an automatic washing machine. Another original idea is making a lawn mower. For a small area, an electric model connected to a power source with a cord is quite sufficient. The design of such a unit is very simple. You will need to make a platform on four wheels with a small diameter.
The platform can be made of metal or OSB board, plywood and even the body of the same washing machine
The engine is fixed on top of the platform, the shaft is threaded into the hole below, and the knife is attached to it. All that remains is to attach handles and a lever to the cart to turn the power on and off. If you have an asynchronous motor lying around, you will be surprised at how quiet the unit will be, even compared to factory models.
Advice! To prevent grass from wrapping around the knives, you need to slightly bend their cutting edges down.
Video: how to make a lawn mower
Use Cases
The working motor from the SM can be used for household needs. Have you decided to tile your yard? Make a homemade vibrating table.
You will need one plate, secured with moving parts to the base. Starting the electric motor from the washing machine will help move the stove. By releasing air from the concrete, you can improve the quality of the tiles, making them stronger and more durable.
You can also make a concrete mixer, but you will need an additional tank. Metal blades in the shape of the letter “P” are installed inside the tank. The drain hole closes. How to connect a washing machine motor to a homemade concrete mixer can be seen in the video:
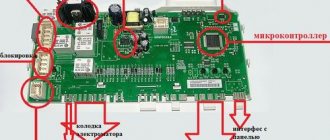
1. You need to find the Tachometer wires. Usually they have a noticeably smaller cross-section and when “ringed” with a multimeter, they can show resistance or ring with a “chime”. The tachometer is located at the rear (relative to the pulley) of the electric motor, with wires coming out of it.
2. The brushes are located by sequentially “diagning” the wires. The two wires should ring with each other and should also ring with the motor commutator.
3. The winding may have two or three wire leads. It is also located by sequential “ringing” of wires. If you have three terminals (with a middle point), you need to measure their resistance to each other. Two of them should show more resistance, the other end, less resistance. If you choose a winding with more resistance, you will get less revolutions, but more torque. Conversely, a winding with less resistance will give more revolutions, but less torque.
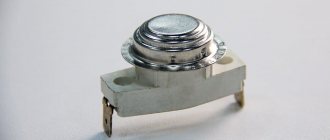
4. Thermocouple wires have two wires and are usually colored white. In our case they will not be used. Not shown in the picture!
Now, after all the wires have been found, you need to randomly connect one wire from the brushes to one of the wires of the selected winding. We connect the two remaining leads (from the brushes and winding) to a 220V network. If you want to change the direction of rotation of the rotor, you need to change the ends of the connection between the wires of the brushes and the windings.
After you have checked the operation of the electric motor from the network, you now need to connect it to the board. To do this, on the back side of the board, under the three terminals on it, there are the letters “AC””M””T”.
“AC” – designates the terminal to which the 220V mains power is connected. "M" - indicates the terminal to which the motor is connected. The same wires that were connected to the network above. “T” is the terminal to which the tachometer wires are connected.
How best to use the board in your system
Since motors from automatic washing machines are high-speed, they are still designed to operate in this range. Since this is related to its cooling and the moment of force on the shaft (torque). Therefore, if you plan to use the engine at low speeds with full torque (at the full power declared by the manufacturer), then you may need to install additional cooling (cooler). Since the airflow of the installed impeller due to low speeds may not be enough. If you touch the electric motor with your hand and cannot hold it for more than 15 seconds, then additional cooling is required.
Since the engine is high-speed, its maximum power is achieved when the board is adjusted from 600 rpm. All revolutions that are lower may not have the maximum torque. Therefore, if your system requires very low speeds (from 1 to 600), you need to use a belt drive consisting of two pulleys (for example, from the same washing machine).
Thus, you will “Kill three birds with one stone”, achieve very low speeds, get even more torque (force on the shaft), and have a smooth intake with speed control.
If you need to connect two motors to the board at the same time, or power any motor with direct current, then you need to use a diode bridge at the output of the board with the further connection described above.
Connecting the motor from an automatic washing machine
Before we talk about connecting the washing machine motor, you need to understand what it is. Perhaps someone has known the wiring diagram for the electric motor of a washing machine for a long time, while others are hearing it for the first time.
An electric engine is a machine powered by electricity that serves as a drive for various mechanisms, i.e. setting them in motion. They produce asynchronous and synchronous units.
How to build a generator from an old washing machine
We continue to look at homemade products from a washing machine motor, and the turn has come to the generator. You won't be able to assemble a powerful device, but in the event of an emergency shutdown, you can be well prepared. To turn the engine into a generator, you will have to disassemble it and partially cut off the core. In the remaining part of the core you need to make grooves for neodymium magnets.
The magnets must be placed in two rows with the same spacing
The gaps between the magnets are filled by cold welding. To operate the device, the kit must include a motorcycle battery, a rectifier and a charge controller. Details of the work in the video:
How to connect a three-phase asynchronous electric motor?
Each of these motors is designed, as a rule, for 2 mains voltages: 220 V, 220 and 127 V, etc.
There are two connection diagrams for it: you can connect the electric motor from the washing machine with a “triangle” (220V) and a “star” (380V). By reconnecting the windings, they achieve a change in the rating of one voltage to another.
If the electric motor has jumpers and a block with six terminals, you need to change the position of the jumpers.
For any connection scheme, the direction of the windings must coincide with the direction of the windings. The zero point for a “star” can be either the beginning of the winding or the end, in contrast to the “triangle”, where they are connected only in series. In other words, the end of the previous one with the beginning of the next one.
It is also possible to operate the motor in a single-phase network, but not with full efficiency. For this purpose, non-polar capacitors are used. With capacitors installed in the network, the maximum power will not exceed 70%.
Video: How to connect a motor from an old washing machine through or without a capacitor
Source
Homemade concrete mixer
If you have started a small renovation that requires, for example, plastering the walls, a concrete mixer will come in handy. Once again, washing machine parts will come in handy.
As a result, you will receive a compact device with low power, which you won’t mind throwing away after the repair work is completed.
As a container for concrete, you can use the same drum with pre-sealed holes for draining water. It is best to use parts from a front-loading machine; there will be almost nothing to redo. To strengthen the body, use a metal corner, and for convenient movement of the concrete mixer, equip it with wheels. The main difficulty in the design is the manufacture of a “swing” for the correct tilt and subsequent pouring of concrete. How to do it correctly in the video:
Advantages of asynchronous motors
The electric motor that turns the drum is the heart of the washing machine.
The drive in the very first versions of the machines was belts that rotated the container with laundry. However, today the asynchronous apparatus, which converts electricity into mechanical energy, has been significantly improved. More often, washing machine circuits contain asynchronous motors, consisting of a stator, which does not move and serves as both a magnetic circuit and a supporting system, and a moving rotor that turns the drum. An asynchronous motor operates due to the interaction of the unstable magnetic fields of these structures. Asynchronous motors are divided into two-phase, which are less common, and three-phase.
The advantages of asynchronous devices include:
- uncomplicated system;
- basic maintenance, including replacing bearings;
- periodic lubrication of the electric motor;
- silent operation;
- conditional low cost.
Of course, there are also disadvantages:
- low efficiency;
- large scale;
- low power.
Such engines usually have a lower cost.
Homemade products from a washing machine engine: circular saw
You will be surprised, but a circular machine can also be built based on the motor from a washing machine. An important point in this matter is the additional equipment of the motor with a device that regulates speed. Without this additional module, the circular machine will work unevenly and simply will not cope with the task. Device assembly diagram:
Circular saw diagram
The principle of operation of the device is simple: the engine drives a shaft on which a small pulley is mounted. From the small pulley there is a drive belt to a large pulley with a circular saw.
Important! When working with a homemade circular saw, take care of your hands. All structural parts must be firmly fixed.
The resulting unit will not be very powerful, so it can only be used for cutting boards up to 5 cm thick. How this homemade circular saw works:
Types of electric motors
An electric motor is a machine operating on electricity that moves various elements using a drive. They produce asynchronous and synchronous units .
Synchronous motor
It has been established since school days that when magnets approach each other, they attract or repel.
The first case appears at opposite magnetic poles, the second - at like ones. We are talking about stable magnets and the magnetic field they constantly organize. In addition to those presented, there are unstable magnets. Everyone, without exception, remembers the example from the textbook: the picture shows a magnet in the shape of an ordinary horseshoe. Between its poles there is a frame made in the shape of a horseshoe with half rings. Current was supplied to the frame.
Since the magnet rejects the same poles and attracts different ones, an electromagnetic field appears around this frame, which turns it in a vertical position. As a result, it is acted upon by a current opposite to the main case in terms of the symbol. The modified polarity rotates the frame and again sends it to the horizontal area. The operation of a synchronous electric motor is based on this belief.
In this circuit, current is supplied to the rotor winding , represented by a frame. The source that creates the electromagnetic field is the windings. The stator performs the functions of a magnet. In addition, it is made of windings or a set of stable magnets.
The rotor speed of such an electric motor is the same as the current supplied to the winding terminals, i.e. they work simultaneously, which gives the electric motor its name.
Asynchronous device
To understand the principle of operation, let’s remember the picture: a frame (but without half rings) is located between the magnetic poles. The magnet is made in the shape of a horseshoe, the ends of which are united.
What else can be made from a washing machine drum: original decor ideas
The drum with its correct perforation is a material for the manufacture of decorative objects. Here are some interesting ideas.
Ottoman with drum base. It’s easy to do – you just need to attach the wheeled legs and make a soft seat
Such a drum can also be turned into an original lamp. If you place a lamp inside, the perforated surface of the drum will cast glare on the walls. Such lamps will look good on the ceiling of the veranda or even on the floor
Bedside tables and tables. Drums with doors from top-loading machines can be used to hide small items.
This is how the drum turns into a cabinet or nightstand
Making a barbecue from a drum from a washing machine, photo examples
A metal grill is a temporary product. Sooner or later it burns out and requires replacement. You can buy a new one each time or use improvised material, for example, a drum from a washing machine. Making this craft from a washing machine drum takes a couple of minutes. The beauty is that oxygen easily enters the perforated container, which causes active combustion.
Kebab coals burn quickly, and the process of cooking meat is significantly accelerated
The metal of the drum can withstand a couple of seasons. Make a comfortable stand for it so you don’t have to bend over, and you’re done. Standard length skewers will fit comfortably on a small roasting pan. If necessary, you can lightly weld a couple of guides.
Tips for working
When using a powerful machine motor in a new guise, you must remember 2 important nuances of connecting it:
- such installations do not start through a capacitor;
- no starting winding needed.
Before connecting, we recommend that you understand the wires of different colors located there on the transfer case:
- 2 white wires are from the generator, we don’t need them;
- brown and red usually go to the windings of the stator and rotor;
- gray and green are connected to the brushes.
Be prepared for the fact that in different modifications the wires differ in color, but the principle of their connection remains constant. To identify pairs, ring the wires in order: those going to the tachogenerator have a resistance of 60-70 Ohms. Move them aside and secure them together with electrical tape so that they do not interfere. Ring the other wires to find a pair for them.