Before we begin the actual process of dismantling the top control panel, we need to gain access to the screws that secure it.
One of them is located under the tray where the powder is poured. Therefore, first of all, with a slight movement of the hand and pressing a special button (on LG machines of recent years there is always a button that allows you to easily remove the tray), the tray is removed from its usual place.
One or two more screws are located on the opposite side, but we already have access to them, since we removed the top cover in the first step, and therefore, without thinking for a second, we begin to dismantle the top control panel, unscrewing the screws. After unscrewing all the screws, try to slightly pull the panel towards you: if this is successful, then you can safely remove the panel, because nothing is holding it in place.
Depending on the model of the machine, the control panel can either be hung on a service hook specially prepared by the manufacturer for such cases, or simply carefully moved to the side without breaking the wires: do not forget that we are not breaking the washing machine, but trying to do something to “heal” her.
Removing the front wall
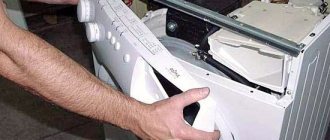
The time has come to remove the front wall, which has long been looking at us with its sad glass gaze and asking us not to remove it. Let's not listen to the pleas of modest components: necessity is necessity.
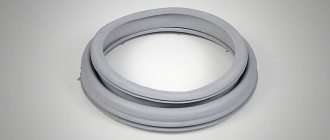
But in order to dismantle the front wall, you must first disconnect the cuff (the elastic band located immediately behind the door) so that it no longer blocks the panel. Removing the cuff is not a difficult process: just feel for the spring holding the cuff and press on it, and the cuff will immediately loosen, and you can put it in the tank so it doesn’t get lost.
Now, by the way, you can begin the process of removing the front wall. To begin with, the screws connecting the front panel to the top are unscrewed, and, accordingly, they are located at the top. The number of screws is usually 3-4 pieces, no more.
By unscrewing them, the front panel can be lifted: it is held on hooks, in other words, hanging. Most likely, you won't succeed the first time. The tank lock will interfere, preventing the door from opening at the most inopportune moment during operation. It needs to be disconnected. On many models of LG washing machines, this is done by simply removing the lock from the groove with a screwdriver even before removing the front panel.
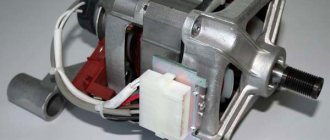
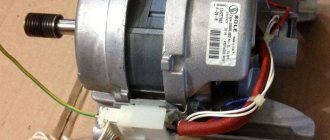
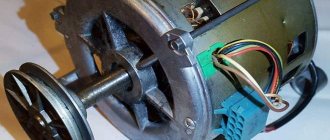
LG washing machine motor design
Most LG washing machines are equipped with commutator-type motors. These are single-phase motors with series excitation of windings.
The commutator motor housing contains:
- stator (steel plates between which there is a copper winding);
- rotor (consists of a core, winding and collector);
- tachometer (fixed on the body, transmits data to the control module about the engine speed);
- two graphite brushes (provide contact between the stator and rotor).
The current is transmitted through the winding of the immovable stator element to the rotor. A pulley is pressed onto the rotor shaft, which through the drive belt causes the drum of the washing machine to rotate (the rotation speed depends on the network voltage). The rotation frequency is controlled by a tachogenerator; two graphite brushes ensure maximum contact between two elements: stator and rotor.
The latest models of modern LG washing machines are equipped with inverter-type electric motors. It was LG that was the first to equip washing machines with electric motors of this type, thereby ensuring its leadership in the market.
In comparison with collector motors,
inverter motors are distinguished by :
- maximum speed of acceleration,
- silent operation,
- possibility of setting the drum rotation mode,
- simple and compact design.
The inverter motor is a disk with a shaft located on a central axis.
The operating principle of the inverter motor is based on the use of electromagnetic induction. Instead of graphite brushes, the winding current is controlled by an inverter . The rotor operates at a very high speed, without dropping speed. Thanks to this feature, it is possible to achieve the best spin of laundry after washing.
The absence of carbon brushes and a rubber drive belt (it is these parts that quickly wear out under the influence of friction) ensures the maximum period of uninterrupted operation of the inverter motor (the manufacturer provides a guarantee of at least 15 years).
Removing the back wall
Perhaps removing the back wall is the simplest thing we will have to do in the process of disassembling the LG washing machine. Business: unscrew two screws on the very back wall and remove it with a slight movement of your hand.
It’s even somehow uninteresting and undignified, but without this banal and, if I may say so, boring action, the entire next process will not make sense. We deliberately separated it from everything we had been doing so far, since the previous processes were rather mechanical, and ingenuity and accuracy came to our aid. Now the actions will become more difficult, and the risk of breaking the machine will increase.
Removing the narrow panel
It is necessary to unscrew the lower front strip, since it hides the fastening of the large front panel. There is also a hatch that provides access to the pump and filter. Once you remove it, you will see screws that will have to be unscrewed.
After removing the bolts, lightly pry the cover from the bottom using a flathead screwdriver. The fastening elements will slide out of the grooves, and the plate can be removed and then set aside.
We remove what interferes and distracts
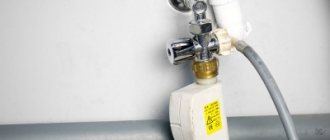
Having removed all the covers and panels, we saw all the ins and outs of the washing machine in the literal and figurative sense of the word. All unnecessary parts now need to be removed, and therefore the pressure switch hoses, the hose coming from the place where the tray (powder receptacle) was, the inlet hose and the drain pipe are removed from the car overnight.
The word “hose” is too much, isn’t it? Briefly speaking, we can assume that all the large hoses that catch your eye when looking at the washing machine in its current form are removed. To remove the hoses, you will need to unscrew the clamps securing them, and then directly remove the hoses. It is advisable not to remove the clamps from the hoses, especially if the latter are of different diameters.
Trouble-shooting
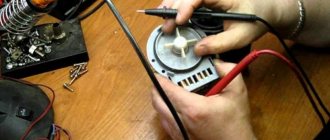
Most often, the commutator motor in a washing machine stops working because the brushes wear out. Less often, this occurs due to faulty windings or wear of the lamellas.
To identify the malfunction, you need to start the engine. To do this, you need to make a series connection of the stator and rotor windings, and then supply alternating current with a power of 220 Volts through the free connectors. The motor will begin to rotate.
If the washing machine is many years old, the brushes will be almost worn out, and strong sparking will be noticeable when the motor is running. The whole brushes are long and have no external defects. Otherwise, the brushes must be removed from the motor and replaced. New parts should be purchased only original ones, this will significantly increase the life of the washing machine.
Strong noises, heating of the motor, and insufficient operating power indicate a faulty winding. To verify this, you need to take a multimeter, select the ohmmeter mode and measure the resistance on adjacent lamellas. The difference should be no more than 0.5 Ohm. Otherwise, the user will see a short circuit between the turns. In the same way, you need to check the operation of the stator. Next, you need to diagnose the short circuit of the windings to the stator or rotor housing.
If the motor parts are in good condition, the resistance values will be very high.
To make sure that the lamellas are worn, you need to remove the rotor from the motor and inspect the collector. A malfunction will be indicated by peeling of the lamellas, burrs appearing, or a break in the supply contact. All this leads to sparking of the brushes. Usually the lamellas overheat and peel off if the rotor becomes jammed or an inter-turn short circuit occurs.
Another popular car malfunction is a broken or slipped belt. In cases where this problem occurs frequently, this may indicate a faulty pulley. It will need to be replaced. You need to disassemble the washing machine, remove the belt, unscrew the fasteners, remove the pulley from the engine and replace it with a new one.
Disconnect the wires from the tubular electric heater (TEH)
The time has come to meet the electronics and start turning off the heating element, an item that is almost the most important part of the entire washing machine as a whole. There will be no electric heater - the water will be icy... well, or rather, the temperature set by the management organization.
In order not to confuse anything, take as clear a picture as possible of how the heating element was connected before dismantling. At the beginning of the article, we already recommended making a photo report of the entire process, but special attention should be paid to disconnecting the wires from the heating element.
Any mistake can cost a fatal breakdown of the tubular electric heater, and replacing it will cost a pretty penny... although, of course, if the LG washing machine is being disassembled precisely because of a faulty heating element, you don’t have to think too much, but still take precautions.
How to remove and replace the motor on an activator-type washing machine
In activator-type devices (Malyutka washing machine, some compact top-loading washing machines), an activator is located on the motor shaft to create water movement.
To remove the engine in such devices, you need:
- Remove the plug from the housing behind which the motor is hidden.
- Align the hole in the impeller and the notch in the rotor by manually turning the activator.
- Use a screwdriver to lock the rotor by inserting it into the hole.
- Disconnect and remove the activator (if the washing machine was manufactured before 1985, turn the part clockwise, otherwise counterclockwise).
- Pull out the drive mechanism, then remove the motor.
The engine undergoes a similar process.
The wires of the electric motor of the washing machine also need to be disconnected, and we strongly recommend taking a photo of them: the photo will only take 1-3 MB, but it will give you self-confidence and the opportunity not to make mistakes when subsequently assembling the machine.
Wires for some unifying reason can be fastened with a plastic tie, and therefore all such “sets of wires” should be carefully removed from the machine so that they do not interfere and are not subject to any influence in case the situation gets out of your control .
More: LG washing machine does not drain water, what to do
Disassembling washing machines: general information
The panels that block access to the washing unit are held in place with screws, sometimes with hidden fasteners that slide apart when the lid is moved to the side. As a rule, in all units both the rear and front panels are removable, and in modern SMA models the top panels are also removable.
Important! Be careful when unscrewing screws and parts. Place the removed fasteners in pre-marked envelopes so that nothing gets mixed up at the assembly stage.
Before removing the cover or performing any other disassembly on the washing machine, it is important to turn off the power to the equipment. It is also a good idea to wear rubber gloves.
After this, move the machine to the side. This is important, since in many washing machine models the bolts holding the upper part are located on the back side. If we are talking about built-in equipment, it will also need to be removed from the niche.
To unscrew the lid in a washing machine (no matter what model), you will need a regular Phillips screwdriver. Depending on the type (side or top loading), the procedure will be slightly different. Today we will talk about all cases, particulars and exceptions.
Removing the LG washing machine tank
The machine is already ready to remove the tank, and only one thing prevents us from starting this: the shock absorbers of the tank itself.
Before removing the tank, you need to unscrew the shock absorbers using a wrench and remove the tank directly from the springs. On most models of LG washing machines, removing the tank does not imply preliminary dismantling of the electric motor, and therefore these processes have to be combined. So, having removed the tank from the springs and having full access to it, we need to remove the engine. Before doing this, you need to remove the belt from the tank and also remove the shock absorbers. After this, you can remove the engine by unscrewing several nuts securing it. Without neglecting photography, having done everything that was required, reassemble the machine
You disassembled the washing machine for a reason, didn’t you? You had a specific goal, after which you need to do the opposite - assemble the washing machine, which you recently so carefully disassembled, following our advice. Remember how at the beginning of the article we strongly recommended taking photos or videos? If you heed this advice, assembling the machine will not be difficult for you: you will only need to reproduce all the steps in reverse order. Voila!
Let us note once again: everything you do with your favorite and unique household appliances, you do at your own peril and risk. Today we found out how to disassemble LG washing machines. Let's hope that our advice has been at least somewhat useful to you.
Replacement
Happy owners of LG washing machines with inverter motors are extremely rarely interested in the issue of replacing or repairing the motor. Owners of washing machines with commutator motors are mainly concerned about the problem of restoring the functionality of household appliances.
Problems with the winding are indicated by:
- when the washing machine starts, the fuse in the switchboard trips;
- the engine constantly turns off due to overheating;
- The washing machine does not respond to the command to start the wash.
Violations of the integrity of the winding cannot be eliminated independently at home. The way out of the situation is to purchase and install a new engine.
You can tell that the brushes are worn out by the unpleasant grinding sound that appears during the washing process. It is also necessary to pay attention to the motor brushes in a situation where the washing machine drum rotates only at low speeds.
If you suspect a malfunction in the LG washing machine motor, it must be removed and tested in more detail.
How to remove?
Dismantling the electric motor proceeds according to the following algorithm:
Getting ready for the process.
To do this, disconnect the washing machine from the power supply, turn off the water supply tap, and unscrew the inlet hose. You also need to unscrew the drain filter (hidden behind the hatch at the bottom of the front panel) and move the household appliance away from the wall.- Remove the back panel of the washing machine. To do this, using a Phillips screwdriver, unscrew all the fasteners around the perimeter of the panel.
- As soon as the back wall is dismantled, the mechanical assembly of the washing machine’s internal structure will be revealed - the pulley and drive belt. The belt needs to be removed. To do this, rotate the pulley with one hand, and with the other pull and remove the drive belt.
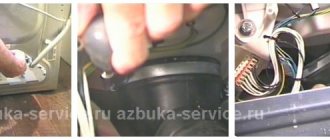
- The motor is located under the washing machine tank. Numerous wires interfere with dismantling the electric motor. They need to be disconnected. Before removing the wiring, the location of the connectors and the diagrams for connecting them to the electric motor must be photographed.
- Having freed the motor from the wiring, unscrew the fixing bolts and remove the motor from the bushings (move the part slightly forward).
Once the electric motor is removed from the washing machine body, it can be examined in more detail and tested for faults.
So, to check whether the electric motor has burned out or not, you need to alternately connect the stator and rotor windings (the remaining ends) to a voltage source . If there is no rotation, the engine must be replaced.
To check the motor brushes, just take a good look at them (the elements are located on the sides of the housing). Worn brushes are several times smaller in size than original new parts. Even if only one brush is worn out, both parts must be replaced.
A multimeter will help you test the motor winding. To do this, the tester is set to resistance measurement mode, after which one probe is glued to the rotor winding, the other to the lamella. Differences in resistance readings should not exceed 0.5 ohms.
After this, one tester probe is applied to the body, the second to the winding. A sound signal will indicate that there is a problem with a winding break (the washing machine may shock).
Repairing the engine at home (especially if the issue concerns the winding) is not economically feasible. In terms of labor costs and financial benefits, it is more profitable to replace a failed electric motor .
The video will show you how to remove and repair the motor of an LG washing machine:
How to connect a new one?
After the fasteners are unscrewed and the faulty motor is removed from the washing machine body, a new motor can be installed in its place.
Replacement is carried out with a new mechanism that exactly matches the dismantled part in terms of fastening shape, power and other technical parameters. Algorithm of actions:
- We insert the new engine with bushings into the mounting holes, tighten the mounting bolts;
- Based on the previously made photo notes, we connect the wiring;
- slowly turning the pulley, we pull the drive belt onto it;
- fix the back panel in its original place.
After the reassembly process is completed, the washing machine is connected to the sewerage system, water supply and electricity, the drain filter is screwed in, and a test wash is started.
SDLG LINGONG won't start
SDLG LINGONG special equipment is very reliable and rarely fails. But even she sometimes has breakdowns. There is a very unpleasant situation when the SDLG LINGONG engine stalls and does not want to start. At the same time, a message with a corresponding description of the fault code appears on the instrument panel display. But there are exceptions when errors are not displayed. Our company’s specialists have accumulated solid experience in diagnosing and repairing the described faults. There are two radically different options for not starting the engine:
- When you turn the key in the ignition, the starter cranks the excavator engine
- The starter does not turn on and does not turn the engine
I will try to tell you in more detail about each of the options for equipment malfunction.
Starting the engine on the road
The specialists of our company have accumulated extensive experience in providing services for starting the SDLG LINGONG engine when the equipment stalls while performing work. We have technical assistance vehicles and experienced technicians who are ready to help at any time. Specialized diagnostic equipment.
SDLG LINGONG starter does not turn
If the control system of the above equipment does not turn on the starter when turning the ignition key to start, then the cause of the breakdown lies in the electrical equipment or electronic systems of the truck. The reasons may be the following:
- Faulty relay and fuse box
- Lack of contacts in electrical wiring connectors
- Truck main relay malfunction
- Failure of the ignition switch Failure of the starter
- CAN bus break or short circuit
- Lack of “mass”
- No supply voltage at the engine control unit
- Open or shorted wiring harness
- Starter solenoid relay malfunction
- Failure of the ignition switch
- Failure of the engine control unit
Starter turns but won't start
If the starter of the described equipment spins when you turn the key in the ignition, but the engine does not show any signs. The cause of the malfunction may lie in both the electrical equipment of the car and the mechanics. Auto electrician malfunctions can be as described above, except for malfunctions associated with the starter and its circuits, plus the following reasons:
- Malfunction of the high pressure fuel pump (HPF)
- Mechanical engine failure
- “Airing” of fuel equipment
- Immobilizer malfunction
- Lack of diesel fuel in the tank
- Fuel filter clogged
- Chip in the key is faulty
- Clogged fuel lines
- Check valve failure
- Mechanical faults of injectors
SDLG loader: characteristics and instructions
When the abbreviation SDLG is mentioned, it immediately becomes clear that we are talking about a front loader. Construction equipment manufacturer SDLG is one of the top 100 manufacturers in China, which encourages us to constantly work to improve quality and apply new developments and technologies to create special equipment. More than 30% of the Russian market of Chinese loaders is occupied by this brand, which is a partner of Volvo, which demonstrates all the reliability of SDLG loading equipment in operation.
- SDLG Loader Review
- Characteristics of SDLG loaders
- SDLG loader - operating instructions
- Changing the oil in an SDLG loader
- Video
SDLG Loader Review
SDLG front wheel loaders are designed to perform work related to loading bulk cargo. At the same time, it successfully copes with digging, clearing and leveling functions. This technique can partially replace an excavator.
The SDLG front loader is designed for all-season operation and is aimed at European consumers. In winter, in addition to loading work, it serves as snow removal equipment. In summer it is actively used for heavy work with construction waste of different fractions, sand, crushed stone and different types of soil.
SDLG front loaders belong to the group of articulated wheel-based single-bucket loaders. Several generations of front loaders are constantly updated, expanding the model range. The manufacturer has taken care of the wide operational capabilities of its equipment and produces forklifts of a wide variety of configurations and carrying capacity.
In the simplest configuration, SDLG loaders have levers for control and are equipped with a conventional stove for heating and ventilation. Full equipment includes air conditioning, joystick control and even the installation of a standard radio. For operation in Russian regions, the installation of a German Eberspeaher engine pre-heater is provided. Taking care of the multifunctional qualities of front loaders, the manufacturer has provided attachments for various tasks, which can be easily changed using a quick-change device.
Additional equipment for SDLG loaders:
- buckets for heavy, light and rocky soils;
- side bucket;
- volumetric bucket for light loads;
- jaw bucket 4 in 1;
- pallet forks;
- turbo - , forest - , hay grab;
- heavy and light rotary and straight blades.
SDLG loaders, like most Chinese equipment, are characterized by low quality in small details. This is most obvious when inspecting the cabin - loose seals, poor-quality painting, weak wiring. Otherwise, SDLG loaders are characterized by good performance, without emergency stops during operation. In addition, prices for SDLG loaders are several times lower than their European or American counterparts, which makes equipment from this brand affordable for small farms.
Characteristics of SDLG loaders
The SDLG range of loaders is represented by equipment designed to perform multi-level tasks of varying complexity. This is manifested in the presence of small-sized equipment with low carrying capacity, and models of the medium and heavy class. The load capacity of front loaders, depending on the model, ranges from 1.8 to 8 tons.
SDLG loaders are equipped with engines of varying power, starting from 58 hp. and ending with 300 hp. The most common are engines of our own production or other Chinese manufacturers. Engines from Volvo and their partners are available for the European market.
Transmissions are available both manual and automatic, with a different number of speed modes. A transmission with mandatory reverse gear makes it easy to control equipment and perform complex maneuvering patterns.
SDLG loaders have a number of advantageous characteristics:
- high capacity lifting bucket;
- high speed of lifting a loaded bucket;
- equipped with an automatic leveling function;
- simple hydraulic control;
- the low cost of official maintenance compensates for minor factory defects.
SDLG loader - operating instructions
The SDLG forklift operating manual includes basic technical data about the models and their features. For some models, instructions are included not only for operation, but also for repair. In the manual you can familiarize yourself with possible malfunctions of the working equipment, gearbox, electrical, brake and steering systems, as well as methods for initially eliminating these problems.
The manual clearly describes the operating principles of the main devices and how to operate them. The rules for carrying out maintenance are also indicated, and a scheduled maintenance card is attached with recommendations for the brands of fuel and lubricants to be replaced.
Changing the oil in an SDLG loader
Turbochargers of diesel engines installed on SDLG loaders are particularly sensitive to oil cleanliness. An oil change occurs during each service maintenance, i.e. every 250 operating hours. Transmission and hydraulic oil must be changed every 500 operating hours. SDLG loaders are unpretentious to oils from one manufacturer or another; the main condition is that they meet their intended purpose and are replaced in a timely manner.
It is recommended to use engine oil according to operating conditions and engine type. The manufacturer recommends using synthetic and semi-synthetic oils. For example, a good option for diesel engines is GProfi 10w-40.
Oil for the hydraulic system of SDLG loaders is suitable for the MGE brand or the usual Russian hydraulic spindle.
Transmission oil No. 6 and No. 8 is poured into the SDLG box according to Chinese technical classifications of oils. It is possible to use API CF-4/SG SAE15W/40 summer oil. It is strictly forbidden to pour motor oil or any other purpose oil into the automatic transmission of a loader.