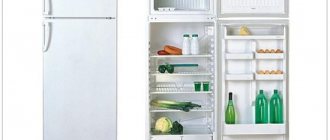
It is difficult to imagine your life without household appliances. There are devices that we could do without, and there are those without which the arrangement of a living space is quite rightly considered incomplete. One of these vital items is the refrigerator. Do you agree?
Do-it-yourself repair of household appliances is a good help for the family budget. If desired, you can master many repair operations. For example, replacing a refrigerator thermostat is not that difficult. You just have to understand the design features and operating principles of the device.
We will tell you how to detect a faulty thermostat. The article we have proposed describes in detail how it is replaced during the repair of a Stinol brand refrigerator. The information is accompanied by a thematic selection of photo and video materials with expert advice.
Design features and operating principle
The thermostat or thermostat is one of the main elements without which normal operation of the refrigerator is impossible. It records the readings of temperature sensors in the refrigerator and freezer compartments and sends a signal to the compressor start relay.
In accordance with these signals, the compressor turns on if the chamber is not cold enough and turns off when the temperature reaches a set level. Technically, the thermostat is a relay, at one end of which there is a sealed tube filled with freon.
On the other side there are contacts, the opening and connection of which sends a signal to the compressor. The end of the tube with freon, also called a capillary tube, is fixed to the evaporator.
The refrigerant placed inside reacts sensitively to heating and cooling. When the temperature decreases or increases, the pressure level inside the tube changes, causing the relay contacts to connect or open.
The movement of the contacts is controlled by a small spring. It is used to set the temperature level that should be inside the refrigerator compartment. A temperature adjustment knob is attached to the spring. Turning this knob changes the tension of the spring.
As a result, more or less force must be applied to close and open the contacts. This affects the level of pressure in the capillary tube at which the contacts are triggered.
A thermostat is a small device that is equipped with a sealed tube with a sensor filled with refrigerant. Based on changes in evaporator temperature, the relay turns the compressor on or off
This regulates the degree of cooling of the air in the refrigerator. When using an electronic regulator, this process is carried out slightly differently, but the principle remains approximately the same: the desired temperature level is set based on the actual indicators recorded by the capillary tube.
But such models use an electronic control module that can simultaneously manage data from several sensors. It is not always possible to repair or replace such a thermostat at home. Handling complex electronics requires knowledge and special equipment.
Typically, the thermostat is installed inside or outside the refrigerator compartment. Before starting repairs, it will not hurt to study the structure of the refrigerator and the technical data sheet of the device. There may be a lot of useful information on the design of a specific thermostat model, as well as its location.
Usually the thermostat is located next to the handle for setting the temperature. The internal arrangement is typical for relatively old models. Inside the camera, the element is usually enclosed in a plastic protective housing.
The adjustment knob is located directly on it. To remove the thermal relay, you need to remove this handle and unscrew the mounting screws to remove the housing.
In more modern models, the thermal relay is placed outside the chamber in order to save precious cubic centimeters of internal space and not spoil the design with additional elements
But you also need to look for the thermostat near the control knob, usually under the refrigerator body somewhere at the top. The handle is removed in the same way, the fasteners are unscrewed and what you are looking for is found behind the protective panel.
Thermostats for two-chamber refrigerators
Most often, for refrigerators with two chambers, thermostats are used, designated by the symbols T-130, T-132, T-133, TAM-133, TAM-133-1M. Temperature parameters are the same. They differ in appearance, the diameter of the handle rod and bellows tube, and the presence of a transverse bar for attaching the thermostat.
All devices in this group turn on at +4 degrees Celsius and turn off at -14 degrees. The handle rod and bellows tube may have different diameters, so the selection of the model is carried out according to the equipment documentation.
An analogue of the TAM-133 (1.6) thermostat is Ranco K59-L2172 or Ranco K59-S1887.
An analogue of TAM-133 (1.3) is Ranco K59-P1686, which is suitable for all 2-chamber refrigerators of domestic (except OKA-6) and foreign production with a capillary tube length of 1-1.3 m.
Analogues of TAM-133 (2.5) are DANFOSS 077B6496, ATEA A13 0646, Ranco K59-L1275, which are suitable for all 2- and 3-chamber refrigerators of domestic and foreign production with a capillary tube length of 2-2.5 m.
TAM-133-1.3M
Ranco K59-P1686 (1.3)
Ranco K59-Q1916 (2.0)
Ranco K59-L2172 (1.6)
Ranco K59-S1887 (1.6)
Ways to detect the problem
If the thermostat breaks, this does not mean that the entire refrigeration unit will immediately stop working. But the lack of correct information about the current temperature will affect its operation.
Option #1 - check the functioning of the equipment
Symptoms of incorrect operation of refrigeration equipment may be as follows:
- the compressor operates without interruptions or with very short and rare interruptions;
- the temperature inside the refrigerator chamber drops to zero, and sometimes even lower;
- a large amount of frost or even ice appears on the walls;
- It's too warm inside the refrigerator;
- The refrigerator does not turn on after being turned off, etc.
Of course, these signs can be associated not only with breakdowns of the thermal relay, but also with malfunctions of other elements.
In order to correctly determine the cause of problems identified during the operation of a household refrigerator, you will need to carry out a little diagnostics. You can do this yourself
Option #2 - diagnostics using a thermometer
To do this, you need to completely disconnect the refrigerator from the power supply, and then completely defrost it in accordance with the instructions. Of course, the contents will have to be removed.
After this, you need to turn on the device and move the thermostat knob to the position that will allow you to get the lowest possible temperature. If your refrigerator model has a freezing mode, it is recommended to use it.
To test the operation of the thermostat, you need to empty the refrigerator of all food, place a thermometer inside the chamber and check its readings after a few hours
In the refrigerator compartment, approximately in the middle, you need to place a thermometer designed to measure air temperature. It is better to use a device that allows you to take measurements below zero. The refrigerator is left in this mode for about two hours. After this, you need to check the thermometer readings.
If the temperature in the refrigerator compartment has dropped to about six degrees by this time, there is no problem with the thermostat. But when the inside becomes noticeably warmer or colder than this level, the thermostat will have to be replaced.
Option #3 - visual inspection of the refrigerator chamber
If, after defrosting, a so-called snow cap forms inside the chamber very quickly, the initial diagnosis of the health of the thermostat can be performed very simply.
The appearance of a snow coat in the refrigerator compartment almost always means that the thermostat is not working correctly; you need to diagnose its condition
To do this, when the compressor is operating, the adjustment knob begins to be turned in the direction of increasing the temperature inside the chamber. If the relay is working properly, at a certain moment the sensors will record the desired temperature level, after which the compressor will turn off. If the engine continues to run, the thermostat needs to be changed.
After such diagnostics and if the thermal relay is working, it is recommended to remove all contents from the chamber and allow the device to run idle for about six hours. During this period, you need to pay attention to the duration of breaks in the operation of the compressor.
If it is about 40 minutes, everything is fine, you can use the refrigerator as usual. If the compressor turns on too often or infrequently, you should try to adjust this moment using the relay settings. If this fails, you will most likely have to install a new thermostat.
Thermostats for freezers
Temperature regulators T-144 and T-145 are used for installation in freezer cabinets. The T-144 thermostat differs from most models in that the manufacturer did not leave room for independent temperature control. Usually there is a special rod for this. The thermostat turns on at -20 degrees Celsius and turns off at -24 degrees.
There are four terminals on the side of the thermostat body, two of them are double terminals, this is “ground”. Terminals numbered 3 and 4 are contacts through which electricity is supplied to the compressor. A special function is performed by contact number 6; it turns on a lamp indicating that the permissible temperature standards in the chamber have been exceeded. Activation of this contact is performed at -15 degrees Celsius.
Analogs of the TAM-145 freezer thermostat are Ranco K59-L2829 (2.5), Ranco K56-L1916, Ranco K56-P1431, Ranco K56-L1954.
Ranco K59-L2829 (2.5)
Rules for dismantling the thermal relay
If the refrigerator does not turn on at all, it will be impossible to carry out the diagnostics described above. The probable cause of the breakdown is an electrical failure of this element.
But a problem can also be a compressor malfunction, for example, a burnt out motor winding. To determine whether the thermostat needs to be replaced, it will have to be removed from the refrigerator for examination.
Typically, the thermostat is located next to the control knob, which is used to set the air temperature in the refrigerator compartment. Double-chamber models are equipped with a set of two such handles
First you need to unplug the refrigerator. Now you should find the place where it is located, as described earlier. Usually you need to remove the adjustment knob, remove the fasteners and remove the protective elements.
Then you need to carefully inspect the device, paying close attention to the wires through which the power is supplied.
All of them have different color markings depending on their purpose. Typically, a yellow wire with a green stripe is used for grounding. This cable should be left alone, but all the others should be disconnected and shorted together.
Now the refrigerator is plugged in again. If the device still does not turn on, the thermostat is probably working properly, but there are serious problems with the compressor.
If the refrigerator does not turn on at all, the cause may be not only a malfunction of the thermostat, but also a breakdown of the compressor, for example, a burnt-out motor winding
If the engine starts working, we can clearly conclude that the relay needs to be replaced. Before starting work, it doesn’t hurt to arm yourself with a smartphone or camera in order to consistently record all operations. When installing a new thermostat, these pictures can be very helpful, especially for beginners.
You need to clearly remember which cable core was used for what purpose. Typically, a black, orange or red wire is used to connect the thermal relay to the electric motor. A brown wire leads to zero, a yellow-green wire provides grounding, and a pure yellow, white or green wire is connected to an indicator light.
To connect the thermal relay, wires with different color markings are used; you need to remember the purpose of each wire so as not to get confused during reassembly
Sometimes removing a damaged regulator can be difficult, especially when it is placed outdoors. For example, in some Atlant refrigerator models you have to completely remove the chamber door from its hinges. To do this, you need to remove the trim that is installed above the top hinge and unscrew the bolts hidden under it.
Before removing the adjustment knob, you also have to remove the plugs and unscrew the fasteners. All these operations must be done carefully. It is better to store fasteners and linings in a small container so that they do not get lost. The thermostat itself is usually screwed to the bracket; it must be carefully removed, unfastened and removed.
If the thermostat is located inside the refrigerator compartment, it is usually hidden under a plastic casing, where a lamp for illumination can also be mounted
A new thermostat is installed in its place, following the reverse assembly order. Sometimes the breakdown of the thermostat is associated with a malfunction of the so-called capillary tube or bellows. If you replace only this element, the relay can be left.
To perform this procedure, you will have to remove the thermal relay, following the method described above. The bellows must be disconnected from the evaporator and carefully removed from the device body. Now a new capillary tube is installed, connected to the evaporator, and the relay is mounted in its original place, and the disconnected wires are connected.
The design and principle of operation of the thermostat
The basic principle of the thermostat design for electronic and mechanical versions is similar.
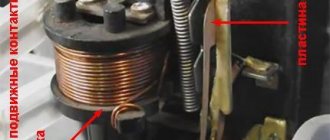
- Metal corrugated bellows.
- Freon.
- Capillary tube.
- Evaporator.
- Spring.
- Knob-regulator.
- Plate.
- Contacts.
- Frame.
The diagram describes in detail the structure of the refrigerator thermostat.
The desired temperature inside the refrigerator chamber is set using a control knob, which compresses and unclenches the spring. The less the spring is compressed, the less pressure is required to close the contacts in the bellows.
Understanding the structure and operating principle is not difficult, but you should not try to repair it yourself. Only a specialist can carry out the work efficiently.
Due to the heating/cooling of the freon located in the capillary tube and bellows, the contacts are closed/opened, which operate the compressor.
The picture shows a diagram of the operation of the refrigerator thermostat.
Replacement using the example of a Stinol refrigerator
For Stinol refrigerators, relay failure is a fairly common occurrence, especially after five to seven years of operation.
Most often, the bellows tube fails here, since this is the option provided by the manufacturer of this element. The Stinol-101 model has only one compressor, but the Stinol-103 has two: separately for the refrigeration and freezer compartments.
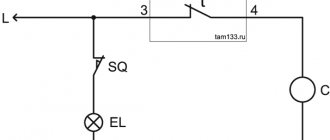
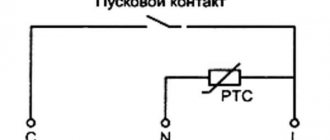
This is a contact diagram for a K-59 type thermal relay, which allows you to get an idea of which wires should be connected where. Color markings may vary; a photo on your phone will help you save the information; you can also draw a similar diagram yourself
The automation of different models is slightly different, which is reflected in the corresponding electrical diagrams, but otherwise these refrigerators are very similar, so it makes sense to consider the procedure for repairing them at the same time.
To understand that the Stinol refrigerator needs repair or replacement of the thermostat, you need to pay attention to the following signs:
- the compressor runs non-stop and does not respond when the regulator is set to OFF;
- when moving the adjustment knob to the OFF mark, there is no characteristic click;
- the temperature in the refrigerator chambers noticeably exceeds the parameters set during adjustment.
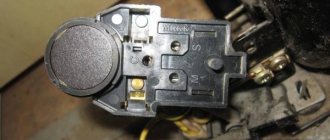
The Stinol-103 refrigeration chamber uses a K-59 thermal relay; it is easy to check the markings, they are indicated on the body. To remove the adjustment knobs, you need to use a thin awl. You just need to pry them up and remove them. The Stinol-101 model has only one adjustment knob, while the Stinol-103 has two, one for each compressor.
To remove the adjustment knob of the Stinol refrigerator (1), you need to use some sharp object, for example an awl. Then remove the decorative trim (2), which is held in place by four protrusions
After the handle is removed, you need to remove the decorative trim, which has six protrusions. This is a fragile item and must be handled with care to avoid damaging it. There are nuts under the cover that need to be unscrewed. After this, you need to unscrew the screws that secure the control panel.
Under the decorative trim there are mounting screws (1) that hold the thermal relay in the correct position; they must be unscrewed to continue dismantling the element
It is best to remove the screws holding the refrigerator door hinge last. To avoid possible damage, the door must be held. Now you can lift the panel and remove the door from its hinges.
The next step is to remove the top cover of the refrigerator.
The fasteners that secure the control panel and door hinge (1) of the Stinol refrigerator must be unscrewed, moving towards the door, and not away from it
The necessary fasteners are located on the rear side. They are unscrewed and the cover is removed. This will give you free access to the thermostat.
First you need to disconnect the relay contact connectors, after which you can remove the element from the refrigerator control panel.
After the doors and top panel of the Stinol refrigerator have been removed, you can carefully remove the thermal relay for inspection and diagnostics
At this stage, you need to remember or write down the color coding of the individual wires. To remove a worn capillary tube, remove the plastic cover.
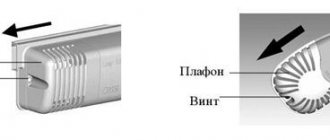
Now you need to unscrew the fixing screw and remove the lighting unit. The tube is removed through the hole provided for this purpose.
To continue replacing the thermostat in the Stinol refrigerator, you need to remove the cover (1) in the refrigerator compartment and remove the capillary tube (2)
The new element is installed in such a way that the uninsulated area in its lower part is securely hidden under the overlay. The hole is closed with a plastic plug to restore the seal of the chamber.
Typically the capillary tube protrudes beyond the thermostat. It must be carefully placed under the top lid of the refrigerator; there is enough space there.
To remove the capillary tube (2) and replace it, you first need to disconnect the lighting unit, which is secured with a screw recessed into its housing
Now you need to reassemble the thermostat and the refrigerator: connect all the necessary connections, install and secure the refrigerator lid, and hang the door.
And again, screwing the door hinge fasteners is done last, when other similar screws are already installed.
The hole that appears on the rear panel during repair work should be sealed with plastic to restore the tightness of the refrigerator compartment
To check the condition of the Stinol refrigerator thermostat at home, you can use simple diagnostics. Contacts 3 and 4 of such a device should remain closed at room temperature.
If, after connecting them with a jumper, the compressor turns on, the thermal relay is faulty and needs to be replaced. If the thermostat settings are lost, they can be corrected by turning the adjusting screws, but this should be done in a service center that has the necessary equipment.
An equally important functional unit in the design of the refrigerator is the starting relay, the device, purpose and repair methods of which will be introduced in our recommended article.
Thermostats for single-chamber refrigerators
Temperature regulators T-110, T-111, T-112 are mounted on refrigerators with one chamber. The T-112 thermostat may be designated TAM-112, or TAM-112-1M. In terms of temperature indicators, all devices are the same, turning off is done at a temperature of -14 degrees Celsius, turning on at -12 degrees.
The thermostat models of this group differ somewhat in external characteristics. First of all, this concerns the dimensions; the handle rod and the bellows tube can have different diameters. Some models have a crossbar for easy fastening. The length of the bellows tube is indicated on the thermostat body and looks like two numbers separated by a comma. Example: a) 0.6 - tube length - 60 cm; b) 1.3 - tube length - 1 meter 30 cm.
TAM-112-1M
Ranco K50-L3392 (0.8)
Ranco K57-S5588 (0.5)
In some cases, products are interchangeable. To install thermostats of the new TAM-112 model instead of T-110, an installation kit is provided, consisting of a crossbar, a nut and a nylon adapter that increases the diameter of the adjusting rod.
Ranco K50-L3392 with a long capillary tube of 0.8 meters, is an analogue of the domestic thermostat TAM-112-1M, suitable for most domestic single-chamber refrigerators.
The Ranco K57-S5588 thermostat is suitable for Liebherr single-chamber refrigerators.
Conclusions and useful video on the topic
The process of replacing the thermostat is clearly demonstrated in the following video, in which the master shares the nuances of repairing Stinol-type refrigeration equipment:
Interesting tips for diagnosing the condition of the relay and replacing it using the example of two models of refrigerators are contained in this video:
The procedure for replacing a thermostat cannot be called too complicated. However, if you mishandle this element, you can only worsen the situation. A detailed study of the repair procedure and attention to detail will help restore the functionality of the refrigerator .
Tell us about how you selected a thermostat to restore the functionality of the refrigerator. Share useful information and valuable information on the topic of the article that can be useful to site visitors. Please leave comments, post photos and ask questions in the block below.
Methods for checking the refrigerator thermostat
There are several ways to check the temperature sensor of a refrigerator, which can be done either independently or by contacting a specialist.
- Checking the bellows. In order to use this method, you must have basic technical knowledge. In this case, there is no need to remove and disassemble the part. All you have to do is get to it, find the terminals, move them and click them. If movement and clicks are present, then the regulator is working. Otherwise, it must be replaced.
- Tester check. The most common verification method among craftsmen. During such a check, the thermostat is removed and checked with a multimeter set to “resistance” mode with minimal settings.
- Directly. It is carried out with the unit’s engine turned off, by closing the relay contacts. If the refrigeration unit starts working when connecting the contacts, the thermostat must be replaced.
A specialist can check if the temperature sensor is broken in several ways.
Note! When checking with a tester, the thermostat may work without working while in the device. The reason for this is a temperature-related malfunction. To solve this problem, just put the part in cold water for a while and then ring it.
The easiest way to check the operation of the thermostat is to use a tester.
How the device works
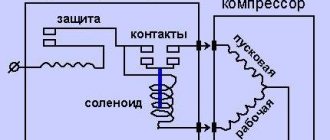
The direct purpose of the thermostat in a refrigeration unit is to maintain the temperature set by the consumer. In compression refrigeration units, the thermostat turns the compressor motor on and off, and in absorption refrigeration units, the heater is turned on and off. The device that regulates the temperature in the cooling chambers is classified as a manometric design. This means that the operation of the unit depends on the instability of the pressure of its filler (usually gas) as the temperature fluctuates.
A mechanical thermostat is a lever device that contains a power lever and a contact circuit. The elastic element (tubular bellows) of the temperature control system and the spring exert an impact on the power lever. The electrical part of the device is separated from the mechanical part by an electrically insulating gasket.
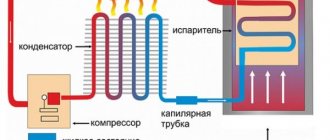
The operating conditions for freon are concentrated steam, the pressure of which depends on temperature conditions. At the end of the tube, liquid gas accumulates. The section of tube in which the separation of vaporous freon and liquid occurs reacts to temperature fluctuations. This segment is located in the cooling zone.
Tips from repair experts
Before replacing the relay (removing panels, casing and housing, disconnecting wires and other operations), remember, write down the sequence of actions or photograph each stage of dismantling - this will be useful when assembling a household appliance. Be extremely careful and careful when handling the bellows tube: this part is easy to damage, and incorrect position of the element or kinks will lead to incorrect operation of the refrigerator. It is unacceptable to solder relay wires to the terminals - this can lead to failure of the element, breakdown of insulation, or short circuit to the metal body of the household appliance.
The operating mode of the refrigerator compressor depends on the correct operation of the thermostat. A malfunction of the temperature relay leads to rapid failure of the equipment, so at the first sign of a breakdown of a functional unit, it must be repaired or replaced.
Replacing the thermostat yourself
Of course, specialists know well how to replace the thermostat in a refrigerator quickly and efficiently. But sometimes the owner of the unit wants to do it himself. It can be recommended that he study the principle of operation of the thermostat and adhere to the following sequence:
- Open the refrigerator body. In devices with electromechanical control, the temperature sensor is located inside the device in the area of the top wall. In electronic refrigeration units, the temperature sensor can be accessed both from the inside and from the outside.
- Remove the faulty device. In electromechanical modifications, you will need to disconnect the contact circuit, then remove the thermostat. In an electronic refrigerator, the sensor should be disconnected from the mechanism that controls the device. After this, pull out the cable with the thermostat.
- Install a working temperature indicator. In an electromechanical unit, you need to connect the contacts to a new thermal relay. Then insert the thermocouple through the technological hole into the recess of the evaporator. Seal the opening. In an electronic refrigerator, pass the cable with the temperature sensor through the back wall. Next, solder the wire to the control unit. Hermetically isolate the area where the work was carried out. This is done to prevent moisture from entering.
- Assemble the household appliance. First check the resistance of the refrigerator thermostat. The indicator should be equivalent to the factory parameters. In electromechanical units, the process of installing a working device may result in the length of the tube of the new temperature sensor exceeding the standard value. In this situation, the excess should be carefully rolled up and placed in the recess under the refrigeration unit cover reserved for the relay.
- Check the operation of the refrigerator by connecting it to the mains. Monitor the functioning of the device over the next couple of days. If all parameters are within the normal range, the replacement was successful.
Regardless of the model, replacing a mechanical thermostat in a refrigerator should be done in the following sequence:
- Remove the cover.
- Disconnect the tube and evaporator.
- Disconnect the wiring from the thermostat, remove the fixing screws and nuts.
- The installation of a new temperature indicator should begin by connecting the tube and attaching the device to the evaporator.
- Connect the electrical wiring and secure the thermostat.
- Start the unit.
When starting repairs, in order to avoid further confusion, it is recommended to photograph the sequence of connecting the wires.
When choosing a temperature sensor, you need to consider the following characteristics:
- The length of the refrigerator thermostat tube. When installing a product smaller or larger than the original, engine performance may be affected.
- The location of the thermostat in refrigeration units is different.
- Number of terminals on the thermal relay.
Replacing a thermostat is not difficult, but incorrect actions can make the situation worse. If you lack the skills, you should entrust the repair to a professional.
When replacing the temperature indicator with a new one, minor deficiencies in the functioning of the refrigerator may occur. For example, the cells may not be cold enough. To eliminate the cause, you will need to adjust the thermostat.
Safety rules when carrying out repair work
A refrigerator is a unit that requires high voltage to function. Therefore, it is necessary to clearly assess the dangers associated with performing any work with an electrical appliance:
- electric shock through contact with thermal relay terminals;
- electric shock due to a short circuit in the electrical wiring of the refrigerator;
- frostbite from refrigerant.
Having decided to repair the refrigerator thermostat yourself, you should seriously think about safety measures. Servicing a working device is prohibited.
Optimal temperature in the refrigerator
The optimal temperature in the refrigerator compartment is from +4 to +6°C. Since the unit has a large volume, heat is distributed unevenly in it. The closer to the compressor, the colder it is.
So, on the top and bottom shelves (depending on the location of the freezer) the temperature is maintained from +8 to +9°C, on the central one - from +2 to +6°C, in the door - up to +10°C.
The temperature in the freezer is maintained from -6 to -24°C, the optimal temperature is -18°C.
How to get to the thermostat
It is easy to find, since the thermostat is located in the same place as the temperature control knob. In older models, for example, Oka 6M, it is located inside the refrigerator compartment, on the right wall, next to the lighting lamp. To get to it, first remove the handle by simply pulling it towards you. Then the protective casing is removed, which is secured with latches in the holes in the chamber wall.
In modern refrigerator models: such as Indesit, Stinol and others, the thermostat is installed outside, usually above the door, but other options are possible. To access it you will need a Phillips screwdriver. The path to it also begins with removing the handle, the casing is removed from the latches and removed, then the screws securing the bar with the signal light and the thermostat itself are unscrewed.
The thermostat may be located in different places.
Main signs of failure
It is possible to detect a faulty thermostat based on various symptoms. When faced with signs of breakdown, it is recommended to immediately begin repairs so as not to provoke a deterioration in the condition of the equipment.
Doesn't turn off on its own
Any type of refrigerator provides for periodic shutdown when the temperature inside the chamber reaches the required level. If the thermostat breaks down, the relay does not receive a signal about temperature fluctuations, and the refrigerator continues to operate continuously. Typically, this symptom requires replacement of the component because repair is not practical.
Turned off and silent
When the refrigerator turns off and does not resume operation after a certain period, several factors may be the cause of the breakdown. If the light inside the chamber is on and the motor does not work, the likely cause of the malfunction is a burnt-out compressor. A breakdown can often be determined by the quiet clicks that the start-up relay makes when it tries to turn on.
The thermostat itself, which controls the temperature in the refrigerator compartment, does not transmit information through the contacts if it breaks down. Lack of temperature rise data results in the motor not turning on.
Snow coat
The formation of ice and a layer of snow on the back wall of the camera is one of the most popular problems. The malfunction is especially relevant for equipment with a drip defrosting function. If there is a snow coat in the chamber, the normal food storage regime is disrupted. The products in the chamber begin to freeze, lose their taste characteristics and presentation. In addition, there is a risk that the snow coat will sometimes melt and the refrigerator will begin to leak.
To fix the problem, many try to defrost or break off pieces of ice, but this is not a solution to the problem if the ice appears due to a broken internal part.
If the thermostat malfunctions, the sensor erroneously sends a signal that the temperature is not low enough, and the motor turns on more often to cool the chamber. As a result, the back wall of the chamber does not have time to thaw and becomes covered with snow. In most situations, replacing the thermostat completely solves the problem.
Procedure for replacing the temperature relay
The process of removing and replacing the temperature relay occurs in the same way both by a specialist and independently.
- If the device is inside, then the door and “roof” of the equipment are removed.
- The thermostat handle also needs to be removed.
- Dismantling the temperature relay, disconnecting the capillary tube.
- Replacing the unit.
- Connecting the power supply.
- Connecting the tube.
- Installing a working relay.
- Installing the thermostat knob.
- Installing the door and “roof” of the refrigerator.
A qualified technician will be able to not only repair the refrigerator, but also give recommendations for its maintenance.
Temperature regulating device
A thermostat is a fairly simple device. Even in modern refrigerators and refrigerators this is a simple contact group. It is controlled by a pressure gauge with a capillary tube, the end of which is located in the chamber and measures the temperature. Today there are two types of temperature regulators in refrigerators: mechanical and electronic.
A modern thermostat has two main elements. This is a box in which there are control and actuator mechanisms, and a capillary elongated into a tube. The box is a bellows (hermetically sealed tubular spring). The accuracy of the determined indicators depends on its tightness. The compression and expansion of the bellows is controlled by a spring, optimizing it with pressure indicators. Modern mechanical thermostats may have several springs. It depends on the destination: refrigerator or freezer.
An electronic thermostat for a refrigerator is more reliable and allows smooth regulation of the operation of the entire refrigeration system. The price of this device is significantly higher than mechanical ones and ranges between two thousand rubles (while a mechanical one costs up to a thousand). In an electronic thermal relay, a thyristor or sometimes a resistor is responsible for sensitivity.
In refrigerators with high energy consumption, such thermostats quickly fail. In class A+ cooling units with linear compressors, electronic temperature controllers require replacement much less frequently. Therefore, most manufacturers of such equipment are now switching to linear compressors with electronic thermostats.
Adjusting the refrigerator temperature sensor
Before adjusting the thermostat, you should study:
- handle rotation vector to increase or decrease temperature values;
- the relationship between switch speeds and changes in the cooling level on the evaporator shelf.
The thermostats are adjusted by measuring the temperature on the evaporator shelf in the freezer compartment. First you need to start the compressor engine and turn the temperature sensor handle to the middle position. After 3-4 hours of operation of the motor in this mode, take a temperature measurement. Compare the indicator with the desired one. If the data does not match, the thermostat must be adjusted by first turning off the power supply to the refrigerator.
Adjusting the thermostat in previously released modifications requires removing the cover on the side opposite the terminals. To reduce temperature indicators, the debugging bolt must be turned counterclockwise with a screwdriver. If the goal is to increase temperature indicators, the bolt should be rotated clockwise. Turning the adjustment screw 180 degrees in any direction adds or subtracts 2 degrees.
In recently produced models, unlike Soviet-era refrigerators, the process of setting the desired temperature is simpler. You can adjust the refrigerator compartment or freezer compartment separately. The sequence of actions is described below using the most popular brands as an example:
- "Horenje." Setting the temperature parameters in refrigerators of this brand is done by rotating a special temperature sensor handle. The user only selects the required data between the maximum and minimum. The manufacturer recommends choosing the eco option.
- "Liebherr." In this case, the temperature sensors are adjusted using an electronic control system. This household appliance is superior to others due to the fact that the temperature indicators in the refrigerator compartment and freezer do not depend on the temperature in the room where the refrigerator is located.
- "Atlant" is one of the popular brands. The thermostat is adjusted using the handle. The available adjustment range is measured on a seven-point scale.
A table of thermostat models recommended for use in refrigerators of different designs is presented below.