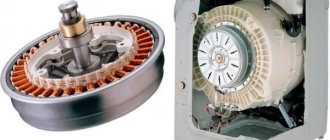
Let's consider replacing the bearing on the LG washing machine with your own hands at home. LG brand SMAs have proven themselves to be reliable and unpretentious, while having a stylish design that many consumers like. But even such washing machines are prone to breakdowns. One of them is wear on the drum bearings. And as a result - increased noise during spinning, sometimes becoming so loud that further operation becomes unbearable. In this case, replacement is necessary.
Expert opinion
I work in the household appliance repair industry. Extensive experience in restoring washing machines and dishwashers.
Ask a Question
Wear can be determined by significant play of the drum in different directions. Quite often in this case the belt begins to fly off if the machine is not equipped with a direct drive motor. If you wish and have the necessary tools, you can actually carry out such repairs yourself at home. To do this you need to remove the bearing.
- Preparation for repair
- Disassembling the LG washing machine
- Replacing bearings
- Assembling an LG washing machine
- Video
- Catalog of LG washing machines
Preparation for repair
Please note that sufficient space is required to complete the work. You will have to completely disassemble the car, removing additional equipment. Then you will need to take out the tank, divide it and pull out the drum. Please consider these points before starting repairs.
Repaired washing machine
Important! First of all, we disconnect the machine from electricity and sewerage. We also disconnect the inlet hose, having first shut off the water supply through it to avoid flooding.
The work will be carried out on an Ldzhi washing machine with a Direct Drive system with a 7 kg load of laundry. This model has a steam cycle, but this does not affect anything. You just have to dismantle the additional element. The device of other models is the same.
We prepare the tools:
- Slotted, Phillips, and Torx screwdrivers.
- Pliers.
- Wire cutters.
- Hammer.
- Punch.
- Ratchet socket wrenches.
- Penetrating lubricant like WD-40.
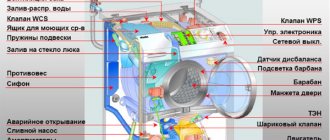
How to access the tank
Before removing the bearing on an LG washing machine, you need to disassemble almost the entire machine, gaining access to the tank and drum. Walls, motor, cuff and other parts block your path. How can I quickly remove all this in order to remove the tank and find the bearings?
Step 1: Top cover
- To remove the top panel, unscrew the 2 screws holding the cover on the back of the case.
- Pull the panel towards you.
- Lift up slightly and remove.
- Set the lid aside.
Step 2: Control panel with display or indicators
- Remove the detergent receptacle by pressing the central valve at the back of the cuvette.
- In the niche where the receiver was, find the mount.
- A few more bolts are located at the top and right of the control panel. Unscrew all fasteners.
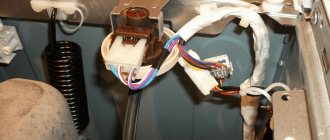
- Carefully remove the wires from the panel connecting it to the parts of the CM. In order not to forget how everything happened, film the disassembly process on video or label the wiring. If you are a careful craftsman, you don’t have to remove the wires - in this case, work carefully so as not to break anything.
Step 3: Bottom panel
- The panel is held in place by plastic latches - find them and bend them back using a slotted screwdriver.
- Remove the panel and set aside.
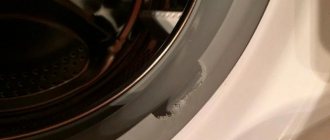
Action 4. Hatch cuff
Without this, you will not be able to remove the front panel.
- Find the thin metal wire clamp that holds the cuff, pry it with a screwdriver and remove it.
- Pull the cuff out of the groove with your hands without removing it completely.
- Disable the blocker sensor.
- Unscrew the bolts to remove the sensor.
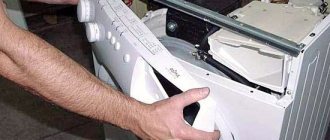
Step 5. Front panel
- The front wall fastenings are located behind the powder receiver, behind the water drain valve and in the corners: upper left and upper right, lower right and behind the display panel.
- Unscrew all the screws found.
- Remove the front cover.
- Set aside.
Action 6. Freeing the tank from fasteners
Need to remove:
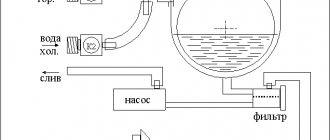
- water intake valve fasteners;
- water drain pipe;
- wiring from the heating element and temperature sensor;
- wires from the electric motor;
- pump wiring;
- counterweights (large upper and small lower);
- pressure switch pipe;
- shock absorber (damper) fasteners.
Important! After going through the entire list and removing all the wires and pipes, you can remove the tank. Ask someone to help you to make your work easier. Let your partner unhook the springs while you lift the tank and remove it from the housing.
Replacing bearings
Note that there are specialized bearing pullers. But the cost of such a mechanism is: 4-5 thousand rubles. There is no practical sense in purchasing them for one-time repairs. Therefore, we use a hammer and a metal drift, which can be a chisel. This is the best option.
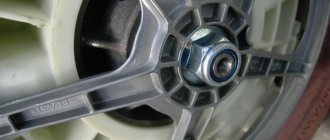
Let's start with the oil seal. We pry it off with a strong screwdriver and pull it off. If it doesn’t work right away, then soak it in a penetrating lubricant.
Then we knock out the outer bearing. Place the tank on a stand and strike with a hammer, moving the drift in a circle. As a rule, this is the easiest dismantling.
Then remove the inner one in the same way. If difficulties arise, use VD-40. This procedure is quite loud, so it can be moved outside so as not to irritate the neighbors.
Important! When dismantling, it is allowed to hit the inner rim of the bearing. During installation - absolutely not!
Installed new bearing
We clean and dry the seat and begin installing the new repair kit. We carry out the work in reverse order. We install the oil seal last. Before installing it, apply lubricant to the skirt, as well as the internal spring. For convenience, we use old bearings, cleaned of oil and dirt. That is, we hit them. This will avoid distortion during installation.
It is recommended to fix the oil seal using glue or self-tapping screws.
After cleaning the tank, carefully inspect the shaft, especially the oil seal seat. LG is the only company that has this part made of stainless steel. If repairs are carried out a long time after the bearings begin to fail, this area may be damaged by rust. For small flaws, the situation can be corrected using fine sandpaper. If there is significant damage, then boring or seating of an additional ring is necessary. In this case, an oil seal with a different standard size is selected.
How to remove and replace the bearing in an LG washing machine? Preparatory work
In the early stages, it is difficult to determine that the cause of the breakdown is worn-out components. When the moving part is thoroughly worn out, traces of wear can be seen on the rear wall of the tank. If you shake the drum up and down with your hand, there will be a noticeable play between it and the tank. And at high spin speeds the machine hums like a jet engine.
You can't delay repairs. Following the bearing, the shaft will wear out. And this threatens to completely replace the tank and drum. In this case, it is cheaper to immediately buy new equipment.
Before replacing parts, thoroughly prepare for the repair. Find out how much they cost and what bearings are installed in your ElG model. They are identified by a serial number, as shown in the table below:
The kit also includes seals. They are the most common cause of wear and tear. Oil seals serve as protective seals against moisture ingress. If damaged, water seeps into the moving parts, washing away the lubricant, which leads to wear and tear.
You will need a lot of space for renovations. If it is not possible to take the equipment to the garage, disconnect it from communications and take it out into the middle of the room.
What tools will be useful:
- Set of screwdrivers (flat and Phillips).
- Mallet and chisel.
- Pliers.
- Open-end wrenches.
- WD-40 product.
- Metal pin.
- Sealant.
Let's get down to business.
DIY bearing replacement in an LG direct drive machine
Prepare the washing machine for disassembly. Disconnect it from the network, close the inlet valve. Disconnect the fill and drain hoses that are attached to the back of the housing.
Drain off remaining water:
- Remove the plinth panel. It is secured with latches and screws.
- Place the container.
- Unscrew the drain filter.
- Wait for the liquid to drain.
- Also take out the powder dispenser.
- Remove all moisture.
During the process of disassembling and tilting the SM housing, water may get onto the board. And this is one of the most expensive components.
Now push the body of the washer to the center of the room so that it is convenient to approach the back and side walls. Dismantling begins from the top cover:
- Unscrew the screws on the back, slide the cover away from you and remove it from the case.
- Unscrew the front panel mounting bolts.
- The wiring may not be disconnected. Hang the panel on the service hook or leave it hanging from the wires.
Move to the front wall:
- Open the loading door.
- Bend the seal. It is fixed with a metal clamp. Pry it up with a screwdriver and remove it from its place.
Assembling an LG washing machine
Front Panel Installation
When connecting a tank, it is recommended to apply high-temperature plumbing silicone to the joint to eliminate possible leaks due to deformation of the rubber gasket.
All steps for assembling the washing machine are performed in reverse order and do not cause any difficulties.
Adviсe:
- When disassembling, you can photograph the stages sequentially.
- All screws and self-tapping screws are screwed back in. This will avoid confusion.
Common mistakes
Quite often, replacing bearings on your own in an LG washing machine ends in failure. And then, in addition to the usual cost of replacement, you have to pay for restoring the functionality of other components of the washing machine. Among the most common errors leading to additional repairs are:
- broken wiring to the drum door lock module;
- damage to the surface of the cuff seal (when trying to remove it without dismantling the clamp);
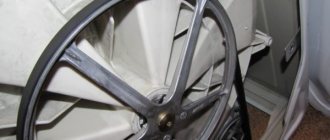
- deformation of the pulley when removing it from the axle;
- violation of the integrity of threads on bolted connections;
- broken wiring to the heating element or temperature sensor;
- violation of the tightness of the water inlet pipelines (when removed without loosening the clamps);
- damage to the tank and drum due to careless removal or installation of bearings.
Considering that few washing machine owners have sufficient experience in performing repair work, it is more profitable to immediately contact a service center - it will not only be faster, but will also be cheaper.
Model and bearing correspondence table
Devices from this manufacturer have 2 bearings – small and large. You will have to buy this set. Often such elements are sold with seals. At the same time, experts do not advise buying universal elements.
In order for the device to work as long as possible, it is worth choosing an original bearing, taking into account the brand of the washing machine.
To select the right parts, it is worth considering the model of the unit:
See also
Is it possible to lengthen the drain hose of a washing machine and how to do it
| LG washing machine model | Stuffing box | Bearing |
| F 1068 LD | 37x66x9.5/12 | 205-206 |
| WD 6007 C | 25x50x10 | 203-204 |
| WD 1020 C | 25x50x10 | 203-204 |
| WD 1030 R | 37x66x9.5/12 | 205-206 |
| WD 1090 FD | 37x66x9.5/12 | 205-206 |
| WD 1050 F | 35.75×66.9.5 | 205-206 |
| WD 1074 FB | 35.75×66.9.5 | 205-206 |
| WD 1040 W | 20x50x10 | 203-204 |
| WD 6002 C | 25x50x10 | 203-204 |
| WD 1256 FB | 37x66x9.5/12 | 205-206 |
| WD 1274 FB | 37x66x9.5/12 | 205-206 |
| WD 6212 | 25x50x10 | 203-204 |
| WD 8014 | 20x50x10 | 204-205 |
| WD 8022 CG | 37x66x9.5/12 | 205-206 |
| WD 8023 CB | 37x66x9.5/12 | 205-206 |
| WD 8050 FB | 37x66x9.5/12 | 205-206 |
| WD 8074 FB | 37x66x9.5/12 | 205-206 |
| WD 10130 | 37x66x9.5/12 | 205-206 |
| WD 10150 S | 37x66x9.5/12 | 205-206 |
| WD 1020W | 37x66x9.5/12 | 205-206 |
| WD 1080 FD | 37x66x9.5/12 | 205-206 |
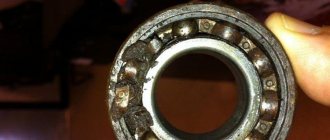
We change bearings and seals
In modern direct drive washing machines of the LG brand, the tank is collapsible. You don’t have to saw it, as is the case with non-separable containers; you just need to unscrew the screws holding the two halves of the assembly together.
After removing the bolts, you can lift the top of the tank and move it to the side. Further work will take place with the other half. It is necessary to knock the drum out of it. Place a block or chisel on the bushing and tap the tool with a mallet. The drum will fall out of the plastic container.
The next step will be to reinstall the components. washing machines are equipped with two bearings - internal and external . To begin with, the “distant” ring is knocked out - the chisel is placed on its holder and tapped with a hammer. The position of the chisel should be changed by placing it crosswise. The outer element is removed in the same way.
Before installing new components, be sure to clean the seat from debris, rust, and old lubricant residues. Having finished cleaning, you can install new bearings. The ring is placed in the socket and driven into place. It is necessary to hit exclusively on the outer ring, this will help not damage the part. An oil seal is placed on top.
During the installation process, it is important to treat the bearings and oil seal with a special protective lubricant; it will prevent water from entering the unit.
To prevent the bearings from wearing out prematurely, do not overload the washing machine, avoid spinning at maximum speed, and level the machine to prevent vibrations in the body. Then repair of the unit will not be required soon.
Interesting:
- Replacing a bearing in a Zanussi washing machine
- Replacing a bearing in an Electrolux washing machine
- How to remove a stuck bearing from a drum...
- How to change the seal of a Bosch washing machine?
- How to change the bearing in a Daewoo washing machine?
- How to change a bearing on a Samsung washing machine
Reader comments
- Share your opinion - leave a comment