Here you will learn:
- Boiler device
- Operating principle of an electric heating tank
- Identifying causes and typical faults
- Do-it-yourself Termex boiler repair
- Verdict
Thermex models are storage type water heaters. The main cause of breakdowns is most often poor quality water in the pipeline. Unfortunately, because of this, the tank will have to be cleaned quite often. For example, if water consumption is high, then system maintenance is carried out once a year. However, it doesn’t always make sense to call a specialist; you can repair Termex water heaters yourself, having at your disposal a small amount of knowledge, tools and spare parts.
Boiler device
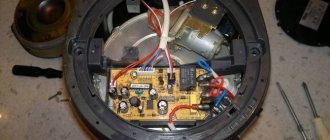
Before we begin repairing the boiler with our own hands, let’s look at the design features. The design of the water heater is quite simple, the main components are as follows:
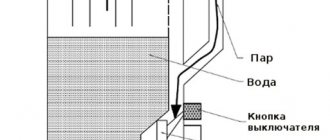
Diagram of the Termex water heater
- body made of steel sheet with stainless steel coating;
- Inner tank made of alloy steel, durable and corrosion resistant;
- the steel flange is a platform on which the elements of the device are attached: heating element, magnesium anode, thermostat;
- a large magnesium anode is a metal rod that is coated with a magnesium alloy; thus, the element reduces the corrosive activity of water, protecting the tank and increasing the durability of the water heater;
- stainless steel tube for releasing hot water;
- thermal insulation made of high-density polyurethane foam;
- The heating element, which, in fact, heats the water;
- a thermostat that acts as an auto-regulator of water temperature (turns off the boiler when the water is heated, and vice versa);
- cold water supply tube made of stainless steel.
Recommendations for self-repair of Thermex water heaters
When hot water supply cannot be called stable, many people decide to get a household water heater, for example, a Thermex electric water heater. However, it can fail quite unexpectedly. This is especially true for inexpensive boiler models. Of course, you can immediately contact a specialist, or you can try to fix the breakdown yourself.
Operating principle of an electric heating tank
The operation of the water heating tank is based on the principle of convection:
Cold water always enters the storage water heater from below, and when heated, it rises upward, where the hot water intake tube is located.
- cold water enters the tank through the inlet tube;
- the heating element turns on and heats the water to the set temperature (there is a regulator on the dashboard with which the temperature is set);
- thanks to convection, hot water rises independently to the top of the tank;
- the hot water outlet tube is located at the top of the device, through which the heated liquid enters the pipeline;
- when the water temperature in the tank drops, the thermostat turns on the heating element, and when it reaches the maximum, it turns off.
it-yourself repairs are carried out in the same way for both the 80-liter Thermex water heater and the 50-liter Thermex water heater . Their design is identical, only the tank volumes differ.
Termex instantaneous water heaters
They differ from storage boilers in their smaller size and different operating principle. The design of instantaneous water heaters includes several heating elements - usually 2, but models with three or more heating elements are also available.
The heating elements are made of ceramic materials and are usually placed in a special copper cylinder. The installed power regulator allows you to control the temperature of the liquid passing through the boiler. Also, in addition to the regulator, a pressure sensor and a temperature sensor are installed. The pressure sensor turns off the water supply if the permissible quantity in the water heater is exceeded. And the temperature sensor is set to certain values, if exceeded, it turns off the heating elements.
Combined type
Such water heaters include a small-volume tank from flow-through devices and a storage principle from simple boilers. The heating element has a different design, which is why it can operate in two modes: both a storage and a flow device.
Termex combined water heaters have received universal recognition due to their positive qualities:
- Compact size, does not take up much space.
- They are practically not subject to corrosion, which means they have a long service life.
- Combined operating mode.
- Average power, which is usually 2.5 kW. High-quality heating and low energy consumption.
Disassembly Features
Boilers “Termex”, “Ariston”, “Combustion” may differ in design and design. Therefore, immediately decide what type you are dealing with.
It could be:
- Heating element heater - “central nut 55”.
- Economy class - with an oval flange.
- Medium class - bolts in a circle.
- With flat tank.
heating element heater
This is the cheapest and simplest model - there are no adjustment devices on the body. The heating element is secured with one central nut, which can be conveniently removed with a 55 wheel hub wrench or a gas wrench No. 2.
Sequence of work:
- Unscrew the two screws that secure the bottom cover of the case.
- Disconnect the thermostat wiring and remove it.
- Place a deep container under the tank; residual liquid may spill out.
- Using a wrench, unscrew the nut counterclockwise.
For convenience, the housing can be removed from the wall and installed upside down.
- Now you can remove the heating element. Remove it from the housing - proceed carefully so as not to damage the element.
If the part does not come out due to scale, clean the hole a little using a plastic knife.
Economy class
This is a more modern technology. Most often, devices with an oval flange are produced.
Important! This type of boiler cannot be disassembled by turning it upside down. During dismantling, the heating element will fall inside, which will damage both the element and the walls of the tank.
- To remove the cover, you need to unscrew two bolts. They are located near the inlet and drain hoses.
- You can remove the thermometer by pulling it down, but the movement must be quick and precise.
- A special nut secures the flange strip. Unscrew it and remove the flange.
- Before removing the part, spin it.
Medium class
The most common design found in Ariston and Atlantic. The heating element is located on a flange, which is secured with nuts in a circle. There may be five or six of them.
During operation, the check valve may interfere with your operation; it is better to twist it. A common problem is finding bolts to remove the cover. Sometimes manufacturers hide screws behind stickers. Remove them and unscrew the fasteners.
- Remove the cover.
- Remove the temperature sensor. First disconnect the contacts from the heater.
- Remove the flange bolts using a socket wrench.
In the latest Ariston models, the manufacturer uses nuts on studs rather than screws.
Typical malfunctions and their causes
Since boiler systems have a relatively simple design, their malfunctions are not very diverse. They all boil down to the following manifestations:
- The appearance of extraneous potential on the housing (they say that the equipment “shocks with current”).
- The liquid in the boiler heats up too slowly (and sometimes it does not heat the water at all).
- Heated water cools down too quickly.
- Leaks are detected.
When a water heater “electrics”, the cause of the breakdown is most likely in its electric heating device (TEN) or the wires suitable for it.
If foreign potential appears on the device body, you must immediately turn it off to avoid possible electric shock. If a lack of water heating is detected, the causes of the problem must be sought either in the thermostat or in the heating element, the failure of which usually manifests itself in this way. It is extremely rare that this happens due to a breakdown of the control board.
If slow heating of the coolant is detected, this can also occur “due to the fault” of the heating element, on which a thick layer of scale accumulates during operation. The penultimate of these cases (rapid cooling of the water) is the most unpleasant, since this means the tank loses its thermal insulation properties and needs to be replaced. Usually the same decision is made when leaks are detected in the tank.
From the analysis of possible causes, it is clear that in order to repair the boiler, one way or another, the tank will have to be removed from it, which is impossible without a special tool. Therefore, before starting repairs, you will have to worry about purchasing a set of adjustable wrenches, screwdrivers and pliers.
And to repair the electrical part of the water heater, you need to stock up on a special device - a multimeter, which allows you to measure voltages, as well as check the serviceability of wires and circuits.
The water heater has stopped working, the indicator lamp does not light up
This problem is quite rare, and the household appliance is not always to blame in this situation. The main reason for the water heater not working may simply be a faulty socket, which will require a multimeter or an indicator screwdriver to check.
The sequence of checking the operating voltage in the socket:
- Turn on the multimeter, set the AC voltage measurement parameter, and place the probes in one and the second hole of the socket. The indication of the probes does not matter. Achieve quality contact. If the device shows 220 V with a slight deviation (plus or minus 10-15 V), then the socket is working. If the value is less than 200 V, or 0, then the outlet must be repaired.
Checking voltage with a multimeter
- You can also check the socket using an indicator screwdriver. Insert a screwdriver into the first and then into the second hole of the socket. Where the phase is located, the signal LED on the screwdriver will light up. When it comes into contact with zero, the screwdriver will not burn.
Selection and purchase of necessary spare parts
You can purchase a full set of components for the repair of Termex electric water heaters from the manufacturer’s catalog, from heating elements and thermostats to RCDs and valves. For each device, the boiler model and its volume in liters are indicated.
The parts presented in the catalog are original spare parts manufactured by the Italian Thermowatt factory. The cost of the elements depends on the material, diameter size, coating (silver plating).
DIY repair tools
To check for voltage in an outlet, use a tester or multimeter, but you can get by with a simple device consisting of a light bulb, wires and a plug. To disconnect the boiler from the water supply, you will need a gas wrench. To unscrew the nuts, you need wrenches and pliers (for connecting wires).
What you need for work
Before you begin solving the problem, you need to acquire a tool. If you do not want to start repairing water heaters, then it is better to purchase inexpensive tools. Chinese manufacturers are ideal for small household solutions.
List of necessary tools for repairing Termex boilers:
- Pliers. The most common ones, without ergonomic handles, made of environmentally friendly material.
- Flat and figured screwdriver of medium length. It will come in handy more than once in the future for housework.
- Multimeter. Probably the most expensive device on the entire list. Allows you to measure electrical network voltage, current, resistance and test wires for integrity.
- Spanners. In order not to waste time, it is better to purchase a small set, which will also be useful in the future.
The above tools are quite enough to troubleshoot water heaters. But besides this, some consumables are also required:
- Insulating tape. Adhesive tape with high electrical insulating properties. Necessary when restoring the integrity of wires. The insulating tape can be replaced with a more convenient heat shrink tube.
Heat shrink tubing in different colors
- Plumbing sealant. Liquid sealant, used when replacing gaskets; when hardened, it forms a layer that prevents liquid leakage. If desired, you can replace it with a more expensive automotive sealant.
Finding the cause of the breakdown
Before you begin repairs, you need to find out what is causing the problem.
This can be understood in advance without disassembling the device itself.
The main malfunctions of electric water heaters are:
- the device does not turn on;
- short circuit protection (RCD) is triggered;
- the water heater does not heat water or does not comply with heating standards;
- boiler leaked.
If a leak appears, you need to find out where the leak is. If it is the heating element gasket that has leaked, then such a defect can be easily eliminated. You just need to replace it with a new one, especially since they cost pennies.
You can find out how to make the right choice of water heater and not make a mistake here: https://teplo.guru/vodonagrevateli/ariston-termeks-elektrolyuks.html
You can first understand that it is the heating element that has failed by the following indirect signs:
- automatic protection is triggered;
- knocks out the machine on the meter;
- the water does not heat up, or the device does not heat well;
- the hissing of the water heater and the release of water with a cloudy consistency and an unpleasant odor.
With such symptoms, the heating element is most likely to fail. This can also be determined by the appearance of the heating element itself - the shell is damaged.
Sometimes heating elements burn out without visible damage to the shell, then this can be determined using a tester.
If the ohmmeter shows infinity at the terminals, then the nichrome spiral is broken.
If it is zero, then there is a short circuit somewhere. In any case, such an element needs replacement.
In some cases, the heating element fails for the following reasons:
- The heating element has served its term;
- the unit was turned on without water;
- the water heater was turned off for a long time, but the water was not drained;
- sudden changes in voltage in the network.
In any case, the heating element needs to be changed. Of course, the easiest way is to use the services of a specialist, but it is quite possible to change the heating element yourself. It is necessary to warn that repairs must be done in a certain sequence to avoid confusion. This is an important key to successful repairs.
Troubleshooting procedure
Troubleshooting a boiler yourself begins with completely shutting off the water supply, then you need to drain the remaining water from the tank. In addition, it is necessary to disconnect the device from the power supply and remove it from its permanent location.
Next, dismantle the protective cover of the water heater, located either at the bottom of its body (for a vertical version) or on the front side.
The second option applies to boilers with a horizontal tank.
When unscrewing the mounting screws and removing the panel, be careful not to damage wires or other electrical components.
Disassembling the heater
Disconnect the boiler from the electrical network and turn off the water supply to it, drain the water from the tank through the drain pipe, remove the check valve, the protective cover, unscrew the flange and very carefully remove it from the tank opening.
Disconnect the wires from the connectors and remove the flange assembly completely from the housing. This should be done very carefully, since a significant layer of scale can prevent this and easily damage the gasket or flange seat, and possibly the heating element itself.
In the case of such scale, you need to carefully clean it with your own hands using a blunt screwdriver to the extent that allows you to easily remove the part from the tank.
Once the parts are removed, their condition should be assessed. The thermostat, anode and heating element must be clean, with a smooth, even surface. If used for a long time without prevention, the worst thing is the anode, all corroded by rust and with thick flakes of an incomprehensible off-white scale. This appearance speaks ambiguously about the need to replace it.
You should also evaluate the condition of the heating element and thermostat. If they have traces of corrosion, scale, cracks or deformations, the verdict is the same - replace them.
In addition, inspect the flange carefully and clean thoroughly if necessary.
We would also like to draw your attention to the thermostat sensor; it is attached to the internal tank through a layer of heat-conducting paste. Remove it and check the condition of the paste; if it is dry and lacks plasticity, it must also be replaced.
Without doing this, you will deprive the automatic heater of the ability to properly regulate the temperature, and you yourself will be surprised by the difference in temperature on the display and the water from the tap.
Electric heater repair (replacement)
Before you start repairing a Thermex boiler, take a photo of its heating elements along with the supply wires (some models may have two heating elements). This will allow you to fix the power connection diagram and not waste time preparing a sketch.
Then, using a multimeter turned on in the “Dialing” mode, you need to check the wires suitable for the heating elements for the presence of a break or short circuit. When they ring as serviceable, this means that the electric heater itself (one or both) is not working or is “electric”.
When checking a working heating element in conductivity measurement mode, the device should show a resistance of 40–60 Ohms.
If at the same time a break (infinity) is displayed on the device indicator, this means that the heating element has burned out and needs to be replaced with a new one. Before replacing, you should thoroughly clean the seat from scale and dirt accumulated on it, and then install the new device on “fresh” gaskets.
You can try to remove scale found on a working heating element using special chemicals or a solution prepared with vinegar (5%) and citric acid. This measure will help cope with the second operational problem - slow heating of water in the boiler.
Thermostat problems
If, after cleaning the heating element, the water still heats up too slowly, one thermostat remains among the “suspects” of a malfunction, ready to turn off ahead of time. It makes no sense to repair it yourself, since fine-tuning this electromechanical device is possible only in a specialized workshop.
Do-it-yourself Termex boiler repair
Before you begin the repair, first gather the necessary tools: a set of wrenches, an adjustable wrench, electrical tape, various screwdrivers, pliers. After this, turn off the water by closing the inlet and outlet valves to the water heater. Then drain the water from the boiler tank and disconnect it from the power supply .
The next step is to remove the protective cover. If you have a vertically located boiler, then the lid is located at the bottom, and in the case of a horizontally located one, it is on the left or in front.
When removing the cover, pay attention to the stickers. Often the screws for securing it are located under these stickers. If you have unscrewed all the screws and the cover still does not come off easily, check the stickers again.
Replacing the heating element
First, perform all of the above steps and remove the tank cap.
To make it more convenient to work, you can even remove the tank from the wall.
It is worth noting that most Thermex models have not one, but two heating elements. Therefore, it is imperative to remember how and in what sequence the parts need to be connected . It’s better to photograph the whole process.
To remove the heating elements from the Thermex water heater, remove the top cover by unscrewing the bolt; disconnect all plugs and unscrew the bolts securing the heating elements.
The heating element itself is turned off as follows:
- After removing the cover, find the protective thermostat, remove the tips from it;
- also remove the tips (3 pieces) from the heating element;
- cut the plastic clamp;
- Unscrew the screws, removing the sensor;
- now disconnect the cable and unscrew the four screws;
- then you need to dismantle the nut on the clamping bar and pull out the heating element.
After dismantling the heating element, it is necessary to clean the surface of the tank from dirt and scale. Only after this can you install a new heating element and put everything back together.
Do not forget that the heating element does not always need to be changed. If the water in the tank still heats up, but it happens slowly, then, most likely, scale has formed on the heating element. Then dismantle it and descale it. Then install. The problem should go away. Also, do not forget that it is advisable to clean the heating element with chemicals rather than scrape off the dirt. In the latter case, there is a possibility of damage to the part.
To clean the heating element, you can use a solution of citric acid or vinegar (its percentage in the solution should be about 5%). The part must be immersed in liquid and wait until the scale falls off. Then you need to wash the heating element.
Faulty thermostat
The thermostat in Termex water heaters is located under the cover, next to one of the heating elements, and its sensor is located inside the tank.
Sometimes the thermostat fails. This element cannot be repaired; it must be replaced . To perform the replacement, you need to do all the preparatory steps, remove the cover, then remove the thermostat. But before dismantling, we recommend checking this part. To do this, use a lighter to heat the tip of the sensor (copper). If the thermostat is working properly, you will hear a characteristic click, which means that the protection mechanism has activated and the circuit has opened. Otherwise, you will have to replace the part.
Tank leak
No matter how trivial it may sound, but first you need to find where the water is coming from. A lot depends on this, since if the tank is rotten, you will have to buy a new water heater. So:
- if water oozes from the side seam, then the container is rusty and repairs will not be possible;
- If water comes out from under the lid at the bottom, then you need to disassemble the tank.
If traces of leakage are found in the places where the heating elements are attached, then your water heater is not hopeless and can be saved by replacing the gasket.
In the case of the second option, complete all preparatory steps, then remove the plastic cover. Next, take a close look at where the water is leaking. If it comes out near the flange, then the rubber gasket has deteriorated (less often this is a problem with the heating element). Otherwise, the tank is rusty and the boiler can be thrown away. To replace the gaskets, you need to remove the heating element. But it is necessary to carefully examine the heating element itself. If it is cracked, it is also better to replace it.
Other faults
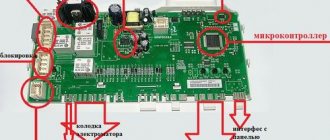
If you have checked and replaced all the parts, but the boiler still does not work, then it is quite possible that the electronics have failed. The control board cannot be repaired, and it will be extremely difficult to find a similar one in a store. Therefore, in this case, we recommend contacting specialists.
Instructions and operating features
The activation method depends on the model. Some boilers have a button for this. In order to monitor the condition of equipment, a display is often installed. It is not available in all models of 50 liter Thermex water heaters. If possible, use the regulator to set the required power value. For many devices in this group, this parameter does not change. In addition, you need to set the temperature value.
During operation of the boiler, you can change the temperature values at your discretion. When the network parameters change or the operation of the unit is disrupted, the RCD is triggered. To turn it on, you need to press the button located on this device. You can begin operating the equipment after installation by opening the mixer taps, which will allow air to escape from the tank.
The frequency of device maintenance depends on the composition of the water supplied to the boiler. For this reason, maintenance can be performed every 6-12 months, and sometimes once every 2 years. To do this, the unit is disconnected from the network, the water is drained from the tank, it is dismantled and washed from the inside. Additionally, a new magnesium anode is installed, since the old one quickly deteriorates - within a few months. In addition, it is necessary to clean the heating element from scale. Then it is installed in place and the device is reassembled.
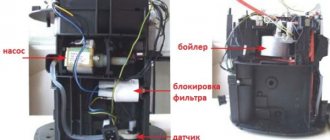
Types of instantaneous water heater control systems
Depending on the model and design of the water heater, the control system for its operation can be designed differently. For example, in the THERMEX STREAM model, temperature control is carried out by controlling the water flow. The flow itself is regulated by special shower or washbasin nozzles included in the delivery set. In this case, the protection components are a pressure switch and a thermal fuse (temperature sensor).
Flow-through heater THERMEX STREAM disassembled
Accordingly, the electrical circuit diagram of this water heater differs significantly from the electrical circuit given above - here the phase current passes sequentially through the pressure switch and the thermal fuse, which returns to the on position after the temperature drops. Before repairing the water heater yourself, you should definitely study the electrical diagram and instructions from the manufacturer.
Example diagram of instantaneous water heaters THERMEX STREAM
As can be seen from a comparison of two circuits from the same manufacturer, the principles of control and protection in these models of water heaters differ significantly. Water heaters have a completely different design, and the circuit will be different. Below, for example, is the electrical circuit of the Atmor water heater.
Scheme of instantaneous water heater ATMOR, power 7 kW
Also, some models may have an electronic interface directly connected to power relays for controlling the supply of heating elements. This means that a breakdown in this electronic board, or a failure of the algorithm, can lead to the stoppage of the water heater. Some instantaneous water heaters may have temperature control, which is achieved by switching heating elements, or using an electronic circuit.
How to care for your water heater
The quality of main water allows for an increased content of hardness salts. A concentration of magnesium and calcium salts that is harmless to humans precipitates on the surface of the heating element. The same layer of salts on the inner surface of the tank is not dangerous. It increases the protective layer and becomes additional insulation. And the heating element must be cleaned annually, since the sediment does not conduct heat, the element overheats and fails. In an acidic solution of acetic or citric acid, the precipitate is destroyed and the element becomes pure.
As a preventive against scale, you can use preliminary softening of water before supplying it to the water heater. There are special water purification filters for this. Be sure to install a filter on the water supply line to remove suspended substances from the water and direct them into the sump.
Sources
- https://remont-system.ru/vodonagrevateli/remont-vodonagrevateley-termeks-samostoyatelno
- https://TechnoSova.ru/klimaticheskaja-tehnika/vodonagrevatel/ne-rabotaet-termeks-prichiny-i-remont-svoimi-rukami/
- https://vannayaa.ru/tehnika-v-vannoj/remont-vodonagrevatelej-termeks.html
- https://tehnika.expert/klimaticheskaya/vodonagrevatel/termeks-remont.html
- https://StrojVannu.ru/texnika/vodonagrevateli/remontiruem-svoimi-rukami-vodonagrevatel-termeks.html
- https://kvanta.ru/vodonagrevateli/tehnicheskie-harakteristiki-vodonagrevatelya-termeks-na-50-litrov
- https://glav-dacha.ru/remont-vodonagrevateley-termeks/
Basic operating rules
The equipment requires regular maintenance. The main reason for appliance failure is scale, so you need to install a water filter. The boiler is placed as close as possible to the points of consumption. When operating, follow these recommendations:
- You can turn on the device only after filling the tank;
- Before dismantling and repairing, the device is de-energized;
- connection is made according to the diagram attached to the instructions;
- Before draining the water, turn off the device;
- connection to the water supply system is carried out only with shut-off valves.
Preliminary preparation
Preparations before repair are as follows:
- Disconnecting the water heater from the network. Unplug the plug from the socket.
- Close the check valve and water supply valves.
- The cold water hose is disconnected and the liquid is drained. There will be a small amount of it, only residues in the system.
- The hot water hose is disconnected and the water in the tank is drained. If there is no separate pipe for draining water, a check valve is used as one, although in this case the water takes quite a long time to drain.
- It is necessary to completely drain the water, after which the water heater is removed. It is best to do this together, because the weight of the water heater is quite large without water.
You may be interested in an article about Termex storage water heaters. Read the article on how to properly replace the heating element in a Thermex water heater here.
Descaling
Hard tap water inevitably provokes the appearance of salt deposits or simply scale on the heating element and the walls of the housing. If you do not remove deposits, a number of problems may arise over time: deterioration in water heating, loud boiler noise, overheating relay operation, and even breakdown of the heating element. To prevent these malfunctions and, as a result, save on repairs, regularly - at least once a year - clean the Termex water heater.
heating element
Descaling is carried out in three stages:
- The first is preparing the boiler for cleaning. At this stage, you need to disconnect the equipment from the network, turn off the water supply, empty the storage tank, disconnect all the wires and dismantle the heating element.
- The second is cleaning the equipment. First, remove any hard deposits, dirt, and debris from the tank and rinse the tank walls with warm water. For cleaning, you can use either special chemical compounds or a solution of acetic acid: 25 ml of vinegar per 10 liters of water. Rinse the inner walls of the tank with the solution. At the same time, place the heating element in a container with a cleaning solution - remove the part when the scale dissolves.
- The third is boiler assembly. Rinse the tank and heating element with warm water and wipe dry, then assemble and connect the boiler.
Advice. If the layer of scale on the heating element is very thick, the deposits can be removed with a wire brush, but this must be done carefully so as not to scratch the part.
Replacing the temperature controller board
In Taganrog, the search for such a board did not lead to success, and the Internet showed that its price was more than 7 thousand rubles, with delivery on order within a week. Winter was upon us, and action had to be taken.
It was decided to repair the Termex water heater by using a different thermostat, since this is the main function of the heater.
It was decided to leave the control board (panel), but only because it covers the hole in the tank). And the power board also had to be removed, since it is useless without a controller.
I installed a temperature controller from a Russian Heat RTC 70.26 heated floor, which I had been lying around for several years without use. Although it is intended for a different purpose, electrons do not care what it is to heat water or the floor.
Floor thermostat as a water temperature regulator.
A small minus is that the regulator for a heated floor can produce a temperature of up to about 45 degrees, but for comfortable use of a storage heater, a temperature of up to 70 is needed so that the water can be diluted. I solved this simply - I inserted the temperature sensor into place not as deep as the original one was, but only 3/4 of the way through the body, and fixed it. During field tests, it turned out that due to this, the actual temperature of the water in the tank is approximately 20 °C higher than that set on the regulator scale.
This arrangement of the sensor leads to the fact that the regulator has greater inertia, i.e. a wider hysteresis loop and a wide temperature spread during adjustment. That is, he thinks for a long time, but clicks less often. But the temperature spread in this case depends mainly not on the method of installing the sensor, but on how intensively the water is drained from the tank.
There will be more articles about the thermostat and heated floors, but for now - how I installed and connected this regulator in this case.
Installation of a thermostat for a Termex storage heater.
A detailed connection diagram is printed on the thermostat, so there were no problems during installation. I installed the regulator on the external box; the cable channel was already there.
I installed the sensor that is connected to the warm floor. As a result, this is what happened:
Repair of Thermex storage wall heater - replacement of temperature controller
The cable that went to the control panel was left out of use.
The original (original) board included sections of the heating element separately. In this case, the Russian Heat regulator has one relay, so I connected both parts of the heating element in parallel.
The cost of repairs in this case was reduced by about 3 times, and the time - by 10 times.
Water heater assembly
First, we purchase a new heating element
It is important that the new element matches the one that burned out as closely as possible, especially where it is attached to the body of the water heater. The number of tubes for the device sensors must be the same as they were before disassembly
Assembly must be done in exactly this sequence:
- It is better to buy a new silicone gasket. It costs very little, but a new gasket can provide the necessary tightness of the connection. Otherwise, new leaks and completely unnecessary problems will arise,
- The magnesium anode is placed in the right place on the heating element,
- The finished heating element returns to its proper place in the unit body,
- The fastening strip is installed in its original place, the heating element is pressed against it and the nut is tightened,
- You can see that the assembly of the device is a mirror image of the disassembly. Now we find a photo of what we did before, all the electrics are connected to it,
- Now you can close the lid.
So, the water heater is completely assembled and can be placed back on the wall. This operation, of course, is best done together. After all, installation is much more difficult than dismantling. The tank can now be filled with water
It is very important to monitor the entire filling process to ensure there are no leaks. If no leaks are found, you can try turning on the device
That's it and it's back to work.