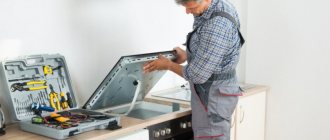
Repairing a geyser with your own hands is a serious and dangerous matter. Any professional will tell you: “a geyser is a potentially dangerous piece of equipment, so you can only trust its maintenance and repair to a qualified specialist.” However, the ability to understand exactly which element has failed and what this can lead to will definitely not hurt.
DIY geyser repair
In addition, some faults that do not specifically affect gas equipment can be resolved on your own. Read the description of typical breakdowns and recommendations for action if they are detected.
Gas water heater device
Geyser refuses to ignite
Equipment may fail to light for several reasons.
Gas water heater device
Expert opinion: Masalsky A.V.
Editor of the “construction” category on the Stroyday.ru portal. Specialist in engineering systems and drainage.
First of all, you must make sure that the igniter is working properly. If it does not light, contact your gas service. A specialist will clean or replace the failed element. You cannot touch it yourself - it is dangerous.
Gas water heater diagram
In modern units with electronic ignition, if there is no ignition, the gas stops flowing - it is cut off by a valve. The user learns about this through the corresponding indicator. In some situations, this problem can be solved by simply replacing the battery. Please clarify this point in the instructions. If the manufacturer does not give such recommendations, it is better to immediately contact the gas service or a third-party repair service.
At one point the column may not light up
Battery pack for igniting the column
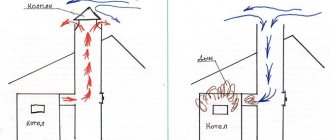
The column will not light up if there is no ventilation draft. To check the draft level, place a strip of paper near the ventilation grille. If the leaf does not change its position or does not change it sufficiently, there are obvious problems with traction. In apartment buildings, utility workers are responsible for cleaning ventilation shafts - contact them. You can do this yourself using a metal brush tied to a flexible wire (hose, etc.) of suitable length, but utility services usually do not approve of such unauthorized actions.
Ventilation cleaning
Often burners do not fire due to membrane wear. This structural element deforms quite quickly, the burner starting mechanism becomes less sensitive and does not work when the water is turned on. Even in expensive heaters, the membranes wear out within 5-8 years - unfortunately, nothing can be done about this.
Often burners do not fire due to membrane wear
To check, turn on the water to maximum. If the column turns on under strong pressure, the problem is definitely in the membrane. You can replace this element yourself.
To do this, do the following:
- unscrew the fastening nuts from the water unit (usually there are 2 of them);
- unscrew the fastening screws that hold the water unit in the gas unit (usually 3 screws);
- separate the halves of the assembly and you will see a rubber membrane. If it is not flat but noticeably warped, replace it. To do this, buy a similar product in a specialized store. If possible, give preference to a silicone membrane - it will last much longer than its simple rubber counterpart.
Expert opinion: Masalsky A.V.
Editor of the “construction” category on the Stroyday.ru portal. Specialist in engineering systems and drainage.
At the same stage, you can check the condition of the water intake filter. If it is clogged, clean it or replace it with a new one. To clean, simply unscrew the nut on the water supply side, remove the mesh and wash it or replace it with a new one, depending on the condition.
Find out detailed instructions on how to repair the Neva 4511 geyser yourself from our new article.
Heat exchanger repair
There are several situations when heat exchanger repair is necessary:
- Additional noise appeared during operation of the unit.
- The liquid heats up, but not well.
- The outlet from the column does not provide sufficient liquid pressure. Then you will have to figure out how to remove the cap from the gas water heater.
One of the reasons is scale accumulated on the surface of copper tubes. Because of this, the heat transfer rate drops, and the same applies to the throughput of the product. If servicing has been abandoned for a long time, there is a high probability that dust and soot will appear between the plates. Because of this, water heating also deteriorates. Instantaneous water heaters also sometimes work with such problems.
Removing the heat exchanger is not difficult.
- They start by disconnecting all parts from the main pipeline, then drain the residual liquid. To do this, unscrew the corresponding plug from the water section.
- Be sure to disconnect the tubes supplying and draining water. (shown in the figure by green arrows).
- They proceed to unscrew the screws (blue arrows), remove the plate responsible for fixation (yellow pointer). The main thing is to purchase a repair kit for the water unit in advance.
Flushing the internal parts under water with high pressure is what is done when repairing any heat exchangers. This is necessary to remove any contamination. Afterwards, it is recommended to immerse the unit in water with at least a small amount of detergent added. This concludes the DIY gas water heater repair.
Clean the unit using a small, soft brush. After this stage, everything is washed again, including water. The tubes are cleaned by a strong flow of water in the opposite direction. You cannot do without a special solution if scale remains even after strong pressure. Otherwise, repairing the water block will not yield any results.
100 grams of acid are diluted in 1 liter of water heated to 40 degrees. The solution is poured into the heat exchanger pipe. The reaction will appear immediately, foam will begin to appear from the structure. Leave everything in this flooded state for a few minutes. Afterwards, all channels of the water unit of the Neva gas column are washed again with ordinary water.
The geyser goes out
The geyser goes out.
If the heater turns on but goes out, the problem in most situations lies in the bimetallic temperature sensor, which is necessary to protect the equipment from overheating. Also, due to malfunctions of this element, the heater may not turn on at all.
This problem has 2 main development scenarios.
- In the first scenario, the burner lights up properly, the equipment functions for some time without any complaints, and then goes out and shows no signs of life for some time - attempts to ignite the heater lead to nothing. Usually after 20-30 minutes the equipment turns on again and history repeats itself. This occurs due to the excessive sensitivity of the sensor. As a rule, it is “congenital”, i.e. This is a factory defect. It is extremely difficult to do something on your own. It is better to immediately contact the manufacturer’s service for warranty repairs.
- In accordance with the second scenario, the column may turn off chaotically, and sometimes not turn on at all. The reason, as a rule, is the wear of the insulating material of the bimetallic sensor conductor. There is a banal short circuit to the housing, as a result of which the safety valve is activated and the column begins to behave abnormally.
Contact the service center for warranty repairs
There is no point in contacting gas workers - the defect is clearly not a “gas” defect. There is also no need to try to get rid of the breakdown yourself - you can only break the unit. Contact the service center for warranty repairs.
The burner does not go out when the hot water valve is closed.
The probable cause is a jammed rod of the water or gas unit. The microswitch should be disconnected and the rod freed. If there are signs of oxidation on it, clean them off.
Instantaneous water heaters operating on natural and liquefied gas are quite reliable devices and rarely break down. Minor faults that arise during operation can be corrected by the user independently. The gas technician solves the problem literally within 5 minutes, but demands payment for the call - is this a familiar situation? It is not difficult to avoid such incidents - try to repair the geyser yourself, following our instructions.
Water comes out with weak pressure
Water comes out with weak pressure.
Most often this happens due to the column heat exchanger being clogged with scale. Typically, the cause of clogging is prolonged “idle” firing of the igniter. The device heats the heat exchanger to a temperature sufficient to evaporate any remaining moisture.
There is no water flow, scale is not washed out of the heat exchanger, and before the next time the equipment is turned on, it sets, as a result of which the column ceases to function normally. Cleaning the heat exchanger usually helps. In advanced cases it has to be changed.
To replace it, it is better to immediately contact professionals, but you can handle the cleaning yourself. Prepare screwdrivers, rubber hose, open-end wrenches and paranitic gaskets. Buy a descaling mixture from a hardware store. This is usually called anti-scale. A more budget-friendly option is washing with vinegar essence. Work in this order.
The best all-purpose descaling products
First step. Sequentially remove the fittings and casing from the heater.
Second step. Shut off the water at the inlet and open the hot water tap, preferably as close to the water heater as possible.
Third step. Unscrew the water supply tube from the heat exchanger and then move it to the side. After unscrewing the nut, the column heat exchanger will begin to release water. In total, about 1 liter will be drained.
Fourth step. Place a hose of a suitable diameter onto the inlet of the heat exchanger and lift it slightly above the heater. Insert an ordinary funnel into the attached hose and begin to slowly pour in the prepared solution in a thin stream (preparation instructions are given on the package). There's no need to rush. If you pour too quickly, the antikipin will simply push it back out, and you are unlikely to like it.
Flushing the geyser heat exchanger
Leave the cleaning agent in the heat exchanger of the heater for 2-3 hours (usually the required time is indicated on the packaging).
Place a suitable container under the water tap and carefully resume the flow of liquid to the heater. Observe what comes out of the hose. Did a lot of sludge come out, and then the pressure returned to normal? Everything is fine. Otherwise, the washing will have to be done again. Typically, the need to re-rinse occurs only when using vinegar essence. Antiscale can cope with most situations the first time.
Water heater operating algorithm
If you have little understanding of the structure and operating principle of a modern geyser, we recommend that you familiarize yourself with this section, otherwise you will not be able to repair the device. The design of an atmospheric heater with an open combustion chamber is shown in the diagram below.
Note. The photo shows an old type column with manual ignition of the burner from a piezoelectric element. Updated versions of the devices (including the Russian brand “Neva”) ignite automatically; the power source is batteries or a 220-volt home power supply.
A turbocharged column is designed in a similar way, only the combustion chamber is completely closed, and a fan supplies air to the burner. The algorithm for starting the unit and heating water for DHW needs looks like this:
- After opening the mixer tap, a flow occurs through the water unit and the column heat exchanger.
- A membrane installed inside the frog body pushes the rod forward due to water pressure. The latter compresses the spring of the mechanical valve in the gas block, opening the passage of fuel to the burner.
- At the same time, the rod releases the microswitch button, closing the solenoid valve circuit. It is triggered and releases gas into the supply tube, where there is an already open spring valve.
- At this moment, the pulse device delivers a high-voltage discharge to the electrodes installed near the burner. A spark ignites and the water begins to heat up.
- Three sensors are connected in series to the solenoid valve circuit - thrust, overheating and flame (ionization). When the latter detects the presence of fire, sparking stops.
Reference. In older water heaters, instead of two electrodes igniting the main burner, one contact and a constantly burning pilot light are used. The presence of a flame is monitored by a thermocouple.
Now let's look at the most important point necessary for a successful repair. Under what conditions does the column automatically turn off (the main burner goes out):
Column "claps"
The column “pops”
In such a situation, it is better to immediately contact a professional. He will make adjustments, which are extremely difficult to make without knowledge of the matter, and the column will begin to work normally.
You can find out the reasons for the appearance of such a malfunction for general development. There are two main reasons:
- gas flows under too much pressure. The heater lights up too actively, which leads to a fire failure;
- gas flows at too low a pressure. Air penetrates into the heater burner, which leads to a micro-explosion, which is interpreted by human hearing as a bang.
If the gas in the wick makes a loud noise when burning
The loud noise of gas in the wick during combustion can be eliminated without even removing the casing from the column.
If you encounter this problem, all you need to do is insert a tin strip 5 mm wide and 3 cm long into the burner. The strip can be cut from an ordinary tin can - you will get something like a fishing lure. The method is very simple but effective.
The water heater does not heat the water enough
The water heater does not heat the water enough.
This usually happens due to the insufficient power of the gas water heater. The user begins to demand more from the equipment than it can do.
There are two options to solve the problem:
- we stop abusing and do not open hot taps at all water intake points at the same time;
- We buy a more powerful speaker.
Expert opinion: Masalsky A.V.
Editor of the “construction” category on the Stroyday.ru portal. Specialist in engineering systems and drainage.
Also, inadequate heating of the liquid may occur due to a clogged burner. Look at the color of the fire. Under normal conditions it is bluish. If the flame turns yellow, contact a gas specialist. You can only trust such repairs to a professional, because... This is already a “gas” breakdown.
Equipment disassembly
Before you begin disassembling the equipment, you need to do three things:
- shut off the water supply,
- shut off the gas supply,
- remove the speaker from the wall.
The first two operations are done using shut-off valves installed on the corresponding pipes. As for removal from the wall, there are options. If you just need to carry out a routine inspection of the inside of the device, then the column can be left in place. If any repair work or cleaning is required, it is better to remove the device. As a rule, it is fixed on the wall using special elements and fasteners. To remove, you only need a screwdriver.
Before removing the speaker from its rightful place, be sure to disconnect it from all communications. First, open the “hot” tap at the nearest water tap and drain the remaining water in the heat exchanger. Then close this faucet. Disconnect the water pipes, then the gas pipes. Don't forget about the chimney pipe.
Go ahead. Disassembly is carried out in several stages.
- Removing the handles. We are talking about regulators that are located on the main panel of the device. They are installed on the same principle as the handles on a regular stove. You can remove them either by simply pulling them towards you, or by prying them with a long flat-head screwdriver and, again, pulling.
- Removing the casing. The front panel is usually secured with screws. Their location depends on the specific speaker model - they can be at the top and bottom, or on the rear panel. In any case, they need to be found and unscrewed. After this you can remove the front panel. Sometimes it is additionally secured with hooks. In this case, you need to lift the lid a little and only then pull it towards you. Do not make sudden movements, since wires are attached to the control panel from the internal elements of the speaker. They need to be disconnected and only then completely remove the casing.
- Removing the heat exchanger. As a rule, it is attached to the fume hood and to the gas burner using screws. They need to be unscrewed and pulled out, and then the element itself must be removed, being careful not to damage the wires and contacts. You can watch the video for a detailed description of removing the heat exchanger:
For all these operations you only need a set of screwdrivers. Be careful: place all removed screws in some container so that they do not get lost later. When it comes to removing the heat exchanger, we recommend photographing the location of the structural elements before each subsequent step. This way you can later easily restore their original position and connect everything correctly.
After the equipment is completely disassembled, you can begin preventive or repair procedures.
The most common breakdowns
As you know, nothing lasts forever and gas heaters are no exception. Like all equipment, they tend to fail, due to many factors. Some of the more common breakdowns include the following malfunctions.
- The main burner does not ignite when the ignition is working.
- Burner goes out for no reason.
- Doesn't heat water well.
- There is some popping noise when the speaker operates.
- When you turn on the heater you can smell gas.
- The device does not light up.
This is a list of common problems with gas heaters. If you have a tool and a little knowledge, you can fix these problems yourself. Otherwise, it is better to entrust this process to an understanding person.
Other malfunctions of flow-through heaters
In addition to the problems listed above, speaker owners have to deal with the following problems:
- weak sparking, sometimes single discharges slip through, the gas does not flare up;
- ignition is accompanied by a strong bang;
- after closing the DHW valve, the burner continues to operate until the electromagnet cuts off the fuel supply due to strong heating (at the command of the sensor);
- spontaneous ignition after connecting to a power source;
- insufficient heating;
- Water is leaking from the water heater.
Advice regarding weak discharges on electrodes. If the batteries and contacts are in order, try cleaning the ends of the electrodes and adjusting the gap between the needles and the plane of the burner (the value is indicated in the technical data sheet of the product). If there is no result, call a specialist - most likely the reason is in the pulse block.
The gap is set by bending the end of the needle.
Problems with sparking generate pops - gas manages to accumulate in the combustion chamber before a sufficiently powerful discharge is formed. If the spark remains weak, the fuel-air mixture ignites when it reaches a high concentration, which is accompanied by a micro-explosion. There have been cases where the pops damaged the heat exchanger, disrupted seals and normal contact in the electrical circuits of the sensors.
Continuing heating after turning off the water is a rather dangerous malfunction. If it coincides with a failure of the overheating sensor, a vapor phase will form in the heat exchanger that can rupture copper tubes and honeycombs. The reason is the jamming of the “frog” rod that opens the gas valve. How to repair:
- Remove the water module according to the instructions above.
- Disassemble the “frog” and remove the plastic plate.
- Unscrew the nut (or screw) in the left half of the membrane chamber and remove the pusher.
- Change the seals, thoroughly clean all parts from deposits, including the spring monostat (located on the right side of the “frog” behind the membrane).
Recommendation. Before assembly, check how freely the rod moves inside the new seals. For details on disassembling and repairing the speaker, watch the video:
Spontaneous start of heating without turning on the water is a consequence of sticking of the pusher. When the burner of the device does not turn off and the thermostat trips, the user temporarily turns off the power source. Since the rod remains pressed, after the power supply is restored, the column turns on itself, without opening the DHW tap. The “treatment” method is described above.
The reason for low heating is total contamination of the main elements of the unit - the heat exchanger and burner. The column needs to be completely disassembled and serviced; it is better to entrust such work to a specialist. In case of burnout and leakage, the heat exchange unit must be removed and properly soldered, which is not always possible to do at home.
The radiator is leaking - how to fix it
If the radiator in a gas heater begins to leak, it would be more expedient to replace it with a new one, but its cost is often one third of the cost of the heater, which is completely irrational. In such cases, it would be more natural to solder the leaky radiator. This can be done using solder, since the water that passes through the radiator does not exceed 100 degrees, and the melting point of solder is 200 degrees.
Step-by-step instruction
In order to solder the radiator, you must perform the following steps.
- Drain the water from the column and remove the radiator.
- Find the leak and clean the soldering area with fine sandpaper. The cleaned area must be wiped and degreased with alcohol.
- Immediately before soldering, the leak site must be tinned. This can be done using regular rosin.
- Soldering must be done with a soldering iron with a power of at least 100 watts and solder. On the prepared area for soldering, you need to apply a uniform layer of solder with a heated soldering iron. If the soldering is applied unevenly and is loose, you need to heat the soldering area more strongly.
After soldering, you should check the radiator for leaks and if everything is fine, install it into the column in the reverse order.