If you don’t have special equipment (rolling, torque wrenches, vacuum pump and much more) and the skills to work with them, then you’re unlikely to be able to do it yourself for the first time.
No matter how many useful tips and instructions from A to Z you read, you can still miss some subtle detail, or do the work of insufficient quality due to lack of experience.
As a result, after a certain period of time, you will still have to call specialists and redo everything.
What is this article for then? In order to invite an installer or a team of air conditioners, you can independently control the quality of work during the process, and be sure that your air conditioner will work for a long time and without any problems.
Where to drill a hole for a highway
Where does the work begin? First of all, choose a place to install the air conditioner and mark a hole for laying interconnect communications.
Next, you begin drilling a through hole to the street. For this, a drill with a length of at least 800 mm and a diameter of 45 mm is used.
For powerful air conditioners over 2.5 kW, a drill with a diameter of 80 mm may be needed.
To avoid the formation of dust in the room, with an economical option, hang a plastic bag under the drilling site.
Professional installers have been using a construction vacuum cleaner for this task for a long time.
However, when wet drilling solid concrete walls, no amount of protection or vacuum cleaners will save you.
This hole, after all communications have been laid through it, is subsequently foamed.
Mistake #1
Please note that for normal condensate drainage, it is necessary to drill at a slight angle towards the street.
In this case, condensate will be removed unhindered, and water will not accumulate and become moldy in the drainage.
Mistake #2
Some people first attach a mounting plate under the block and then drill.
It is not right. The fact is that when drilling in a pre-designated place, you can accidentally hit the reinforcement.
As a result, the hole will have to be moved. Because of this, the air conditioner itself inside the room will move a few centimeters.
When choosing a place for a through hole and placing the outdoor unit on the side of the window, it is necessary to drill so that the hole ends up almost at the top level of the outdoor unit.
This will create maximum slope for the main pipes and will help prevent oil from entering the evaporator.
How does air cool and heat happen?
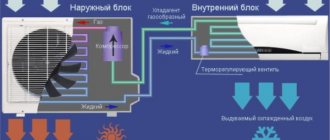
During evaporation, the refrigerant is able to remove heat. As a small experiment, you can do a little experiment. To do this, smear your hand with alcohol or a solution containing alcohol. After applying the liquid, you will feel cold on your hand, which is formed due to the evaporation of the liquid, thus, the alcohol, evaporating, takes away the heat emanating from the body.
The reverse process: during condensation (that is, when a liquid passes from a gaseous state to a liquid), a substance releases thermal energy. This condensation process can be observed in a steam room.
At the moment when the air conditioner operates in cooling mode, freon is subject to evaporation in the heat exchanger in the internal part of the system, and condensation takes place in the external block. When the device operates in heating mode, the entire process occurs in reverse order. Condensation occurs in the heat exchanger, and evaporation occurs in the outdoor unit.
How to use air conditioner correctly? To work with the equipment (to become familiar with the operating process and correctly turn on the system), it includes a user manual with a complete description of the operation of the modes and control of the system via the remote control.
An air conditioner can be used instead of a heater and, as some information shows, using it is much more profitable than turning on a heater. Another advantage of an air conditioner is that it does not dry out the air, as happens when a heater is running.
Air conditioner installation location
Align the mounting plate strictly according to the level.
In this case, the distance from the ceiling to the air conditioner itself must be at least 10 cm. This ensures good air intake and free installation and dismantling of the indoor unit.
For reliable fixation, use high-quality dowel nails 6*40mm or 8*32mm.
Next, you can proceed to installing the outdoor unit. Mark the mounting points for the brackets.
Again, don't forget about the level.
Use a hammer drill with a 12mm drill to make holes. Then secure the dowel brackets with 12*80mm nails.
Fasten securely, especially if the condo hangs from the side of the house where the roadway or sidewalks are located.
The distance from the rear wall of the outdoor unit to the wall of the building should be at least 10-20cm. Although much here will depend on the performance of the fan.
Where to place the external unit, under the window or on the side, is a matter of aesthetics and ease of use.
Many simply don’t like the extra meters of dangling cable and tubes hanging down the wall. In this case, a lateral location is selected.
Although competent installers can lay both the cable and the freon pipe very beautifully. Here a lot depends on the level of professionalism of the performers.
An air conditioner under a window is somewhat easier to maintain than one on the side. Especially if after a few years its bolts completely rust. In this case, you can’t do without a tower or climbing equipment at all.
When installing the block on the side of the window, it would be a good idea to be on the safe side. The order here is this.
Raise the air conditioner to the windowsill. Pass a rope through the drilled hole, pull it out from the street and tie it to the block.
Your partner belays the air conditioner with this rope, and you install it on the brackets. It is better not to untie the rope until the bolts are tightened.
Mistake #3
If after installation it turns out that the vibration of the air conditioner is heard as a strong hum in the room (this happens when mounting brackets directly into concrete using anchor bolts without dowel nails with plastic inserts), then special vibration supports or at least thick rubber inserts are placed under the legs of the outdoor unit.
Upon completion of the installation of the external unit, proceed to the preparation and installation of inter-unit communications.
Indoor unit
The indoor unit includes:
- The front part of the case looks like a regular grille made of plastic (like the entire body of the unit). It allows air flow into the body. The unit panel is very easy to remove, which provides easy access to all internal parts of the device when cleaning the equipment;
- Coarse air filter – plastic mesh. It is designed to protect the system from large particles of dust and dirt, hair of dogs and other animals, fluff, etc. For efficient operation of the filter equipment, they must be cleaned regularly, at least once or twice a month. You can do the cleaning yourself or order professional specialists from the service center and pay for their work. The entire operating principle of the air conditioner is based on filters;
- The filter system includes several different filters that are necessary for the continuous and efficient operation of the air conditioner. Filters are divided into:
- Coal (they are designed to remove various odors);
- Electrostatic (they are necessary to retain small dust particles);
- Antibacterial;
- Other.
- Fan. Its task is to circulate purified air in a room, office or other area;
- Evaporator. It is a regular radiator. It is designed to heat cooled freon and evaporate it. As air is blown through the radiator, it cools;
- There are horizontal blinds. Their task is to regulate the direction of air vertically, which also affects the cooling rate of the air. The blinds can be adjusted using the system's remote control;
- Panel with indicators. Necessary to display information about the operating mode of the equipment and the presence of probable malfunctions and breakdowns;
- Vertical blinds. They regulate the flow of air in the apartment entering the room in a horizontal direction;
- Union connections. Necessary for fastening copper tubes connecting the indoor and outdoor units.
Installation of freon main
For a standard air conditioner with a power of up to 2.5 kW you will need the following materials:
- copper freon pipe with a diameter of 1/4 and 3/8 inches
- heat insulator, also known as insulation (K-Flex) with a thickness of 6 mm and above
- interconnect electrical cable
- drainage hose d-16mm
- reinforced tape or vinyl tape
Measure the required length of the freon line, leaving a reserve that will go to the ring behind the outdoor unit.
Mistake #4
With the total length of the route up to 2m, measure about 1m for the reserve and the ring. This loop plays the role of hydraulic compensation and is necessary on short routes.
With large lengths, the hydraulic loop creates additional resistance to freon and only interferes with the operation of the air conditioner! Although some still do it, supposedly to reduce noise.
Results
A device mounted on a wall in a room is called an indoor unit. The outdoor unit is located on the facade or roof of the building. It is important to understand this so as not to make mistakes during installation.
Installing an outdoor unit is fraught with many difficulties. Especially if the weight of the unit exceeds 15 kg and requires installation on a high floor. Therefore, soberly assess your strengths and capabilities before starting work. We strongly recommend that you entrust installation to professionals. Working at height can be dangerous to your life and health.
In this article, we described in detail how to install an air conditioner yourself and what features you should pay attention to. Still have questions? Ask them in the comments below. There you can share your experience in installing and operating modern split systems. Good luck!
Flaring of copper tubes
We move on to the stage of preparing the tubes.
Mistake #5
They can only be cut using a special pipe cutter, no hacksaws or grinders!
When making a cut, it is necessary to hold the end of the copper pipe strictly downward in order to prevent any chips from getting inside.
The ends are processed with a rimmer.
Use the rimmer carefully to avoid scratching the skirt. The quality of rolling is one of the most important aspects in installing an air conditioner.
Mistake #6
Flaring is carried out using a special tool with an eccentric. Don't forget to put the connecting nut on the tube before this step!
The width of the flare should be such that the connection eventually fits freely and unhindered into the nut.
The height of installation of the tube in the rolling clamp is strictly regulated.
The simplest and most proven old-fashioned way to determine the quality of rolling, at least at the initial stage, is to see your reflection in the “skirt”.
Flaring of the pipes of the outdoor unit will have to be done outdoors on weight. Otherwise, the line simply will not fit through the hole.
Mistake #7
Please note - if the installation does not take place on a hot, warm day, then when bringing copper pipes home from the street, close their ends and be sure to wait time for the copper to reach room temperature.
If you bring them in cold and open, then due to the dew point effect, condensation will form inside the tube, which, on a poorly evacuated air conditioner, can lead to dire consequences.
Split system installation diagram
- Communications (in the groove)
- Drainage (in the groove)
- Sewerage
- Siphon
- Electrical wiring - to the panel (in the groove)
- Hole in the wall, punched at an angle of 1–3°
First stage: separate electrical wiring is carried out
Any, even low-power (1.5 kW) air conditioner must have separate electrical wiring and a separate circuit breaker installed in the electrical panel. Because the old wiring may not withstand the load and, God forbid, will catch fire. If specialist installers install separate wiring for the air conditioner, the possibility of a fire is reduced to almost zero.
Be especially vigilant if your house is older than 1990. In old houses, the wiring, alas, is not designed to withstand the loads caused by the use of powerful electrical equipment. Installers remember a case when the owner of an apartment was forced to replace all the wiring because of the air conditioner: the old one simply could not stand it and constantly knocked out the plugs.
Second stage: installation of the outdoor unit
To do this, installers drill holes for brackets, onto which they then install the external unit.
If you place it on an open balcony, then there are no problems: you attach it with bolts, the breeze blows through it - and everything is in order (if the balcony is glazed, then the device will not have enough air to work and it will soon break). If you want to attach the block to the wall, then you cannot do without durable brackets. Moreover, they must withstand a weight several times greater than the weight of the block. On high floors, the “outdoor” is mounted from a machine equipped with a sliding staircase. Or they call climbers (if the installation goes above the 5th floor). Such calls are paid separately and cost from 60 to 150 dollars. And sometimes both equipment in the form of a machine with a fire escape-boom and a climber are required.
External and internal (wall-mounted) units of the Carrier split system
If you live on the upper floors, then the outdoor unit can be placed on the roof. But keep in mind that the difference between the indoor and outdoor units in height should not exceed 3–20 meters (depending on the brand of air conditioner and model).
If your apartment is located on the ground floor, I strongly recommend hanging the external unit higher than 1.8–2 meters above the ground and “hide” it in a cage. Or they might steal it. At one of the companies they told us a story. A man came and ordered only an external unit. The managers were surprised: “Why don’t you want a complete split system.” “Yes, I have an air conditioner inside, but the outer “box” was cut off yesterday. On the first floor, hanging under the window.” Regardless of the height at which the external unit is “screwed”, you need to make a metal canopy over it. This will save the block from snow and icicles, which in the spring tend to fall from the roofs, breaking everything in their path.
In general, installing an external unit is a responsible undertaking. If it is loosely secured, it might fall... on someone. During the warranty period, the company that installed the air conditioner is responsible for the consequences of this. And then you will answer for yourself.
What cannot be done with the external (outdoor) unit?
There are space restrictions for installing an external unit:
- The surface of the wall on which the block will be installed must be strong (otherwise it may collapse under the weight of the block) and smooth (otherwise the block will vibrate and deform).
- Do not bend the tubes with refrigerant (freon) several times in a small area and unscrew their connections (this will lead to refrigerant leakage). If the tubes are twisted into a ring with a radius of less than 100 mm, then it will be more difficult for the compressor to pump freon.
Third stage: installation of the indoor unit
Installers fasten special brackets with screws to the wall (if the block is wall-mounted) or the ceiling (if the block is ceiling-mounted) and install the blocks on them. After this, be sure to check the strength of the fastening (is the structure wobbly? Does it vibrate when the air conditioner is turned on?). Otherwise, sooner or later the entire structure may simply collapse on your head.
But for the floor block, no special fasteners are required. He, as they say, “will stand on foot.” You just need to immediately choose a place for it (when choosing a place, make sure that the unit does not blow on the curtains or the wall and is located away from the heat source). And although the block is not attached to the floor, after all communications have been laid, it can no longer be moved from place to place.
Air conditioner control panel
So, the indoor unit cannot be installed:
- ...above a heat source (for example, a radiator). Otherwise, the air conditioner will work on cooling “until it loses its pulse” and will very quickly fail. Imagine that you opened the door of the refrigerator, and it will cool not only the camera, but the entire room. It will “work” and fail by the end of the day. The same thing will happen with the air conditioner. In addition, the heat emanating from the room battery can cause the plastic housing of the unit to become deformed.
- ...in rooms where devices with high-frequency electromagnetic oscillations (for example, a drill, a drilling machine) are constantly operating. High-frequency vibrations can knock down the chip (processor) installed inside the air conditioner.
- ...directly above the bed or workplace, otherwise there is a danger of constantly catching a cold or, worse, getting pneumonia.
- ...where air circulation will be difficult, for example, behind curtains, etc. The distance to the obstacle should not be less than 3 meters. Otherwise, the air conditioner, which maintains the set temperature automatically, will fail. The cooled (or heated) air flow from the air conditioner will be reflected from the obstacle and will return back at the same temperature with which it “came out”. The air conditioner will decide that the work has been done, the desired climate has been set and will turn off. This is exactly what happened to my friends. Their air conditioner constantly got tangled in the curtains and turned off before it could bring the room temperature to the set temperature. I had to call specialists and reinstall the system.
- ...with a skew - then water (condensation) will flow out of it onto the floor, which, according to the installation rules, must be discharged through a drainage pipe into a special tank (see our certificate on drainage).
Stage four: gating walls or floors
In order to connect electrical wires and freon tubes between air conditioner units, installers punch gutters in the walls or ceiling (or, as the installers say, you need to “drill the line”). This is done if you want to make a hidden highway. Sometimes you have to “drill”, for example, not the walls, but the floor of the apartment.
Don't want to dabble? Then you can hide the wires in decorative plastic boxes (sometimes the boxes are hidden under the baseboard). But before doing this, installers will need to connect two copper pipes (for the refrigerant) and the “ends” of the wiring between the outdoor and indoor units. Make sure the installers do this using the connecting fittings. And a “waterproofing cup” with a connecting hose was placed into a pre-punched hole in the outer wall.
The installers come to the site with all the necessary equipment, lay communications in the groove, and place the drainage pipe in the groove at an angle
After this, they must carry out the so-called vacuumization of communications, and always within 50 minutes (it is during this time that “extra” air and moisture will come out of the communications). This manipulation must be done using special equipment.
Please keep in mind that, as a rule, a separate hidden line is made for the drainage pipe (in the wall or under the floor).
Fifth stage: checking the operation of the system using a special program
At this stage, installers must turn on the split system (air conditioner) by setting it to the test program. If everything works and the case does not vibrate, then everything is in order. The work is almost finished. By the way, we recommend that you independently conduct such a check of the system’s operation every year (using the same test program).
Stage six: garbage collection
I must warn you: laying the main line and other installation procedures involve dirt, dust and noise. But good installers (with a license to install air conditioners) will arrive with special tools (including a metal detector to examine walls for fittings and hidden communications).
In addition, installers should have a vacuum cleaner and other cleaning equipment. With their help, after finishing the work, they must remove all the garbage themselves. If installers try to dodge “dirty” work, strictly demand that “cleaning up the area” is included in the payment for installing an air conditioner. In addition, you can enter into an agreement with a reputable company for preventive maintenance of the split system. Then you won’t have to risk your life, leaning waist-deep out of the window, to clean the outdoor unit with a vacuum cleaner or call climbers at your own expense. When concluding such an agreement (it also includes warranty repairs), of course, you will have to pay a certain amount, but believe me, it is worth it. By the way, we hasten to announce a pleasant detail: the company that sells Japanese Daikin air conditioners will replace your air conditioner with a new one free of charge after the three-year term of the service contract. However, if you are satisfied with the old unit, you can not change it for 20 years. The company guarantees its uninterrupted, good operation. By the way, in the well-known building on Lubyanka, Daikin air conditioners have been installed since the time of the “corn general secretary” Nikita Khrushchev and are still working properly.
The outdoor unit must be regularly cleaned of dust and dirt. A particularly difficult period for the outdoor unit is the time of flowering of poplars. The fluff instantly clogs the filters, and the air conditioner (if it is not cleaned right away) breaks down. Of course, you can clean it with a vacuum cleaner if you are not afraid of heights. But it’s better not to risk it and call the “air conditioner rescue service” - that is, a service company.
At temperatures below –15°C, the air conditioner may refuse to work “heat”, and then low-temperature equipment (heat pump, compressor heater and even drain tube heater) will be needed. By the way, some models already include these devices (see table).
What did the installers say?
Experienced installers do not recommend buying air conditioners “from anyone,” on the market or second-hand.
“How many times has it happened that some kind of illiterate whiner will carry out the installation, and then people call us and beg us to help,” one experienced installer from a very reputable company told me. “It used to be that such would-be installers would bring with them a copper pipe for freon, but it didn’t have plugs. If there are no plugs, then moist air will get inside. And humidity is unacceptable for an air conditioner: when it combines with the insides of the entire system, it forms an acid that corrodes the air conditioner mechanism from the inside! And instead of serving properly for many years, such an air conditioner is, of course, sent to a landfill after three years.
The installers told me that sometimes they come across particularly stubborn customers, saying, “I’m paying, do as I say!” What should I do? There was a case recently. The client ordered that the outdoor unit be installed not from the street side, but inside the apartment, and in the children's room. He motivated this with a strange statement that his children, they say, would live at the dacha for another two months. He ignored all the persuasions and arguments of the installers that the outdoor unit cannot be installed in a closed, and especially in a residential area. It is clear that after two months the stubborn buyer called the installers to reinstall everything.
Or here's a case. The client wanted the indoor unit to blow directly onto the bed and the air temperature to be 18°C. They tried to prove to him that it would be cold, and that a directed flow of cold air could cause a cold. "No! I won't catch a cold! Place it!” There is nothing to do, they set it. The next day they came to install the air conditioner in another room, and they saw that the temperature on yesterday’s split was set to 22°C.
- What's wrong? - they ask.
– It’s true, guys, I froze at night.
In general, when the air conditioner is working properly, a person should not feel that something is cooling or heating him. Just comfortable – that’s all! One day a friend called the company and asked to come. He says: “I didn’t buy it from you, though.” Okay, let's go. They opened the block, and there was a dead rat.
That's it. Hence the conclusion - it’s not enough to buy and install a split system. The main thing is that professionals do this for you.
Our information
The optimal temperature for human life is + 21–23°C.
Connecting freon pipes
We move on to the stage of connecting communications.
Connect the flared tubes to the indoor unit of the air conditioner using adjustable wrenches.
If you have a torque wrench, it is better to use it.
Here are the recommended tightening torques for freon tubes of various diameters:
- 1/4 – 16-20Nm
- 3/8 – 35-45Nm
- 1/2 – 45-55Nm
Next, take the interconnect cable and twist it all into a single unit with the freon line using reinforced tape or vinyl tape.
Do not forget to stretch the insulation of the required diameter onto the copper tubes.
To prevent dirt from accidentally getting inside the tube, wrap its ends with electrical tape.
Mistake #8
Under no circumstances should the thermal insulation of the tubes be left unprotected.
Otherwise, from the street under the influence of UV rays, within several seasons it all turns into dust.
If your thermoflex is lightfast and not afraid of the sun, then think about the birds. Crows peck very well and take away such material for their nests.
Mistake #9
Also, do not leave any area indoors without insulation. Especially the junction points.
Condensation will gradually form here and eventually a neat trickle of water will appear on your wallpaper.
The line itself, wrapped with tape, is hidden inside the room in a plastic box.
However, if you have a short area and there are old wallpapers left, then instead of using a box, the highway can be covered with them. The result will be an almost invisible picture.
Next, pass the line through the through hole to the outside.
Conclusions and useful video on the topic
Self-installation of an air conditioner is clearly shown in this video:
In the same video you can see the most common mistakes made when installing an air conditioner yourself:
Air conditioner installation can be done independently. To do this you need to have a little knowledge and skills. When installing air conditioner units, be sure to follow the instructions and safety requirements. However, when performing work, you cannot do without the help of an assistant - the weight of the outdoor unit can exceed 20 kg.
If, after reading the article, you still have questions or have installation suggestions based on personal experience, be sure to share them in the special comment block below the article. Here you can also add unique photos of your air conditioner installation.
Drainage
Please note that the drainage hose must be located below the freon line.
Attach the indoor unit to the mounting plate.
Connect the air conditioner drain hoses.
For extensions, many use a regular metal-plastic pipe d-16mm. The factory drain tube is flared and metal-plastic is inserted into it, sealing the connection at the top with electrical tape.
However, over time, a fungus may form inside the metal-plastic material, which will not allow the water to drain away quickly enough.
Therefore, other installers use only corrugated pipes as drainage.
In addition, it is the corrugated drainage that allows you to connect directly to the bath without additional connections.
Distance between air conditioner and furniture
For high-quality distribution of treated air, it is necessary to remove from the area within a radius of 1-1.5 meters all furniture and any other interior items that could serve as a barrier to it. Air currents will be reflected from them and return back to the device, which will cause it to turn off, as the temperature sensors will receive a command that there is sufficient cooling/heating. Over time, this disables the climate control equipment.
To ensure proper placement in the room, it is advisable not to hang it above tall cabinets, elongated computer desks and various shelves. This also serves as a limitation for the normal dispersion of circulating air flows.
Connecting the air conditioner to the mains
To finish with the indoor unit, let's move on to connecting the power wires.
Having opened the front cover of the indoor unit, unscrew the plastic plug to connect the cable.
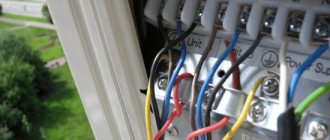
Having inserted the cable, connect it according to the electrical diagram. To do this, look for the following markings on the terminal block:
- L-phase
- N – zero
- grounding icon
Check on the power cable where you have phase and zero and connect the corresponding ends to your terminals.
When connecting a low-power air conditioner (up to 2.5 kW) directly from the switchboard without an outlet, you must have a three-core cable VVGng-Ls 3 * 2.5 mm2 in the groove.
A 16A circuit breaker is installed in the panel.
With a low-power condenser up to 1 kW, you can, of course, use a section of 1.5 mm2 + a 10A automatic, but 2.5 mm2 is a more universal option and will allow you to easily change the split system with a higher power in the future.
If the air conditioner will be connected through an existing socket, then use a wire with a 3*2.5mm2 PVA plug.
There is also nothing complicated about connecting the indoor and outdoor units. Here, as a rule, a 4*2.5mm2 or 5*2.5mm2 cable is used. The terminal markings on these blocks are the same.
Accordingly, throw a cable between them (not the PVS wire, but the VVGng cable!) and connect the wires of the same color to terminals L1 on the internal unit and L1 on the external one, N on the internal one and N on the external one, etc. Just follow the connection diagram and labels.
Sometimes the air conditioner itself in the room is powered not from the outlet, but from the outdoor unit (most often with inverter models). In this case, the exterior will have several more terminals.
This is phase-zero-ground. Then you lay the power cable from the outlet or diffavtomat in the switchboard outside, and not to the indoor unit.
Connecting the freon route pipes from the outside is similar to the room connection.
Where is the best place to install air conditioning in an apartment?
The choice of equipment location depends on the layout of the apartment. In typical one-room apartments, the best option for installing air conditioners to create a comfortable microclimate is to install them in the room and in the kitchen. An alternative option for installing a split system is to place it above the doorway of the room or opposite it. With this arrangement of the device, the air flow will flow into the hallway and kitchen.
In multi-room apartments, adjacent rooms are equipped with one split system. It is located in the same way as in one-room apartments above the doorway connecting the rooms. In apartments with isolated rooms, one air conditioner can be located in the hallway. In multi-room apartments with complex polishing, multi-splits are usually installed.
Air conditioner vacuumization
But for the next stage of work you will need a vacuum pump. It is necessary for vacuum drying of the freon line.
Mistake #10
You can never guarantee that all the moisture will be driven out simply by the freon itself. The air contains this moisture. Without normal vacuumization, sooner or later your compressor will fail.
If you do not bleed the air, the pressure in the system will be affected (it will rise). In this case, the compressor’s performance may drop by about 30-35%, and it will operate under constant load.
And the moisture contained in the air affects the rapid decomposition of oil and an increase in its acidity level.
This further leads to two consequences:
- destruction of the varnish insulation of the windings on the electric motor by the acidic environment and its failure
- gradual “washing out” of copper from the tubes and its entry onto the working surface of the compressor with a decrease in gaps
Therefore, if the invited “specialist” came without a vacuum pump, then know that very soon you will see him again. And you will meet him very often.
The operating time of the vacuum pump depends on the length of the line. The minimum length is 2m. If you get less, then sooner or later the oil from the compressor will definitely get into the evaporator and your air conditioner will not work for a long time.
For a standard short section, vacuumization time is from 15 to 20 minutes. It is counted after the direct creation of a vacuum (reaching a pressure of 5 torr). This can be checked on the pressure gauge manifold, or heard by the changed sound of the pump.
When the sound almost disappears, start counting the time from that moment.
What you need to know about installing a split system
Problem: The main difficulty faced by the buyer of a split system is the problem of proper installation. Installation determines 90% of the quality and service life of the air conditioner. If errors are made during installation, it is very difficult to correct them later.
Solution: Installation must be carried out by specialists licensed to install air conditioners, in compliance with the instructions and using special equipment. After installation, there should be no debris, dust, or boxes left in the room. The word “air conditioning” has taken root only in our country. This is actually a piece of the phrase air-condition, which translated from English means “condition of the air.” The air conditioner serves to maintain the desired temperature and humidity in the room. By ventilating the air, the air conditioner cleans it by passing the air flow through special filters.
Today we will talk about installing a more modern type of air conditioning system - a split system. What are the advantages of a split system over a “regular” air conditioner? The split system does not block natural light, like a “window” that is cut into the window frame. This is the first difference. In addition, it does not depend on the general air conditioning system of the house, if there is one (this is when one hefty unit stands somewhere in the basement and circulates air throughout the house). And it differs from a “regular” air conditioner in that it consists of two blocks - external and internal. If there are more than two indoor units, then this is already called a “multi-split system”.
But let’s agree: for simplicity of presentation, I will talk about the split system, calling it the word “air conditioner” that is more familiar to our ears.
First - repair, then - split
So, a split system (from the English word split - “split, split”) consists of two separate blocks: internal (evaporator) and external or external (condenser). The blocks are connected to each other by electrical wires and two copper tubes through which refrigerant (freon) flows. A thin plastic tube (drainage) also extends out from the indoor unit to remove condensed moisture. Ideally, it should be connected to a drain (sewer) pipe or to a special tank, but often it is simply taken out into the street, and then drops of water fall on the heads of passers-by (see below for information on how to properly make drainage).
The operating principle of a split system is as follows. If the room needs to be cooled, freon flows from the heat exchanger of the outdoor unit through one copper tube to the heat exchanger of the indoor unit. There it is blown by a fan, as a result of which cold air comes out of the indoor unit. If the air in the room needs to be heated, then with the help of a heat pump the external condenser turns into an evaporator, and the evaporator becomes a condenser. In addition to the condenser and evaporator, the split system includes a compressor, which is installed in the external unit. The main function of the compressor is to compress freon to give this gas properties that significantly increase the efficiency of the air conditioner.
Split system:
- – outdoor (external) unit
- – internal wall block
The indoor unit operates almost silently (for Daikin models, the noise level of some indoor units is 28 - 31 dB, and for Mitsubishi, when the engine is turned on at the lowest speed, it is 26 dB; the same noise level is created by a flying butterfly). But the fan and compressor of the external device can “buzz” and become louder.
Depending on the method of fastening, indoor units are either wall-mounted or floor-ceiling (floor-ceiling are so called because they can be attached to both the ceiling and the floor). There are also cassette and multi-zone indoor units, but we will talk about them next time.
In apartments, wall-mounted indoor units are most often installed. With the help of movable blinds on the wall unit, you can change the direction of air flow. But the power of wall-mounted units is specially limited - otherwise a strong stream of cold air will simply “blow away” everything in its path. But if a more powerful air conditioner is required in a room (for example, in an office), a floor-ceiling unit is installed. It will allow you to direct a strong jet along the wall or ceiling and thus ensure uniform temperature distribution in the room.
Our advice: if the length of the room significantly exceeds its width, it is much more effective to install a floor-ceiling air conditioner!
Split systems vary in power (cooling capacity) and design. The choice of design is at the discretion of the buyer. But about power, you should definitely consult a specialist. In doing so, you need to know:
- The area (volume) of your premises.
- The size of the window, the direction of the world it faces.
- Presence (absence) of blinds on the windows.
- The amount of constantly running equipment that generates heat (TV, computer, etc.).
- Number of radiators in rooms.
- The number of people constantly present in the room.
- Is there forced ventilation?
Another piece of advice: if the company where you want to buy an air conditioner didn’t ask you anything about it, then it’s better not to buy from them. Because there is a danger that you are being offered something that is “not typical.” In reputable companies, before selling an air conditioner, a consultant, as a rule, goes to the site where the device is supposed to be installed, takes measurements and finds out all the necessary details. Then all this data is entered into the program, and only after that the computer selects the optimal model. For example, they work in, specializing in Carrier air conditioners (USA), in (Daikin air conditioners) and (Hitachi air conditioners).
What else do you need to know? Experts advise INSTALLING A SPLIT SYSTEM BEFORE or DURING REPAIRS, and not after all the repair work has already been carried out. Then you won’t have to hammer and drill freshly painted and leveled walls in order to lay electrical wiring for the air conditioner and strengthen the brackets for fastening the indoor unit. You can, of course, hide communications in external boxes, but this will not decorate the interior.
This is what the distribution of air flows from a wall-mounted indoor unit looks like
Moreover, installation work in a freshly renovated apartment is much more expensive, especially after European-quality renovation.
Now about other possible “ambushes”. Very often, mistakes begin when purchasing an air conditioner. Wanting to save money, we go to the nearest store (or even to the market) and buy an air conditioner. And what? And that’s it: we’re one on one with him. In the best case, after carefully reading the instructions, we undertake to install it.
Meanwhile, installing a split system in an apartment is not at all the same as installing a refrigerator or TV: they say, you bring it home, put it in the chosen place, turn it on and - it works! This number will not work with air conditioning. The air conditioner requires proper installation. This is exactly the case when you can’t skimp on installation. The better it is installed, the longer it will last. It is no coincidence that installation work accounts for 18–30% of the cost of the unit.
I remember how one experienced and reserved-looking installer, answering my quite innocent question: where to start installing an air conditioner, suddenly became agitated and shouted: “People! You are all literate! Each air conditioner comes with instructions in Russian, in which both installation and operating rules are described “for fools,” point by point. Read it, damn it, before you stick your hands in! Better yet, call the specialists.” And, alas, he is right.
Installation: where to start?
Work order
To carry out the correct installation of the system, you need to understand the installation procedure.
Installation of the indoor unit
Work begins with mounting the internal module of the device. This procedure consists of several successive steps:
- Mark on the wall with a marker or chalk the place where the indoor module will be installed.
- Attach the mounting plate to the wall to which the structure will be connected.
- Using dowels, secure the module to the plate.
Preparation of communication channels
The next stage of installing the system is preparing the channel in which pipes with wires will be laid. To bring the pipes out, you will have to make small holes in the wall. To perform such work, you will have to use a special hammer drill equipped with an extended drill. The wall is drilled at a slight angle to create a slope for condensate to drain.
Installation of the outdoor unit
The most difficult thing to install is the outdoor module, which weighs about twenty kilograms. The installation process begins with markings, after which holes are made in the marked areas for mounting mounting brackets
After installing them, hang the external unit and carefully secure it
It is better to install the external module together, as it is difficult to lift it yourself.
Connecting electrical wiring
Connecting an air conditioner to electricity is quite easy. To do this, you only need to lay two electrical cables:
- A wire that connects the internal and external modules of the structure.
- A cable used to connect the indoor unit to a power source. It must be brought out to the electrical panel, connected to the machine, after which the system is connected to the outlet.
Pipe laying instructions
Before laying pipes, they are carefully wrapped with heat-insulating material. For this, special reinforced tape is most often used, which is used to wrap each pipe in 2-3 layers.
Then they are carefully screwed to the walls with metal clamps
Evacuation of the air exchange system
To carry out evacuation, a vacuum pump is connected to the fitting, which will clear the system of air. The pump should run for at least half an hour.
Filling with freon
Before filling the system with freon, the valve on the liquid valve is slightly opened, after which the refrigerant is started. When the procedure is completed, unscrew the hose from the service port. In this case, you need to unscrew it as quickly as possible so that the freon does not evaporate from the system.
The first stage of device installation
Before starting installation work, you need to decide where to install the split system. To determine the most optimal location, it is worth considering some factors.
- Under no circumstances should the indoor unit of the system be installed where air circulation is limited. This is possible due to closely spaced cabinets, curtains or partitions.
- The distance between the equipment and the nearest obstacle should not be less than 1 meter, since cold air, reflected from it, will quickly return without changing its temperature. Because of this, the system will quickly turn off, considering that the desired temperature has been reached.
- It is advisable to locate the internal unit of the system away from the place where people spend most of their time.
It is not difficult to install a split system yourself, the main thing is to observe the correct operation during installation. So, when fastening the outdoor unit, you need to carefully ensure that:
- it was located on a flat surface, and there were no sources of heat or steam nearby;
- the block was installed strictly horizontally, so when fastening it to the surface it is advisable to use a building level;
- a unit located outside cannot be mounted close to the wall. The distance between the device and the wall should not be less than 10 cm. Air should circulate freely in the space left.
When installing the indoor unit, the following rules should be followed:
- When installing the unit, be careful. so that it is located strictly horizontally, without slopes;
- try to maintain the distance between the outdoor and indoor units;
- Do not install the equipment close to the ceiling or near sources of steam or heat.
So, when the location has been chosen, you can proceed directly to the installation work. You should start with the electrical wiring. The split system should be connected to the electrical network via a separate line specially designated for this equipment, with the obligatory installation of an additional circuit breaker in the electrical panel.
Common mistakes
Rules and requirements are often not followed, which leads to the collapse of air conditioners. The reason for this is lack of experience, reluctance to pay for the services of specialists or the attraction of unskilled workers. Often the type of material that makes up the walls or their covering is completely ignored. As a result, the service life of the equipment is greatly reduced, and funds are wasted.
The list of frequently encountered errors includes the following:
- The freon pipes are too kinked, which increases the load on the compressor. As a result, it breaks down quickly.
- Installation on a loggia impairs air circulation.
- Climate control equipment is reinforced where there are devices emitting electromagnetic waves
- Condensate flows out of the evaporator unit due to its misalignment.
- The air conditioner is mounted directly above the source of heat radiation.
All of the above errors must be eliminated during the installation process, however, this requires having the appropriate knowledge and extensive practical experience.
Is permission needed or not?
An air conditioner is a multicomponent system, one of the units of which is located outside. During operation, it makes quite a lot of noise and produces condensation, which creates some discomfort for others. Therefore, it is important to understand that unauthorized installation in multi-apartment residential buildings, without obtaining the necessary permits, can lead to a number of problems.
Installation of equipment must be carried out with strict adherence to all specified distances, as well as compliance with mandatory requirements for strength, reliability, free outlet of air masses, and access to service ports. During installation, it is important to choose the correct mounting location. When choosing equipment, you should consider the following details:
- Weight of the outdoor unit.
- Horizontal placement direction (north/south).
- Facade cladding material, building design.
- Availability of free access for maintenance.
If these conditions are met, the structure will last a long time, reliably and will not cause negativity among neighbors.
To date, judicial practice on this issue is ambiguous. Some decisions state the following: the front side of the building is the common property of citizens, and the installation of equipment on it is considered reconstruction. Another point of view is that federal legislation does not indicate the need for mandatory approval.
The following conclusion suggests itself: before making a decision on air conditioning, you should contact the municipal administrative authorities to find out if there is a regulatory act. If it is not there, the authorities have no legal basis for issuing permits and must explain to the applicant the existing procedure for strengthening air conditioners on the walls of buildings.
Is residents' consent required?
The consent of other apartment owners is required. Failure to provide documentary evidence will result in a court decision requiring the equipment to be dismantled. The façade air conditioner is considered to violate the following legal rights of other citizens:
- due to humming, noise and vibration, neighbors cannot rest in peace;
- condensation falls on balconies and loggias, rendering the front walls unusable;
- the view from the plaintiff’s window is blocked;
- installation was carried out without observing installation and fire safety regulations.
Article 36 (clause 1) of the Housing Code of the Russian Federation establishes that the facades of multi-storey buildings are the common property of its residents. To avoid dismantling, it is necessary to gather a majority of neighbors in advance to obtain their approval.
Important! Without it, installation will be considered unauthorized.
Mandatory permission
In the following situations, you will definitely need an air conditioner permit from the relevant authorities:
- When strengthening equipment on the front side of a high-rise building.
- If the building is recognized as historical value.
- When installation is planned over pedestrian paths.
- In the absence of masking barriers in the window opening.
Semi-industrial and industrial microclimate systems cannot be installed without prior approval. Household appliances can be secured if you have permission from most neighbors.
How to get
To obtain a permit, you will need to order the creation of a project, make a preliminary calculation of the noise emitted, and submit documents to Rospotrebnadzor, DEZ, HOA. We again remind you of the need to initiate a general meeting of apartment owners to obtain their consent. If these requirements are strictly followed, the rules for installing an air conditioner on the facade of the house will not be violated.

