The importance of grounding a flow-through heater
Due to the absence of a storage tank, the device operates directly through the heating element, interacting with the water flow. Such water heaters must be equipped with grounding.
An example of a possible breakdown of a device best argues for the importance of grounding a flow-through boiler. Let us assume that there is a breakdown of the device
The result of such a phase breakdown of the device body is the formation of a deadly conductive chain:
It is not allowed to use a instantaneous water heater with working grounding without an RCD.
There is a generally binding regulatory regulation for the production of a grounding loop and its electrical installation. The main requirement is to perform work in accordance with all safety requirements.
All rules and specialized requirements for grounding safety precautions must be taken into account by the specialist when carrying out work. There is provision for standardization of data such that it applies to the production of all types of electrical installation and commissioning work, including grounding.
Having summarized the data from the documentation regulating the grounding of various types of electrical equipment, we can highlight the main task of the grounding device - the implementation of the working and protective functions.
Experts strongly recommend not to neglect the grounding of the boiler. The working function of the grounding electrodes increases the service life of the boiler. The stainless steel used in the manufacture of the heating tank is exposed to stray currents. Micropores form and the overall tightness of the device is compromised. Grounding allows you to neutralize the harmful effects on a thermally insulated tank by draining currents.
The production of grounding a water heater can be represented as a complex of sequential implementation of interconnected elements. Each element of the grounding system is very important. A reliable level of electrical safety for residents and a long service life of the water heater are the main arguments in favor of the need to ground the device.
A water heater is a powerful consumer that operates simultaneously with water and electricity. Therefore, the boiler must be grounded without fail. Most apartments do not have it, since the buildings were built a long time ago. You will learn below how to organize a safe connection of equipment.
It ensures stable and uninterrupted operation of the equipment. Main reasons:
- Water is an excellent conductor of current. Since the boiler parts are in constant contact with moisture, grounding allows you to avoid many problems. If the integrity of the wires is broken, you may feel a small shock when you open the faucet or take a bath. This can be deadly. When one of the elements hits the body, an electric shock can occur upon contact.
- Discharge of stray currents. They accumulate in the metal elements of the device and lead to corrosion of the tank and its parts. In addition, a person may feel a slight tingling sensation during use.
- When struck by lightning in a thunderstorm, the ground will take the shock. This way your equipment will remain safe and sound.
How to ground equipment if there is no way to route the wiring into the ground? For example, in an apartment. Many turn to options that are contraindicated. Let's look at them in more detail to prevent problems.
How not to ground a boiler
It is prohibited to carry out the procedure using a heating riser or water supply. Firstly, this leads to corrosion and rapid deterioration of the pipeline. Secondly, you and your loved ones can get an electric shock when touching a boner.
Connect to mounting hardware. This leads to the same consequences as stated above.
Why ground the boiler?
The operation of any electrical device does not exclude the possibility of malfunctions in the operation of the device. The cause can be both external factors and problems in structural elements.
The presence of a grounding device for the boiler will protect the user from the consequences of the following situations:
- Sudden damage to the insulation of a tubular electric heating element (TEH). Due to the significant conductivity potential of water, the danger of electric shock to humans increases.
- Phase short circuit on the water heater body. A typical situation for most electrical appliances.
- Continuous circulation of water serves as a constant source of charges. Electrostatic particles have the function of constant accumulation.
The user may receive an electrical burn in any similar situation with water heating equipment.
Proper grounding of a water heater should be based on the design compliance of the device with the selected grounding technique. The phased implementation of the technical component is an important aspect that determines the quality of the electrical installation result.
Connecting an instantaneous water heater
In a flow-type boiler, water passes through its shell, and the heating element turns on only when the water flow moves in the body of the device. Therefore, overheating in this system is practically impossible and a pressure release valve is not installed in the heater.
A shut-off ball valve and necessarily coarse sand filters are placed in the cold water supply pipeline of a flow-through water heater - the absence of filter elements is a gross violation of the operating rules and may cause the service organization to refuse to fulfill its warranty obligations.
Rice. 9 Examples of installation of instantaneous water heaters
Is it worth grounding a water heater in an apartment or in a house?
Liquid from the water supply is an excellent conductor, constantly in contact with the heater of a household appliance, regardless of the type (flow-through or storage). If the wires burn out or the housing of the heating element is destroyed, contact of water with electricity cannot be avoided. Contact with the metal body of the boiler or contact with a stream of water from a faulty device is inevitably accompanied by an electric shock. Due to the fact that it is impossible to quickly get out of the bath or shower, the impact of the current becomes fatal. One of the effective ways to reduce the negative impact (in conjunction with the installation of protective equipment) is to ground the water heater.
How to make grounding
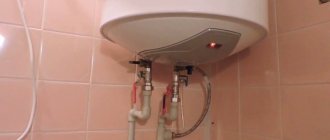
You can organize everything correctly with the help of our recommendations. Inspect the water heater and locate the ground terminals. All modern devices are equipped with them.
Buy an outlet with three holes and a moisture-resistant casing, especially if installing in a bathroom.
- Mount the outlet at a distance of 50-80 cm from the floor and the water heater.
- You need to run a three-core copper cable from the panel to the outlet. If desired, you can embed the wiring into the wall by drilling a channel.
- Turn off the electricity and connect the wires to the outlet. Their colors will help to correctly distribute the veins. See the picture below: photo 4
- Connect the ground cable to the busbar on the panel.
What to do in a private house
In the private sector or at the dacha, you need to organize grounding yourself. You will need skills to use a welding machine. Also three metal pins (angles, pipes) 1.5 meters high and 15 mm in diameter.
Select a site 1.5 meters from the house. No one should go here in the future.
- A trench in the shape of a triangle is dug at the selected location. Each side should not exceed three meters. A trench is also dug from the corner of the house.
- Place one pin in each corner.
- Weld M8 or M10 bolts to the top part.
- Drive the pins into the ground until only the 5cm tip remains.
- Choose a place on the wall of the house. It is better to choose a point at a distance of two meters from the shield and 10 cm from the floor.
- Make a hole with a hammer drill.
- Take a steel wire (6 mm) and connect it to the heater terminal.
- Run the wire along the wall to the hole and then to the post outside.
- Place a washer on the bolt and wind a coil of wire. Secure on top with another washer. Do this with each pin, then make a loop.
- Fill the trench with soil and compact the surface.
- Now measure the circuit resistance. Normally it should be less than 4 ohms.
All that remains is to connect the water heater, add water and start the test operation.
As you understand, grounding can be carried out both in Khrushchev and in the private sector. This is an important part of the operation of an electrical appliance. Watch the video to make it even easier:
In order to ground a boiler in a private house as best as possible, you need to make a high-quality grounding loop and connect it correctly.
To do this you will need the following tools and materials:
- A metal corner or profile with a side width of 5 cm. It will take about 18 meters for the electrodes and their connections.
- Metal wire or strip, at least 3 mm wide, for connecting grounding to the shield.
- Electric welding, which will be used to weld the circuit structure.
- Grinder for cutting corners and wire. A hammer drill for drilling a hole in a house to introduce grounding.
- Sledgehammer, which will be used to hammer the profile into the ground.
- A three-core cable for conducting electricity in the house from the panel to the outlet.
- Modern socket with grounding terminal. Automatic device corresponding to the power of the storage water heater.
- Screwdriver, probe, knife.
First of all, you need to choose a place for the future placement of the circuit. It should be no further than five meters from the shield. The main thing is that people and pets do not walk on top, since in the event of a breakdown the electricity will go into the ground around it. If someone passes there at this time, he will be shocked. You can make a decorative decoration from stones on top of this place with your own hands or specially enclose it with a fence.
Installation of the ground loop
The circuit will require several steel pipes or angles 2–2.5 m long. They need to be sharpened and driven into the ground at a distance of 2–2.5 m from each other. But do this not from ground level, but dig a trench 0.5 m deep. At the bottom of it, the electrodes are connected with a steel strip by welding. The seams are painted, the remaining parts should not be coated.
You can arrange three such electrodes in the form of a triangle, you can line them up in a row. If the soil is sandy, then it is better to choose a line arrangement and hammer in more electrodes.
A steel strip with a welded bolt is led from the contour to the wall of the building. A conductor going to the PE bus is connected to it. Parts exposed outdoors are painted black.
After installation and connection to the PE bus, it is advisable to call specialists and measure the resistance of the resulting circuit. It is regulated by the rules of the PUE. You won’t be able to take the measurement yourself; you need a special device.
Main process
Instructions for connecting the boiler to the electrical network will be provided from the point when the entire heating system is connected to the installation site of the unit. All that remains for you is to hang the water heater on the wall and connect it to the power supply.
Wall mount
Let's consider a more complex option when installing a storage type boiler will be used, because... installation of a walk-through water heater is less labor-intensive (due to the lighter weight and dimensions of the product). First you need to mark the wall in accordance with the placement of the fasteners. To do this, measure the distance required to install the mounting ears and transfer it to the wall. Be sure to use a building level so that the ears are placed strictly horizontally.
Any misalignment will affect the performance of the unit, and therefore its service life and efficiency of use. The tank must be placed perfectly level in both horizontal and vertical planes.
After marking, take a drill, drill holes in the wall and drive dowels into them. Next, we screw the anchor hooks into them and hang the boiler on the wall, as shown in the photo below.
Don't worry about decorative wall decoration. Even if renovations have already been made in the apartment, with careful installation you will not damage the surface. You can also see detailed instructions for installing and connecting a wall-mounted boiler in the video example:
How to install a water heater on a wall
Connecting wires
Once the water heater is securely mounted on the wall, you will need to install the electrical wiring to it yourself. Let's consider two existing options for connecting wiring from the meter.
Option 1 - Powered from a wall outlet
This option is used if the unit power does not exceed 3.5 kW. In this case, it is necessary to connect the socket to the place where the boiler is connected to the electrical network, as shown in the diagram above. The minimum cable cross-section should be 2.5 mm2. (copper conductors). It is recommended to calculate the cable cross-section in advance so that it can withstand the resulting loads.
Option 2 - Power from the shield
If you purchased a device with a power of more than 3.5 kW, it is prohibited to use power from the outlet, because it simply will not withstand such a load. In this case, it is necessary to connect the cable to the water heater directly from the electrical distribution panel installed in the apartment or house.
Please note that the boiler can be connected to a single-phase network if its power is no more than 4 kW. If the rated power is higher, the network must be three-phase (voltage 380 Volts)
After you decide on how to connect the boiler to electricity, you need to power the device yourself and move on to the next step. The video below discusses various water heater connection diagrams:
Electrical installation diagrams
Setting up protection
Since when creating a heating system you will be dealing with powerful equipment, as well as the close location of water and current, you need to take care of protecting the boiler and yourself.
First of all, you need to connect the RCD and circuit breaker to the line that will serve the unit. If the power will be supplied from an outlet, it is recommended to install protective equipment on the distribution panel. In the event that the power will come directly from the shield, the protection devices must be located near the object itself so that it can be conveniently and safely serviced. Do not forget that when placing RCDs and AVs close together, it is necessary to ensure that the devices are protected from moisture. To do this, it is recommended to place the products in a sealed box.
In a 220 V network, it is necessary to connect the electric boiler through a two-pole circuit breaker
Remember an important rule - the automation is installed with the upper connection of the input phase and zero
First start
When all electrical installation work is completed, you should proceed to starting up the equipment. The first step is to check all connections of wires and pipes for integrity and tightness. If no abnormalities are detected, you can proceed to turn on the power supply. To do this, first open the valves on the pipes (cold and hot circuit), after which you can turn on the machine and the RCD. We strongly recommend watching the video instructions, which clearly explain the entire process:
Video lesson: connecting an electric boiler to the network and pipeline
https://youtube.com/watch?v=3MPlGi1Zqss
If the water heater is installed by a specialized team
It would seem there is nothing to worry about. Professionals will do everything right. But this is not always fair. First of all, you need to check in the work contract whether there is a section on connecting to protective grounding. By signing such a document, the foreman bears responsibility (including criminal responsibility) for the safety of operation. Before starting work, ask the installers what the boiler ground will be connected to. Perhaps your home does not have a working ground connection at all. Then the “masters” use the working zero as ground.
Important! The use of a working zero instead of a protective grounding, as well as connecting the “ground” to the “zero” in the power supply panel, is unacceptable!
If the installers offer you this option, either do not enter into an agreement with them, or require a different grounding scheme. After carrying out the work, it is necessary to check the correctness of the ground connection. To do this, measure the voltage (using a multimeter) first between the phase and zero, then between the phase and the contacts to which the boiler is grounded. Without going into details, the voltage should be slightly different. If the measured potential is the same (for example, 219 volts in both cases), your boiler will operate without grounding!
How to install a instantaneous water heater
As already mentioned, a instantaneous water heater has smaller dimensions, so it is easier to find a place for it. You can hang it nearby on the wall, or you can hide it in a cabinet. Its dimensions are usually 15*20 cm*7 cm or so. In general - small. Weight is at most 3-4 kg, so the requirements for fasteners are minimal. Usually it is either hung on two small diameter dowels screwed into the wall, or has a mounting plate that is screwed to the wall, rather than where the water heater is already hung. We figured out how to install a instantaneous water heater, now about the connection.
Connecting an instantaneous water heater to the water supply
From this side everything is simple. But the disadvantage is that it can only supply water to one point at a time. Depending on the installation location, either a shower head with a flexible hose or a gander for washing dishes is installed at the warm water outlet. It is possible to install both a “gander” and a watering can through the tee (as in the picture on the far right).
How to connect an instantaneous electric water heater
To make it possible, if necessary, to remove the water heater without shutting off the water in the entire apartment or house, ball valves are installed at the inlet and outlet. They are mandatory equipment. The connection from the pipes to the point of insertion into the cold water supply line is carried out in the same way as when connecting a boiler: with corrugated stainless steel hoses or plastic pipes. If necessary, hot water is supplied to the point with a flexible hose: here, in principle, temperatures do not get too high, so it should be able to withstand it.
Connection diagram for instantaneous water heater to water supply
Another feature of instantaneous water heaters is that they can only heat a certain amount of water properly. If the flow increases or the inlet temperature is too low, they cannot cope with the task. Therefore, most often such a water heater is used as a temporary one - at the dacha or when the hot water supply is turned off for maintenance (for the summer).
It is not difficult to solve the problem with an excessive amount of water (when the pressure rises above the standard): either install a reducer at the inlet or a flow limiter. The reducer is a more serious device and is recommended to be installed at the entrance to the apartment, and the flow limiter is a small cylinder with a valve. It is screwed onto the cold water inlet pipe. An example of how to install a instantaneous water heater and where to screw the flow limiter is in the video.
Electrical connection
With the electrical part of the connection, everything is the same as with the boiler: dedicated line, RCD + automatic circuit breaker. Others are only the ratings and wire cross-sections. Rating for power up to 5 kW - 25 A, up to 7 kW - 32 A, from 7 to 9 kW - 40 A. Cross-section of copper wire - 4-6 mm (solid core).
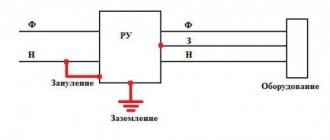
Electrical wiring diagram of an apartment building
Until 1998, according to the standards in force at that time, most houses were powered using the so-called TN-C circuit or a circuit with a solidly grounded neutral.
A four-core cable was installed in the house, which had 3 phases and one neutral conductor. In an apartment, such a system is easy to identify - all sockets do not have a protective contact, they are two-pin.
In modern houses, the power supply is supplied by a five-core cable (TN-S wiring), in which the working and protective neutral wires are separated. The sockets have a protective contact, just like when using the TN-CS circuit. There are other grounding schemes.
Grounding organization diagrams
“The figure shows possible options for power supply and grounding schemes. If you don’t have exact information about what kind of circuit is organized in your home, contact the energy specialist of the management company.”
Safety precautions
All electrical work should be carried out with the current switched off. In any case, before touching any wire, you should check it with a probe. It is prohibited to connect grounding to any pipes.
If the house is not grounded and the boiler is not connected to it, there are two potential dangers:
- Any electrical breakdowns will go to the water and shock the person using it. This puts you and your loved ones at risk.
- Stray currents will gradually destroy the boiler body and lead to rusting of its metal elements.
If you did everything correctly, grounding should protect you from electric shocks and premature breakdown of the boiler. Just in case, you can call specialists who, using special instruments, will check the resistance of your circuit.
Here is a video about grounding in a private house:
All high power electrical appliances require grounding. Typically, this requires connecting a special contact to the plug and socket. But the water heater is grounded using the terminal that the device is equipped with.
What grounding options should not be used?
Publications on some Internet resources offer easy-to-follow but strictly prohibited grounding methods:
- Connecting the third (neutral) wire from the outlet to the water riser or heating radiators. If a phase gets on the body or water, then a dangerous voltage level will flow to the riser and the neighbors who turned on the water will fall under electric potential. This method does not work at all if the pipes are plastic.
- Combining neutral and grounding conductors in a socket.
- Connecting devices to ground in series.
- Connection of several ground conductors to the same bus terminal.
Under no circumstances should you rely on “maybe” when using electrical appliances. This is even more true for water heaters exposed to the aggressive influence of liquids. Mandatory grounding and installation of protection devices in the circuit will save the life of the user and neighbors in the house, and will make the device operate for a long time and without failure.
Choosing a place to install equipment
Before installing the device, select the location where it will be located. Storage water heaters are quite large in size, which must be taken into account when placing them. There are three types of devices:
- Wall-mounted, the capacity of which does not exceed 200 liters.
- Floor-standing, volume from 200 to 1000 l.
- Built-in, having different capacities.
In addition, there are devices of vertical and horizontal types. Depending on this type, the device should be located.
Incorrect placement complicates the operation of the equipment and quickly disables it. All these factors must be taken into account when choosing a location for a water heater.
In addition, a number of other requirements must be met. The device must be installed in a place protected from cold so that the water does not freeze. It should be located close to water points.
In this case, it is desirable that the length of the water pipes be minimal.
To install a massive floor-mounted storage water heater, you will need a strong, level base, in some cases this may be a special stand
If the water pipes are too far from each other, it is worth considering installing several water heaters. It is advisable to choose a location for the device so that the pipelines with cold and hot water are located close enough and are easily accessible.
It is also important to examine the condition of the wiring.
Particular attention should be paid to its cross-section and ability to withstand additional power. If necessary, the wiring will have to be replaced
Another important issue is the availability of equipment. At the installation site of the device there must be enough space for unhindered installation work, subsequent maintenance and possible dismantling.
Based on this, it is necessary to provide a free distance from the nearest surface to the protective cover of the device. It cannot be less than 50 cm.
If you plan to install the water heater in the bathroom, you need to take into account that there are zones with different humidity levels. In some of them, installation of electrical equipment is strictly prohibited.
When attaching wall-mounted appliances, it is very important to determine the strength of the wall. Brick and concrete partitions, even if there are ventilation shafts behind them, can withstand a device of up to 100 liters
Equipment with a volume of up to 200 liters can only be hung on load-bearing walls.
If there are serious doubts about the strength of the wall, you should not hang a device with a capacity of more than 50 liters on it. In this case, you will have to install a special supporting frame made of metal.
The location for built-in water heaters is selected in strict accordance with the manufacturers' recommendations.
RCD installation
It is mandatory to install an RCD - a residual current device - in the boiler supply line. Select its current one order of magnitude higher than the current of the machine.
Leakage current for RCD – 10mA or 30mA.
Why 10mA is better and not more can be understood from this sign of the effect of current on the human body:
A significant disadvantage here is that at 10mA the protection may falsely trigger. Especially if your water heater has been hanging for more than a year and such condensation and moisture often form in the places where the terminals are connected.
How can I check if this is a false positive or if the heating element itself is faulty? To do this, use a multimeter.
Turn off the power supply or pull out the plug from the socket and disconnect the standard grounding from the titanium body.
Then remove the terminal clamps from the heating element itself, and using probes, measure the resistance between the boiler body and the heating element.
If the heating element is working properly, the readings on the multimeter screen should tend to infinity, that is, they should be something like this:
In case of breakdown and damage to the heater, they will either be zero, but most often they can be several hundred or even kiloohms. In the photo below this is exactly the option ~ 500 kOhm.
Very often, in many of the latest boiler models, an RCD with a leakage current of 15 mA is already built into the cable for connecting to the outlet. In this case, it may not be necessary to install an additional leakage current protection device in the panel.
However, do not forget that such a built-in RCD will protect against leakage only if there is damage in the heater itself, but will not protect you in any way if there is a fault directly in the outlet or the supply wiring to it.
How to find these and other similar faults and what this can lead to can be found in the article “Electric shock in the bathroom. 5 reasons and what to do?”
What to do if you are not an expert in electricity and you yourself cannot or do not want to go into the electrical panel in order to install all the required protection devices there. But you still need to protect yourself.
The simplest option is to purchase an RCD socket.
Plug it into the existing outlet in the bathroom, and through it you plug the plug from the boiler cord.
Will the residual current device on the boiler trip if you do not have a ground connection? Will. These two systems, when working together, are designed to complement each other.
In the event of a current leak on a boiler without grounding, the protection device will only work when you directly touch the tank or the water from it (with the heating elements turned on).
Care and maintenance features
Both storage and flow models require care and periodic maintenance.
Trouble-free equipment service can be ensured by:
- correct operation;
- care;
- timely service.
By following the manufacturer's instructions and recommendations for operating the water heater, you can protect the equipment from accidental breakdowns.
It is advisable that during operation the device should not be splashed with water, and that it should be securely fastened to the wall
As for care, all models, without exception, are extremely undemanding. It is enough to periodically wipe off dirt from the surface of the device. A soft rag or sponge soaked in a soap solution is suitable for this.
Neither storage nor instantaneous water heaters should be watered with detergents. Also, as necessary, you need to change/clean the coarse filter.
As for maintenance, all requirements are clearly indicated by the manufacturer in the instructions for a specific model. If this is gas equipment, then specialists from the relevant service will definitely come to check it.
Electric models can be serviced independently, if this option does not contradict the warranty conditions.
Some manufacturers stipulate that installation, first start-up of equipment, periodic maintenance and replacement of spare parts must be carried out by a specialist from the dealer company.
He is obliged to put a mark on the warranty card about all work performed, certifying his signature with the company’s seal. Otherwise, the owner of the water heater loses the right to use the warranty card if such a need arises.
Many home craftsmen neglect the warranty and carry out all installation, further maintenance and repair work themselves. This option costs them much less than calling specialists
Servicing of storage water heaters is most often suggested to be carried out once a year. Carry out all the work yourself or invite authorized specialists - this depends on the manufacturer’s recommendations. Do-it-yourself maintenance often risks voiding the warranty.
For cumulative models, the following work must be carried out annually:
- clean the heating element from scale;
- remove sediment accumulated in the tank cavity;
- assess the condition of the magnesium anode and replace it if worn.
All work is carried out with the water heater turned off and disconnected from the network. In some cases, if the water has a large amount of impurities, you will have to change the filter more often and remove scale. The magnesium anode may wear out faster.
You may be interested in the step-by-step instructions for replacing the heating element with your own hands, discussed in our other article.
The internal space of the storage heater should be cleaned as plaque and scale forms on the walls and on the heating element
If the storage unit is installed in the country house and no one will use it during the cold season, then you must take care of draining the water from the container. Also, you must remember to completely disconnect the device from the power supply before doing this.
Maintenance of instantaneous water heater models is also carried out as needed. The frequency of these works will become clear during operation.
As soon as the water pressure has noticeably weakened and scale has appeared, it is necessary to clean the individual elements of the device:
- a mesh filter or coarse filter installed on the water supply;
- aerator-tabs installed in the tap hole;
- tab installed in the shower head, if the device is equipped with this element.
Clean the outside and remove filters only when the power to the water heater is turned off. If you do not remove the plug from the outlet, you may receive an electric shock when removing the prefilter.
Boilers that process pre-treated water may require less frequent maintenance work - once every 2 years.
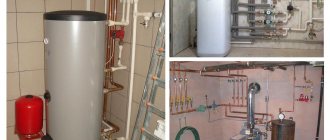
Storage heater installation
Electric boiler installation
In the case of storage heaters, temporary installation is not provided. You, of course, can connect an ordinary hose with a watering can to the warm water outlet, but using such a unit will be absolutely inconvenient.
Water heater connection diagram
First step. Select a suitable location to install the water heater and check the wall.
Flow models are quite light in weight. Cumulative ones will put a much more significant load on the wall
Therefore, when choosing a place to install the heater, you need to pay attention not only to the degree of convenience of pipe installation, but also to the strength of the surface
How to install a storage water heater
As a rule, heaters with a volume of up to 200 liters are attached to the wall. Tanks of larger volume require exclusively floor installation. If the heater has a volume of more than 50 liters, it is recommended to attach it exclusively to a load-bearing wall.
Second step. Prepare all the necessary equipment for installing the water heater.
Materials you will need
You will need:
- a hammer drill (if the wall is concrete) or an electric impact drill (if the wall is brick);
- marker;
- tape measure;
- a tile drill (if the surface where the heater will be mounted is tiled);
- safety valve;
- FUM tape;
- dowels and fastening hooks;
- building level.
If the required wiring is available with pre-installed tees and shut-off valves, installation of the storage heater is carried out in an extremely simple sequence.
How to install a boiler
First step. Step back approximately 150-200 mm from the ceiling surface and leave marks on the wall for future holes. Thanks to this gap, you can conveniently lift the water heater for hanging and removing the tank.
Second step. Armed with a drill (hammer) with a suitable drill bit, make holes in the wall with a depth corresponding to the length of the mounting hooks.
Third step. Hammer the dowels into the prepared holes, and then screw the screws into them. Be sure to leave a gap to accommodate the water heater mounting strip.
Fourth step. Install the tank onto the mountings.
Fifth step. Install a safety valve at the cold fluid inlet. With its help, excessive pressure will be removed from the system. Connect the tube for draining excess liquid to the sewer pipe. This tube can also be carefully inserted into the toilet tank.
Sixth step. Connect the cold water pipe to the water heater inlet. The entrance is marked blue. Connection must be made exclusively through the safety valve. At the outlet (marked in red) connect the pipe for the output of the finished hot liquid.
Water heater installation
Typical storage water heater installation diagram
Again, note the importance of the safety valve. Without such a device, the tank may be seriously damaged or even rupture due to excessive pressure build-up during hot water preparation.
DIY boiler connection diagram
If there is a safety valve, the excess pressure will simply be released and the device will continue to operate under normal conditions. Also, with the help of a safety valve, you can quickly and conveniently drain water from the heater when it is necessary to carry out maintenance and repair work on the equipment.
Thus, installing a water heater is not particularly difficult. If you wish, you can install and connect the storage model or flow-through heater yourself. It is enough just to follow the provisions of the presented guide and everything will definitely work out.
Gas water heater diagram
Good luck!
Why do you need a water heater in your dacha?
A water heater in a country house can have many meanings: with its help you can not only take a shower, but also wash dishes, do laundry, and do cleaning. However, no matter what purpose you need hot water for, today its uninterrupted availability in a country house is no longer a luxury, but a completely ordinary convenience.
To provide yourself with the most comfortable conditions for relaxation in this regard, an electric water heater is the best choice. They can be either different in their location, such as Ariston - horizontal type water heaters, or vertical - like Gorenije. (See also: How to connect a water heater)
Electric water heaters are the most optimal devices for providing a summer house or country house with hot water: electricity is available in every cottage village, this benefit of civilization does not need to be stored for future use, such as firewood or buying cylinders (gas), and with the help of electricity, the water heats up quickly enough. In addition, the heating process does not require additional human control.
Electric water heaters are:
- storage (water is accumulated in a separate tank and heated there. One of these is Baxi electric water heaters);
- flow-through (water accumulates and is heated inside the tank using a heating element. The greater the water pressure, the cooler it will become);
- bulk (water is poured into the jar manually, unlike the first two types, after which you will have to wait for some time until it heats up to the required temperature).
The latter type of water heaters has become quite rare in stores recently, but many still continue to use them, since few people still have a centralized water supply in towns and villages.
To choose the right electric water heater for a summer house or country house, you should consider how it will be used most, how many people will use it and at what time of year, as well as how much you are willing to spend on it.
Its location, future dimensions, volume, connection method, power and many other characteristics will depend on all this. Clage water heaters are the most compact, they are designed for a small family and have small dimensions. Of the larger ones, it is worth noting StiebelEltron and Superlux.
Boiler grounding methods
The most primitive method of grounding a boiler indoors is to wire the casing to any metal part whose structure goes underground. Suitable for this purpose, for example, is a central heating battery. In modern realities, plastic pipes are becoming increasingly popular among residents, in this case it is necessary to check the riser, perhaps it is all-metal
In addition, it is important to know that grounding electrical appliances to pipelines and other metal structures is strictly prohibited, so we strongly recommend avoiding this method of organizing protection (shown in the photo below)!
Terminals for connecting a grounding contact are present in most modern electrical installation devices. This applies, for example, to sockets with “antennae”, which are precisely the conductor for the “ground”. To make a proper connection to the water heater you need to:
- Install a socket with a grounding contact. Its location should exceed 80 cm from the floor level and half a meter from the boiler itself.
- If the house is old, it has two-core wires. They need to be replaced with three-wire ones. One of the cores should have green-yellow insulation; this is the correct one to be connected to grounding. The wire goes all the way to the electrical panel, which, in turn, must also be grounded.
- To install a new cable with your own hands, you will have to re-make the groove for it. This is a labor-intensive process. There is a simpler solution using cable channels, but using it in an apartment is not comme il faut.
- Having turned off the input circuit breaker, you need to connect the necessary wires to the socket terminals (observing the color marking of the wires relative to the “ground”)
- Connect the remaining terminals to the electrical panel. In this case, the ground is connected to a special bus.
If the wiring is two-wire, as, for example, in a Khrushchev building, you can run the third core through a cable channel, thereby avoiding the need for gating. This will avoid mess and a lot of work, but it won't look very right. However, this is one of the frequently implemented options when the cable is two-core.
Another effective way to ground a boiler is to connect a residual current device or a differential circuit breaker with a rating of 10 or 30 mA (leakage current) to the water heater line. In this case, even if there is no grounding in the apartment, if a dangerous situation arises, an electric shock can be avoided, since the RCD will trip and the entire line will be disconnected from the network. We talked about how to connect an RCD in an apartment in a separate article. We also talked about connecting the difavtomat separately.
There are cases when residents use the water heater in the bathroom only when it is turned off. That is, first the water is heated, then the boiler is turned off, and only after that the heated liquid is used. The method has a right to exist, but it is extremely inconvenient - the water cools down, there may not be enough of it for the entire washing process, and there is a risk of forgetting to turn off the heater on time. Grounding will solve all these problems.
As a piece of advice, you need to buy water heaters of the highest quality. They have good insulation of the tubular electric heater, which will eliminate the possibility of breakdown. We talked about how to choose a storage water heater for your home in a separate article.
The process of connecting a grounding contact for a boiler in a country house or in a private house is completely similar to that described for apartments. The only exception is that the structure itself, which can be grounded, must be erected independently and strictly guided by the rules for installing electrical equipment. We talked about how to make grounding in a private house in a separate article.
In conclusion, I would like to note that the need for proper grounding connection for a boiler, like any other powerful electrical appliance, is primarily due to safety. It is the grounding contact of the water heater that will save residents from the potential for a tragedy, and will also ensure safety in terms of eliminating the risk of fire. You shouldn’t play with fate; it’s easier to ground the boiler and make your life calmer. We hope that our step-by-step instructions for grounding a water heater in an apartment or private house were useful for you and helped you install the grounding loop yourself!
You probably don't know:
- How to make grounding in an apartment with your own hands
- Why do you need a potential equalization system in the bathroom?
- How to choose an RCD for an apartment
Published: 04/18/2017 Updated: 09/06/2019
Self-connection of the boiler
You can install and connect an electric boiler yourself. First you need to decide on the place where you will install the water heater. Correct connection to the electrical network will ensure uninterrupted and safe operation of the boiler. More convenient The easiest way is to install a water heater in the bathroom to make it easier to connect it to the water supply system.
When it comes to safety, it is safer to do the work yourself. Moreover, depending on the location of the boiler installation, the methods of ensuring safety are slightly different.
How to ground a water heater in a country house or in a private house? Regardless of whether the room is equipped with a standard ground bus or not, connecting it to an electrical appliance is not difficult. The soil is literally under your feet. You need to choose a place in the yard where excavation work will not be carried out in the future, and install a grounding loop. Dig a triangle with a side of 1 meter along the contour, drive steel pipes (corner profiles) into the corners and connect them together by welding. The result will be the best a real protective grounding that you use not only to protect the boiler, but also for the entire home. Schematically, it looks like this: Next, we insert a conductor into the house and organize a panel with a terminal block for grounding electrical appliances. First of all, we pull the wire to the outlet into which the heater will be connected. If the case has a separate contact for ground, we connect that too. In addition, the boiler must be connected via an RCD. After the residual current device, an ordinary circuit breaker is installed, with an operating current lower than the input circuit breaker at the entrance to the house. How does grounding work on a water heater if you do it yourself? When the phase makes contact with the body, an actual short circuit will occur through the protective “ground”. The machine will work and disconnect the phase wire. If the voltage on the body is not enough to trigger the protection, and you are in a shower stall, the resistance along the boiler-water-your body line is significantly higher than along the ground loop. You will not feel anything, electric shock will not occur. In this case, the RCD will operate, responding to current leakage through the housing. How to ground a water heater in an apartment if there is no standard “ground”? There are two ways, legal and illegal. The correct way is to organize a strong tire made of rebar from your apartment to the nearest front garden at the entrance. Build a real ground loop in the ground and connect this structure to your boiler. In fact, such a solution is not always possible. The semi-legal method contradicts the PUE, but at least makes the operation of the boiler safer. It is necessary to find a shaft in the apartment for the passage of the main hot water supply pipeline. Then make sure that this pipe is all steel (usually it is) and it is buried in the ground. These pipes have jumpers for attaching to the wall. It is on this strip of metal that you can organize a contact pad. By connecting the boiler body there, you will actually fully ground it
If this is not possible, you need to strip the pipe section of paint and screw on the contact clamp. However, with such an organization of the “ground”, you should adhere to an important rule: When the boiler is heating up, you do not use it. After heating, disconnect it from the power supply (automatically, or by unplugging it from the socket), and you can climb into the bath.
If this method is not possible, do not install a boiler. It is unacceptable to turn on the water heater without grounding!
Stages of grounding work
Regardless of the manufacturer and model of the device, the connection instructions contain a recommendation for the need to ground the device.
Production stages:
- Checking the device for the presence of a special ground terminal. In its absence, work is carried out using a special contact (in the plug and socket). You cannot connect the socket and the boiler directly through a phase - there is a high probability of emergency phase failure.
- Search for grounding material. Sections of a corner or part of a metal circle are ideal. The length of the grounding conductors must be at least two meters, taking into account the peculiarities of ground freezing in a certain region.
- Analysis of optimal characteristics of metal bonding. The thickness of the strips is standardized (more than 4 mm), and the length is selected based on the characteristics of the ground electrodes. The length of the metal bonding strips must be sufficient to combine the ground electrodes into a circuit.
Grounding is a complex of interrelated tasks. The preparatory stage is no less important than its production itself.
Preparation
Carrying out any electrical installation work requires the availability of appropriate construction equipment. A general list of necessary materials and construction tools for organizing a boiler protective device:
- metal wire;
- iron rods, metal angle or similar material for the ground electrode;
- bolts, nuts and washers with high-strength mechanical characteristics;
- a hammer drill with a drill of the required diameter;
- welding machine, preferably of the inverter type;
- hammer and wrenches;
- sharpening machine.
At the preparatory stage, a specialist assesses the electrical wiring of the object (the cable must have the appropriate cross-section), determines the suitable material of the grounding conductors and the shape of their arrangement.
The completion of the preparatory stage of work is the assembly of the grounding loop.