Home air conditioners and their owners can encounter a variety of types of breakdowns. And the reasons and sources are also different. These are complex devices consisting of a large number of parts and mechanisms, and therefore require more attention. That’s why it’s so important to study the main breakdowns of air conditioners in advance. There are several problems that appear most often in practice. Methods for eliminating breakdowns have also been known for a long time.
The main causes of breakdowns
Timely maintenance of equipment will be the key to its stable functioning. You can list such problems that are typical for modern devices.
Air conditioning master preparing to install new air conditioner. drilling the wall.
Filter dirty
Such a breakdown leads to the following consequences:
- Air circulation inside is impaired.
- Refrigeration equipment is malfunctioning.
- Copper pipelines become covered in ice.
As a result, excess water is often observed to flow and drip from the housing.
The standard filter cleaning frequency is every three weeks. The devices are washed under running water, then it is possible to completely get rid of dirt. All that remains is to dry the filters and return them to their original position. Such a problem is not enough to write off equipment.
Freon leak
No one is safe from leakage, even if all recommendations are followed perfectly. 2-3% per year is a normal figure, equal to approximately 150 grams. Refueling is carried out 2-3 times a year to avoid serious breakdowns. Then the freon level inside the system rises to normal levels.
But sometimes leakage exceeds any current standards. If ice and frost form on special copper pipes inside, this means that serious problems have arisen. These leaks cause mechanical problems.
Operation of the device in winter
Most modern devices are not adapted to work in the cold season. -7 - +40 degrees - standard temperature ranges during operation. Normal work with negative temperatures is impossible without special technical training.
The operation of the compressor and drainage systems is disrupted if used incorrectly in winter. The drain freezes, preventing water from leaving the system. Liquid leaks into the room where the device is installed. Air conditioner problems continue to develop if no steps are taken.
The device does not cool the air
The device data sheet always indicates what power the device has and the size of the room it can cool. Some people neglect these indicators, and then do not understand why the air conditioner does not cool the air. Everything has its limit and if you neglect it, the consequences will be unpleasant. You should not expect from technology what it is not capable of.
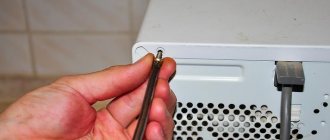
If the internal filter is clogged, then a weak air flow will flow from the air conditioner, which will not be able to cool the entire area of the room. Therefore, the algorithm of action is simple: regularly clean the filter from dirt.
The filter is located under the split system cover
Due to a lack of refrigerant in the split system, the device may not be able to provide a comfortable temperature for living. Therefore, it is better not to act arbitrarily, but to call a specialist. He himself will add the required amount of refrigerant, doing this without consequences for the equipment.
About the main faults
It is not recommended to fix any breakdowns yourself. If you do the repair yourself, and then problems arise, the manufacturer will most likely refuse the warranty.
If there is poor cooling in the room
This is usually due to the following reasons:
- Weak power.
- The appearance of internal damage.
Sometimes it happens that the power of the air conditioner is not enough to maintain the temperature in a particular room. An example is due to a sharp change in the climate in which the operation is carried out. The average temperature range is from -7 to +40 degrees. These are the main indicators that apply to all devices.
In other situations, the problem is related to internal failures of the device. It is recommended to immediately seek technical service; it is also difficult to solve something on your own.
Short cycle unit
At first the device is turned on, but it stops working literally after 15-20 minutes.
This problem has several reasons:
- Dirty radiator.
- Failed thermostat.
- Broken control board.
- Problem with settings.
External radiators are subject to various mechanical damage and stress, especially in the summer. When foreign objects get inside, the entire system begins to overheat. Because of this, all work stops. The problem is eliminated by flushing the radiator with water and strong pressure. This will help eliminate other air conditioner problems.
After refilling, a refrigerant imbalance may occur. It is enough to measure the operating pressure of the compressor to understand how severe the problem has become. If an overload occurs, the excess liquid is simply disposed of.
Condensate leakage from the indoor unit
This is also one of the signals of faulty equipment. This may happen due to a clogged condenser tube.
The repair involves performing several simple steps:
- Turning off the air conditioner. You have to wait 10 minutes.
- Disconnecting the plastic drain tube.
- Cleaning and drying.
- Returning the structure to its original position. This often helps if the air conditioner is broken.
Compressor
Signs of a compressor malfunction may include:
- air conditioning delay;
- work cycle disruptions;
- presence of a characteristic hum (the air conditioner does not turn on).
The reasons may be breakdown and breakage of conductors, failure of capacitors in AC devices, failure of valves (TRV or four-way), filling the crankcase with freon, etc.
It is not recommended to carry out problem diagnosis and repairs on your own, even when there is complete confidence in the need to replace parts and assemblies. After replacing them, you will most likely need to adjust the sensors, which is difficult to do without full access to the capabilities, primarily of the electronic unit.
Automatic diagnostics
Factory defects, poor installation and improper operation are the main reasons why the internal parts of the air conditioner fail prematurely. There is practically nothing that can be done about a manufacturing defect; in the other two cases there is a chance to improve.
Inscriptions on the display and blinking lights will help you find out in time that certain problems have arisen.
Error codes in the air conditioner usually indicate breakdowns of the following nature:
- Broken thermistor, resulting in no additional temperature control.
- Problems with the directional valve.
- Problems inside the fan.
- Voltage surges at the outdoor unit.
- Exceeded parameters related to energy consumption.
- Problems with the cable or circuitry due to communication.
- Lack of overvoltage protection.
- The work goes on both heat and cold at the same time.
- Malfunction in the thermistor of the external part.
- Faulty internal thermistor.
The instructions provide a precise definition for those who are interested in deciphering the appearing codes and designations. This allows you to quickly determine what exactly happened.
The main thing is to check in advance whether there really is a breakdown inside. Typically, the device reports problems by flashing various indicators and the appearance of inscriptions.
But not every code has a decryption for users. Most of the information is handled by technicians belonging to a particular service center.
Compressor and clutch problems
If the radiator on the external unit is clogged with dirt, this part of the structure may overheat. Heat removal becomes more difficult and the load on the device increases. The pressure level in the lines requires a separate check. Excess refrigerant must be released if the reading is higher than normal.
Never rule out the possibility that the fan on the external unit has become faulty. Clogged capillary tubes are another common cause of later problems. Replacing one of the tubes often solves the problem.
There are other signs that indicate breakdowns in this part:
- The compressor refuses to start when the air conditioner is turned on.
- Presence of oil leaks on the compressor.
- Compressor drive belt creaking.
- Extraneous noise.
- Decreased performance.
Complete compressor replacement and repair are complex operations, so it is recommended to immediately contact specialists.
But noise can indicate both problems in the compressor and malfunctions in the drive. The pulley bearing is most likely the source if the noise is heard even when the device is turned off.
If the compressor refuses to start, they also look closely at several parts of the mechanism:
- Clutch.
- Relay.
- Fuse.
A blown fuse is the easiest to deal with; in case of breakdowns, it is simply replaced with a new one. The electromagnetic clutch is studied next if the previous steps did not produce any result.
As for the compressor itself, there are several reasons for its breakdown:
- Reduced refrigerant level.
- System clogged.
- Complete blockage.
Repairing and replacing a compressor is quite an expensive undertaking, so it is recommended to treat the part with as much care as possible during operation.
When the device turns on and turns off immediately, the reason most likely lies in the sensors - evaporation or temperature. Data from temperature sensors is associated with the operation of the control board. If the system is faulty, there is no information. And the device believes that the current operating mode does not need adjustment for this indicator.
Compressor overheating and shutdown often occur due to fan malfunctions. This usually happens if the rotation speed of the device is less than certain specified parameters.
Dirt and dust may appear in some other parts:
- Dryer filter.
- External radiator.
- Capillary tubes.
In such situations, the compressor stops turning on and working normally.
DIY air conditioner hose repair
Due to a violation of the seal in the hoses and main pipes, the car air conditioner does not work properly. This is the most common breakdown in a car's cooling system.
The pipes in question are located at the bottom of the car. Due to their location, they are affected by external mechanical influences, which leads to various damages and the car’s air conditioning stops working correctly. The most reasonable solution to this problem is to replace the device hose.
There is a version that the reduction in the service life of the hose and tubes is due to their contact with dirt and high humidity. In addition, debris on the road and vibration in the area of the wheel arches provoke cracks, so it’s worth considering and replacing the lines with metal ones, as they are more durable. Although, even such a resistant material as metal has its drawback - tubes made from it are susceptible to corrosion and are not resistant to temperature changes.
Hose repair
Replacing a hose is far from cheap, so it's worth knowing how to do it yourself.
If the rubber hose is not significantly damaged, you can solve this problem with a patch. The patch is made using specialized tools and substances; its damage is significant, then the hose must be replaced with a new one.
If you decide to replace the hose yourself, follow the description below:
- First, you need to choose a hose that is suitable in size.
- After this, crimping cylinders are hung on it.
- Finally, it is placed on the teeth and crimped with cylinders.
To avoid such problems, it is important to regularly carry out repairs and maintenance of the car’s climate system; if the breakdown is not repaired in time, the malfunction may develop into a larger problem.
Video describing in detail the repair of air conditioning hoses:
About standard fault codes
First of all, you need to look at how many times the sensors flash. If it “blinks” only once, most likely the problem lies in the thermistor, which is installed on the internal unit of the split system. Two signals indicate that problems have arisen on the external unit. With three flashes, the system begins to work simultaneously for both cold and heat.
Overload protection is disabled when the lamp flashes four times. Turning on the signal five times means that errors occur between blocks during the exchange of information. Six flashes mean that the consumption level is significantly higher than normal. It is recommended to carry out additional testing in different parts of the device.
With ten flashes, the directional valve is definitely broken. Finally, turning on 10 times indicates a thermistor that has failed. This means that the air conditioner no longer controls the temperature. Most brands and models of devices experience approximately the same problems. Each device has its own codes that indicate errors. The instructions will help you identify the malfunction and set the correct settings for stable operation.
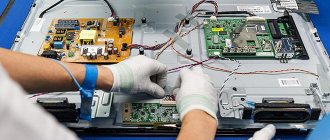
DIY air conditioner repair
Not all faults can be fixed on their own, but most breakdowns can be dealt with by a person even without the skill of repairing household appliances. This is not as difficult a task as it might seem at first glance, and you can also save a lot of money. Before repair work, it is necessary to diagnose the device; it will help identify the cause and type of air conditioner failure. Diagnostics are also carried out before preventive work. In order to carry out a complete diagnosis of the air conditioner, you must:
- Inspect the device for mechanical damage.
- Check that the electrical connections and units are securely fastened.
- Inspect the condition of the filters.
- Test the operation of the air conditioner in different modes.
- Check how the display system works.
- Measure the pressure in the system
- Make sure all connections are tight.
- Inspect other details (operation of the blinds, evaporator temperature).
Many models have a built-in indicator that changes color or flashes at different rates. Thanks to it, you can determine the cause of incorrect operation without diagnostics.
The user manual describes the causes of the malfunction depending on the indicator. If the instructions do not contain enough information, consultants at the store where the device was purchased will help you figure out what the change in the indicator means.
After diagnostics, you can proceed directly to repairs. For effective repairs, you need to know what types of faults generally exist and how to properly eliminate them.
Air conditioner diagnostics
Fan
Some errors are indicated by indicators on the device's electronic display. Most often, during such breakdowns, the system turns on for a few seconds, and then immediately turns off.
The following are the main reasons for what is happening:
- Faulty capacitor in the electric motor.
- Breakdowns in the motor.
- Broken fan blades.
In any situation, the problem can be easily solved by replacing the failed part.
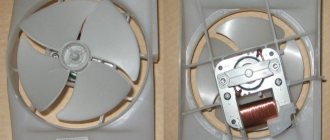
The impeller changes in the following sequence:
- Removing the front protective grille.
- Unscrewing the nut that secures the fan.
- The electric motor pulley is released from the impeller.
- Using a new impeller on a pulley.
- The reverse procedure is used when assembling parts.
When replacing a fan motor, it also requires a few simple steps:
- De-energize the system, remove the front protective grille.
- Unscrewing and removing the nut securing the entire fan.
- Disconnect all electrical connections.
- Unscrewing the motor itself, completely disconnecting it.
- Putting on a new spare part.
- Assembling and securing parts using reverse order.
A certain procedure remains the same when replacing the starting capacitor:
- De-energizing the system.
- Disassembly of the outdoor unit.
- Unscrewing the fixing bracket.
- Disconnect all wires.
- Replace with a new starting capacitor.
- In reverse order, the parts are assembled and secured.
The fan repair procedure will require about an hour of free time. The urgency and scope of repairs, the characteristics of the fan itself determine the total cost of the work.
Cleaning or replacing the filter
Filters in air conditioners are divided into two types:
- Coarse filters are present in all models and serve to protect the “organs” of the air conditioner from dirt and dust.
They are located under the front panel and look like a fine-mesh plastic mesh. There are two ways to clean them: with a vacuum cleaner by lifting the front panel, or by removing the filter itself and rinsing it yourself under water. Don't forget to dry it completely after the procedure. An under-dried filter can cause further damage to the entire air conditioner. - Fine filters are all other types of filters found. They are thinner in structure and have various functions (antibacterial, adsorbent, antioxidant, etc.). At the end of their service life, they are usually replaced with new ones. They cannot be washed.
How to disassemble an air conditioner
Disassembling any block follows the same pattern, so this method is universal. First, we stock up on the following tools:
- screwdrivers of all types;
- hexagons;
- soldering iron;
- cleaning agent.
Main components of the indoor unit
To simply clean the indoor unit, it is not necessary to remove it from the wall. Step-by-step instruction:
- First of all, the device is de-energized.
- First, the outer panel is removed. Under it there are two bolts, closed with a fuse, and they need to be unscrewed.
- Then we snap off the two latches and remove the frame. The top panel is usually dirty and needs to be washed.
- It is necessary to pull out the blade that directs the air masses and remove the lower panel of the indoor unit from the valves.
- After which the wires are disconnected (to avoid confusion, it is better to sketch their location in detail).
- Then the brackets are pressed out and the housing of the electrical unit and transformer is removed.
- To dismantle the drain and outlet hose, three supporting fasteners are pressed out.
- Then the supporting bolts of the electronic motor are unscrewed, the radiator is carefully lifted, and the motor support is removed.
- After this, the blades and the engine, located in a special cell, are removed. To prevent the radiator from accidentally falling, you can put it in place.
- Then you need to remove the thermal lock, which is located on the mounting bolt of the friction wheel with the electric motor rim. It's quite difficult! To avoid unexpected combustion of the rubber part that transmits energy, using a thin soldering iron you need to heat the bolt head, trying to unscrew it during the soldering process. After carefully separating the blades from the motor part, dusty and moldy parts are cleaned with a special product.
Video: Disassembling and cleaning the split system
Malfunctions of electronic control boards
The failure is associated with software settings and settings, when all the LEDs are constantly blinking, and the system itself does not turn on. To troubleshoot problems, the system is simply reprogrammed using special codes.
The likelihood of a burnt-out control board increases if the voltage constantly fluctuates. The same thing often happens with short circuits. New microcircuits are placed in place of the old ones, the latter are soldered out of their places. Separately, the buffer circuit is checked and the triacs are replaced with more powerful varieties.
Most manufacturers equip control boards with solid-state switches that rotate the fan. If you have problems with the operation of this part, you can take a closer look at the board. Separately, the resistance of the part is pre-measured. If the indicator is closer to zero, the broken microcircuit is also unsoldered.
A sign of a faulty control board is the following parts that work intermittently:
- Motion Sensor.
- Temperature sensor.
- Compressor.
There is no need to take measurements if the naked eye can see that one of the microcircuits has burned out. You must immediately replace the semistor when starting work.
Errors in interconnect connections are often made during installation. Even professionals are not completely protected from this. In such situations, parts like the voltage stabilizer, transformer, and diode bridges burn out first. If the air conditioner board burns out completely, its repair becomes impossible; the part is replaced with a new one.
The control board is changed in the following order:
- Turn off the power.
- Removing the top cover once the body is disassembled.
- The boards are removed from the slots by unscrewing all elements for fixation, including wires with connectors.
- Replace with a new part, assemble in reverse order.
In the case of a faulty board, it is better to immediately contact the service center employees. The work itself is expensive, and the slightest mistakes can negatively affect future operation.
The air becomes dry
Typically, the air conditioner dries out the air due to incorrectly installed or broken settings.
You need to make sure that the settings are set to cooling rather than dehumidifying. If everything is set correctly, then the cause of dry air may be dirty filters that need to be washed and dried. If this procedure does not help, then you need to contact a service center - often the reason may be the lack of refrigerant in the system.
The service center employee will charge the system and the equipment should function normally again.
Problems with the outdoor unit heat exchanger
One of the most common malfunctions in this part of the structure is freon leakage through the external unit. If R-22 was used for refilling, use a special leak detector to identify the problem. If there is an option with modern R-410-a products, the surface is simply “soaped”. And then they look to see if foaming has occurred, where it happened.
Leaks are eliminated in two main ways:
- Soldering.
Use a torch to heat the area where the leak appears. Then everything is sealed with special solder. The tubes are lightweight and thin, so processing requires care.
- Replacement.
Complete disassembly of the case begins after disconnecting the external unit from electricity. Cutting out and soldering the old heat exchanger is mandatory. The new one is placed in place of the old one, using nitrogen for connection. The module is reassembled by connecting the electrical connections. The tubes are also connected to the system, ensuring its tightness. Everything is refilled and the overall performance is checked.