A small part of any gas stove, without which it cannot work properly, is the nozzle. They have to be changed very rarely, and only in the case when the incoming blue fuel is changed to liquefied from cylinders instead of stationary gas. You can replace the nozzles in a gas stove with your own hands, only for this you need to know all the nuances of dismantling.
The principle of operation of the nozzle
The classic solution for kitchen stoves is the gas supply system. It includes the burner, transport channels, shut-off valves and, in fact, the burner itself. Regardless of the model type and price segment, these elements remain unchanged.
The volume of supplied gas and its pressure fall on the shoulders of the shut-off valve and burner. This tandem is most often called a jet and an injector, where the first is part of the second. Both liquefied gas - propane (in cylinders) and natural gas - methane (pipeline) can be used as fuel.
For correct operation of the equipment, clearly adjusted gas supply proportions are required. That is, fuel must be supplied at a certain speed and in equal shares. This is precisely why a jet is needed in the system.
In addition, it is necessary to select injectors taking into account the type of fuel. For example, an element designed to work with propane will smoke dishes and emit harmful substances if installed in a system operating on methane.
To maintain the required volume of gas and pressure, an adjustable hole is provided in the nozzle. On new plates, the elements are calibrated to optimal/universal parameters. The latter are calculated based on the power of the equipment and the maximum rate of fuel combustion.
Purpose and types of jets
The purpose of a gas stove nozzle is to ensure gas flow to the burner. At the same time, it also evens out the flame on the burner due to the dosed supply of combustible substances. You can connect the kitchen stove to gas coming from a gas pipeline or liquefied gas in cylinders. Since such substances have different pressures and compositions, different jets will be required. Their main difference is the different hole diameter. LPG requires a narrower diameter. Also, the greater the power of the burner, the larger the hole size will be.
It happens that, after serving for some time in the kitchen in an apartment, an outdated stove is transported to a dacha or to a country house where there is no main gas pipeline or connection to it. And gas in cylinders will be used as a flammable substance. In such a situation, you not only need to connect the cylinder correctly, but also replace all the nozzles.Approximate prices for injectors:
System Features
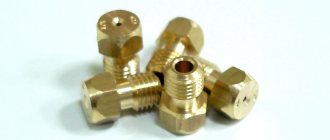
Jets are very similar to regular bolts: a hex head and threads. Among others, the element is distinguished by a small hole in the central part. The diameter of the nozzle is calculated based on the type of gas, the power of the stove and the characteristics of the fuel supply system.
Jets for gas stove
With equal power ratings of equipment for propane, the hole size is slightly narrowed, while for methane it is noticeably wider. If you install nozzles for natural fuel on a burner running on bottled gas, the tongues will be much longer than they should be. On the plus side, a specific noise will appear, and the flame will turn orange. Replacing the part with an element with a narrower nozzle will help here.
Purpose and types of jets
Natural gas NG G20 is mainly supplied to kitchens through city pipelines. It is supplied directly to the stove under a pressure of 20 mBar. In places where there is no gas pipeline, bottled gas, also called liquefied gas, is used. The most common of them is LPG G30. The pressure at the outlet of the cylinder is 50 mBar. Due to the difference in the composition of the gas and its pressure when entering the furnace, the combustion of the gas-air mixture is significantly different. To even out the flame on the burner and avoid harmful soot, the jet was created . It is a regular threaded bolt, but only with an internal hole. People often call them injectors or nozzles. Their main difference is the caliber of the hole through which fuel is dosed.
Important! Different manufacturers may differ in the shape and configuration of the product, as well as the outer diameter of the thread with which the nozzle is screwed into the gas pipeline of the furnace.
Converting a stove to propane-butane is not the only reason when nozzles need to be replaced. You should also install other nozzles if on the stove burner:
- soot appears and the fuel burns unevenly;
- the flame comes off the burner and a hissing sound is heard;
- The color of the flame is yellow-white, instead of blue.
Any of these actions indicates that the stove has inappropriate jets.
It is not difficult to understand that the stove is working correctly after replacing the jets:
Jet sets
Almost all jets have the same slot size - 7 mm. On large industrial equipment or, conversely, on mini-plates, you can find non-standard format parts. The length of the jet also depends on the type of fuel. Elements running on liquefied gas are slightly longer than those running on natural gas.
Recommended hole diameters for different types of fuel:
Most manufacturers equip their models with universal nozzles that operate on regular natural gas. As a rule, models from the mid-price and premium segments allow you to regulate this moment, that is, switch the fuel type to propane and back using a nozzle. If this is not possible, then the corresponding set of jets can be purchased at almost any specialized store.
The elements themselves are made of brass. They can easily withstand severe temperature changes, are resistant to corrosion, and at the same time durable. In addition, during cooking the jets practically do not heat up. On old-generation equipment, these elements were combined: one part was made of brass (the nozzle itself), and the other part was made of aluminum (the base into which it is screwed). In this case, when replacing, you must be careful not to strip the threads.
As for the thread pitch, in the absence of documentation, determining this is not so difficult. In stores you can find two standard sizes - 0.75 and 1.0 mm. With rare exceptions, there are non-standard options, but such exotic ones are suitable for the same specific equipment, not intended for domestic needs.
Almost all models are from 2009. and were previously equipped with jets with a pitch of 1 mm. Modern equipment is equipped with elements with a thread of 0.75 mm. It’s easy to find out exactly what pitch the part has: apply the old jet to the ruler. If the thread clearly follows every millimeter on the scale, then the pitch is 1 mm, and if it lags, then 0.75 mm.
Important! When switching equipment from methane to propane, you will need not only new nozzles, but also a gas reducer.
Connecting the plate to the cylinder
For this operation, you need to screw a fitting onto the gas stove pipe, and put a previously stored flexible gas hose on it and secure it with a worm-type clamp.
We attach the second end of the hose to the reducer and also tighten it with a clamp, and connect the reducer directly to the liquefied gas cylinder using paronite gaskets. Fastening is carried out using an open-end wrench; we place the gearbox in a horizontal position - this is important!
If everything is done correctly, there should be no gas leaks, but it is better to check this personally. To do this, use the simplest method - applying a soap solution to the joints. If there is a leak, it can be easily seen by the inflating soap bubbles. In this case, it is necessary to change the gaskets, tighten the clamps, and if there is damage to the hose, replace it.
Possible injector malfunctions
Jets are quite reliable elements and can last for many years. They are changed, as a rule, in two cases: a manufacturing defect or a change in fuel type. For normal operation of the parts, it is enough to simply clean them of dirt.
Factors indicating clogged injectors:
- flames with a red-yellow tint;
- the burner often goes out;
- The flame intensity changes periodically;
- The burner is difficult to light or does not light at all.
Part replacement is required only when the flame comes off the divider and is poorly controlled by the fuel supply system. Most often this is a factory defect of the injector. If a similar problem occurs on all burners, then the gearbox is most likely faulty.
Jet maintenance
For most popular models from well-known brands, there is no need to remove the nozzles for subsequent cleaning. It is enough to remove the burners to open access to contaminated parts. In some cases, it may be necessary to dismantle the hob if it is a closed type.
A regular needle or copper wire is suitable for cleaning the nozzle. We pass the tool into the hole and rotate it around its axis. When the needle has reached the bottom, turn on the gas and only then remove it. Thus, the jet from the nozzle pushes dust and fine dirt out. Two to three seconds is more than enough to clear the air.
Cleaning the nozzle
If there are problems with on-site maintenance, or the design of the stove does not allow for this, the nozzle must be completely removed, cleaned, rinsed and dried. In a good half of cases, the detailed procedure is described in the operating instructions for the equipment.
Required tool:
- jets – 8 mm wrench (7 mm for propane);
- burner fastening – 14 mm;
- pipeline nuts – 17 mm.
On some specific slabs, the fastening may differ from that indicated. As a universal option, you can use a wrench with a variable head diameter.
Connecting the plate to the cylinder
For this operation, you need to screw a fitting onto the gas stove pipe, and put a previously stored flexible gas hose on it and secure it with a worm-type clamp.
We attach the second end of the hose to the reducer and also tighten it with a clamp, and connect the reducer directly to the liquefied gas cylinder using paronite gaskets. Fastening is carried out using an open-end wrench; we place the gearbox in a horizontal position - this is important!
If everything is done correctly, there should be no gas leaks, but it is better to check this personally. To do this, use the simplest method - applying a soap solution to the joints. If there is a leak, it can be easily seen by the inflating soap bubbles. In this case, it is necessary to change the gaskets, tighten the clamps, and if there is damage to the hose, replace it.
Changing injectors
Working with gas appliances always involves extreme caution - all steps should be carried out strictly according to the instructions. This is especially true when it comes to the use of physical force: one excessive force, and replacing a nozzle turns into a major overhaul for your gas stove.
Replacing jets is a fairly simple operation, but if you have absolutely no skills in working with such equipment, it is better to invite a service specialist.
The basis for successful DIY gas stove repair is strict compliance with all safety requirements. First, let's prepare a simple set of tools. You will need a Phillips screwdriver and a set of open-end and ring (star-type) wrenches:
- for jets - 8 mm (for liquefied gas - 7 mm);
- burner nuts - 14 mm;
- The tip of the oven pipeline is 17 mm.
We shut off the gas supply to the stove and prepare a table for storing various parts that have been removed for the time being. All photographs were taken during the dismantling of the Brest 300 slab; for other products, the replacement of such parts will not differ much.
Stove burners
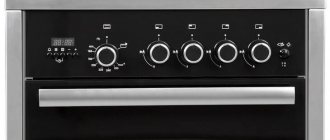
- The cooking panel has standard devices, as shown in the photo. To get to them, you need to remove the grille.
- Now carefully remove the dividers and remove the burners from their sockets.
- To get to the jets, we need to remove the burner table cover, which is secured with screws.
- Different models have specific fastenings; we only had to unscrew two screws, and after that the cover can be lifted easily.
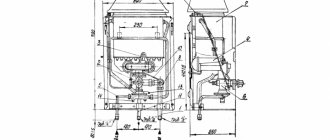
- Our gaze revealed two strips of metal - traverses, on each of which the burner bodies are reinforced, which have the same design, and the difference is only in the length of the aluminum pipeline. At the end of this tube there is a nozzle into which blue fuel is supplied, and then through a hole at the end of the nozzle it exits into the burner leg, mixes with air and is supplied to the divider. If the divider holes are clogged, then the flame does not escape from all points - cleaning or blowing of the holes is required.
- The burner body is rigidly fixed to the traverse and holds the entire structure vertically. Here we should make a small digression and talk separately about special devices - there is a myth among users about a unique set of tubular wrenches, with the help of which it is easy to replace jets on any model of gas stove. Anyone, even someone who does not have a technical education, immediately sees that such a key will not fit into the nozzle due to the special structure of the entire structure.
The first photo clearly shows how the nozzle is secured to the pipeline in our case, and next to it are other designs of gas burners from more modern types of stoves, where the nozzles are screwed into the body from above; there is no need to disassemble the table. Such options are much more expensive, but are easy to replace jets. - To release the tip, you need to find a special lock - this is a plate with a slot and a hole in the middle, it looks like a clothespin. We squeeze one side of the clamp carefully, without using force, pull it out of the socket - the tip with the nozzle is free, press the tube and it comes out down from the fastening ring.
- Now you can start replacing. There are two options: pull off the tips from all pipelines and unscrew the jets on the table, or try to remove the jet on the spot. The first is preferable, because the nozzles stick to the tip body so much that it can be very difficult to unscrew them - to do this, it is sometimes carefully clamped in a bench vice. If you are afraid of confusion, then all tips have markings.
- When you pull off the tip, an O-ring remains inside, so when assembling it you need to take it out and put it on the tube. The nozzle thread is not sealed - there is no technical need for this. The rings are also not lubricated by anything, because the internal pressure of the main gas pipeline is much lower than in water pipes.
At this point, the replacement of nozzles on the table is completed, assembly is carried out in the reverse order, but first you need to change the jets in the oven.
Oven nozzle
- We open the lower technical drawer of the stove, and completely open the oven door to the lowest position.
- The nozzle is located behind the left wall of the oven in a special housing into which an arc-shaped burner is inserted. To get to it, you need to pull out the floor, there is a slot for this, pull it towards you, it should come out without resistance. We put it aside.
- We unscrew the two screws securing the burner and remove it from the oven. A hole opens on the left through which gas enters the burner. There is an injector hidden there that needs to be replaced.
- Considering that during long-term operation the nozzle could become strongly stuck to the nozzle body, you should not try to rip it off - if the thread breaks, you will have to buy a new body.
- We unscrew the three screws securing the left side wall of the stove, and move it to the side.
- There is a nut at the end of the pipeline - it must be unscrewed using a 17 mm wrench to remove the nozzle body. It unscrews without any problems.
- To unscrew the two screws securing the housing to the wall of the oven, you need to move the pipeline a little, after that we take out the nozzle.
- We carry out the replacement in a calm atmosphere at the table - the jet got very stuck, so we had to lubricate it with a special product and wait a few minutes.
Assembly is done exactly the opposite, with all precautions.
That's all the nuances of replacing nozzles in a gas stove. You just need to remember that you only need to install your own jet, and strictly according to the markings - for each stove model there are special sets of these small but very important devices on sale.
Instructions for converting Darin's gas stove to liquefied gas
Instructions for converting Darin's gas stove to liquefied gas. Converting Darin's gas stove to bottled liquefied gas. First, let's look at the diameters of the nozzles. In the factory configuration of the stove designed for natural gas, the following nozzles are installed: For high-power burners (these are two large burners), nozzles with a diameter of 123 microns are installed For normal power burners (these are two middle burners), nozzles with a diameter of 110 microns are installed. For the main burner of the oven, a nozzle with a diameter of 145 microns is installed.
This entire set of nozzles assumes normal flow on the stove at an operating gas pressure of 1300 Pa, 130 mbar.
Naturally, when such a stove, without converting the nozzles to nozzles with a smaller diameter, is connected to a cylinder with a gas output pressure of 3000 Pa, 300 mbar, you can imagine what kind of torch and soot would be produced, for example, by an oven nozzle with a hole of almost one and a half millimeters. There, the chicken will turn black after 30 minutes of cooking. This is unacceptable. The proposed kit for converting a Darin gas stove to bottled gas contains nozzles of the following diameters: But, since the presented set of nozzles is universal for all Darin gas stoves, one nozzle with a diameter of 72 microns will remain unused. It is designed to replace the nozzle installed on the grill burner. Therefore, it is necessary to use it, if there is a grill burner in the stove. Another important point: this entire set of liquefied gas nozzles for Darin stoves should reduce the maximum gas consumption of the stove to 612 grams per hour. The indicated figure implies the maximum gas consumption on the stove, i.e. with all five burners running simultaneously, including the oven.
There is no loss of power from the burners themselves. This very power of the burners will be provided to us only by the correct installation of the vapor phase at the outlet of the pressure reducer (frog) installed at the outlet of the cylinder. This figure should be in the range of 2750 – 3000 Pa (275-300 mbar).
If difficulties arise with this, then we have a reducer that, without any adjustments, will provide a stable outlet pressure of 300 mbar. The body is armored. The gearbox itself is non-separable. Replacing jets on Darin’s gas stove. Let’s go to the stove. Turn off the gas (if it is already connected). Remove the table grille. remove the burners. It's quick and easy. Now you need to separate and remove the plate table. This is done like this: The table is fixed to the plate on both sides using plate clamps. These latches are located near the front of the cooker. One by one, you need to use something thin that will fit into the gap, press on each of the latches and try to lift the table. First, on one side, then we do the same on the other. Remove the stove table.
In front of us is a gas train with pipelines. Each of the pipelines will lead us to the desired nozzle. Each of the pipelines is fixed to the burner frame using a bracket. To free the pipeline and get to the nozzle, you need to remove the bracket from the grooves, bend it and move it down.
Before us is a pipeline with a nozzle at the end. By the way, the nozzle is simply put on the end of the pipeline. It must be carefully removed. At the same time, it is important not to lose the red seal rings. It is the red ring that seals the nozzle “sitting” on the pipeline. They can sometimes come off along with the jet. This must be repeated with all five pipelines installed in the slab. We change the nozzles (jets) in the following order: change 123 microns to 73 microns, 110 microns to 69 microns. After the new nozzle is put on, we insert the tube into the frame, take the bracket and fix it back into the grooves. Ready.
You need to reach the oven nozzle from the back of the stove. The procedures for replacing it are the same. After replacing all the nozzles, we wash the joints of the nozzles with the pipelines and open the gas. We check for leaks.
Replacing the nozzles for converting Darin's gas stove to liquefied gas is complete. A few words about VMR - low-flow screws. In each of the five taps of the stove burners there is a so-called low-flow gas adjustment screw. What is the point of adjusting it? It should always be set to such a position that when the tap is in the “smallest flame” position, the latter should not go out. If you have changed the jets and everything is fine, then there is no need to go there. But if one of the burners starts to go out when the tap is running at the “lowest flame”, it needs to be turned. Although in practice this never happens, since liquefied gas is always “richer in flame” than natural gas. Therefore, when converting from natural to liquefied, such problems (with the burners going out with a low flame) never arise. That’s all. Good luck to you! Other news from the TSKL.ru store:
- to gain access to the burner, you need to remove the top cover of the gas stove, which is secured with screws;
- then you should remove the tips with nozzles from the traverse with the burners, for which you first need to find the latch (outwardly resembling a clothespin), effortlessly squeeze its ends and carefully remove it;
- Next, the tip should be released from the socket and removed from the gas pipeline tube;
- an O-ring will remain in the tip, which needs to be removed from there and put back on the tube;
- the next step is to carefully unscrew the jets using a socket wrench counterclockwise (if the nozzle is stuck and does not budge, it is recommended to use a vice);
- and finally, new nozzles need to be screwed into each tip, and then reinstalled.