Every housewife understands that it is periodically necessary to clean and clear even the most difficult places of dirt. However, not everyone knows how to get to them and clean the product as much as possible. The answer can be found in this article.
The cost of carrying out work by specialists
Malfunctions occur suddenly and require quick fixes, especially when a gas stove breaks down. However, not all home appliance owners have the necessary skills. When it is impossible to carry out repairs yourself, you have to call a specialist to your home. What expenses await the owner:
- replacement or repair of a gas supply valve - from 300 to 1,200 rubles;
- nozzle cleaning - from 400 rubles;
- replacing the oven lamp - from 400 rubles;
- gas adjustment - from 500 to 900 rubles;
- lubrication and cleaning of rods on the feed lever - 900 rubles;
- replacement of rods - 1200 rubles;
- thermocouple replacement - 900 rubles;
- replacement of the ignition unit - 900 rubles;
- cleaning of supply contacts - from 900 to 1,100 rubles;
- change of sealing gum - from 500 rubles;
- replacement or repair of a spark plug - 800 rubles.
Prices depend on the stove model and the region where household appliances are serviced and repaired.
Instructions for removing the handle
Since most modern cookers have removable power controls, they can be easily removed for cleaning. But, if this has not been done before, then rough oiling can create certain difficulties. Despite this, the cleaning operation is still worth carrying out.
It is important not to forget that the stove is a gas-using equipment, during the operation and maintenance of which it is important to comply with fire safety rules. Therefore, before starting to work with the stove, it is necessary to turn off the gas supply, since any manipulations are considered flammable
Stage #1 - selection of necessary tools
To carry out the work you need to prepare the following:
- gloves;
- gas key;
- pliers;
- screwdriver;
- knife;
- rags;
- water and detergent.
According to safety requirements, work must be carried out with rubber gloves.
Some models of gas stoves have special mounts for handles. You need to remove them carefully so as not to damage the thread and then return them to their place.
A gas wrench, pliers and a screwdriver will be needed to remove the gas stove handle, while a toothbrush and detergent will be needed to clear clogged areas. It is worth remembering that different models of gas stoves have different methods for removing handles.
Stage #2 - dismantling the gas stove handle
You should start working after the gas supply valve is closed.
The gas stove knobs should be set to the “Off” position. In order to remove one handle, you need to pull it towards you and slowly pull it out of the groove. This operation must be carried out very carefully so as not to damage the rotating mechanism.
If you cannot remove the handle manually, you can use pliers
Using the rag as a spacer between the handle and the working surface with part of the pliers, gently squeezing and pulling towards you. In some types of plates, the handles are screwed on with screws; you need to use a screwdriver to unscrew them.
There are also options when you can remove the handle by lifting the mounting protective cap. When using a screwdriver or knife to pry up the handle, you should act extremely carefully so as not to damage the surface of the stove
In some types of stoves, the handles are screwed on with screws; you need to use a screwdriver to unscrew them. There are also options when you can remove the handle by lifting the mounting protective cap. When using a screwdriver or knife to pry up the handle, you should act extremely carefully so as not to damage the surface of the stove.
There are models where the protective ring has grooves, and in order to get it out, you just need to twist the ring a little to the side.
Stage #3 - cleaning removable elements
To clean dismantled handles, you need to prepare a container with warm water and detergent in which to place all removable mechanisms that need cleaning. Keep it in the washing solution for at least 10 minutes, and in case of severe contamination, change the water additionally.
To clean the surface of the handles, do not use substances containing chlorine, as this can damage the enamel coating and erase the inscriptions on the handle.
Using a brush, carefully remove dirt from the areas of the stove where the handles were installed.
Pay special attention to notches, gaps and reliefs
It is worth noting that when processing aluminum parts of the handles, it is better to use a rag moistened with vegetable oil, and then remove any remaining oil with a detergent containing alcohol
Also, when cleaning the surface of the stove and hard-to-reach places under the handles, do not forget about the grate. It also requires timely maintenance.
To effectively clean grates made of various materials, various methods and available means are used.
Stage #4 - reinstalling the handles
The handles are installed after all parts have completely dried. It is necessary to correctly put all the rotating mechanisms in their original places. If the handle shaft is not fully seated in the groove, it will not work.
The handles of gas stoves come in plastic and metal. They are equally heat resistant, however, when removing and installing a plastic handle, the likelihood of damage is much higher
How to unlock the Combustion stove
Locking the hob is possible for induction EIT6351XPD, EIT6341WD, EIT5351WD; to remove the block, you need to press the “key” symbol.
Models with IconLED are equipped with a safety lock function to prevent settings from being changed accidentally, for example by children. To turn it on, you need to press and hold the watch sensor for 5 seconds. “Loc” will appear on the display for 5 seconds.
There are two options:
- If the safety lock is activated and no function other than the current time is set, the oven will not operate.
- If you turn on the lock after setting one of the programmer functions, the oven will work, but it will be impossible to change its operating parameters.
Methods for cleaning pens depending on the type
If the regulators are easily removed, they can be soaked or boiled in a solution to remove grease, and then easily clean off the residue with a brush.
If the handles on your stove are not removable, do not be upset, and for this case there will be a way; in this situation, sticks with cotton wool, again a toothbrush, which is no longer suitable for brushing teeth, gauze swabs and toothpicks are quite suitable for helping us.
Cleaning of fixed handles is carried out in the following sequence:
- take a product that contains chlorine;
- moisten a gauze swab in it and apply it to the hands (or spray it with a spray bottle);
- wait a few minutes;
- Next, we take a brush and clean it, in hard-to-reach places we go through with a cotton swab and a toothpick;
- Afterwards, use a sponge or cloth to wipe away any remaining dirt.
Preparing to wash the stove
In fact, there is no difference whether it is a gas stove, induction or electric. There are handles on almost any cooking equipment. Although modern models are increasingly equipped with electronics and push-button controls. But let's focus on the handles. They can be removable or stationary. For most household stoves they are removable.
Before you begin cleaning, you must remove all rotary toggle switches. This will make the process much easier. It’s okay if you can’t remove the switches, you can restore them to their original form and in place.
Regardless of the method chosen, you may need: a foam sponge, an old toothbrush, a pair of napkins that absorb moisture well, and gloves. It is highly not recommended to use metal brushes for cleaning gas and other stoves. But what can be truly useful is a melamine sponge.
How to disassemble the stove Combustion
Of course, it is prohibited to disassemble the device; this may affect its functionality, not to mention the fact that the operation of faulty equipment can lead to a breakdown of the electrical network or a gas leak. But you can remove the parts for cleaning and replace the oven light bulb yourself. Just unscrew the lamp cover.
Possible replacement (look at the markings on the nameplate):
- Halogen bulb: G9, 25 W, 230 V.
- Regular light bulb: E14, 25 W, 230 V.
For cleaning, the inner glass of the door or the entire door is removed.
- Open the sash completely.
- With a standard hinge, open the latches completely. With GentleClose - 90°.
- Slowly close the door, lift it up and remove it from the hinge slots.
- To remove the inner glass, you need to lift the latches, lift it by the bottom edge and slide it out. In some models, the fastening is made using screws; they can be unscrewed.
- Install in the reverse order, making sure that the latches are completely closed, otherwise the powerful spring may forcefully slam the door shut.
In some models, you can remove the container for storing dishes; it is removed like a regular box from a cabinet. To put it back, you need to get the runner into the guide; if the runners are equipped with wheels, then this is even easier.
Do-it-yourself gas stove cleaning
Not all housewives and owners of gas stoves know how to properly clean the stove with their own hands, as well as what is required for this. Folk remedies are suitable for those housewives who prefer not to buy household chemicals, but to use safe methods that have been proven over the years.
And besides, you can use household chemicals only with gloves, so as not to damage the skin of your hands.
To avoid damaging the skin of your hands, it is best to clean the stove while wearing gloves.
If you still prefer synthetic products, then it would not hurt to learn about alternatives and safe methods. The washing and cleaning mixture can be made at home from available products that are found in any home. As a rule, such mixtures wash away dirt no worse than all popular household chemicals, and at the same time they are also safe.
To clean a gas stove and oven you can use:
- Citric acid;
- Vinegar;
- Ammonia;
- Soap dissolved in hot water;
- Baking soda.
Using these components, you can clean not only the stove, but also other kitchen appliances, such as a microwave oven, electric kettle, multicooker, juicer and other household appliances.
How to clean pens
To clean the regulators from grease and dirt, you can use various household chemicals. However, most housewives prefer to do this work with the help of effective improvised means. The easiest way to clean handles is with soapy water. To do this you need to do the following:
- Pour water brought to a boil into a deep container.
- Finely grated laundry soap is dissolved in it. For every liter of liquid you need to take 2 tbsp. l. cleaning agent.
- The previously removed handles are placed in the prepared solution and left for 6-8 hours.
- After the specified time, the dirt will become wet and can be easily removed with a sponge.
- Clean regulators are wiped with a dry cloth and returned to their place of work.
- 1 bottle of ammonia is poured into a bowl.
- The same amount of water (necessarily at room temperature) is added to it.
- The components of the cleaning product are mixed.
- A cotton pad is soaked in it.
- They are used to wipe the regulators removed from the gas appliance.
- After 7 minutes, clean the products with an old toothbrush.
- The parts washed from dirt are wiped dry and installed in their original place.
Detection of failure in models
Like all similar household appliances, a gas stove becomes unusable over time, parts wear out, and repairs become necessary. Each manufacturer's furnaces have their own list of common faults. Most often this concerns problems with burners, electric ignition, and oven doors.
Hansa
Common problems with Hans gas stoves:
- The burners go out immediately after the switch is released. The reason is the adhesion of grease or food residues to the nozzles, a burnt-out thermocouple, damage to the magnetic valve, or faulty electric ignition.
- Unstable fire on the divider. The reason is a clogged nozzle or a misalignment of the air damper, which limits the air supply to the burner.
- No spark in electric ignition. Indicates a faulty fuel control system or worn spark plug.
- The oven door does not close well. The reason is a displacement of the fastening axis or mechanical damage to the door.
- The gas valve is stuck. Most likely, the valve body is damaged, the oil has thickened or dried out, or the locking handle has slipped off the axle rods.
- The smell of butane near the switched off stove. You need to check the connection of the gas pipe to the stove, the pipe itself for any gaps, and inspect the tap.
Darina
Typical malfunctions of Darin gas stoves include:
- random activation of the automatic burner ignition system;
- constant flame during operation;
- turning or sticking of the adjustment knob;
- malfunction of the solenoid valve that turns off the gas supply when the fire goes out;
- When the stove is turned on, there is a smell of fuel, smoke appears, and the flame is orange.
The most common breakdowns typical of Ardo slabs:
Periodic shutdown of the gas burner or lack of ignition. Most likely, the reason is a violation of the spark plug insulation, failure of the thermocouple, solenoid valve, or due to food residues in the injector.
Self-extinguishing burner. The reason is a burnt thermocouple or the need to clean the nozzle or adjust the gas supply.
Difficulty adjusting handles. Usually the problem is solved by washing and cleaning the rotating mechanisms.
Problems with electric ignition
Pay attention to the contacts of the power buttons; they may need to be cleaned. Inspect the unit responsible for supplying the spark, check the voltage in the network.
Insufficient combustion
The problem is caused by the need to clean the nozzle.
The smell of gas appears. To determine the cause, they urgently call a technician and ventilate the room, after first shutting off the gas supply pipe.
Ariston
The most common breakdowns in Ariston gas stoves:
- The gas does not ignite. Breakdown of the gas supply valve or electric ignition.
- Electronics malfunctions.
- Uneven burner flame. Indicates that the gas supply is incorrectly configured.
- The burner does not light. Most likely the solenoid valve is not working.
Malfunctions in the operation of the ignition module or igniter are less common; over time, the capillary tube or thermostat becomes damaged, and the burner channels become clogged.
Hephaestus
Common breakdowns of Gefest gas stoves:
- Uneven flame. Eliminated by adjusting the supply of flammable substances.
- Automatic extinguishing of the burner after ignition. The reason is a failed thermocouple.
- No flame. The reason is a malfunction of the Hephaestus model with electric ignition or gas supply tap.
- Malfunction of the electronic module (display, light bulbs, temperature sensors).
Indesit
The following faults are often encountered in Indesit gas stoves:
- An unpleasant odor appears after turning on the burners. It is necessary to clean the burners from food residues.
- The power controls are difficult to turn. The reason is the accumulation of dirt on the mechanism or the decorative handle needs to be replaced due to a faulty faucet fastening.
- Increased combustion. For bottled gas, adjustment of the reducer is required; for a centralized gas line, the reason is a problem with the nozzle.
- Low combustion intensity. It is worth checking the pressure in the system, the condition of the hose, and the nozzle.
- The burner does not light. If there is only one, most likely the divider and nozzle need to be cleaned. If all the burners do not light up, the problem is with the electric ignition.
- The burner smokes during operation. Indicates high pressure in the system, dirty nozzles, deformation of the flame diffuser, low gas quality.
- The oven light does not come on. Most likely, the light bulb has burned out or the contacts have oxidized; also check the serviceability of the socket and network cable.
- Smell of gas when the stove is turned off. It is possible that the device is connected incorrectly to the main line or one of the elements or connections of the structure may be depressurized.
Troubleshooting
Having taken precautions - opening the windows, getting rid of open sources of fire, preparing a flashlight instead of electric light sources - they begin to troubleshoot.
Read more about how to repair electric stoves of different models with your own hands here.
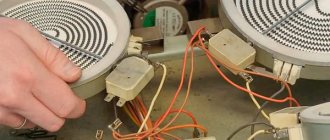
Electric ignition
Electric ignition modules are installed in almost all modern models of gas stoves. This is a high-voltage voltage generator supplied to ceramic electrodes attached to the burners, usually located under the top cover. A malfunction occurs on one or periodically occurs on several burners.
- Most often, the essence of the repair is to eliminate the short circuit that has arisen between the stove body and the high-voltage cable. Behind the front panel there is a technological space used to accommodate wires and gas pipes. Over time, water and food residues formed after cooking accumulate in the cavity.
This is a liquid substance with an acidic reaction that conducts electricity and causes ignition failure if it gets between the housing and the cable. The wires are cleaned, dried, placed in polyvinyl chloride tubes, secured on plastic stands, making sure that there is no contact with the metal case.
- The next reason for malfunctioning ignition is dirty spark plugs. To repair, remove the contact connector from the element, remove the leaf spring with a screwdriver and pliers, and pull out the spark plug. The part is thoroughly washed in soapy water, dried, and put back in place.
- Another reason for repairing electric ignition is that the system operates even when the burner control handle is inactive or clicks after the handle is released. The reason for this is a short circuit between the control cable and the stove body, caused by severe contamination. For repairs, the device is disconnected from the network, the top cover is removed, the entire technological niche is cleaned and dried.
Thermocouple
To resolve the problem, perform the following steps:
- Using sandpaper, clean the element from grease, dust, and chemical residues.
- If cleaning does not bring results, then the thermocouple requires replacement. To do this, remove the top panel by first removing the handles and unscrewing the bolts.
- The thermocouple is located near the spark plug. Disconnect from the burner and free from the wire.
- The attachment point is cleaned and a new element is installed.
- Return the cover to its place.
Cranes
If the gas stove taps do not turn or turn with difficulty, the reason is sticking of fat and excess lubricant or a breakdown of the turning mechanism.
- It is necessary to remove the handles and clean them from residual grease and lubricant. This is done in a soapy solution, then the taps are dried and a thin layer of new lubricant is applied.
- If the problem has not been resolved, after removing the handles, inspect the seat of the taps.
- If the metal plate located at the inlet of the valve stem is damaged, it is replaced with a new one. You can make it yourself by cutting it out of a canning lid or a tin can.
Oven doors
The oven door does not close for two reasons:
To fix it, do the following:
- the hinges, supplemented with clamps, located on both sides of the oven, are bent;
- then carefully close the door until it rests against the latches;
- by pulling it towards you and up, disconnect the door from the body;
- Next, remove the side walls of the case to gain access to the brackets responsible for the clamping;
- parts requiring repair are disconnected from the oven, and the deformed elements are leveled with pliers and a hammer;
- if the bracket is broken, it is replaced with a new one;
- Assemble the body, install the door in place in the reverse order.
The sealing gasket is removed by first unscrewing the door. The groove intended for installing the gasket is washed with detergent, a new rubber band is installed and the door is put in place.
Read about how to repair the oven doors on the stove yourself in a separate article.
Hob
If the hob of a gas stove does not work, perform the following steps:
- Investigate electric ignition. The problem is the accumulation of fat and food residues on the element. To eliminate the defect, just wash the part well, dry it and put it back in place. The functionality of the electrical network is also checked.
- Make sure that gas is entering the burner. If the valve is not closed, gas enters the system, proceed to inspecting the nozzles.
- Clean the jets, which are also susceptible to clogging with food debris. After washing, you need to thoroughly dry the parts so that the ignition system works correctly.
Lattices
Over time, they burn out and fail. Enameled steel lasts a long time, but due to the characteristics of the material, the appearance quickly deteriorates. Cast iron does not last as long, as it becomes brittle due to exposure to high temperatures.
Replacing the grille, regardless of the material, is done independently. Purchase the part in a specialized store to ensure the correct choice of model.
Housewife's advice: how to clean stove handles (video)
We tried to talk about the most famous methods for cleaning handles on gas stoves. Of course, complex cleaning will not be necessary if you spend a few minutes on your hands after each cooking process, but situations are different and perhaps our advice is exactly what you will need in the near future. Be patient, use detergents, and start sprucing up your pet.
kitchenremont.ru
All gas stoves are equipped with removable handles.
The main thing here is not to rush, but to act carefully, without rushing and without breaking the plastic.
Stoves from different manufacturers certainly differ from each other. However, as experience shows, most design solutions from different manufacturers are VERY, VERY similar.
Before starting work, turn off the gas supply using the shut-off valve.
Gas stove Hephaestus, Indesit, Electrolux, Darina (knobs that need to be pressed and turned when igniting).
Just pull it towards you, along with the ring on which the symbols are drawn.
If you have any difficulties, try treating it with WD-40. Then, inserting one knife into the gap between the ring and the handle itself, bend it a little. And on the opposite side, use a second knife, acting as a lever.
If it doesn’t go through the cloth, use pliers carefully.
Then soak the hands in water with the addition of fairy. After a while, the fat will turn white and be wiped off with a toothbrush.
How to lubricate the tight rotating mechanisms of the crane?
Factory lubrication of the faucet is designed to last approximately five years. In Soviet times, gas workers used graphite lubricant (called NK-50), LG-Gaz41, LS-1P.
Graphite (crushed carbon), which forms the basis of the lubricant, is able to fill microscopic irregularities in parts, while reducing friction.
It has great refractoriness and does not dry out for a long time.
You can use solid oil or technical petroleum jelly.
Tips for repairing gas stoves with your own hands
usluga-spb.ru
Internal structure of the stove
Before doing any repairs, you need to understand what a gas stove is, what parts are present in it, and what kind of DIY gas stove repair may be required in a given case.
There are many companies producing gas stoves: Gorenje, Ardo, Ariston, etc. But all tiles, even if they differ in price, have a similar type of internal structure.
The structure of the burners
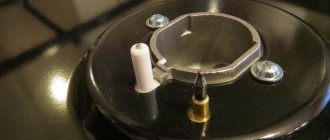
The most noticeable part of any stove is the burners. Each burner is attached to the stove table using bolts. The burner also consists of several parts: they have a lid, a divider and an injector.
Each burner is connected to a steel and copper tube with a fastening similar to the American one. Due to this device, the burner receives gas.
Gas burner device
To work with the burners, you don't need any special tools: you will need a wrench, most likely a size 13, to disassemble the burner parts if it needs repairs or cleaning.
After completing the repair and assembly, you need to assemble the structure and check how tight it is to prevent gas leakage.
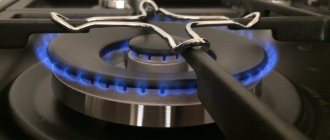
Each burner has two candles around its perimeter.
One helps create ignition by working with piezoelectric elements or an electronic circuit, and the second serves as a thermocouple connected to a circuit that controls combustion.
Gas burner (grill removed): 1— nozzle, 2— spark plug, 3— flame sensor (thermocouple hot junction)
The candles differ from each other even in appearance, so it will be difficult to confuse them.
A candle for electric ignition has a ceramic caftan; it is needed to prevent the spark from breaking below the required level.
That is why it is important to properly ground the stoves where electric ignition is built-in. Also, electric ignition does not tolerate the use of water pipes and metal threads.
It is important to separate the slab from the riser using special gaskets during installation and repair, otherwise there is a real risk of explosion.
If there is a lot of fat: how to wash a gas stove
For the highest quality cleaning and removal of all contaminants, it is necessary to carry out preliminary preparation.
Sprinkle baking soda onto a damp surface in an even layer and let it sit for 30-40 minutes. This method is not complicated and makes it possible to clean the stove and oven. The oven can also be cleaned this way.
If there is too much grease, then it is better to apply a cleaning agent on it and leave it for a while, and then wipe it off
After waiting time, you can start cleaning; water and baking soda must be removed from the surface of the stove using a soft sponge.
In no case should steel wool be used when cleaning the stove and oven, as they can cause damage to the surface, but it is better to use a sponge and a toothbrush or cotton swabs, but this is in the most difficult to reach places.
To clean the grate on a gas stove, you must use the soap solution described above. Citric acid or juice and vinegar are also excellent auxiliaries. They can be used in place or separately. Ammonia and vinegar can remove dried and burnt-on stains on the surface of a kitchen gas stove.
All gas stoves are equipped with removable handles.
The main thing here is not to rush, but to act carefully, without rushing and without breaking the plastic.
Stoves from different manufacturers certainly differ from each other. However, as experience shows, most design solutions from different manufacturers are VERY, VERY similar.
Before starting work, turn off the gas supply using the shut-off valve.
Gas stove Hephaestus, Indesit, Electrolux, Darina (knobs that need to be pressed and turned when igniting).
Just pull it towards you, along with the ring on which the symbols are drawn.
If you have any difficulties, try treating it with WD-40. Then, inserting one knife into the gap between the ring and the handle itself, bend it a little. And on the opposite side, use a second knife, acting as a lever.
If it doesn’t go through the cloth, use pliers carefully.
Then soak the hands in water with the addition of fairy. After a while, the fat will turn white and be wiped off with a toothbrush.
How to lubricate the tight rotating mechanisms of the crane?
Factory lubrication of the faucet is designed to last approximately five years. In Soviet times, gas workers used graphite lubricant (called NK-50), LG-Gaz41, LS-1P.
Graphite (crushed carbon), which forms the basis of the lubricant, is able to fill microscopic irregularities in parts, while reducing friction.
It has great refractoriness and does not dry out for a long time.
You can use solid oil or technical petroleum jelly.
Tips for repairing gas stoves with your own hands
How to set up an electronic gas stove programmer
We have already described above how to set the time on a gas programmer. You can also program the duration of operation of any of the burners. Press the button and select the desired one (the indicator will flash), use the buttons to set the desired time, for example, 10 minutes. After a few seconds, the burner indicator will go out and the current time will return, and the programmer will begin counting down. After the set time has elapsed, the gas supply to the burner will stop and a short beep will sound. To cancel the timer, you need to set the time on the desired burner to 0:00.
For the oven, you can program the cooking time only for the bottom burner of the oven, not for the grill. All settings are made in exactly the same way, you just need to select the oven burner.
The maximum time for which you can program the operation of the hob and oven burners is 3 hours!
The alarm timer works regardless of whether you are using the stove. You need to select the appropriate button and set the time; after it expires, a sound signal will sound and the indicator will go out. All this time, the current time of day is displayed on the display, and you can find out how much time is left until the end by pressing the button.
What do we need?
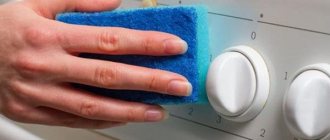
The process of cleaning a flat horizontal or vertical surface, as a rule, does not cause difficulties, but removing dirt from the handles of the stove, which have a complex shape and relief, is quite difficult.
Therefore, in order to remove grease deposits from the most difficult to reach places and completely clean the regulators, prepare the following before starting work:
- cleaning agent;
- cotton swabs, cotton pads, gauze cloth;
- toothpicks;
- an old toothbrush;
- sponge and soft, clean cloth.
Folk remedies
There are many grandmother's remedies that can be prepared at home from the most ordinary materials. They can always be found in almost every home.
Lemon juice
After processing this method, a pleasant lemon aroma will remain in the kitchen. We work with the use of this representative of citrus crops in the following sequence:
- We take one lemon, squeeze the juice out of it, then take a toothbrush (which we will no longer use to clean our teeth) and, dipping as necessary, clean our hands in a circular motion.
- If after this the dirt remains, additionally take baking soda and alternately dip it in juice and then in soda and clean off the remains.
- Afterwards, wash with a damp cloth or sponge and rub with a dry towel.
Vinegar will get rid of odors and remove dangerous bacteria.
If the handles are removable, add a solution of equal proportions of water and vinegar in a saucepan, carefully remove the handles from the stove, lower them into the diluted liquid and put them on medium heat, bring to a boil and boil for 6-8 minutes. Then remove, cool and rub with a towel until dry. We install it in place.
If the handles are not removable, then in a spray bottle you need to dilute the composition of one part vinegar plus one part water, spray the handles generously, wait a while, and then wipe them with a clean, dry towel or paper napkin.
Laundry soap
For removable regulators, the following method is suitable:
- take a basin or large saucepan (the main thing is that everything fits there);
- rub laundry soap on a coarse grater into our container, fill it with hot water (about 80 degrees);
- stir until the soap dissolves (dishwashing detergent, washing powder);
- carefully lower our hands into the resulting solution and hold for 20-30 minutes (depending on the degree of contamination);
- then, after the time has passed, we find an unnecessary toothbrush and carefully clean the regulators on all sides and rinse with water.
After such cleaning, the removable regulators will again sparkle like new.
This solution can also be used for handles that are not removable. To do this, use the non-soft side of the sponge, after applying the solution to it, and thoroughly rub the stained areas. And then remove the residue with a rag or paper towel.
Ammonia
This drug will help remove very strong and old stains if you work in the following sequence:
- dilute one part of water with one part of ammonia;
- dip a gauze swab and apply the product to the surface; We treat hard-to-reach places with a cotton swab and toothpick;
- wait a few seconds and wash off any remaining dirt with a clean, damp cloth.
Recommendations for cleaning stove handles
Methods for cleaning the handles of gas and electric stoves directly depend on their model. In fact, all old stoves and the vast majority of new ones have handles that can be removed, which completely separate the individual parts from the body. These handles are much easier to clean than non-removable ones.
Non-removable ones include those turntables that are quite difficult or cannot be separated from the stove body at all. In most cases, similar cleaning products are used for them, but the way they are used is fundamentally different.
Cleaning Removable Stove Adjusters
When the toggle switches are separated from the stove body, they can be soaked in a previously prepared solution.
There are several productive recipes for cleaning turntables made of any material, be it plastic or metal.
- Citric acid solution. Dissolve 1-2 tablespoons of citric acid in a small container with warm water and stir. You can clean your handles with this option in 20–30 minutes. After time, the remaining dirt is washed off with a slightly damp cloth, the handles are washed under tap water and dried.
- Vinegar, pharmaceutical alcohol, hydrogen peroxide. Instead of citric acid, you can add a few tablespoons of acid or alcohol to the water - they have similar characteristics.
- Soap. A bar of laundry or toilet soap grated on a coarse grater is added to hot water. Instead, you can supplement them with dishwashing detergent, which is an excellent grease dissolver. The dirtier the switches that will be removed from the stove, the thicker and hotter the solution must be.
Fixed stove regulators and their cleaning
It is much more difficult to work with non-removable toggle switches - cleaning the handles on the stove will only be possible on the spot.
Toothpicks and cotton swabs will also come in handy here, as well as cotton swabs, paper napkins and clean rags. They can be soaked in the solutions mentioned above. Gas valves are wiped directly on the work surface, large stains are removed with cotton pads and rags, and grease and food residues are removed from places that are difficult to reach with toothpicks and chopsticks.
Sensor-based panel
This type of control is very common in modern stoves - mechanical handles are gradually becoming a thing of the past, giving way to today's technologies.
Despite the complexity of this electrical solution, cleaning the panel is very simple. In most cases, it is a flat, smooth panel made of stalinite. You can wipe off stains of various origins from it with the same alcohol, vinegar or citric acid solution using a cotton swab or cloth.
If grandma’s products do not allow you to clean dirty handles that are firmly stuck to the panel, you need to turn to more serious products or prepare a miracle mixture to clean the stove.
Features of cleaning stationary handles
Using tools on a plastic or wooden base will prevent you from scratching the working surface of the stove.
The following methods can be used for cleaning:
- Household chemicals. Depending on the type of cleaning product chosen, you must act strictly according to the instructions indicated on the packaging.
- Laundry soap. You should rub the head of the toothbrush with a damp piece of laundry soap, then clean the handles until soapy foam is created. This method allows you to remove dirt and give the surface of the thermostats a great look.
- A solution of vinegar and water. Using this method, it is necessary to strictly observe the proportions: mix one part of vinegar with four parts of water. It is necessary to clean the handles with this solution while wearing gloves and using cotton swabs. This solution removes not only dirt, but also old fat.
- Lemon juice or citric acid. Apply the concentrated solution to the surface and after 5 minutes, remove with a clean rag.
But by regularly using the above methods, you can avoid global contamination of your pens.
Design and principle of operation
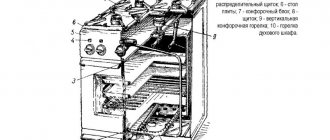
The design of a gas stove from any manufacturer is not much different, with the exception of some features. The oven includes several systems, the operation of which is interconnected:
- Frame. Made of enameled steel, the body is durable and resistant to aggressive influences.
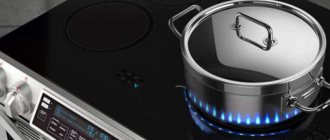
- Working surface. Usually coated with enamel with super-heat-resistant properties. Expensive models contain a stainless steel coating. On top there is an enameled steel or cast iron grate that protects the burners and the entire surface of the stove.
- Burners. The quantity ranges from 2 to 4 pieces depending on the model. Material - from ceramics to aluminum, different sizes. They release gas needed for cooking.
- Oven. Most models of gas stoves have it. Located under the work surface, it occupies a significant part of the entire device. Designed for heat treatment of products: baking, drying, etc.
- Gas equipment. Consists of distribution pipelines, shut-off valves, burners and burners.
- Automatic ignition system. This button, located on the front panel of the case, is needed to ignite the burners, and in some models, also for the grill, without the help of matches or lighters. Allows you to turn on the lighting in the oven.
- Gas supply, control and monitoring module. Has a built-in timer, thermometer, processor, and other devices.
The principle of operation of a gas stove is to use natural gas for heating the home and cooking:
- Gas enters the stove through a tube connected to the supply source. When the substance is supplied from a pressurized cylinder, propane is used as fuel.
- After passing through the burner, the gas reacts with air, turns into a gas-air mixture, which reaches the perforated part of the burner in the upper part, escapes through the dividers and ignites. Cookware placed on the wire rack becomes hot.
- The gas flow is regulated by switches located on the panel.
If the design of the stove is made with high quality, complete combustion of the gas occurs.
Instructions for removing the handle
Since most modern cookers have removable power controls, they can be easily removed for cleaning. But, if this has not been done before, then rough oiling can create certain difficulties. Despite this, the cleaning operation is still worth carrying out.
It is important not to forget that the stove is a gas-using equipment, during the operation and maintenance of which it is important to comply with fire safety rules. Therefore, before starting to work with the stove, it is necessary to turn off the gas supply, since any manipulations are considered flammable
Stage #1 - selection of necessary tools
To carry out the work you need to prepare the following:
- gloves;
- gas key;
- pliers;
- screwdriver;
- knife;
- rags;
- water and detergent.
According to safety requirements, work must be carried out with rubber gloves.
A gas wrench, pliers and a screwdriver will be needed to remove the gas stove handle, while a toothbrush and detergent will be needed to clear clogged areas. It is worth remembering that different models of gas stoves have different methods for removing handles.
What do you need to remove the handles?
Removing the handles is a simple task that even a young housewife can handle. Before you get started, you need to prepare various tools. With their help, it will be easier to achieve a positive result without spending a lot of free time on it.
- kitchen knife with a pointed end;
- pliers;
- a set of screwdrivers of different shapes and sizes.
If there is a lot of fat: how to wash a gas stove
For the highest quality cleaning and removal of all contaminants, it is necessary to carry out preliminary preparation.
Sprinkle baking soda onto a damp surface in an even layer and let it sit for 30-40 minutes. This method is not complicated and makes it possible to clean the stove and oven. The oven can also be cleaned this way.
If there is too much grease, then it is better to apply a cleaning agent on it and leave it for a while, and then wipe it off
After waiting time, you can start cleaning; water and baking soda must be removed from the surface of the stove using a soft sponge.
In no case should steel wool be used when cleaning the stove and oven, as they can cause damage to the surface, but it is better to use a sponge and a toothbrush or cotton swabs, but this is in the most difficult to reach places.
To clean the grate on a gas stove, you must use the soap solution described above. Citric acid or juice and vinegar are also excellent auxiliaries. They can be used in place or separately. Ammonia and vinegar can remove dried and burnt-on stains on the surface of a kitchen gas stove.
How to clean the Gorenje stove
To wash the front panel, liquid non-abrasive cleaning agents and a soft cloth are used; there are special kits for each type of surface - enamel, glass ceramics, stainless steel. If you purchased a model from the design collection, then find out which product is best to clean the fittings (copper, platinum coating or aluminum) so that it does not lose its original appearance.
When washing the lid, do not use acidic liquids to prevent the metal edging from becoming dull. The glass lid can be washed with your usual cleaning product.
It is recommended to clean the glass ceramic hob only when it has cooled down. Do not use abrasives, sponges that you used to wash dishes, or steel wool. If you want to preserve the appearance of the surface for a long time, use special products that create a dirt-proof film and clean the glass ceramics every time after use. Except for those cases when you need to quickly remove dirt so that it doesn't burn.
This is especially important if you spilled sugar or spilled sweet compote, jelly or jam. First use a soft damp cloth, and if that doesn't work, use a special scraper, holding it at an angle of 45° to 60° and pressing lightly. Make sure that the plastic handle does not touch the hot glass.
Water stains can be removed with a weak vinegar solution, but do not wipe metal frames with it.
Using aluminum or copper cookware may leave stains that are difficult to remove. This does not affect the operation of the device and damage of this type is not covered by the warranty.
You can clean the oven simply with water and soapy water or a special spray for stubborn stains. Electric models in most cases are equipped with the AquaClean function. You need to pour half a liter of water into a deep baking tray and place it on the lower level. Turn on the steam cleaning mode, then after half an hour wipe all softened dirt with a damp cloth.
The inner surface of the ovens in the Combustion stoves is covered with very resistant non-porous pyrolytic enamel SilverMatte, which is easily cleaned and is not subject to scratches and chips, but still do not rub it with hard, especially metal, sponges; use special detergents.
Do not clean the thermostat and upper heating elements with chemicals, only with a damp cloth. To clean the upper heaters, you must first unplug the appliance from the power supply, then remove the baking trays and wire rack. Pull the heaters towards you, then the cross clamp will pop out of the slots on the left and right. Then push the entire structure back until the holder is secured in the recesses.
Many people are interested in how to clean the thermocouple in a gas stove. Sometimes the electric ignition stops working if the burner is flooded or a greasy coating has formed on the electric ignition plug. The burner can be removed and wiped with a damp and then dry cloth. Clean the thermocouple and spark plug with a soft toothbrush. Before assembling, you need to dry the burner thoroughly, and then try to light the gas for the first time with a match. When the thermocouple warms up, the electric ignition will start working again.
Important! If cleaning does not help, do not try to fix the problem yourself. Contact the service center.
Clean the rubber oven seal after each use using hand washing liquid and a soft cloth, and wipe it dry. Removable guides can be removed for hand washing or dishwasher cleaning. You need to lift them from below to remove them from their nests.
Cleaning and prevention
It is better to prevent any malfunction than to eliminate it. By observing the operating conditions of the gas stove, you will extend its service life, avoiding unforeseen repairs. Preventative care and cleaning:
- Clean the surface of the stove from food debris after each cooking, waiting until the panel has cooled down.
- Do not leave the stove turned on unattended, as boiling liquid from the containers floods the flame of the burners, which leads to premature wear of the auto-ignition and gas control systems.
- Do not forget to lubricate the rubbing surfaces of the adjustment knobs.
- Cleaning of burners, jets, connections of regulators and switches is done with a needle or thin wire; metal brushes and brushes are also suitable.
- Maintenance is carried out periodically. To do this, the protective panel is dismantled, the studs are removed, the rods are pulled out, the parts are cleaned and inspected for mechanical damage and signs of wear. Contacting and mating elements are lubricated with graphite lubricant.
Repairing a gas stove seems like a difficult task. Armed with the necessary tools and troubleshooting instructions, you can repair your home appliances yourself and save a significant amount.
Overview of common faults
If you do not systematically clean the device, there is a high probability of the following problems occurring:
- Difficulty turning the handle . In such a situation, it is worth remembering one rule: using force will only damage the handle. This problem occurs when foreign objects get into the slot between the body and the plug or when a significant amount of dirt accumulates. You can fix the problem by disassembling and cleaning the handle of the gas stove.
- Gas does not flow well into the burner . Even if the knob is turned to maximum, there is a weak fire coming out. The probable cause is that the nozzle holes are clogged with food waste or combustion products. You can fix this problem yourself. To clean you need to use a toothpick. It is also necessary to unscrew the nozzle and wash it with soapy water. Never use metal objects, as even a small scratch can cause a gas leak. But to replace the jet it is better to invite a specialist.
- The tap is difficult to turn . This problem occurs when the graphite grease on the faucet plug is erased and the rotary rod is contaminated. To eliminate it, you need to completely flush the stove tap. To perform this operation, it is better to call a specialist, since it will be necessary to disassemble the front part of the gas stove and unscrew the faucet body, removing the spring and plug from it.
- Rotate the handle 360 degrees . This problem often occurs when using a gas stove for a long time. The reason may be the breakdown of the handle seat. For repairs, you need to purchase and install another handle.
These problems can be eliminated on your own, but if you are not confident in achieving the result on your own, you should call a specialist.
All these difficulties in operation, as well as breakdowns, occur if the gas stove is not maintained. In order not to call a technician to troubleshoot problems, you should take better care of your equipment and perform its maintenance in a timely manner.
If you discover a gas leak or a breakdown of the gas stove, you should immediately call a technician from the gas company with which you have an agreement.
How to remove handles from a Hephaestus gas stove
Any Hephaestus gas stove has removable regulators. But it all depends on the care of the stove. If you wipe your assistant with a damp sponge after each use, then you will not be afraid of severe contamination. Naturally, with such care of the stove, the regulators will not become covered in grease and can be easily removed if necessary.
For example, removing regulators from gas stoves Hephaestus, Hans and Indesit will not be difficult for you. To do this, you just need to pull the regulator along with the circles towards you.
It will not be difficult for you to clean the regulators from contamination at home. Cleaning the handles of the stove only at first glance seems like a difficult and painstaking job. And if you know how to do it correctly, then it will generally turn into a joy, and the stove will be completely clean, it’s cozy and comfortable.