How does a refrigerator work and what place does a compressor occupy in it?
The principle of operation itself can be divided into two main stages:
- At the first stage, freon gas, finding itself in a low-pressure chamber (evaporator), undergoes an evaporation process, due to which it removes heat from the environment.
- When it finds itself in a high-pressure chamber (condenser), on the contrary, it condenses and releases heat.
It is the compressor that provides a closed cycle of the working process, based on the principle of heat transfer with the formation of negative temperatures inside the refrigeration chamber. For correct operation of the equipment, the evaporator is located in the internal structure of the refrigerator, while the condenser is led to the outside. It is this arrangement of the elements that make up the main part of the device that allows it to operate in the desired mode and ensure the circulation of the refrigerant. In order to ensure full operation in the required mode, there is also a throttle or so-called thermostatic valve (capillary), which provides a pressure difference in the two above chambers.
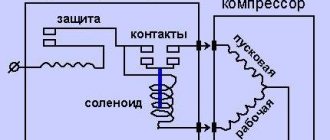
A visual diagram of the operation of a refrigerator compressor.
Pressure check
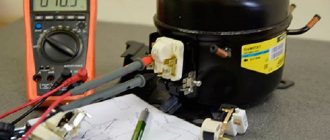
You can check the functionality of the refrigerator compressor with a pressure gauge, which measures the gas pressure created by the unit. Testing is carried out before draining the refrigerant and removing the unit from the refrigeration machine. For measurement, a special pressure gauge with a threaded bushing is used, which is screwed onto the discharge channel. On a working unit, after turning on the power, the pressure reaches 6 atmospheres or higher. If there is no pressure, pulsation or a low value, it is necessary to check the condition of the main pipelines and the unit housing.
Low pressure may be caused by damage to the piston or working cylinder installed inside the compressor housing. It is possible to disassemble the unit by first dismantling the unit. The metal casing is cut with a grinding wheel or a hacksaw; you should be careful when carrying out the work, since there is oil inside the casing. Damaged components are replaced with similar parts taken from another compressor. The cavity of the device is washed to remove any remaining chips and oil, and then the halves are joined by welding.
Operating principle and design of the motor
The operation of a refrigerator of any model (Atlant, Indesit, Stinol) is generally the same. It is based on the circulation of refrigerant (freon) in the system. Initially, the refrigerant is a gas, the pressure created by the compressor causes it to enter the condenser. There the gas cools, turns into liquid and flows into the evaporator. When heated, the liquid returns to its primary state and repeats the cycle.
Therefore, if there are problems with the operation of the compressor, it will not create pressure or there will be insufficient pressure for normal operation.
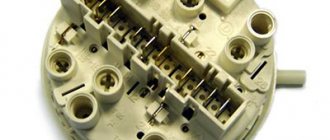
The degree of cooling - the temperature in the chamber - is regulated by a thermostat. From it the signal goes to the motor start relay, which starts the whole process.
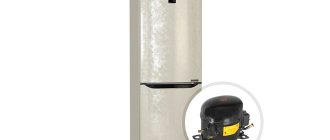
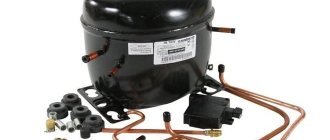
A motor-compressor is located on the rear side of the unit housing. It is fixed in a special oil and covered with a protective casing, which you can see in the picture.
The electric motor consists of a starting and operating winding, as well as a relay.
Three terminals are connected to the case, one of which is common. The other two lead to the start and run windings. The latest models of refrigerators are equipped with an electrical circuit that can regulate the speed of the engine.
resistance of the ATLANT refrigerator motor windings
| compressor marking | Working winding resistance in Ohms | Starting winding resistance in Ohms |
| S-K 100N5 | 18,94 | 27,88 |
| S-K 100N5-02 | 18,94 | 27,88 |
| S-K 100N5-10 | 17,61 | 27,88 |
| S-K 120N5 | 18,29 | 21,08 |
| S-K 120N5-02 | 18,29 | 21,08 |
| S-K 140N5 | 15,1 | 20,1 |
| S-K 140N5-02 | 15,1 | 20,1 |
| S-K 160N5-02 | 14,74 | 19,6 |
| S-K 160N5-1 | 14,74 | 19,6 |
| S-K 160N5-1-02 | 14,74 | 19,6 |
| S-K 175N5-02 | 14,29 | 19,08 |
| S-K 175N5-1 | 14,29 | 19,08 |
| S-K 175N5-1-02 | 14,29 | 19,08 |
| S-K 200N5-02 | 11,87 | 17,61 |
| S-K 200N5-1 | 11,87 | 17,61 |
| S-K 200N5-1-02 | 11,87 | 17,61 |
| S-KO 60N5-02 | 40,4 | 63,47 |
| S-KO 75N5-02 | 26,4 | 43,41 |
| S-KO 100N5-02 | 27,88 | 48,94 |
| S-KO 120N5-02 | 18,29 | 21,08 |
| S-KO 140N5-02 | 15,1 | 20,1 |
| S-KO 140N5-1-02 | 15,1 | 20,1 |
| S-KO 160N5-02 | 14,74 | 19,6 |
| S-KO 160N5-1-02 | 14,74 | 19,6 |
| S-KO 175N5-02 | 14,29 | 19,08 |
| S-KO 175N5-1-02 | 14,29 | 19,08 |
| S-KO 200N5-02 | 11,87 | 17,61 |
| S-KO 200N5-1-02 | 11,87 | 17,61 |
| S-KO 200N5-03 | 11,87 | 17,61 |
| S-KN 60N5-02 | 23 | 35 |
| S-KN 80N5-02 | 23 | 35 |
| S-KN 90N5-02 | 18,94 | 27,88 |
| S-KN 110N5-02 | 18,29 | 21,08 |
| S-KN 130N5-02 | 18,29 | 21,08 |
| S-KN 150N5-02 | 15,1 | 20,1 |
| CKHA61H50 | 43.35 | 43,25 |
| CKHA68H50 | 33,41 | 37,58 |
| CKHA72H50 | 28,35 | 34,98 |
| CKHA81H50 | 28,65 | 34,47 |
| CKHA96H50 | 26,33 | 35,72 |
| CKHA101H50 | 19 | 21,2 |
| TLX4 KK.3 | 61 | 19 |
| TLX4.8 KK.3 | 46 | 22 |
| TLX5.7 KK.3 | 37 | 21 |
| TLX6.5 KK.3 | 30.00 | 15 |
| TLX7.5 KK.3 | 29 | 30 |
| TLX8.7 KK.3 | 19 | 13 |
| TLY4 KK.3 | 48,06 | 15,69 |
| TLY4.8 KK.3 | 38,25 | 17,65 |
| TLY5.7 KK.3 | 34,33 | 20,6 |
| TLY6.5 KK.3 | 2775,00% | 24,62 |
| TLY7.5 KK.3 | 23,24 | 20,69 |
| TLY8.7 KK.3 | 17,06 | 14,42 |
Types of compressors in refrigerators
Most often, piston-based compressors with bypass valves are used in everyday life, drawing in gas during discharge through one valve and pushing it out after compression through another. A conventional compressor, with a crank converting the rotation of the motor shaft into piston movement, is called a manifold compressor. Such units are installed on budget models. They are noisy and get very hot due to the large number of moving parts in the compressor.
Linear compressors have a compression chamber with a piston. The crankshaft is excluded from the system. The piston operates directly from the solenoid, converting alternating current into mechanical energy of the piston movement. Models in the mid-price segment are equipped with linear motors. The energy efficiency of compressors is higher; they belong to class A. Starting and stopping equipment according to the instructions of the thermostat is less noisy.
Inverter compressors are equipment for continuous operation with variable capacity to maintain the mode in the chambers. Quiet operation, high efficiency, and reliability of the entire system are a consequence of installing an electronic converter in a brushless motor. The incoming current with a frequency of 50 Hz is rectified and converted into alternating current of the desired frequency. This provides variable rotation speed. High cost and dependence on stable parameters on the power line are obstacles to introducing new products into all models.
All motor-compressors have a complex structure, hermetically pressed into the housing. Internal failures lead to replacement of the entire assembly. External components include a starting and temperature relay, frame mounting, and gaskets.
Where is the compressor located in the refrigerator?
This unit is located at the rear of the device in its lower part. The compressor refers to the main part through which the refrigerant circulates in the thermal system. Depending on the purpose, two units can be installed in the refrigerator. The compressor is driven by a motor. Modern improved models of devices are equipped with piston compressors, with an engine installed inside them.
Piston devices are less likely to break down because they eliminate the loss of refrigerant.
Compressor device
The compressors of many household refrigerators are very similar to each other.
The operating principle is as follows. Freon in the gaseous state is heated as a result of compression, and cooled with the help of a condenser. turns into a liquid state and cools the surrounding space. Then the freon goes through the capillary expander to repeat the cycle. The key to high-quality operation of the refrigerator is the constant movement of freon through this cycle. This is why the compressor is often called the heart of the refrigerator.
The compressor includes: a piston electric motor with a valve system, a working winding, a starting winding and a relay. The piston electric motor runs on alternating current. The compressor has three outputs: from the starting winding, from the working winding and a common output. These three outlets are located at the bottom of the compressor in a triangle shape. These contacts are connected to a relay that turns on the electric motor.
Refrigerator compressor connection diagram
A specialist and a user who services his device himself should know it. This will help determine the suitability of the motor for operation. However, only a master can determine the reason for the breakdown.
Pinout
There are 3 pins on the motor housing, the pinout of which is indicated by letters:
- C – general output;
- S – starting winding terminal;
- M or R – working winding terminal.
The tester must be connected to the terminals one by one. First, the resistance of the starting and operating windings is measured. The resulting values are added up and then compared with the resistance between the two windings. It is measured with a tester. If the compressor is working properly, then these values will be the same. Slight deviation is allowed.
Checking the starting-protective relays of the refrigerator
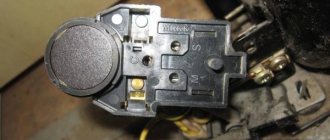
Start-protective relays look like this:
Electromagnetic relay
Relay with posistor
The round black “pill” with terminals is a thermal relay that is closed at normal temperatures and opens only when very hot. It is checked with an ohmmeter - the resistance should tend to zero, or in the “continuity” mode - there should be a sound signal when the probes are applied to the terminals.
The same applies to the posistor - in the normal state it is closed. It is usually located inside the relay, between terminals S and R of the compressor. (In the picture above, these are terminals on a white base).
When is verification necessary?
If the cold blower breaks, the equipment stops working. You need to call a specialist at home or call a service center. However, the opportunity is not always there. Not all people know how to check the health of a refrigerator compressor. To cope with the task, you should arm yourself with some knowledge.
Checking the device is necessary if:
- new equipment has been purchased, you need to make sure it is working;
- a used refrigerator is purchased and diagnostics are required;
- it is necessary to identify the cause of the failure.
Dismantling and replacing the compressor
If a problem is detected, the part should be replaced. To do this, you can use the services of a specialist or arrange all the repair work yourself. This is done when the winding becomes unusable or any other component breaks down.
We hope that there are no dark spots or uncertainties left for you in the question of how to check the refrigerator compressor.
It is also necessary to fill the compressor with oil after repair work. This is a necessary condition for the normal operation of bearings and to prevent rapid wear of parts as a result of friction.
Even if you are not able to completely eliminate all the breakdowns yourself, you will receive accurate information about the faulty parts.
All the steps described above will help you replace the compressor in the refrigerator yourself. But if for some reason some points remain unclear, then you can use the video presented, where all the manipulations are discussed in detail.
Everything you need to check your compressor
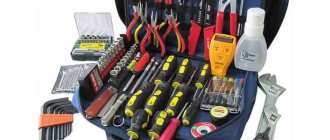
How to check whether the refrigerator compressor is working or not? To answer this question, we will first have to prepare the following set of instruments and tools:
- a set of screwdrivers with different profiles or a screwdriver with a set of attachments;
- wrenches with nominal values of 8, 10 and 12 mm (corresponding screwdriver attachments);
- side cutters, pliers;
- universal type laboratory pressure gauge;
- megohmmeter, multimeter (tester);
- 2-3 conductor jumpers with alligator clips;
- electrical tape, rubber or vinyl plugs;
- personal protective equipment when working with hazardous substances.
Compressor dismantling
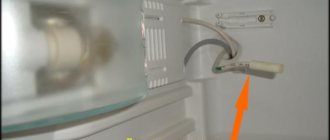
To remove the compressor from the refrigerator, you will need wrenches (or sockets), a screwdriver and a blowtorch (needed to disconnect the metal pipes for freon circulation). The user wipes the surface of the motor from dust and dirt deposits; on the top of the housing there is a plastic tray for draining condensate. The reservoir is secured with latches that can be released with a screwdriver.
Before dismantling begins, the gas must be pumped out or released into the atmosphere. To release gas, a special bent, plugged tube is used, located on the side of the product body. The metal pipeline is cut with wire cutters; it is allowed to make a notch at the point where the tube connects to the heat exchanger. It is recommended to carry out work outdoors or in a ventilated area; the use of open fire is prohibited.
After the gas is released into the atmosphere (the hissing stops), it is necessary to wipe the housing from traces of oil (which is thrown out along with the freon). The user then unscrews the 4 mounting screws or nuts (the type of mounting parts depends on the manufacturer of the refrigerator) and removes the power supply.
The design of the supports uses rubber dampers and metal pressure washers; the components are collected in separate containers.
Then, using a blowtorch, the tubes are separated, after which the compressor can be removed from the rear niche of the refrigerator. It is not recommended to turn the unit body over, since there is a supply of oil inside, which will leak out through the open tubes.
What to check first
There may be several reasons why the above-described operational disturbances may occur. If you have at least minimal knowledge of the structure of household appliances, you can identify the breakdown yourself. Professionals advise sticking to the following operating algorithm, but here you need to take into account the type of thermostat.
For devices with a mechanical thermostat, there are 3 possible causes of failure:
- damage to the start relay;
- thermostat failure;
- Compressor malfunction.
The order in which all the listed details should be checked is not very important. You can start with the node that is most accessible. This rule applies to those devices that stand against a wall or in a niche.
The thermostat should be checked after turning off the device. All those parts that may interfere with the inspection are removed. First of all, these are lampshades and covers.
The next stage is connecting the wires to each other (those that go to the contacts). In this case, the ground wire should not be touched (most often it can be recognized by the green winding). The types of thermostats located in the lighting shade also have a blue wire, which is also not used. After completing this work, the device is connected to the mains. If startup occurs, then the problem lies in the thermostat. If there are no changes, then proceed to checking other elements.
If the refrigerator has an electronic thermostat, then it can be classified as a more complex device. To identify faults, it may be necessary to check the entire module electrically. This kind of work should be entrusted to a specialist.
However, some details can be checked on your own. This is the presence of burnt out elements, the absence of damage to the cable, as well as the strength of the contacts. All these manipulations are carried out only after disconnecting the device from the electrical network.
If a breakdown has not been detected and the equipment does not want to start, then you should proceed to checking the start relay.
In this case, the refrigerator will have to be moved away. In addition, some models are equipped with a partition that completely covers the engine compartment - this must be removed. In most models, the relay is located on the left. After opening the lid you can get to the inside. If no external damage is observed, the connections are removed from the contacts and checked using a multimeter. The problem may lie in the compressor winding.
Functionality check
For what reasons does the compressor stop working:
- Burnt out. This happens as a result of a sharp surge in voltage and increased load.
- The start protection relay is broken.
- Wiring faulty.
It happens that the device hums and works, but there is no cold in the chambers. The reason may be the release of freon gas. Then it is better to contact a specialist who will detect the leak and refill the system.
To find out whether the device is working or not, use a multimeter. Once you get to the motor, you need to make sure that the housing does not break through, otherwise it may cause an electric shock. This most often happens in old refrigerators. Attach the multimeter probes to the body and each contact in turn. If the display shows “∞”, then everything is in order. If numbers appear on the display, the winding is faulty.
To perform further diagnostics, you need to remove the casing and open access to the compressor. For this:
- Disconnect the wiring from the contacts.
- Cut through the motor tubes that connect it to other parts.
Important! Before you begin, find out what type of refrigerant your refrigerator uses. This gas may be explosive.
- Unscrew the casing mounting bolts and remove from the housing.
- Disconnect the relay by removing the screws.
- Now take a tester and measure the resistance between the contacts.
- Apply test leads to the right and left output terminals. Normally the resistance will be 30 ohms. The top right will show 15 ohms, and the top left will show 20 ohms.
Based on the motor model and the refrigerator itself, the values may differ ± 5 ohms.
- If the readings do not match, the device is faulty. If a break appears somewhere, the conventional or inverter motor must be replaced or repaired.
The compressor passed the test, but the equipment does not work? So, proceed to further tests, but not with a tester, but with a pressure gauge.
- You need to measure your blood pressure.
- Connect a hose with an outlet to the discharge fitting.
- Start the engine.
- Measure your blood pressure.
- The readings with a working device should be 6 atm and rising. In this case, you need to quickly turn off the pressure gauge, otherwise it will break.
- If the pressure does not reach 6 Atm, such an engine can be installed in medium-sized refrigerators. The readings reach 4-5 atm, which means the motor can be used in single-chamber refrigerators. A compressor with a pressure of less than 4 atm is inoperative.
The serviceability check has been passed, but there is no result. The unit still does not turn on. In this case, you can establish the operability of the motor by connecting directly, without a starting relay.
Important! Such work is life-threatening. Such diagnostics can be carried out either by a master or an experienced person.
Connect the motor via a cord according to the diagram:
As a last resort, you can check whether the motor is working via a relay. Perhaps the current is not reaching the device.
- Before this, diagnostics were carried out without a relay, now connect it to the motor.
- Run.
- Arm yourself with a clamp tester.
- Use pliers to press the power cord that leads to the device.
- Look at the indicators: with a power of 140 W, the current should be 1.3 A. With a power of 120 V - 1.1–1.2 A.
Additionally, diagnose the start relay. Its contacts are also measured with a multimeter.
Now you know how to check the motor-compressor with your own hands. To be more convincing, watch the diagnostic video:
Disconnect all pipes from the compressor
To disconnect the tubes leading from the compressor to other elements of the system, use wire cutters. If you are not confident in your skills, call a specialist. A refrigerator repair technician will do the dismantling quickly and safely.
Removing Refrigerator Compressor Connections
After cutting the line, the refrigerant can quickly escape to the outside. Since this component is explosive, do not use electrical appliances at this time, turn off the gas and ensure the room is ventilated
Remove the compressor from the base
After the main part of the freon has evaporated, you can continue working with the equipment. All that remains is to separate the remaining pipes with a burner. The freon that burns out is not dangerous. To remove the compressor, simply unscrew the mounting bolts.
We remove the remains of pipes using a torch
Remove the start relay
Before checking whether the refrigerator compressor is working, you need to disconnect the start relay. This element hides contacts required for the following processes. To avoid damaging the start-up relays for refrigerators, use a screwdriver. The design of the mechanism is similar to a regular electrical plug with three prongs instead of two.
Refrigerator start relay
Melted relay contacts indicate a compressor malfunction
Strip off the paint on the surfaces being tested
Before checking the refrigerator compressor with a multimeter, make sure that there is no paint on the surface areas being tested. To determine the level of resistance between the three contacts and the housing, the metal must be clean. If there is any coating, carefully scrape it off with a file.
Check the winding with a multimeter
Resistance measurement is performed with a tester. The output indicators should be as follows:
- Between a pair of horizontal ones - 30 Ohms.
- Between the lower and upper left - 20 Ohms.
- Between the lower and upper right - 15 Ohms.
Before checking the refrigerator compressor windings, check the parameters allowed for your appliance, as they may differ depending on the brand and model.
Checking the compressor winding with a multimeter
If the resistance readings do not exceed 8-10 Ohms, most likely there is an interturn short circuit in the windings. The lower this level, the greater the likelihood of damage.
Check the operating line for a break
To identify the presence of a break, you need to determine what resistance is formed between the contacts of the passage and the equipment. To do this, connect the multimeter to:
- A section of copper on the fitting.
- Pass-through wires.
Checking the compressor resistance level with a multimeter
If the equipment is working correctly, the break data will be displayed on the screen. The presence of resistance indicates serious malfunctions.
Check the compressor with a pressure gauge
If during the previous check you did not find any damage, but the refrigerator still does not work correctly or does not start, use a pressure gauge. This device measures pressure levels. To do this you need:
- Connect the outlet pipe to the discharge fitting.
- Record the readings with the compressor turned on.
The minimum mark should reach six atmospheres. If the number increases, the refrigerator is working correctly.
Checking the compressor pressure using a pressure gauge
Check the current
You can identify problems with current flow in the same way as checking a refrigerator compressor relay, only now you need to use a tested, working part. To do this you will need:
- Connect the relay to the compressor.
- Turn on the system.
- Use the tester's pliers to grab the power cable.
With an electric motor power of 140 W, the acceptable value is 1.3A. These values are directly proportional. Accordingly, when the motor power is reduced, the current should be less. So for a 120 W electric motor, the normal figure will be 1.1-1.2A.
These are the most effective methods for checking the operation of a refrigerator compressor without involving a technician. If you still have questions, you can ask our specialists by calling. If necessary, we will also select components for you to replace faulty ones, including relays, compressors, heating elements for defrosting refrigerators and much more. Contact us any time!
We check the refrigerator compressor: resistance, relay, pressure check
The first necessary action when working with a compressor is to check the housing for breakdown . If there is one, you can feel a noticeable electric shock. This often happens when working with old refrigerators. So it is better if your hand is wearing a protective glove.
Electrical leakage can be determined by measuring the resistance between the contacts and the housing. The paint on the body will have to be cleaned to ensure electrical conductivity, or at least the slightest unpainted area will have to be found.
The device indicator in ohmmeter mode should show the “infinity” sign. In other words, there should not be any numbers. If the indicator displays any numerical value, this indicates the presence of a breakdown. In any case, the compressor needs to be repaired or completely replaced.
Moving from simple to complex, we check the starting relay for liquidity. The principle of operation of this unit is electromechanical (in new models - electronic) frequency conversion of the electric current to excite the starting winding of the engine.
An effective way to check would be to remove the relay from the circuit and briefly supply electricity directly to the terminals of the working winding. If rotation of the rotor is noticed, then it is quite obvious that the starting relay needs to be replaced.
The lack of results when connecting the motor directly indicates the need to test its windings, each of which has its own resistance rating. Typically, on the compressor housing there is a plate indicating operating parameters and a circuit diagram for switching electrical circuits.
After making sure that the electrical equipment of the compressor is in good condition, proceed to checking its operating pressure . Taking precautions, in a convenient place we cut the tube from the discharge fitting with wire cutters. Use pliers to roll the end of the tube going to the refrigerator evaporator, or install a plug.
Important. Before you begin, it is important to know what type of refrigerant your refrigerator uses. This gas can be harmful to the eyes and respiratory tract, flammable and even explosive.
At the end of the tube coming from the compressor, we install a pressure gauge with an operating range of up to six atmospheres. It is important here to ensure that the copper tube is not rolled. To connect to the pressure gauge, use a high-strength rubber hose, for example, from a car pump and screw clamps.
When the compressor is turned on, the pressure gauge should show operating pressure ranging from four to six atmospheres, depending on the model of the refrigeration unit and its power. If the pressure reading is significantly lower than the required parameters, the compressor is considered inoperative and must be replaced.
Among other things, losses of refrigerant are inevitable, and this greatly affects the efficiency of the refrigerator. When replacing a compressor, gas must be filled to the required volume. It is extremely difficult to do this kind of work yourself. It is recommended to involve a specialist with the skills, appropriate equipment and consumables.
Short circuit to the housing - how to check the refrigerator motor
A short to housing often causes compressor failure. The initial insulation resistance of the motor is 1000 MOhm; during operation, the quality of the insulation deteriorates and the resistance value drops to 100 or even 10 MOhm. When the value drops to 1 Megaohm, the motor must be replaced, and when measuring below 500 kOhm, it is prohibited to use the equipment.
Therefore, before diagnosing, it is necessary to check the engine for breakdown, so as not to receive an electric shock from a faulty device when checking the energized current. To measure, you can use a multimeter, ohmmeter or megohmmeter.
- Unplug the refrigerator.
- Remove the compressor panel, if equipped.
- Remove the starting or starter relay from the motor contacts.
- Switch the tester to resistance measurement mode.
- Look for any peeling paint on the engine housing. Or clear a small area.
- Attach one probe of the device to the lower left or right contact, and the second to the motor housing.
- Check the indicator. In a working engine, the tester will show the value as “infinity”. If the insulation is broken, a value close to zero will appear on the screen.
- The most accurate indicator will be given by a megohmmeter or multimeter with a constant voltage mode of 500 V.
Attention! If you find a breakdown of the windings, call a technician. Using a refrigerator with such a compressor malfunction is life-threatening.
What is the difference between a short to ground and a short to ground? An engine shorted to ground will produce a complete zero, and most likely will not work. When shorted to the body, the resistance has a low value, but differs from zero. The circuit breaker does not respond to such motors, but they are dangerous to operate and require replacement. The RCD also does not respond to a short circuit to the housing, because there is no current leakage in the refrigerator circuit, there is only voltage on the compressor casing.
How to check the refrigerator compressor with a multimeter for serviceability
The motor contact terminals are arranged in a triangle. The top one is called common, the left one comes from the starting winding, the right one from the working winding. The resistance value between the contacts of the windings is approximately equal to the sum of the indicators between the pairs “upper common - starting winding” and “common - working winding”.
The indicators are measured in this order:
- top and left contact (start winding);
- top and right (working winding);
- left and right (between windings).
As a rule, the starting winding resistance is higher than the operating winding, but there are models with reverse distribution and high operating resistance.
- Unplug the refrigerator.
- Remove the panel, if present.
- Remove the start relay from the motor contacts.
- Switch the tester to resistance measurement mode.
- Measure the starting winding.
- Measure the working winding.
- Measure the resistance between the windings.
- Compare the readings with the resistance table. The deviation can be 0.1–5 Ohms from the table value.
Data on various models of compressors and brands of refrigerators is collected in tables.
Attention! If the tester shows zero between any pairs of contacts during the measurement, the motor has an interturn short circuit in one of the windings.
Does the measurement data differ from the table values? This means the compressor is working properly and perhaps the reason is that the power supply is intermittent. Checking the current to the compressor will help identify this.
How to check with a multimeter
It is better to check capacitors by removing them from the electrical circuit. This way you can provide more accurate indicators.
The main property of all capacitors is the passage of current of an exclusively variable nature. The capacitor passes direct current only at the very beginning for a very short time. Its resistance depends on the capacitance.
How to check a polar capacitor?
When checking an element with a multimeter, the following condition must be met: the capacitance must be greater than 0.25 µF.
The technology for measuring a capacitor to identify faults with a multimeter is as follows:
- Take the capacitor by the legs and short-circuit it with some metal object, tweezers, for example, or a screwdriver. This action is necessary in order to discharge the element. The appearance of a spark will indicate that this has happened.
- Set the multimeter switch to continuity testing or measuring resistance indicators.
- Touch the probes to the terminals of the capacitor, taking into account the polarity - a red probe is connected to the positive leg, and a black one to the negative leg. In this case, a direct current is generated, therefore, after a certain period of time, the resistance of the capacitor will become minimal.
While the probes are on the inputs of the capacitor, it is charged, and its resistance continues to increase until it reaches a maximum.
If, upon contact with the probes, the multimeter begins to beep and the needle stops at zero, this indicates a short circuit. This caused the capacitor to malfunction. If the arrow on the dial immediately shows 1, it means that there is an internal break in the capacitor.
Such capacitors are considered faulty and must be replaced. If “1” appears only after a while, the part is working properly.
It is important to carry out measurements so that incorrect behavior does not affect the quality of the measurements. Do not touch the probes with your hands during the process. The human body has very little resistance, and the corresponding leakage rate is many times higher.
The current will follow the path of less resistance, bypassing the capacitor. Consequently, the multimeter will show a result that has nothing to do with the capacitor. You can also discharge a capacitor using an incandescent lamp. In this case, the process will proceed more smoothly.
Such a moment as discharging the capacitor is mandatory, especially if the element is high-voltage. They do this for safety reasons and in order not to damage the multimeter. Residual voltage on the capacitor can damage it.
Capacitor Capacitance Measurement
Capacitance is one of the key characteristics of a capacitor. It must be measured to ensure that the element accumulates and holds a charge well.
To make sure that the element is working, you need to measure this parameter and compare it with the one indicated on the body. Before checking any capacitor for functionality, you need to take into account some of the specifics of this procedure.
If you try to measure using probes, you may not get the desired results. The only thing that can be done is to determine whether this capacitor is working or not. To do this, select the ringing mode and touch the legs with the probes.
When you hear a squeak, swap the probes and the sound should repeat. You can hear it with a capacitance of 0.1 µF. The higher this value, the longer the sound.
If you need accurate results, the best way out in this situation is to use a model that has special contact pads and the ability to adjust the fork to determine the capacitance of the element.
The device is switched to the nominal value indicated on the capacitor body. The latter is inserted into the landing “sockets”, having previously discharged it using a metal object.
The screen should display a capacitance value approximately equal to the nominal value. When this does not happen, it is concluded that the element is damaged. You need to make sure that there is a new battery in the device. This will provide more accurate readings.
Measuring voltage with a multimeter
You can also find out about the performance of a capacitor by measuring the voltage and comparing the result obtained with the nominal value. To perform the test, you will need a power source. Its voltage should be slightly lower than that of the element being tested.
So, if the capacitor has 25 V, then a 9-volt source is sufficient. The probes are connected to the legs, taking into account the polarity, and wait for some time - literally a few seconds.
It happens that time has expired, but the expired element is still functional, although its characteristics are different. In this case, it must be constantly monitored.
The multimeter is set to voltage measurement mode and the test is performed. If a value identical to the nominal value appears on the display almost immediately, the element is suitable for further use. Otherwise, the capacitor will have to be replaced.
Inspection of a non-polar capacitor
It is even easier to check non-polar capacitors with a multimeter. First, the measuring limit on the device is set to megaohms. Next they touch with probes. If the resistance is less than 2 MΩ, then the capacitor is most likely faulty.
While charging the element with a multimeter, it is possible to check its serviceability if the capacity starts from 0.5 μF. If this parameter is smaller, changes on the device are invisible. If you still need to check an element less than 0.5 μF, then this can be done using a multimeter, but only for a short circuit between the plates.
If it is necessary to examine a non-polar capacitor with a voltage above 400 V, this can be done provided that it is charged from a source protected from short-circuit. circuit breaker. A resistor rated for a resistance of more than 100 Ohms is connected in series with the capacitor. This solution will limit the primary current surge.
There is also a method for determining the performance of a capacitor, such as checking for a spark. At the same time, it is charged to the working value of the capacity, then the terminals are short-circuited with a metal screwdriver having an insulated handle. Performance is judged by the strength of the discharge.
Immediately after charging and after some time, measure the voltage on the legs of the part. It is important that the charge lasts for a long time. Then you need to discharge the capacitor through the resistor through which it was charged.
How to test a refrigerator compressor without a relay installed
You can test the current using a different power wire and a new relay. To take readings you will need a clamp meter. They give more accurate readings than a tester with probes.
Attention! You will be measuring the current in a live wire. Strictly follow safety precautions. Measure current away from exposed contact parts.
The procedure is as follows:
- Unplug the refrigerator.
- Remove the panel, if present.
- Remove the installed start relay from the motor contacts.
- Take another working relay and another cable.
- Connect the cable contacts to the relay to the phase output and operating winding.
- Plug the wire into the outlet.
- Use a clamp meter to measure one wire in the insulated area. To do this, open the pliers, pass the wire inside, and close it. The device will show the amount of current in the circuit.
- Do not touch exposed parts! You may suffer electrical injury.
- Check the meter reading. The amount of current depends on the motor power. For 120 W the current will be 1.1–1.2A, for 140 W the norm is 1.3A. If the value is below normal, the compressor cannot start normally.
These methods are suitable for diagnosing conventional type motor-compressors. For inverter refrigerators, you need to use a different method.
Current test
To finally check the compressor on the refrigerator with your own hands, you need to make sure that voltage is supplied to the electric motor terminals. To operate the motor in refrigeration machines, a special starting relay is used; to test the equipment, it is recommended to use a new or known-good unit. To check the functionality, a tester is used, supplemented with pliers for connecting to the terminals of the relay and power cable.
Before you start checking the refrigerator relay for functionality, it is recommended to check the condition of the power cable and plug. A test device installed in the open circuit between the power cord and the relay should show a current in the range of 1.3-1.5 A (depending on the power of the installed motor). The standard current value is indicated on a plate glued to the refrigerator compressor housing. It is possible to check the operation of the unit with direct power connection to the windings.
How to check the compressor performance of an inverter refrigerator
In an inverter-type refrigeration unit, it is not the compressor itself that most often fails, but the current converting unit. Therefore, you need to check the inverter first.
For test switching, you will need a garland of three 60 W incandescent lamps connected by a triangle.
Attention! You will be testing the operation of the inverter under voltage. Strictly follow safety precautions. Do not touch wires or equipment while the generator is on.
- Unplug the refrigerator.
- Remove the panel from the compressor, if installed.
- Disconnect the inverter from the compressor.
- Connect the light bulbs to the inverter output.
- Plug in the refrigerator.
- When starting the generator on a working inverter, the lights will turn on and off alternately. Follow the four cycles. One lamp should shine at full strength, the other two at full intensity. Burning duration is approximately 1 second.
If the control lamps light differently in at least one of the cycles, then you need to look for a fault in the inverter. A specialist should carry out a complete diagnosis. You can check the compressor in the order described above.
Why does the motor not turn on?
If suddenly a household appliance breaks down, then you need to know exactly how to check whether the refrigerator compressor is working or not. After all, these actions and their results will help determine where to start repairing the device.
Fundamentally, compressors are no different from each other. They are an electric motor with a piston or plunger injection system.
There is a whole range of problems that can lead to equipment stopping working:
- Instability of the electrical network, which leads to interruptions in operation.
- Failure of the thermostat. In this case, there are clicks when switching modes, but it does not even try to start working.
- If the failure occurs after defrosting, then most likely there is a freon leak or the entire cooling system is clogged.
- If the light bulb inside works, and the device itself makes sounds in the form of clicks, but cooling does not occur, then most likely the reason is that the device has stopped working. Carrying out repairs yourself in this case, without certain skills, will be quite problematic. Therefore, in the vast majority of cases, they try to call a qualified technician for help.
Reasons indicating a burnt out compressor
All refrigerators, regardless of manufacturer and brand, will have the same operating principle. It lies in the fact that freon gas must circulate in the system to create a cooling effect. In order for it to move inside the tubes, the compressor creates a certain pressure. Thus, freon or some other component flows from the part where it cools and turns into liquid to where it heats up and becomes steam again. This cycle must be repeated all the time to create a lower temperature inside the refrigerator chamber.
Therefore, if there is not enough pressure, then the problem is really in the compressor. So, you should pay attention to the following signs:
- If the temperature in the chamber suddenly stops dropping, it means the compressor has burned out.
- Problems with the compressor may occur due to a faulty relay.
- Broken wiring can also cause poor performance.
- A gas leak may occur, which will be indicated by a decrease in pressure.
Pay attention to the sound of the engine running. If it continues to hum, but the temperature rises inside the refrigerator chamber, then most likely there is a freon leak. In this case, you will have to call a technician to recharge the system.
Diagnosis by exclusion
If the refrigerator works but does not freeze, the compressor may have stopped pumping pressure into the system.
Any work on the refrigerator is carried out only when it is disconnected from the electrical network; violation of this rule may lead to electric shock.
You can check the functionality of a new refrigerator only two to three hours after installing it in a level working position and adjusting the legs. Without this, vibration will occur.
Possible malfunctions:
- If the refrigerator has completely turned off, first of all you need to check the socket and plug with known-good devices. More often than not, it's them.
- If the refrigerator hums when turned on, clicks are heard, the temperature regime is disturbed (everything inside melts) - the start relay is most likely broken, because of it the compressor does not turn on and the work cycle does not start. You need to remove this assembly to inspect it and the contacts. If necessary, replace it yourself, which is not very difficult.
- The refrigerator is not freezing, but you can hear normal operating sounds? There is a fairly reliable way to roughly diagnose the compressor: carefully touch it with your hand, but not immediately after starting the refrigerator, but after some time, it may be quite hot. This way you can understand whether it works at all.
- The sound of operation will also allow you to draw conclusions about the reasons - the compressor does not start or the reason is something else. A sharp grinding sound and the cessation of freezing is a sure sign of a stopped and cooling “heart”.
- The shutdown does not occur, probably the thermostat incorrectly determines the temperature, or the heat exchange cycle has stopped for some reason, including the compressor, which again needs to be checked for performance by temperature and sound.
- The refrigerator freezes - the same thermostat may be adjusted incorrectly. You can try setting a different value. In the worst case, this element needs to be replaced.
Diagnostic nuances
There are several elements interacting in a refrigerator, all of which are almost equally important.
The failure of at least one part will affect the operation of the entire system. At home, it is difficult to confidently determine if a compressor is broken. For an accurate diagnosis, you need to either check other options by elimination, or dismantle part of the system in order to check the resistance at the contacts with a tester. But first things first. And it would be more correct to start with visible signs of failure of the refrigerator.
Possible malfunctions:
- does not work at all, until the display and lighting turn off;
- does not start;
- does not cool or overcools, a layer of ice forms on the walls of the freezer;
- noise during operation (including its change up to grinding and similar “unhealthy” signs, as well as complete absence). As a rule, modern “Atlantas”, “Nords”, “Indesites” and other brands make virtually no noise;
- vibration.
To install the compressor after diagnosing and restoring the system, you need to have a blowtorch (gas torch) and special equipment for charging freon.
The process itself requires great care and attention when connecting tubes, and indeed during all actions with equipment.
Errors are fraught with loss of tightness, and as a result, leakage of the refrigerator and disruption of its normal operation as a whole. It is highly not recommended to do this yourself, especially without knowledge and skills.
In case the decision to dismantle it on your own is nevertheless made, further in the article there will be instructions on how to do this. Most likely, even in the case of an accurate diagnosis with such difficulty, you will still have to call a specialist to replace and refuel the compressor.
And if so, maybe it makes sense to entrust all the work to a professional? If the equipment is under warranty, there is nothing to think about.
Please note: in the operating instructions there is a warning about the refusal of obligations by the service center if any repairs were not carried out by a service center from the list of those approved by the manufacturer for service.
Diagnostic methods
To conduct a detailed investigation, you will need to inspect the compressor from the inside. Here the meaning of the numbers displayed on the multimeter display may have a different meaning. To carry out diagnostics, you will need to remove the protective casing and get to the compressor filling. To do this you will need to do the following:
- Disconnect the wires from the motor contacts
- Snip the connecting tubes
Compressor disassembly process
- Unscrew the bolts securing the casing
- Remove the screws holding the relay
Dismantling the relay
Refrigerator engine diagnostics
If you still decide to repair and check the refrigerator compressor yourself, then first carry out a complete preliminary diagnosis of the main engine. To do this, perform the following steps:
- Make sure what temperature the condensate has. Since in this case, insufficient injection of cooling gas may occur.
- If this is not the case, then use a multimeter. This will help ensure that the housing does not break through.
- If this is not the problem, then further inspection is carried out. To do this, the contact wiring is disconnected. Then the motor tubes are cut. Unscrew the housing and remove the relay. After which you can measure the resistance level between the two contacts.
A broken or burned wire in one of the windings is the most common cause of breakdown of the entire compressor unit.
Tips for checking your refrigerator compressor yourself
If you have any problems with the operation of your refrigeration equipment, you can try to diagnose it yourself. You must act carefully. Remember safety precautions. When using testing devices, it is important to make sure the connection is correct several times.
If a malfunction is detected, it is recommended to contact a specialist for repair. Trying to fix the problem on your own may make the situation worse. Therefore, you should not carry out complex repairs yourself. Especially if you are not sure of the correctness of the diagnostic results. Otherwise, you will have to purchase new equipment due to the complete breakdown of the old one.
Sources
- https://210101.ru/kuhonnaya/kak-prozvonit-kompressor-holodilnika.html
- https://pts.ru/proverka-kompressora-kholodil-nika-indezit-mul-timetrom/
- https://its-city.ru/kuhonnaya/kak-rasklinit-kompressor-holodilnika.html
- https://make-a-choice.ru/shema-podklyucheniya-kompressora-holodilnika/
- https://oholodilnike.ru/remont/kak-proverit-kompressor-rabochij-ili-net.html
- https://expluataciya-holodilnika.ru/holodilniki/chasti-holodilnika/kak-proverit-rabotosposobnost-kompressora-bytovogo-holodilnika-samostojatelno/
- https://dns-magazin.ru/v-kuhne/kak-proverit-kompressor-holodilnika.html
- https://dekamall.ru/remont/kak-proverit-kompressor-kholodilnika-poshagovaya-instruktsiya.html
- https://magazin-opo.ru/kak-remontirovat/kak-prozvonit-kompressor-holodilnika-multimetrom.html
- https://opt-orion.ru/kuhnya/proverka-kompressora-holodilnika-testerom.html
[collapse]