Multicooker malfunctions
The first malfunction is the inability to turn on the device. It’s trite, but often people install the bowl incorrectly, as a result of which the switch-on protection is triggered. What to do? Yes, just take out the pan, insert it in some other way and turn it on again. But this is the simplest thing. If the indicators on the panel do not light up, then everything is bad. It’s better to contact specialists or call the service center or store where you bought the model.
The second problem, as many users believe, is when food takes too long to cook. To understand this, first of all you need to understand the principle of operation of a multicooker. It is as follows: each type of dish is cooked in a certain temperature range and a certain amount of time. If you set the “Soup” mode for 20-30 minutes, and after this time it does not even heat up, then most likely you have set the program incorrectly. First, understand the operating modes, and if you are sure that you are doing everything correctly, but the dishes still take a very long time to cook, you need to first check that the pan is installed correctly. It's unlikely that this will be the problem, but it's still worth checking.
Common causes of multicooker breakdowns
It is better to protect the structure from damage, so you should know the common causes of malfunctions. The rarest problem is a manufacturing defect, but defective products do sometimes occur. The most common mistake is placing food in a bowl while it is in the multicooker. In this case, there is always a chance that fat, moisture or pieces of food will get into the interior of the case.
Before going to the service center, try to get things working yourself:
The root of all troubles is non-compliance with the operating instructions, so read the instructions for use carefully.
Of course, the product is prohibited from being beaten, dropped, or used for other purposes. Do not place the multicooker near a radiator or gas stove. This can cause the case to overheat during operation, which sometimes causes internal electrical components to deteriorate. Also, often the device does not work due to the connection of the multicooker to a high-voltage network.
Software glitch
Another reason why the multicooker does not work properly is a malfunction in the program. Let me explain: for the “Soup” mode (this is just an example), the heating temperature is set to 80 C, but if any failure occurs, the program can automatically set the temperature to 30 C (for example). To solve this problem, you need to completely reset all parameters, if possible. Some models have corresponding functions or even buttons. If not, just unplug it and let it sit for a minute or two. Well, if this doesn’t help, then go to the service center again.
Durability of multicookers
You can find out the service life of the multicooker from the instructions. For example, the well-known Redmond provides an extended warranty of 25 months, and data from the technical data sheet says that the device will work for 5 years.
Russian legislation dictates that warranty service must be at least a year; if the manufacturer independently increases the period, it means that it is confident in the quality of its products.
The multicooker itself, from a technical point of view, is a simple device. Malfunctions in the first days may be the result of a manufacturing defect, and if a breakdown occurs after a year or two, then the reason lies in the natural wear and tear of some parts, or it is the result of improper use.
The reliability of any household appliance is ensured by two factors: proper maintenance and adherence to operating rules. They should not be neglected, even if it is not initially clear why the manufacturer indicated certain requirements.
Random shutdown
If you load the saucepan more than the required volume, spontaneous shutdown may occur earlier than expected. Otherwise, the cause is an incorrectly set temperature. Although the multicooker is smart, it does not know how to recognize when food is ready. Sometimes even a timely shutdown causes misunderstanding among people, saying how this can be: the multicooker has turned off, but the food is not yet fully prepared. Nothing wrong with that. Just set the extra cooking time and wait. Alternatively, you just need to try preparing another dish in strict accordance with the recipe according to the instructions, and if the food is tasty, then the problem is definitely in improper handling. Well, if the problem happens again, then... you know what to do (service center and all that).
Additional reasons why the device will not turn on
Users are often confused by a non-working timer that keeps track of cooking time. There may be several reasons for this:
- a lid that is not tightly closed: the time counter starts working only when the device reaches a certain temperature, but through the gap in the lid the heat quickly evaporates, preventing the heating element from warming up, in this case the timer will remain inactive;
- factory settings failure;
- automatic control system error;
- failure of the control sensor.
Advice! In order to eliminate the possibility of electronic failure, you need to reset the settings and then turn on the multicooker again. Perhaps this will help solve the problem.
The multicooker will start counting down the time only when the lid is tightly closed
Smell of plastic from the slow cooker?
Yes, it’s unpleasant when the multicooker smells like plastic. This happens, and some users justify the smell by saying that the device is new, undeveloped, etc. But it is important to know: there should be no foreign odors when cooking food in a multicooker, there should only be natural odors of the food.
If you have already smelled plastic, then things are bad. This indicates either a manufacturing defect or the cheapness of the material from which the model was made. Mechanical damage also cannot be ruled out. For example, if the device fell, it could well move the heating element (heating element) inside the structure, causing it to touch the body or some plastic part of the structure.
There is nothing special to advise: contact the service center. If the multicooker is not under warranty, then it is quite possible to disassemble the device yourself, find the place where the heating element comes into contact with the plastic and move it manually. We believe this is possible.
Rules for using a multicooker
Operating rules
Each instruction manual for the device contains certain rules, such as, for example:
- The device should only be installed on a solid, level surface;
- connect the device only to a grounded outlet;
- before turning it on, be sure to check the tightness of the closed lid;
- after each cooking, the bowl must be thoroughly washed, dried or wiped dry with a towel;
- The lid and the pressure valve located in it also need to be washed well and wiped dry.
When should I contact the service center?
If any cases of the device turning off or its incorrect operation occur, you must first check everything step by step, from correct inclusion to detection of burnt food or dirty contacts. When using a multicooker, you need to check all your actions with the operating instructions.
Many faults, such as dirty or oxidized contacts, can be eliminated independently.
Attention. If the multicooker does not work, the desired cooking mode is not set, or it turns off on its own, before deciding what to do, you must immediately disconnect the device from the network.
Before contacting the service center, it is advisable to perform a number of manipulations:
- turn off the device and try to plug it into another outlet (if the problem is a faulty outlet, the device will work);
- check all wires for damage or maybe a wire has come loose somewhere;
- check the instructions to see if you are doing everything correctly;
- try emptying the multicooker, washing it, drying it thoroughly or wiping it dry with a towel.
If all these manipulations do not help the operation of the device, then you need to contact a service center. But remember that if the device is under warranty, the workshop may refuse free service and repair if the device was opened at home yourself.
Countdown timer not working?
We have already considered the problem when the timer on a multicooker does not work. Let's repeat ourselves a bit here. Often people do not close the lid tightly, and this becomes the reason why the timer does not activate. The idea here is this: the countdown timer starts counting the time from the moment the temperature reaches the value set by the user. If the lid is not closed tightly, heat will escape from the cracks and the set parameter will not be achieved at all. Accordingly, the timer will not be activated.
If the lid is closed tightly, but the timer still does not activate, this indicates either a failure in the electronics or damage to the temperature sensor.
Finally, let’s add: follow the operating rules of the multicooker, read the attached instructions, follow the instructions provided, and then problems will be eliminated.
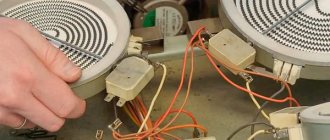
Repairing a home multicooker begins with studying the electrical circuit. Let's take a brief look at two photographs: an image of the pattern of the tracks and the installation of the printed circuit board, which generates the power supply voltage for the control panel and contains a relay that connects the heating element at the right times. Let's first consider the operating algorithm of the device, then we will discuss repairing the multicooker with our own hands. Informing readers, we bring information: equipment that allows you to prepare porridge by pressing one button is produced exclusively for the CIS. Polaris, Brand, Scarlett, Supra, Vitesse, Redmond - sonorous names, and a good half have nothing to do with the West. America recognizes the famous Philips; in Europe, too, the home multicooker has not yet gained popularity. We believe that the current state of affairs is caused by a war of ideas. The United States believes that an air fryer plus a microwave oven can replace the Universe of culinary household appliances.
REDMOND multicooker device, circuit diagram and repair
Redmond RMC-4503 - Error E1. Most likely the error appears as a result of an open circuit in the temperature sensor. Using this model as an example, I will tell you about the structure of the multicooker, the principles of operation of the circuit and disassembly for the purpose of repair.
In appearance, the multicooker is similar to a regular kitchen pan, on the side of which there is a digital indicator with buttons for selecting the operating mode. At the bottom of the multicooker there is a connector for connecting a network cable. From above we see a hinged and hermetically sealed lid. If you open it, you will see a loose cooking bowl inside.
The multicooker operating mode control unit is located in the lower part and is covered with a protective plastic cover, which is also the bottom of the kitchen appliance. The heating system works similarly to an electric kettle or iron, but is controlled by a microcontroller.
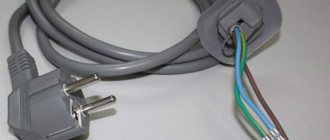
The supply voltage to the multicooker comes from the wires marked L and N in the diagram above. (The green-yellow PE wire is ground or common) In the phase L circuit there is a switch and a thermal fuse connected in series. The first is designed to turn on the kitchen appliance, and the thermal fuse is designed to protect against overheating.
From the thermal fuse, the supply voltage goes to one of the terminals of the heating element and the power and switching board. Wire N (neutral) is connected directly to the power and switching unit. The supply voltage to the other terminal of the heating element occurs when the front contacts of the relay in the control unit are closed.
The Redmond multicooker generates an E1 error if the heating element or sensors are broken. One of the most common malfunctions is grease getting on the contacts of the temperature relay. It can be easily removed and washed. This is one of the most common reasons for the failure of a multicooker, and not only from this company!
.
Decoding error codes for REDMOND multicookers
for diagnostics and repair.
| Error code | Which component failed? | Note |
| E1 or E2 | System error. The switching and power supply unit or heating element may fail or the device cover is not tightly closed | The multicooker has no control over the position of the lid |
| E3, E4 or E5 | Failure of the temperature sensor (thermistor) or the protection system has tripped | REDMOND multicookers have a thermal fuse, and if it is blown, the screen will not light up |
The multicooker does not work, the screen does not light up
First of all, you need to check the presence of supply voltage using a multimeter, then the cord, switch and fuse of the multicooker will ring. In addition, you should very carefully inspect the places where the wires are connected to the network connector and the terminals of the heating element. If you find loose contacts, then the screws need to be tightened, and if you see burnt ones, then clean them with fine sandpaper. At the same time, check the heating element, its resistance should be from 30 to 80 Ohms. After this, check the functionality of the multicooker.
You can check the functionality of the fuse and switch without a measuring device. To do this, you can short-circuit them with a copper wire of a suitable cross-section. After this, put the lid back in place and connect the multicooker. If it works, then the thermal fuse has blown and the multicooker requires minor repairs. It cannot be operated with a shorted thermal fuse!
The digital display may not glow if there is no +5 Volt on the control unit board with the microprocessor or the microcontroller is burned out. The presence of voltage can be easily checked with a multimeter. If it corresponds to the nominal value, then you need to remove the board and carefully inspect it for blackening or destruction of components, look under a magnifying glass for the integrity of the printed conductors and the quality of soldering.
The multicooker does not work, the display is on and one of the E-error codes is displayed
then during repairs you will most likely need to replace the thermal resistance, heating element or repair the power supply.
He will check the heating element of a multicooker, just like the heating element of a washing machine.
Multicooker power supply repair
One of the most loaded units and therefore the most frequently failing one in a multicooker is the power supply. It converts the supplied alternating mains voltage into direct +5 V and +12 V and, based on a control signal, supplies mains voltage through the relay contacts (a rectangular black part on the board, see the video below) to the heating element.
Thanks to the presence of this microprocessor unit (a black chip with many pins), the multicooker is capable of performing so many culinary tasks. The control unit is usually connected to the rest of the circuit using three connectors. Wires from the six-pin connector go to the power supply, and from the other two connectors go to the thermal resistance on the bottom and in the lid of the multicooker.
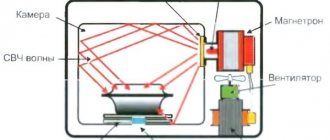
The principle of operation of a home multicooker
Unique home multicooker programs are corporate secrets. The controller is protected against reading information, excluding copying by competitors. The algorithms are stored in non-volatile memory. It is known: there are two sensors that allow the technician to create an algorithm for further actions. The multicooker design is based on mathematical calculations. We believe that the temperatures and durations of individual sections of the recipe are stored inside the memory chip. Valuable information lays the basis for controlling the heating element. The multicooker contains two sensors:
- A thermistor is attached to the back of the main button. It is sometimes difficult to remove; the manufacturer did not at all intend the intervention of a self-taught person, bypassing warranty services. A considerable surprise awaits the lucky owners of Redmond: the removable terminals are filled with a compound, non-invasive dismantling is impossible. The news will prevent you from repairing the multicooker yourself.
- Another sensor is hidden inside the lid. It is extremely difficult to get there; you should only go there if you are completely sure that the fault concerns the sensor. How to gain ironclad confidence. Try to unplug the desired connector, regardless of the compound, and then turn on the home multicooker. Is it still the same? There is a high probability that the snag has been found. Gain confidence by measuring the resistance between the sensor wires and heat the cap. Redmond multicookers pass the wires through the loop of the removable lid. After unscrewing the screw, dismantle the shield, pull the wiring out, cook with a home multicooker, while simultaneously measuring the resistance. You don't have to look for third-party funds.
A home multicooker requires readings from two sensors to operate. A pair of wires come from the sensors to the terminals of the control board; the substrate is often located under the buttons. Determining a faulty power supply is extremely simple: there is no lighting of the display panel elements in any state. Probably a source failure. Remove the bottom, measure the output voltage of the switching power supply. Do not confuse this with a transformer. Remove after filters and diode bridges.
Touch or mechanical control. In the latter case, the printed circuit board is equipped with microswitches. Counters count the number of presses, and the memory chip selects the appropriate information to execute the program. Traditionally, a pair of power wires come here, one goes out (the control signal of the relay that powers the heating element). Really simple! One signal runs the kitchen in a home multicooker. Getting the information requires a chipset to sweat. The signal is a constant level that turns the transistor on and off. The zener diode prevents the contact voltage from exceeding the limit level. The relay armature closes the heating element circuit. Now let's look at the processes occurring in a switching power supply.
Multicooker software errors
Usually, if the multicooker suddenly breaks down or refuses to turn on, a code appears on the display that indicates the cause of the failure. Typically, the cipher begins with the letter E and a number from 0 to 5 after it. The code indicates the possible cause of the malfunction, so further repair actions depend on this index.
The following message options are possible:
- E1. This means that the heating element has burned out; this happens when moisture, fat, or food particles get inside. You will have to disassemble the structure, clean it and dry it.
- E2. On Polaris models, this means a short circuit in the upper temperature sensor, which is mounted under the cover. In addition, this combination may indicate an open circuit, so you need to check the wire that goes from the display to the sensor. To assess its condition, you need to use an ohmmeter.
- E3. First of all, you need to check the tightness of the lid. It is also possible that the cause of the malfunction lies in the dirty inner surface of the case. It is necessary to disassemble the product, clean it and dry it.
- E4. The pressure sensor is broken. Most likely, the problem is that it is clogged, but a broken circuit is also possible. In addition, this error occurs when there is a malfunction in the microprocessor. This is the worst failure code, since you will have to check virtually the entire product.
- E5. The index is displayed when the overheating protection system is triggered. Perhaps you simply placed the device next to a radiator or a gas stove that was on. But the problem may also be hidden in clogged steam valves. If the appliance smells like smoke, then you have probably burnt the wiring.
When can you not do anything?
In the following cases, repairing a multicooker at home with your own hands is unacceptable. You need to take it to a specialized workshop:
- no reaction to actions;
- no temperature information;
- a different error code appears on the display;
- there is visible damage to the cable or housing;
- programming does not work;
- the multicooker does not heat;
- The lid is not sealed.
What problems can be fixed?
If E1 or E2 messages are detected, you must perform the following actions:
- Check the surface underneath the bowl. If there are drops of moisture or food crumbs, clean and dry the product.
- If everything is clean inside, then you need to turn the multicooker over and unscrew the fastener that holds the bottom cover. In this way you can disassemble the structure. Inspect all the insides; if there is dirt or moisture, remove it.
- If everything is clean inside, then you need to find a thermocouple - this is a tubular sensor with a connected wire. To clean, you will need fine-grit sandpaper (no. 0) folded in half. To disconnect the contacts, you need to press the top plate from the side of the adjusting screw so that you hear a click. After this, you need to insert the sandpaper and release the plate (let the contacts go back in). Then you need to carefully clean the terminals.
The easiest way is with error E3. To fix the problem, you need to turn the Vitek multicooker over and unscrew the fastener that holds the bottom cover. Then you need to take out all the insides, clean them and dry them. For quick drying, you can use a hairdryer, but with the setting on low intensity. Then assemble the structure.
The most difficult problem will be with error E4. To fix it, you will need to check all temperature and pressure sensors, inspect surfaces for dirt and moisture. Careful cleaning with sandpaper will be required. If you have some experience, you can try to do everything yourself, but it is better to take the device to a service center.
Switching power supply for a home multicooker
The transformer is clearly shown in the figure. Carefully wrapped with electrical tape and filled with transparent compound. On the right is the input filter. Preventive measures help protect the device from input pulsations (a home multicooker does not create voltage fluctuations). On the board turned upside down, you can see: a resistor plus a capacitor is on the way to the transformer, protecting the low-voltage part. The heating element is powered in a separate way.
An interesting feature of the above diagram. The transformer carries two secondary windings connected in parallel. We believe that this exotic step increases the reliability of the device, since large consumption is not planned on the horizon (energy is spent on heating elements), the element base was created to serve as the basis for the construction of other (household) appliances, the multicooker went along with other factory jewelry.
Ringing a transformer is extremely simple. In the off state, the relay is open; it is unnecessary to disassemble the home multicooker. There is a fairly low resistance between the input terminals of the plug. There is a nuance, the photo shows: there is an electric filter in parallel. To understand whether the winding is faulty, you will have to find out the value of the resistor. When connected in parallel, the sum of ohms is less than the smaller resistance. The winding has a small rating, a maximum of two digits. The capacitor is unusual, if it breaks, the device will continue to work, only the protection will be reduced. The check is simple. Charge the input circuit of the home multicooker with direct current, and place a voltmeter in parallel with the battery. Did the signal disappear immediately or fade out? It must be the latter.
After the transformer there is a full-wave rectifier formed by four diodes. Even a schoolchild can ring the bell.
We remind you: the diode conducts the direct current of the multimeter in only one direction. In a similar way, the integrity of pn junctions of bipolar transistors is checked in a simplified manner. An arrow in an electrical circuit indicates the direction of flow of positive charges (not electrons). Avoid confusion.
Following the rectifier, the switching power supply circuit of a home multicooker includes another filter containing a resistor of the largest dimensions and a nearby capacitor. Then we see an emitter follower with a small zener diode and a resistor that selects the operating point. The proactive step matches the circuit to the load. Attentive readers will notice: the blue and red wires supply power to the home multicooker. White controls the resistor that energizes the relay gate. It is easy to trace: the signal approaches the base (middle contact), at the right moment the voltage generated by the rectifier and filter switches to the relay of the home multicooker. A zener diode is connected in parallel, since (we assume) the rectified voltage has a different rating: the power supply to the microcircuits and the relay is supplied at a different voltage.
We see the disadvantage of the circuit: part of the power is lost, the on state is dominant during cooking. As soon as the control signal disappears, the transistor breaks the connection, the relay opens, and the heating element stops heating. It seems that, using the information, readers will easily repair the multicooker with their own hands, simply by poking where they should be with the probes of the multimeter.
Please note that there is a piece of double wire in the place where the schematic outline of a fuse can be seen in the photo of a home multicooker. Passing the indicated place, a current of 230 V is supplied to the relay. We believe that the jumper replaces a fuse that protects the local network from excesses. In the working position, the printed circuit board is located elements down. As soon as the current exceeds the permissible limit, the wire will begin to melt, the metal will simply flow to the bottom of the home multi-cooker (nothing can cover up such an incident). If during dismantling the indicated sign is visible, a short circuit has occurred inside. The heating element of the home multicooker is broken, or the reason is different. Take some time to restore the jumper.
Take a multimeter and call the heating element. One end will open the relay. Resistance is found from Ohm's law. It is necessary to obtain the power of the spiral of a home multicooker for 230 V, then we will calculate the resistance. First, the square of the effective voltage value (230 V) is divided by the power (watts). The result will be 30 Ohms, the calculated numbers will be shown by the multimeter. It’s easy to check the relay if you turn on the installed program. A voltage of 230 V will immediately appear on the heating element after a slight click. If there is no effect, it is time to change the relay, or the control circuit is broken. The latter is easy to check: control voltage will arrive at the base of the transistor (middle terminal) via the white conductor. Finally, the output parameters of a switching power supply can be easily measured.
How to repair
Scandal! In the service center of a well-known manufacturer of household appliances - we will not name the name - they do not even open the equipment given to repairmen. As we found out: on the forum, a local Lefty was asked to repair a multicooker with his own hands. The response report stated: the case is full of... remains of porridge, no one opened the device. The cause of the malfunction was limited to the thermal fuse! But the office workers said: the microprocessor is broken, repairs will require financial costs of 5,000 rubles!
The company's address was replenished with serious accusations: this is not the first time that a multicooker has been repaired in this way. The reputation of the service center is tarnished. Calls to repair a multicooker with your own hands have gained relevance. A disguised dealer representative appeared on the forum and said:
- gave an email address to leave a complaint about the multicooker repair service;
- explained the dangers of doing work at home;
- I asked if people were ashamed to post photos and videos describing the repair of a multicooker.
While the disguised representative was telling what problems had been noticed and what caused them, impressing the old-timers with his knowledge, several forum users managed to leave a “thank you” to the author of the note. Despite the dangers, the multicooker bodies were dismantled and the ill-fated thermal fuse was subsequently replaced.
Note. The authors think that the danger of electric shock can be avoided if you disconnect the multicooker from the AC mains before repairs. I don’t want to overpay when repairs are carried out by service centers.
When the details were revealed, ideologists were found who were enlightened by the field of assembling and disassembling these complex devices. It turns out that 90% of multicooker repairs involve replacing the thermal fuse.
Thermal fuse
The above-mentioned device, for which they asked for 5,000 rubles to repair, suffered from a common disease. The self-taught master opened the multicooker body, poured out the porridge, got to the thermal fuse, and replaced it. Then, having assembled the device, he gave it to the owner.
What is a thermal fuse. When it comes to repairing a multicooker, we are talking about a cylindrical piece of wire that strongly resembles a resistor in appearance. The operating temperature is 170 ºС, the maximum current is 10 - 15 A, depending on the type of element. When these parameters fall outside the permissible range, the thermal fuse burns, breaking the electrical circuit in which it is connected.
Why can't you make this item yourself? Firstly, the cost of the element is modest, and secondly, they installed a thermal fuse for a reason. A homemade copy has different characteristics, which will not lead to good things. Repairing a multicooker at home using such amateur activities will, in the worst case, end in a fire.
Why is a thermal fuse installed for a multicooker?
The thermal fuse is a kind of wire element that resembles a resistor in appearance. Its main function is to protect the multicooker from overheating.
The temperature when the fuse trips is 170 degrees, and the maximum amount of current passing is 10 or 15 A, depending on the type of element. If these indicators exceed their norm, the fuse burns out.
Not a single multicooker electrical circuit is complete without thermal fuses. They are usually located inside the device. Usually there are several of them, and you have to figure out which one burned out. To do this, you need to check the elements using a multimeter, which should measure the resistance. And if it is not there, the part needs to be replaced.
Reasons for the thermal fuse to burn out:
- Malfunctions of the power supply and switching;
- Sudden voltage changes;
- Malfunction of the control unit.
Thermal fuses can be of several types. Popular types are cpgxld or ldcpg. The operating voltage of such elements is usually designed for 250V, the operating current capacity is 10A or 15A. A number with a degree sign usually indicates at what temperature this element will operate. For example, at 167 °C.
As a rule, these parts are not restored, that is, they operate once, after which a new part must be installed.
Where to find and how to replace the thermal fuse
The thermal fuse is hidden inside, in the heart of the multicooker. A number of things covered with cambrics, dressed with multi-colored wires. Accordingly, in order to detect a burnt part, you should unscrew the bottom of the multicooker.
If you remove the saucepan, you will find a button underneath it. At least that’s what the node looks like and has a name among forum users. This is a solid-sized steel mushroom, the stem of which is covered by a loose spring. The surface around is the heating element. When a multicooker is disassembled during repairs, thermal fuses are placed near the “main” button.
The mentioned cambrics are in plain sight. Sometimes they are additionally covered with a clamp screwed on with a screw; more often they hang in the air.
Note. Cambric is a piece of wired plastic insulation, usually white. Serves to protect junctions of various components.
Thermal fuses are attached by crimping; soldering is strictly prohibited. A hot tip will easily burn a heat-sensitive element. At this point, the repair of the multicooker will stop, and the search for a new thermal fuse will begin.
How to identify a faulty element and check the operation of at least one. Fans recommend using a Chinese tester. To do this, you do not need to remove the thermal fuse. The detected malfunction is eliminated.
Finding and replacing the thermal fuse
Most multicookers have several thermal fuses, which are covered with plastic to protect them from moisture. All of them are located inside the case, so to find the burnt element you will need to disassemble the device. To do this, you need to turn the multicooker over, find the fastener from below that holds the bottom cover, and unscrew it.
After the device is disassembled, you can see several wires inside; you need to find the one that goes from the electrical connector to the terminal of the heating element. The wire will go through a thermal fuse, which is located in a plastic thermal insulation tube.
In most cases, unsecured thermal fuses simply hang down, but sometimes they are fixed with clamps that are attached to a screw. Please note that fuses are very sensitive to heating, so soldering is prohibited.
In addition, manufacturers fix them using a crimping method, so the thermal fuses cannot be removed. Therefore, to determine the condition of each element, it is necessary, without removing them, to use a multimeter to determine the resistance level. Once the condition of each fuse is determined, the faulty parts must be replaced.
Replacing a thermal fuse using an example
Let's look at replacing one thermal fuse using a live example. There is a multicooker whose display does not turn on, initially we do not know what the problem is.
Let's disassemble the device. To do this, you need to unscrew one screw from the bottom and open the bottom cover. You can see that the design of the multicooker is extremely simple. Its insides can be divided into 3 parts:
- The power unit is a power supply and a relay switching heating element.
- Control board with display (which does not work).
- A heating element.
Let's look at the power part of the multicooker and its wires:
- The white wire from the network connector goes to the power supply.
- The red wire goes from the power connector through the thermal fuse to the heating element terminal.
- The black wire goes from the heating element terminal to the power supply.
- The red wire goes from the second terminal of the heating element to the power supply to the switching relay.
- Yellow is the common ground wire that connects the metal structures of the multicooker (external and internal casing).
- The white wire goes to the control board from the switching relay.
The figure shows wires by numbers
First you need to find out if the electricity is reaching the power supply. To do this, you need to connect the multicooker to the network and first measure the voltage at the terminals of the network connector itself.
Next, check the voltage between the connector terminal and the heating element terminal. We see that electricity does not reach the heating element through the red wire.
The red wire goes through the thermal fuse, most likely that is the problem. Let's take it off. To do this, you need to unscrew the screw from the metal plate with which the thermal fuse is attached to the multicooker body.
- model – RY184;
- temperature – 184 o C;
- current – 10 A;
- voltage – 250 Volts.
Thermal fuse close-up
Disconnect the thermal fuse using wire cutters. We order a new element with similar characteristics.
The thermal fuse cannot be connected to the wires by soldering, so you need to make sleeves for crimping. They can be made from a radiator for a transistor. The resulting two plates need to be cleaned with sandpaper. And then bend them into open tubes.
Sleeves that came from the radiator
Using sleeves, we attach the thermal fuse to the wire by pressing it with pliers.
The fuse is fixed to the inner housing using a metal plate in which it is wrapped. It needs to be screwed back to its original place. After this, you can check the voltage at the terminals.
When we are convinced that everything worked out, turn on the multicooker and see the result.
Fuses in Redmond
Why are thermal fuses needed? The reader will immediately interrupt - protect the overheated device. We see reasons to say: thermal fuses are needed to repair Redmond multicookers more often.
How disparate facts are connected. This is what the owner, an experienced multicooker user, writes to members of the forum: “Accidentally turned on the device without a pot, noticed after 40 seconds, immediately turned off the device.” The woman wanted to know what would happen to the Redmond M90 if she didn’t put the pot back in place at all.
Dobrokhot suggested: nothing terrible will happen. The main button (see above), located under the bottom of the pot, will prevent the multicooker from turning on in the absence of dishes. The hostess conducted an experiment: with the lid open (!) and the pot pulled out, she launched the program. Within 10 seconds the heating element became hot. The result is stunning: there is no protection against incorrect switching on in the Redmond multicooker.
What will happen if you leave the cook unattended as a kitchen assistant for a long period of time. The conclusion is suggested by an advanced forum member: to protect against overheating, there are thermal fuses inside. Security elements cope with their function only once - when they burn out. After an incident, the intervention of a “specialist” will be required.
Actually, for this purpose we are considering the manual repair of Redmond multicookers - when the reason is known, the repair becomes a simple matter. If a multicooker once left unattended refuses to turn on, the problem is probably the thermal fuses.
What is the function of a thermal fuse?
The thermal fuse in the multicooker serves as protection against overheating. It looks like a small wire that is very similar to a resistor. Most of them have a conductivity of 10 to 15 A and operate at a temperature of 150-170 o C. If these values are exceeded, the thermal fuse burns out, which initiates a break in the electrical circuit. As a result, the device stops working, but the owner avoids a fire in the apartment. You can determine that a circuit break has occurred using a multimeter.
Chip
A typical multicooker has two electronic boards:
The first is directly next to the bottom. To achieve the second, you will have to completely disassemble the multicooker and remove the inner cylindrical surface.
Microcircuits are inspected carefully. What malfunctions can we notice with the naked eye? Signs of problems will include:
- soot;
- peeling and tearing of tracks;
- violation of solder seams;
- blackened resistors;
- swollen capacitors.
Defective items must be replaced immediately. It is easier to restore soldering. Repair of board tracks is carried out by cleaning with scratch paper and tinning the damage. Sometimes jumpers are added, easy to make from resistor legs. Fill the result of the work with varnish. Otherwise, the leak will end badly for the multicooker. Repairs will become a dire necessity. The varnish protects the metal from water and oxygen - the main enemies of conductors.
Microcircuits in modern multicookers
Modern multicookers contain 2 microcircuits. The first is located in the very center of the device inside the working cylinder and is responsible for controlling the temperature regime. The second is located at the bottom of the multicooker and is a power electronic board.
If you carefully examine the microcircuit, you can find some types of faults with the naked eye:
- swelling of capacitors;
- damage to solder seams;
- soot formation;
- track detachment;
- darkening of resistors.
The best repair option would be to completely replace the electronic board. However, you can repair the solder joint or trace of the chip by using #0 grit sandpaper and tinning the broken areas. The jumpers are recreated from the legs of burnt resistors. It is advisable to use varnish to fix solder joints and tracks, as it protects the board from leaks and oxidation.
Let's start with the banal: a multicooker is an almost ideal kitchen device, with the help of which housewives save both time and effort, and in the end receive excellent dishes. But everything breaks sooner or later, and the multicooker is no exception.
Conclusion
Multicookers are reliable appliances that work for years. Breakdowns are caused by improper operation; sometimes thermal fuses burn out. The instructions discussed above and common sense are enough to understand how to repair a multicooker at home. Naturally, if the device is under warranty, the only option is official service. Then why fence the garden? An official service center will carry out the necessary operations.
Note! Before troubleshooting, try restarting the device. There are known cases of a standard error: a program failure makes it impossible for microcircuits to read sensor signals. As a result, the heating element worked continuously. When turned on again, the device is reset, the error found (being detected) is displayed with a fault code by the time indicator.
Any, even the most elite and expensive multicooker can cause failures and malfunctions. But, to be honest, most problems with multicookers arise due to improper operation or due to oversight or negligence, that is, through the fault of the user himself.
It’s even worse if, by the time it breaks down, the multicooker has already become so in demand and indispensable in your kitchen that its absence has become a serious problem. It is clear that after the familiar and convenient electronic device, using a regular saucepan will no longer be entirely comfortable, so let’s talk about the most common failures and breakdowns of multicookers.
Security measures
The first and most important point: if the multicooker does not turn on, does not turn off, does not start in the desired mode, and so on, you need to immediately disconnect it from the power supply! Under no circumstances should you use a faulty multicooker, much less try to repair it while it’s on!
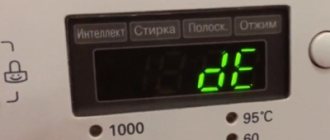
A modern multicooker is capable of diagnosing some malfunctions of its components and assemblies. To do this, the device program includes a function for displaying information about a breakdown on the display. For example, it is not uncommon for an error with the index “E” and a set of numbers to appear on the display screen. To identify a breakdown in such cases, you need to look at the multicooker operating manual and check the list of breakdowns.
E3
For example, the “E3” error that appears means that moisture has usually entered the pressure cooker, that is, directly under the removable bowl. If time and certain skills allow, then in this case, the damage is corrected by removing the bottom of the multicooker for a long and 100% drying of the device. You can use a household hair dryer - with a warm air flow the drying process will go even faster.
E4
A little more experience and skills will be needed if the display shows the “E4” index - most likely, the pressure sensor is clogged. In this case, to correct the problem you will need to pass a piece of fine (grit) sandpaper between the sensor contacts. If the procedure does not help, contact the service center, only there they will be able to professionally diagnose and fix the broken multicooker.
Steam from under the lid
It is not uncommon for problems in the operation of a multicooker to be noticed even without display signals. The most common case is steam escaping from under the lid. In this case, you can visually determine the problem - this is a problem with the sealing ring of the multicooker lid. Perhaps the ring has already worn out in some places, or when closing the lid you moved the ring from its seat.
If you notice that preventive maintenance does not help correct the problem, do not hesitate to contact your nearest service center for qualified assistance.
It is better to immediately take multicookers with the following problems to a specialized service center:
- the multicooker does not respond to user actions;
- the temperature sensor does not display information;
- the display shows an unknown error message;
- there is damage to the cable or housing;
- no auto-programming;
- violation of the tightness of the multicooker;
- malfunction of the pressure limit valve.
The most common reasons affecting the performance of a multicooker:
- Failure to comply with operating rules. Before using the multicooker for the first time, carefully read the instructions for use and the rules for safe use. There you will find typical malfunctions, their correction and prevention.
- Mechanical damage. Naturally, the multicooker is stronger than your smartphone or tablet, but not so strong that it can withstand various shocks or falls without errors. Any damage to the housing, cable, plug, etc. – can lead to serious malfunctions in the operation of the multicooker.
- Manufacturing defect. This happens, or rather, can happen with any model of multicooker, even if it is super expensive and super prestigious. In this case, you should absolutely not carry out independent repairs - only the nearest service center.
The multicooker does not heat: reasons
A multicooker is considered one of the most necessary and practical kitchen appliances.
She is able to prepare almost any dish, from ordinary porridge to pie or pastries. It is common for every electronic device to fail over time. This is due to many provoking factors, including manufacturing defects in internal parts, incorrect operation, network voltage, and so on. The lack of heating of the multicooker is also the result of a certain problem that has arisen inside the mechanism. A technician from the Vostok-Polyus service center, who provides his services in Moscow and the Moscow region, will help you solve the problem as soon as possible.
Why is there no heat in the multicooker?
There are several reasons contributing to this phenomenon:
thermal fuse damage. The breakdown of this element requires qualified intervention, since repairs are accompanied by many complex actions. Restoring a thermal fuse requires increased care and precision, which is inherent only in the most experienced household appliance repairmen;
insufficient mains voltage. Often the unit begins to operate incorrectly as a result of an unstable electricity supply. If, when you turn on the light in the room, you notice its constant flickering, then immediately turn off your equipment and wait until the situation stabilizes. If you neglect this note and try to continue working with the device, the multicooker will most likely stop heating;
foreign small materials entering the device. Some foods that fall under the bottom of the cooking tank may affect the quality of heating. Therefore, try not to scatter various cereals or salt and check the multicooker for cleanliness before each turn on;
clogging of contacts. Water, grains of salt or sugar that get inside the mechanism can affect the condition of the contacts, as a result of which the heating function becomes impossible;
microcircuit malfunction. Various mechanical damage, defects or wear of small parts on the microcircuit can not only prevent the multicooker from heating, but also render it completely unusable.
The quality of operation of a multicooker very much depends on its correct operation. The more careful and attentive the user treats his device, the longer it will serve him. Experts recommend adhering to certain rules:
arrange periodic cleaning;
prevent blockages;
Do not spill water or other liquid on the unit;
protect from mechanical and physical damage;
do not disassemble the device if you do not have sufficient experience in the field of repairing household appliances;
Do not overload the multicooker with excessive amounts of liquid and cooking ingredients.
In case of problems
Repairing a kitchen multicooker must be carried out by a master who specializes in repairing household appliances and has certificates confirming his qualifications. The best solution in the event of a breakdown will be the Vostok-Pole service center with a team of the most experienced and competent specialists who have been repairing multicookers in Moscow for many years.
Our company provides free, thorough diagnostics to each of its clients. This operation allows you to identify the existing problem and localize it in a matter of minutes. After checking the equipment, it is then professionally repaired, the quality of which meets all European standards. And at the end, a repeated diagnosis is carried out, confirming the effectiveness of the repair. Our craftsmen try to complete the work as quickly as possible so as not to cause additional hassle to the client.
Contact us at the hotline number or leave a request online on the website.
The multicooker prepares food automatically thanks to a computer program. You can fry, bake, stew, boil, steam and deep-fry in it. This is a fairly reliable device that can last for decades without breakdowns. Malfunctions of multicookers are rare; in addition, in many cases the device can be repaired with your own hands.